Volkswagen Tiguan Service and Repair Manual: Right Axle Shaft with Mounted CV Joint, Removing and Installing
Special tools and workshop equipment required
- Slide Hammer Set -VW771-
- Tensioning Strap -T10038-
- Puller - Driveshaft -T10382-
- Torque Wrench 1332 40-200Nm -VAG1332-
- Digital Torque Wrench -VAG1756A-
- Drive Shaft Remover -T10520-
Caution
When disassembling and performing repairs on a vehicle, the drive axles must not hang down loosely and contact the stops in the joint by over bending.
Removing
- Loosen the drive axle bolt on the wheel hub:
- Twelve-point bolt with ribs.
- Twelve-point bolt without ribs.
Caution
The wheel bearing must not be under load when the drive axle threaded connection on the wheel side is loose.If the wheel bearings are under the load of the vehicle weight, the wheel bearing will be damaged. This reduces the service life of the wheel bearings.
The drive axle bolt may be loosened maximum 90º when the vehicle is standing on its wheels.Vehicles without a drive axle must not be moved, otherwise the wheel bearing will be damaged. If a vehicle must be moved, be sure to note the following:
- Install an outer joint in place of the drive axle.
- Tighten the outer joint to 120 Nm.
- Remove the lower noise insulation.
- Remove the wheel.
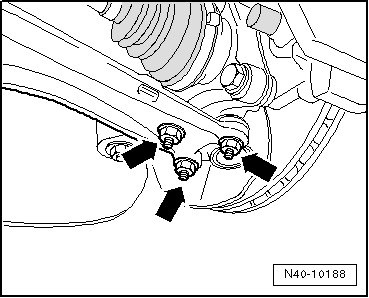
- Remove the nuts -arrows-.
- Remove the wheel bearing housing with the ball joint from the control arm.
- Remove the coupling rod from the stabilizer bar on both sides.
- Slide outer joint out of wheel hub by hand.
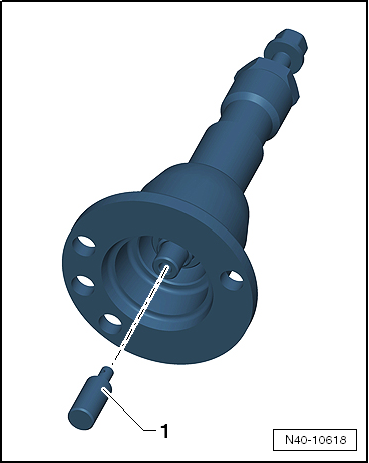
If the drive axle cannot be pulled out of the wheel bearing, then the drive axle can be pushed out of the wheel bearing using the Drive Shaft Remover -T10520-.
Before using the Drive Shaft Remover -T10520-, make sure that the thrust piece -1- is installed.
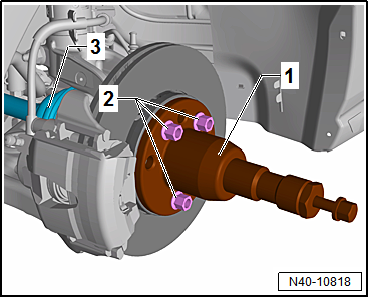
Using the Drive Shaft Remover -T10520-:
- Secure the Drive Shaft Remover -T10520--1- with three wheel bolts -2- on the wheel hub, so that the drive axle -3- can be pressed out.
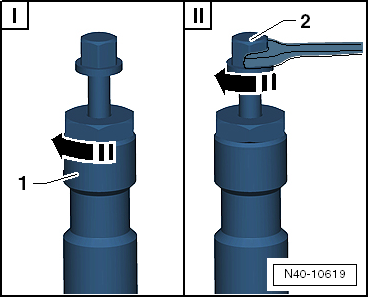
- Follow the specified sequence exactly.
- Tighten the knurled nut -1- hand-tight.
- Only turn the bolt -2- using a wrench and press out the drive axle using the Drive Shaft Remover -T10520-.
Note
At the end of the tasks or to set back, the spindles must be brought back into the original position so that the hydraulic operation can be used.
- Secure the drive axle from falling down.
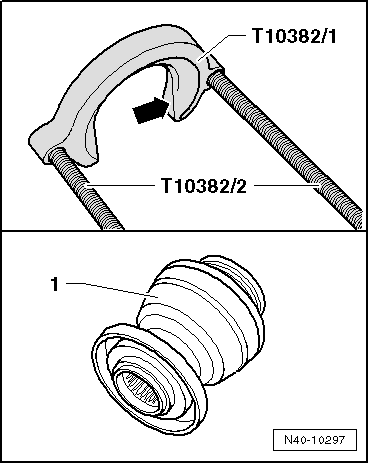
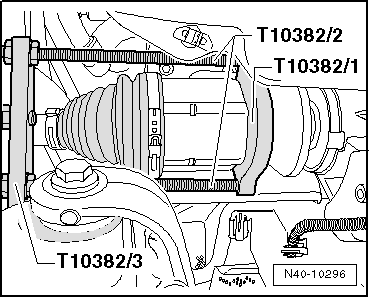
- Align the Puller - Driveshaft -T10382-.
For the CV joint -1-, the opening -arrow- in the Puller - Driveshaft - Removing Plate -T10382/1- must face the Puller - Driveshaft - Spindles -T10382/2-.
- Attach the Puller - Driveshaft -T10382- to the Slide Hammer Set -VW771-.
Note
In order to remove the drive axle from the transmission using the Puller - Driveshaft -T10382-, the suspension strut and all its components must be pulled to the back.
- Pull the suspension strut and its components using the Tensioning Strap -T10038- as far as possible to the back, for example on the shop hoist arm, until the Puller - Driveshaft -T10382- can be installed parallel to the drive axle.
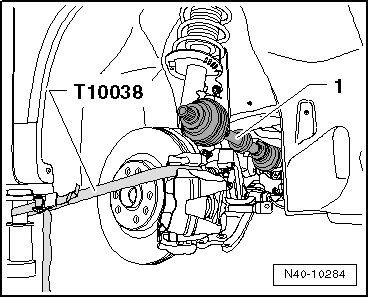
- Install the Puller - Driveshaft -T10382- and remove the drive axle.
- Remove the drive axle from the vehicle.
Installing
Remove any paint residue and/or corrosion in threads/splines of outer joint.
AWD Vehicles
- Tap on the front side of the stub shaft using a plastic mallet.
Caution
- This ensures that the stub shaft circlip engages in the differential bevel gear correctly.
- This also prevents leaks.
Continuation for All Vehicles
- Install the new circlip into the stub shaft groove on the transmission.
- Lightly grease the stub shaft splines with Universal Grease -G 060 735 A2-.
- Bring outer and inner splines of the transmission and CV joint into engagement.
- Grab the drive axle by hand and push it into the CV joint up to the stop.
- Now push the CV joint with one "jerk" onto the transmission stub shaft.
Note
Do not use a hammer or a knocking tool under any circumstances!
- Make sure the CV joint is securely fitted by pulling the CV joint against the circlip resistance.
Caution
For this check, do not pull on the drive axle, but rather only on the CV joint.
- Remove the Tensioning Strap -T10038-.
- Insert outer joint as far as possible into wheel hub splines.
- Attach the ball joint to the control arm -arrows-.
Note
Make sure the ball joint boot is not damaged or twisted.
- Install the lower noise insulation.
- Tighten the drive axle bolt to the wheel hub:
- Twelve-point bolt with ribs.
- Twelve-point bolt without ribs.

Caution
The vehicle must not be resting on the wheels when doing so.
When the bolt is loose, the wheel bearing can be damaged by the vehicle's weight.
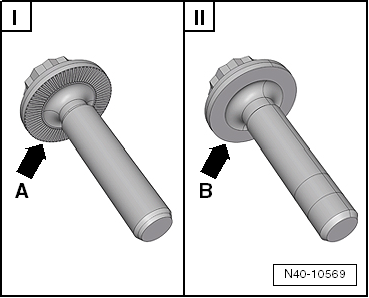
Difference between A Twelve-Point Bolt with Ribs and A Twelve-Point Bolt without Ribs
The contact surfaces -arrow A- and -arrow B- are different on the two-point bolts.
- Twelve-point bolt with ribs -arrow A-
- Twelve-point bolt without ribs -arrow B-
- Install the wheel and tighten.
Tightening Specifications
| Component | Tightening Specification |
Ball joint to aluminum
control arm:
|
60 Nm |
Ball joint to sheet steel
control arm
|
100 Nm |
Drive axle to wheel hub
"twelve-point bolt with ribs"
|
70 Nm + 90º |
Drive axle to wheel hub
"twelve-point bolt without ribs"
|
200 Nm +180º |
 Drive Axle with CV Joint, Removing and Installing
Special tools and workshop equipment required
Torque Wrench 1332 40-200Nm -VAG1332-
Drive Shaft Remover -T10520-
Caution
When disassembling and performing repairs on a vehicle, the drive axles mus ...
 Drive Axles with Triple Roller Joint AAR3300i, Mounted on Transmission Stub
Shaft, Removing and Installing
Drive Axles with Triple Roller Joint AAR3300i, Mounted on Transmission Stub
Shaft, Removing and Installing
Special tools and workshop equipment required
Slide Hammer Set -VW771-
Tensioning Strap -T10038-
Puller - Driveshaft -T10382-
Torque Wrench 1332 40-200Nm -VAG1332-
Digital Torque Wrench -VAG1756 ...
See More:
Volkswagen Tiguan Service and Repair Manual > Filler: Two-Part HS Vario Filler
Definition:
Two-Part HS Vario Filler -LGF 786 004 A4-, gray
Product Description
The two-part vario filler is a high-quality, variable VOC compliant,
acrylic-based two-part HS filler.
Properties:
Can be used as sanding filler and as wet-in-wet filler
Use with HS and VHS hardeners
Has good ins ...
Volkswagen Tiguan Owners Manual
Volkswagen Tiguan Service and Repair Manual
- Body exterior
- Body Interior
- General Paint Information
- Paint
- Brake System
- Suspension, Wheels, Steering
- Wheel and Tire Guide
- Towing Guide
- Wheel and Tire Guide General Information
- Communication
- Electrical Equipment General Information
- Electrical Equipment from 06/2011
- Heating, Ventilation and Air Conditioning
- Refrigerant R134a Servicing
- 6-Speed Manual Transmission 02Q, OBB, and OFB
