Volkswagen Tiguan Service and Repair Manual: Brake Lamp Switch -F-, Removing and Installing
Removing
- On vehicles with a coded radio, note the code and if necessary retrieve it.
- Disconnect the battery.
- Remove the intake hose, air filter housing and battery.
- Remove the battery carrier.
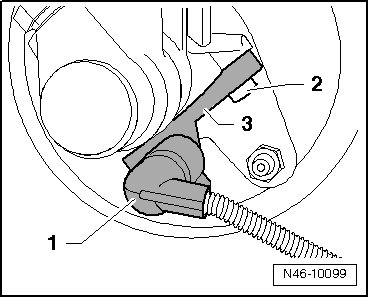
- Disconnect the connector -1- from Brake Light Switch -F-.
- Remove the bolt -2- from the brake master cylinder.
- Pull the Brake Light Switch -F--3- upward and off from the brake master cylinder and remove it from the retaining tab at the bottom.
Installing
- Install in reverse order of removal.
Tightening specification
TORX bolt to master brake cylinder 8 Nm
Brake Master Cylinder, Removing and Installing
Removing and Installing
Special tools and workshop equipment required
- Brake Charger/Bleeder Unit -VAS5234-
- Torque Wrench 1331 5-50Nm -VAG1331-
Removing
- On vehicles with a coded radio, note the code and if necessary retrieve it.
- Disconnect the battery.
- Remove the entire air filter housing.
- Remove battery and the battery carrier.
- Place enough lint-free cloths near the engine and transmission.
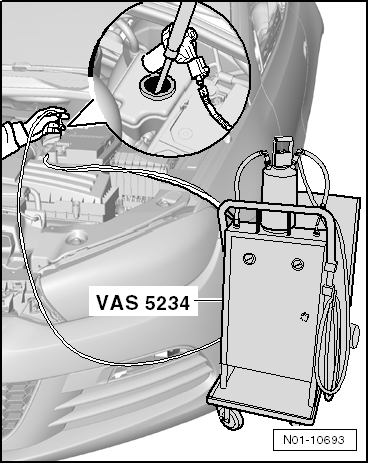
- Extract as much brake fluid as possible from the brake fluid reservoir using the Brake Charger/Bleeder Unit -VAS5234-.
For Vehicles with Manual Transmission
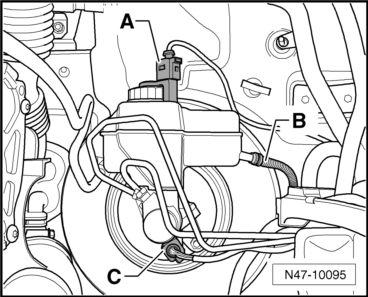
- Disconnect the clutch master cylinder return hose -B- and secure it out of the way or clamp it off with a commercially available tool such as the Hazet 4590 and then remove it.
Continuation for All Vehicles
- Remove the connector -A- from the Brake Fluid Level Warning Switch -F34-.
- Remove the connector -C- from the Brake Lamp Switch -F-.
- Remove the brake fluid reservoir, press the engagement straps toward outside at the container and simultaneously pull the brake fluid reservoir out of the sealing plugs.
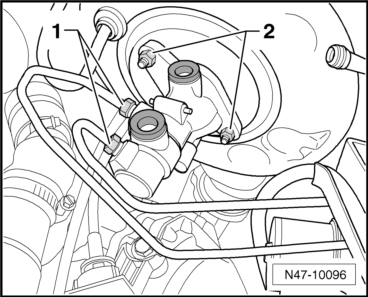
- Disconnect the brake lines -1- at the brake master cylinder and seal the lines with sealing plugs from the Repair Kit -1H0 698 311 A-.
- Remove the nuts -2- from master brake cylinder.
- If present, remove the heat shield.
- Carefully take the brake master cylinder out of the brake booster.
- Remove the Brake Lamp Switch -F- from the brake master cylinder.
Installing
- Install in reverse order of removal.
Note the following points when installing:
- When assembling the brake master cylinder with the brake booster, make sure that the push rod is correctly seated in the brake master cylinder.
- Bleed the brake system.
- Vehicles with a manual transmission: bleed the clutch system.
Tightening Specifications
Brake master cylinder to brake booster 25 Nm
- Use new nuts!
Brake lamp switch to brake master cylinder 8 Nm
Brake lines to brake master cylinder 14 Nm
 Brake Booster/Brake Master Cylinder
Overview - Brake Booster/Brake Master Cylinder
Note
Use only new brake fluid. Observe information on brake fluid reservoir!
Pedal Assembly
Hex Nut, Self-Locking
25 Nm
Always replace if remove ...
 Brake Booster, Removing and Installing
Special tools and workshop equipment required
Brake Charger/Bleeder Unit -VAS5234-
Release Tool - Brake Servo -T10159- or Brake Servo Release Tool
-T10159A-
Torque Wrench 1331 5-50Nm -VAG1331-
...
See More:
Volkswagen Tiguan Service and Repair Manual > Communication: Compass System
General Information
Note
Before troubleshooting or servicing, the technicians must be familiar
with the function and operation of the compass system. Refer to the Owner's
Manual
Use "Guided Fault Finding" when servicing or performing Fault Finding
using the Vehicle Diagnostic Tester.
Afte ...
Volkswagen Tiguan Owners Manual
Volkswagen Tiguan Service and Repair Manual
- Body exterior
- Body Interior
- General Paint Information
- Paint
- Brake System
- Suspension, Wheels, Steering
- Wheel and Tire Guide
- Towing Guide
- Wheel and Tire Guide General Information
- Communication
- Electrical Equipment General Information
- Electrical Equipment from 06/2011
- Heating, Ventilation and Air Conditioning
- Refrigerant R134a Servicing
- 6-Speed Manual Transmission 02Q, OBB, and OFB
