Volkswagen Tiguan Service and Repair Manual: Fender
Tools
Special tools and workshop equipment required
- Torque Wrench 1783 - 2-10Nm -VAG1783-
Overview - Front Fender
Note
The illustration shows the left side. The right side is identical.
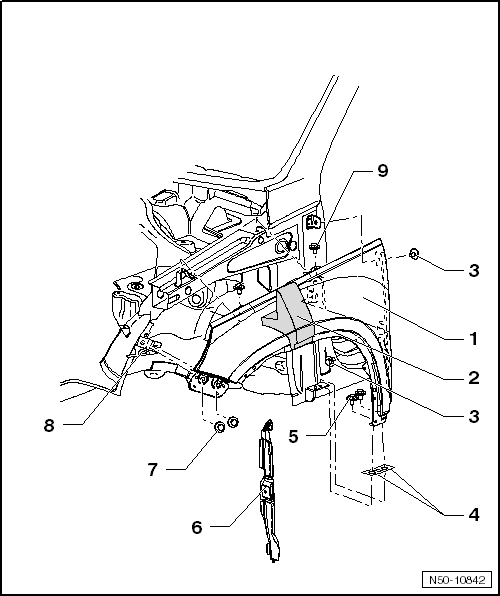
- Fender
- Removing and installing.
- Foam Piece
- inserted between the fender and upper longitudinal member
- Bolt
- Tightening specification: 7.5 Nm
- Quantity: 2, on A-pillar
- Zinc Underlay
- Zinc Spacer -AKL 381 035 50-
- Bolt
- Tightening specification: 7.5 Nm
- Quantity: 2, on side sill
- Fender End Plate
- Removing and installing.
- Bolt
- Tightening specification: 7.5 Nm
- Quantity: 2, on fender brace
- Fender Brace
- Removing and installing.
- Bolt
- Tightening specification: 7.5 Nm
- Quantity: 2 on the fender connecting piece
Fender, Removing and Installing
Note
The following describes the removal and installation of the left fender. Removing and installing the right fender is identical.
Removing
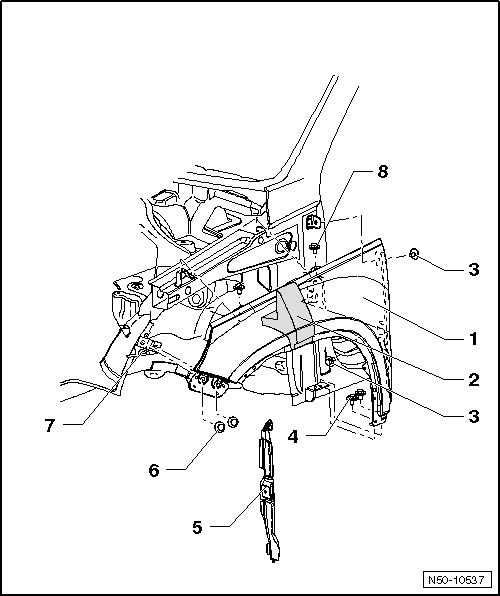
- Remove the front bumper cover.
- Remove the wheel housing liners.
- Remove the bumper cover bracket.
- Remove the fender end plate -5-.
- Remove the bolts -3, 4 and 6-.
- Pull out foam piece -2- between fender and longitudinal member.
- Remove the bolts -8-.
- Carefully remove fender -1-.
Installing
Install in reverse order of removal.
- Insert Zinc Spacer -AKL 381 035 50- between the fender and the side sill.
- For bolt tightening specifications.
- Pay attention to the parallel alignment and the gap dimensions.
Fender Brace, Removing and Installing
Note
The following describes the removal and installation of the left fender brace. Removing and installing right fender brace is identical.
Removing
- Fender is removed.
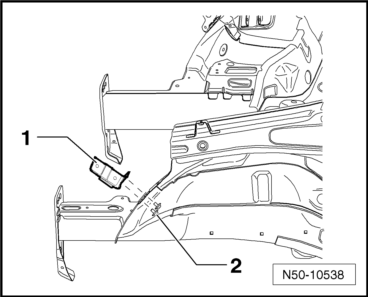
- Remove the bolts -2- and the fender brace -1-.
Installing

- Assemble the fender brace -1-.
- The fender brace is fitted together with the fender to the hood and bumper.
- Bolt -2- tightening specification: 7.5 Nm.
Fender End Plate
Removing
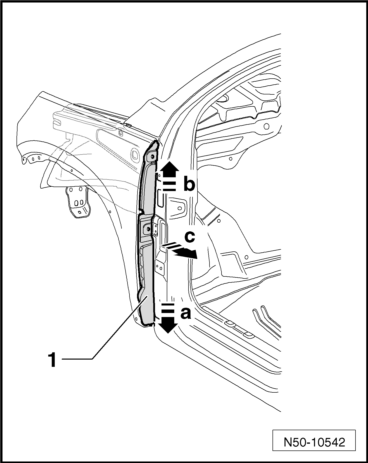
- Remove the wheelhouse liner.
- Press the end plate out of the center catch.
- Pull the end plate first out of the upper mount -arrow b-, and then out of the lower mount -arrow a-.
Installing

- Install the end plate first into the lower mount -arrow b-, and then into the upper mount - a- .
- Press the center catch -arrow c- into the bracket.
 Lock Carrier
Tools
Required Special Tools and Equipment
Special tools and workshop equipment required
Guide Pins -T10093
Torque Wrench 1331 5-50Nm -VAG1331-
Torque Wrench 1332 40-200Nm -VAG1332
Overview - Loc ...
 Noise Insulation
Tools
Special tools and workshop equipment required
Torque Wrench 1783 - 2-10Nm -VAG1783-
Overview - Noise Insulation, Long Version
Note
Depending on the engine version, slight deviations must be ...
See More:
Volkswagen Tiguan Service and Repair Manual > SprayMax System: Silicone Remover -LLS MAX 007-
Definition:
Silicone Remover -LLS MAX 007-
Product Description
The Silicone Remover -LLS MAX 007- is a water-based, reduced-solvent cleaning
agent that is rich in active ingredients. The raw material base has specific
solvent combinations.Properties:
Application-oriented product-specific aero ...
Volkswagen Tiguan Owners Manual
Volkswagen Tiguan Service and Repair Manual
- Body exterior
- Body Interior
- General Paint Information
- Paint
- Brake System
- Suspension, Wheels, Steering
- Wheel and Tire Guide
- Towing Guide
- Wheel and Tire Guide General Information
- Communication
- Electrical Equipment General Information
- Electrical Equipment from 06/2011
- Heating, Ventilation and Air Conditioning
- Refrigerant R134a Servicing
- 6-Speed Manual Transmission 02Q, OBB, and OFB
