Volkswagen Tiguan Service and Repair Manual: Lock Carrier
Tools
Required Special Tools and Equipment
Special tools and workshop equipment required
- Guide Pins -T10093
- Torque Wrench 1331 5-50Nm -VAG1331-
- Torque Wrench 1332 40-200Nm -VAG1332
Overview - Lock Carrier
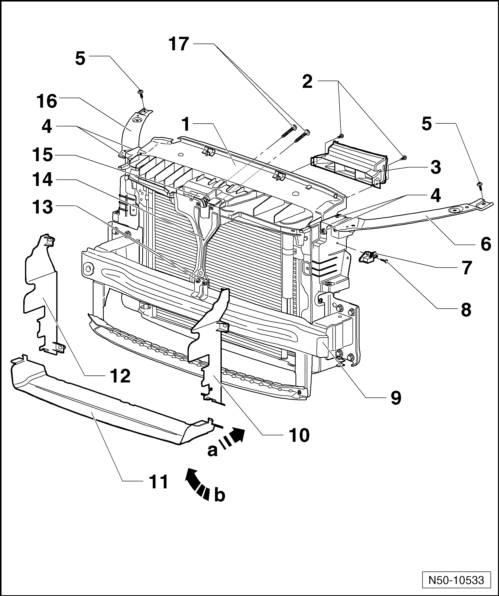
- Lock Carrier with Attachments
- Removing and installing
- Service position
- Screw
- Tightening specification: 2 Nm
- Quantity: 2
- Air Duct
- Bolt
- Tightening specification: 8 Nm
- 2 per page
- Bolt
- Tightening specification: 8 Nm
- 1 per side
- Left Bracket
- Driver Front Airbag Crash Sensor
- Not for all countries
- Left and right
- For driver front airbag crash sensor
- For passenger front airbag crash sensor
- Bolt
- Tightening specification: 6 Nm
- Crossmember
- Left Air Vent
- Lower Air Vent
- Right Air Vent
- Bolt
- Tightening specification: 8 Nm
- Quantity: 2
- Lock Support
- Lock
- Left Bracket
- Bolt
- Tightening specification: 12 Nm.
- Quantity: 2
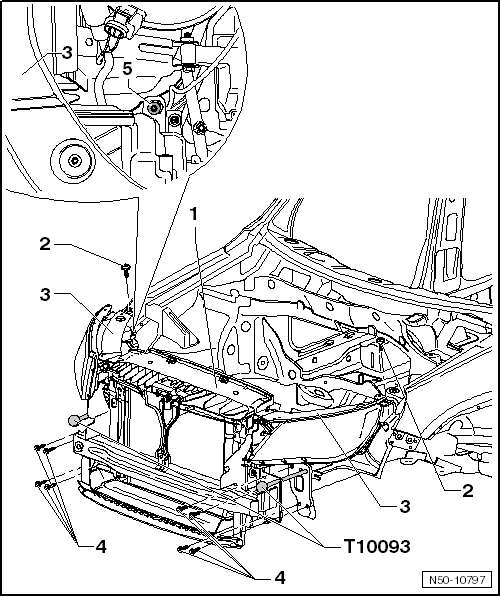
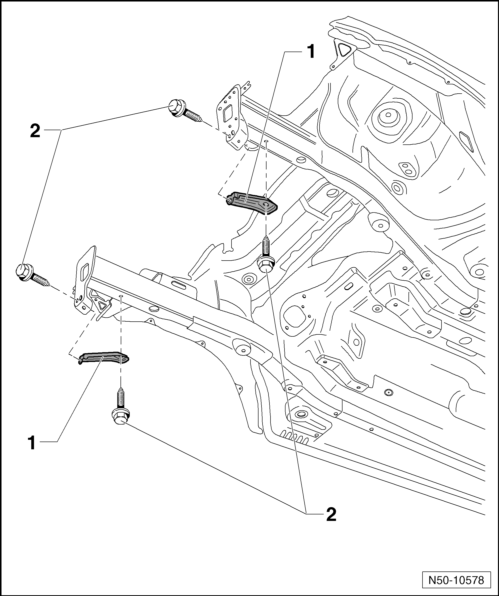
Service Position
Moving into Service Position
- Remove the front bumper cover (18º slope angle).
- Remove the front bumper cover (28º slope angle).
- In vehicles with charge air cooler, loosen the pressure hoses.
- Remove the bolts -4- at left and right longitudinal member.
- Remove rear bolt -5- from the left and right headlamp.
- Install the Guide Pins - T 10093- on the left and right longitudinal member.
- Remover the left and right bolts -2- at the top of the brackets -3-.
- The lock carrier -1- with the brackets -3- can be pulled approximately 10 cm forward onto the Guide Pins -T10093-.
Service Position, Resetting
Install in reverse order of removal.
- For bolt tightening specifications, see the overview.
- Align the lock carrier with the attachments on the longitudinal members and between the fenders.
- Secure the headlamp and check the headlamp setting.
Note
- Make sure that pressure hoses for charge air cooler are re-engaged correctly.
- Hoses and lines must not be pinched.
Pressure Hoses, Removing
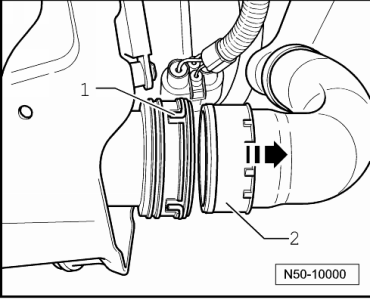
- Disengage connector coupling -1- and disconnect pressure hose -2- in direction of -arrow- from coupling.
- When connecting the pressure hoses, make sure that the connector coupling engages audibly.
Lock Carrier with Attachments, Removing and Installing
Removing
Note
- The lock carrier is a safety-related component and for this reason it may not be serviced.
- If damaged, replace the lock carrier.
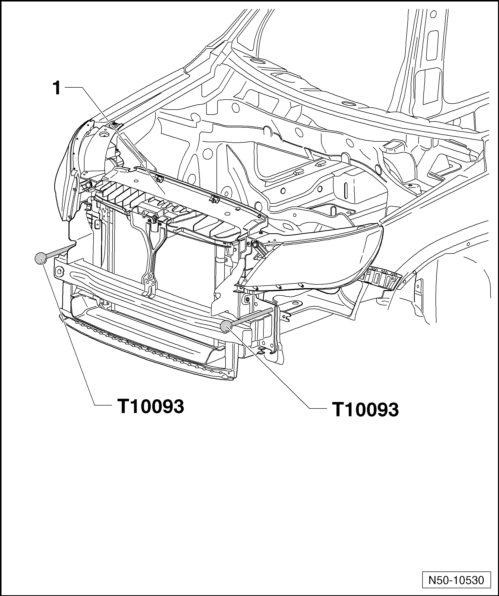
- Bring the lock carrier and its attachments into the service position -1-.
- Disconnect the any connectors present.
- Disconnect the connector for the crash sensor.
- Drain the coolant and disconnect the coolant line.
- Disconnect the condenser lines.
- With a second technician, remove the Guide Pins -T10093- from the longitudinal member on left and right sides and lift out the lock carrier.
WARNING
Do not start the engine whenever the A/C system or coolant lines are disconnected.
Note
- Do not hang the condenser and hydraulic oil cooler by the lines.
- Do not kink the condenser and hydraulic lines.
Installing
Install in reverse order of removal.
- Make sure that all plug- and hose connections are correctly installed when re-assemble.
- The brackets on the longitudinal member must be installed.
- For bolt tightening specifications, see the overview.
- Align the lock carrier with the longitudinal members and between the fenders.
- Secure the headlamp and check the headlamp setting.
Overview - Bracket for Bumper Bracket
- Bracket
- Left and right
- Bolt
- Quantity: 2 on each side
- Tightening specification: 55 Nm
 Body front
...
 Fender
Tools
Special tools and workshop equipment required
Torque Wrench 1783 - 2-10Nm -VAG1783-
Overview - Front Fender
Note
The illustration shows the left side. The right side is identical.
Fender
...
See More:
Volkswagen Tiguan Service and Repair Manual > Bumpers: Front Bumper Cover, Street Version from 07/2011
Note
Before replacing the bumper cover, see if it is possible to repair the
damage.
Parking Aid Bracket, Installing
Tools
Special tools and workshop equipment required
PDC Holder Tool Set -VAS6614B-
Hand Cartridge Gun -VAS5155-
Materials
Note
Correct material part numbers. Refer to the "Electro ...
Volkswagen Tiguan Owners Manual
Volkswagen Tiguan Service and Repair Manual
- Body exterior
- Body Interior
- General Paint Information
- Paint
- Brake System
- Suspension, Wheels, Steering
- Wheel and Tire Guide
- Towing Guide
- Wheel and Tire Guide General Information
- Communication
- Electrical Equipment General Information
- Electrical Equipment from 06/2011
- Heating, Ventilation and Air Conditioning
- Refrigerant R134a Servicing
- 6-Speed Manual Transmission 02Q, OBB, and OFB
