Volkswagen Tiguan Service and Repair Manual: Heater and A/C Unit, Removing and Installing
Special tools and workshop equipment required
- Torque Wrench 1331 5-50Nm -VAG1331-
- Hose Clamps - Up To 25mm -3094-
- Shop Crane - Drip Tray -VAS6208-
- Engine Bung Set -VAS6122-
- A/C Service Station
- -Commercially Available Compressed-Air Gun-
Removing
Note
- Environmentally hazardous draining of refrigerant is an offense punishable by law.
- To improve accessibility, additional components (depending on the engine version) such as the engine cover must be removed.
- Extract the refrigerant using the A/C Service Station, only then open the refrigerant circuit.
- Remove the instrument panel.
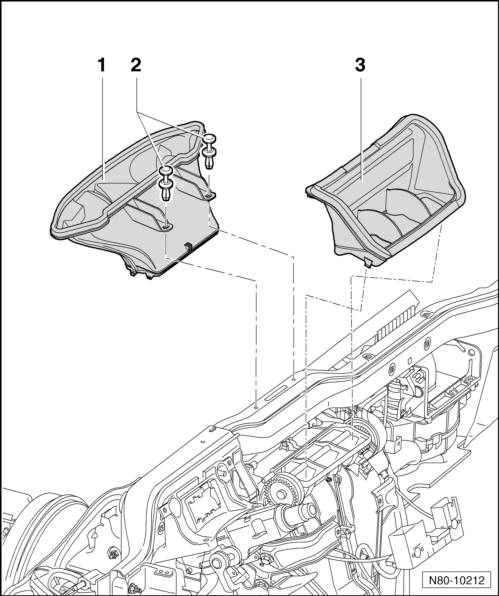
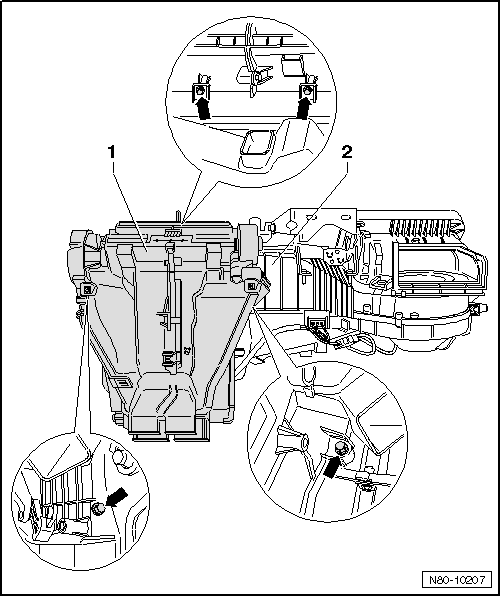
- Loosen the clips -2- and remove the intermediate defrost piece -1- from the heater and A/C unit.
- Remove the intermediate piece -3- from the heater and A/C unit.
- Remove the subframe.
- Remove the rear channels from the right and left footwells.
- Place the Shop Crane - Drip Tray -VAS6208- under the engine.
- Mark the coolant hoses -1-.
The cooling system is under pressure when the engine is warm. There is a risk of scalding from hot steam and coolant. Burns on the skin and other parts of the body are possible.Wear safety gloves.Wear protective eyewear.Reduce the pressure: cover the coolant reservoir cap with a cloth and carefully open.
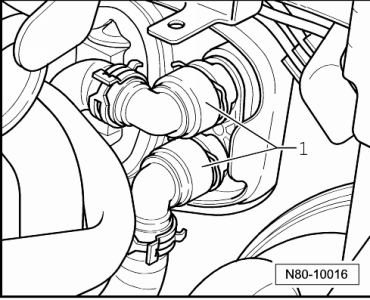
- Clamp the coolant hoses -1- using the Hose Clamps - Up To 25mm -3094- and disconnect the coolant hoses from the heater core.
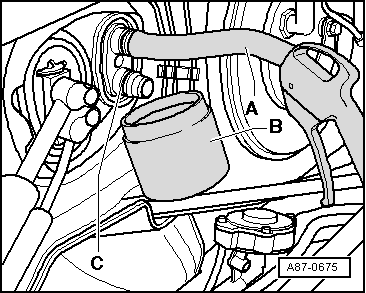
- Connect a section of hose -A- to the upper connection.
- Hold a container -B- under the lower connection -C-.
- Using a compressed air gun, carefully blow residual coolant out of heater core at heater core connection.
Only for Vehicles with a Heat Shield in Front of the Expansion Valve:
- Remove the nut -1- (6 Nm).
- Remove the clamps -2- and the heat shield -3-.
All Vehicles
Danger or frostbite due to refrigerant coming out under pressure.Frostbite on the skin and other parts of the body is possible.Wear safety gloves.Wear protective eyewear.Extract refrigerant and open the refrigerant circuit immediately.If more than 10 minutes elapse after extracting the refrigerant and the refrigerant circuit was not opened, extract the refrigerant again. Pressure develops in the refrigerant circuit due to evaporation.
- Remove the bolts (12 Nm), -1- from the refrigerant lines -2- in the engine compartment.
- Remove the refrigerant pipes from the expansion valve -3-.
Note
- Seal the open connections.
- To seal off all open connections on expansion valve, sealing caps from a replacement expansion valve can be used (preventing dirt and moisture from entering the system).
- Cover the carpet inside the passenger compartment with waterproof foil and water absorbing paper.
- Remove the condensation water drain hose from the heater and A/C unit.
- Disconnect the connectors from the heater and A/C unit.

Note
- All cable ties and other wiring harness fasteners that were released or cut open when removing the A/C unit are to be reattached in the same position during installation.
- The air conditioning wiring harness is removed with the heater and A/C unit.
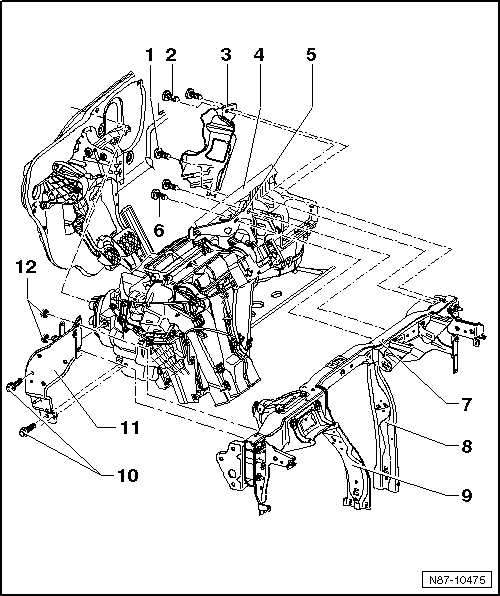
- The tunnel supports -8 and 9- are welded to the subframe -7-.
- Remove the subframe.
- Remove the bolts -5 and 6- from the bracket.
- Remove the bolts -10- and nuts -12- and bracket -11-.
- Remove the bolts -2 and 1- from the cable bracket -3-.
Note
- To be able to reach the bolt -1-, heating and A/C unit on driver side must be pulled out slightly from facing wall.
- When removing the heater, make sure both coolant pipes leading to the heater core do not get caught, bent or damaged on the plenum chamber or noise insulation pan.
- Pay attention to the wiring harness; pulling too hard can damage the individual wire connections.
- Remove the heater and A/C unit.
Note
When removing the bolts, make note of the lengths and allocation.
- Screw
- 4.5 +- 0.7 Nm
- Bolts
- 4.5 +- 0.7 Nm
- Quantity: 2
- Wiring Bracket
- Heater and A/C Unit
- Bracket
- Bolts
- 8 Nm
- Subframe
- Right Support
- Left Support
- Bolts
- 9 +- 1.3 Nm
- Quantity: 2
- Bracket
- Nut
- 9 +- 1.3 Nm
- Quantity: 2
Seal for Heater and A/C Unit / Engine Compartment
Note
Observe the installation position of the seal -A- during assembly.

Installing
Install in reverse order of removal while noting the following:
Note
A second technician is needed to install the heater.
- When inserting heater, have the second technician guide both coolant pipes to heater core through the seal (from engine compartment)
- Make sure the condensation water hose fits correctly.
- Fill the coolant.
Air Distribution Housing, Removing and Installing
Removing
- Remove the heater.
- Disconnect any existing connectors on the air distribution housing.
- Remove the heater core together with the coolant pipes.
- Remove the screws -arrows- 1.4 Nm.
- Remove the air distribution housing -1- from the heater -2-.
Installing
Install in reverse order of removal.
Dust and Pollen Filter, Removing and Installing
Special tools and workshop equipment required
- Commercially Available Vacuum Cleaner
Removing
- Remove the partition from the heater.
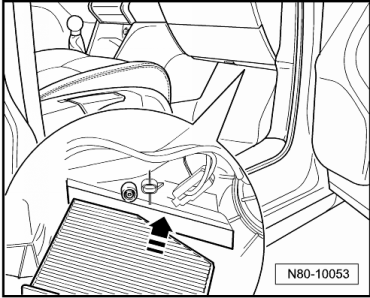
- Release cover -3- in direction of -arrow-.
- Remove dust and pollen filter downward out of heater.

Installing
Install in reverse order of removal.
Note
Note installation position of dust and pollen filter.
Fresh Air Blower -V2-, Removing and Installing
Removing
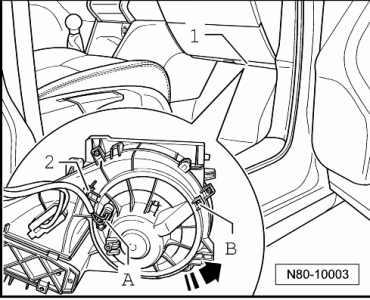
The Fresh Air Blower -V2- is accessible from footwell on front passenger side.
- Remove the partition from the heater.
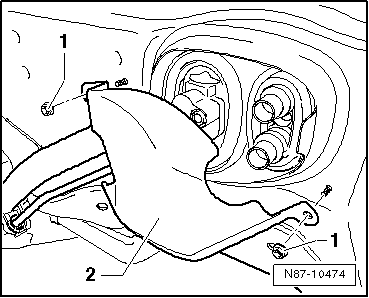
- Remove the connector -A- on the Fresh Air Blower - V2-.
- Remove the bolts -B- (1 Nm) from the Fresh Air Blower -V2-.
- Release the retainer -2- and turn the Fresh Air Blower -V2- in the direction of the -arrow-.
- Remove the Fresh Air Blower -V2- from the heater.
Installing
Install in reverse order of removal.
Fresh Air Blower Control Module -J126-, Removing and Installing
Removing
- Remove the Fresh Air Blower -V2-.
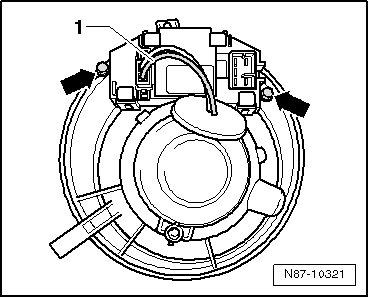
- Disconnect the connector -1- to the Fresh Air Blower -V2-.
- Remove the bolts -arrows-.
Installing
Install in reverse order of removal.
 Auxiliary Heater Heating Element -Z35-, Checking
Checking the Auxiliary Heater Heating Element -Z35- with Peripheral
Components:
The Auxiliary Heater Heating Element -Z35- with peripheral components (load
signal for generator terminal DF, Low Heat ...
 Heater Core, Removing and Installing
Special tools and workshop equipment required
Shop Crane - Drip Tray -VAS6208-
Hose Clamps - Up To 25mm -3094-
Commercially available compressed-air gun
Engine Bung Set -VAS6122-
Removing
Depe ...
See More:
Volkswagen Tiguan Service and Repair Manual > Steering Column Switch, Vehicles with Access/Start Authorization: General Information
Caution
The removal and installation of individual steering column switch components
must be done in a specified sequence.
WARNING
Before working on electronic system and removing the steering wheel the
following conditions must be met:
The technician must discharge static electricity. This is acc ...
Volkswagen Tiguan Owners Manual
Volkswagen Tiguan Service and Repair Manual
- Body exterior
- Body Interior
- General Paint Information
- Paint
- Brake System
- Suspension, Wheels, Steering
- Wheel and Tire Guide
- Towing Guide
- Wheel and Tire Guide General Information
- Communication
- Electrical Equipment General Information
- Electrical Equipment from 06/2011
- Heating, Ventilation and Air Conditioning
- Refrigerant R134a Servicing
- 6-Speed Manual Transmission 02Q, OBB, and OFB
