Volkswagen Tiguan Service and Repair Manual: Digital Satellite Radio Tuner
General Information
Depending on the vehicle radio or radio navigation system used, the reception can be expanded for satellite radio programs via equipment with a digital satellite radio tuner.
The digital satellite radio tuner is installed in the "RNS 315" unit.
Note
- Before troubleshooting or servicing, the technicians must be familiar with the function and operation of the radio unit/radio navigation system and of digital satellite radio tuner.
- Refer to the Owner's Manuals.
For servicing or trouble shooting, use the Vehicle Diagnostic Tester and → Wiring diagrams, Troubleshooting & Component locations
When the battery is reconnected, check any affected system or component (radio, clock, comfort electrical connection etc.) according to the repair manual and/or the Owner's Manual.
A satellite reception antenna is installed on the rear of the roof for satellite radio tuner operation.
In the Tiguan, the digital satellite radio tuner is installed under the front right seat.
Troubleshooting
The digital satellite radio tuner is equipped with On Board Diagnostic (OBD) capabilities
Use the Vehicle Diagnostic Tester under "Guided Fault Finding".
Digital Satellite Radio, Removing and Installing
Removing
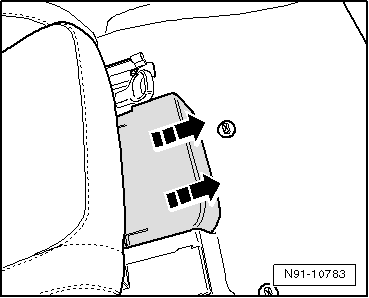
Do the following before starting the procedure:
- Turn off the ignition and all electric consumers and remove the key.
- Slide seat cover off in direction of -arrows-.
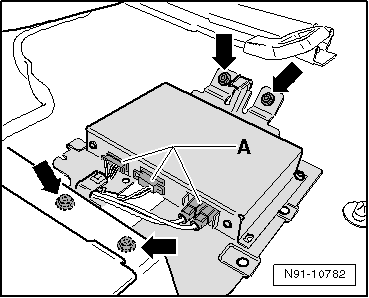
- Disconnect connectors -A- and remove four screws -arrows-.
- Remove digital satellite radio tuner together with bracket.
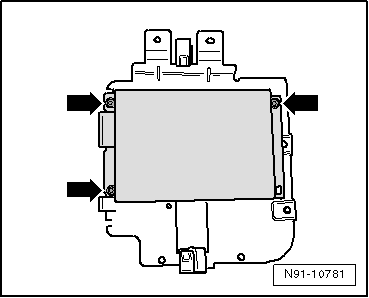
- Remove screws -arrows- while holding nuts under bracket in place - otherwise, these will turn with screws.
Installing
Installation is performed in the reverse order of removal.
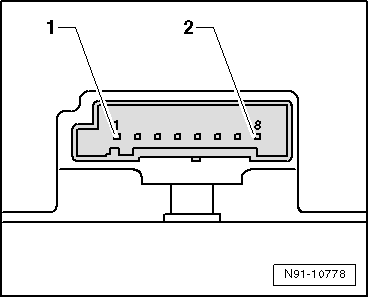
Overview - Multi-Pin Connectors on Digital Satellite Radio Tuner
- Data Input and Output Information Connection
- Voltage Supply Connection
- Antenna Line Connections
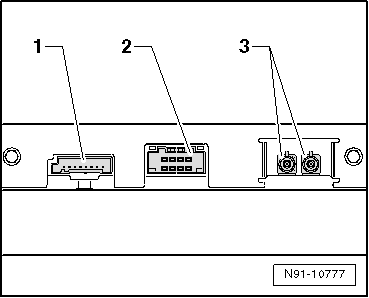
Multi-Pin Connector 1, Assignment
- CAN Bus, Low
- CAN Bus, High
- CDX, Left, Input
- CDX, Right, Input
- Audio, Negative
- Audio, Output, Left, Positive
- Audio, Output, Right, Positive
- CDX, Negative
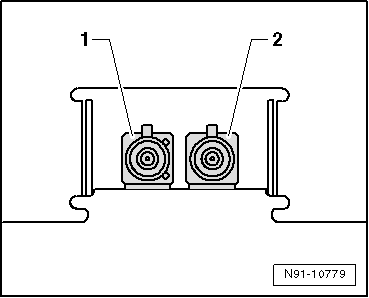
Multi-Pin Connector 2, Assignment
- Voltage Supply, Negative
- Voltage Supply, Positive
- Not Assigned
- Not Assigned
- Not Assigned
- Not Assigned
- Not Assigned
- Not Assigned

Antenna Connectors, Assignment
- Antenna, Terrestrial, Input, Brown
- Antenna, Satellite, Input, Green
For vehicles from 11/2006, a connection is still available here.
 CD Changer
CD Changer, Removing and Installing
General Information
Note
The CD changer is not faulty if the CD changer plays commercially
available CDs, but not self-burned CDs. Do not replace the CD changer ...
 External Multimedia Device Interface -R215-
General Information
Analog audio (via the AUX-IN input) and digital audio (via the USB or iPod
input) can be played on the radio or radio navigation system via the External
Multimedia Device Interfa ...
See More:
Volkswagen Tiguan Service and Repair Manual > SprayMax System: Two-Part Filler
Definition:
Two-Part Filler -LLS MAX 202 M2-, medium gray
Product Description
The Two-Part Filler -LLS MAX 202 M2-, (medium gray) is a high-quality
two-part HS sanding filler. The raw material base is acrylic resin.
Properties:
Constant atomizing pressure
Aerosol distribution
Long curing tim ...
Volkswagen Tiguan Owners Manual
Volkswagen Tiguan Service and Repair Manual
- Body exterior
- Body Interior
- General Paint Information
- Paint
- Brake System
- Suspension, Wheels, Steering
- Wheel and Tire Guide
- Towing Guide
- Wheel and Tire Guide General Information
- Communication
- Electrical Equipment General Information
- Electrical Equipment from 06/2011
- Heating, Ventilation and Air Conditioning
- Refrigerant R134a Servicing
- 6-Speed Manual Transmission 02Q, OBB, and OFB
