Volkswagen Tiguan Service and Repair Manual: Electro-Mechanical Steering Gear, Servicing
Overview - Electro-Mechanical Steering Gear
Currently, there is no service work to be performed on steering gear.

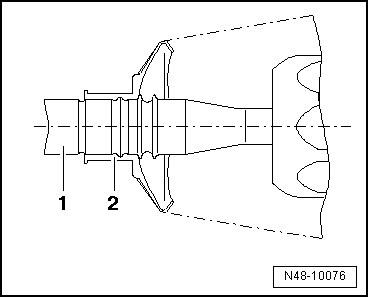
- Right Tie Rod End
- Checking.
- Allocation. Refer to the Parts Catalog.
- Nut
- 70 Nm
- Clamp
- Boot
- Must not be twisted after toe is adjusted
- Removing and installing.
- Clamp
- Replacing
- Tie rod
- 100 Nm
- Removing and installing.
- Long Bonded Rubber Bushing
- Left, rear with centering
- Replacing.
- Allocation. Refer to the Parts Catalog.
- Power Steering Gear
- Allocation. Refer to the Parts Catalog.
- Removing and installing.
- Long Bonded Rubber Bushing
- Rear right
- Replacing.
- Allocation. Refer to the Parts Catalog.
- Short Bonded Rubber Bushing
- Left and right front
- Replacing.
- Allocation. Refer to the Parts Catalog.
- Backing Plate
- Left Tie Rod End
- Checking.
- Allocation. Refer to the Parts Catalog.
Bonded Rubber Bushing, Replacing, Power Steering Gear
Special tools and workshop equipment required
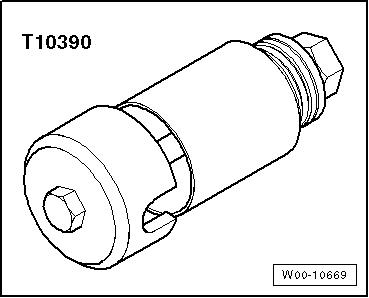
- PAS Housing Mount Assembly Tool -T10390-
Perform the Following
Removing
Note
- The bonded rubber bushings must always be replaced in pairs on each side.
- The following describes removing and installing one bonded rubber bushing. Removing and installing the second bonded rubber bushing is identical.
- Always pay attention to the allocation of the bonded rubber bushings for the power steering gear.
- Remove the power steering gear.
- Mount the tools as illustrated.
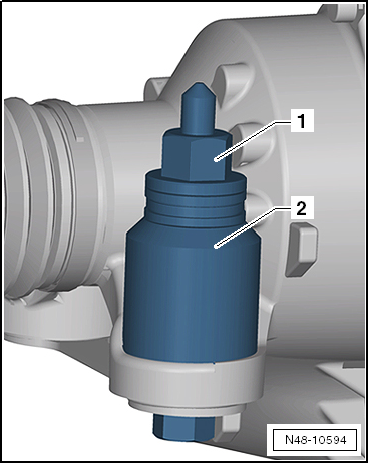
- PAS Housing Mount Assembly Tool - Nut -T10390/3-
- PAS Housing Mount Assembly Tool - Tube -T10390/1-
- Remove the bonded rubber bushing.
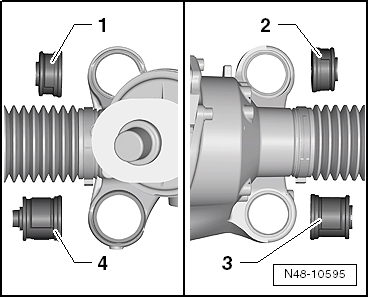
Allocation of the Bonded Rubber Bushings for the Power Steering Gear
- Short bonded rubber bushing for left front
- Short bonded rubber bushing for right front
- Long bonded rubber bushing for right rear
- Long bonded rubber bushing for left rear with centering
Installing
- Always pay attention to the allocation of the bonded rubber bushings for the power steering gear.
- Coat the outer bonded rubber bushing with soapy water.
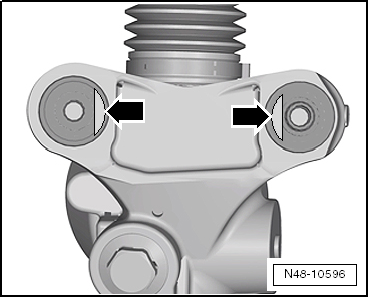
- Position the bonded rubber bushing so that the flat surface is parallel to the inside -arrows-.
Note
Always install the bonded rubber bushing from above in the direction of the drive steering shaft.
- Mount the tools as illustrated.
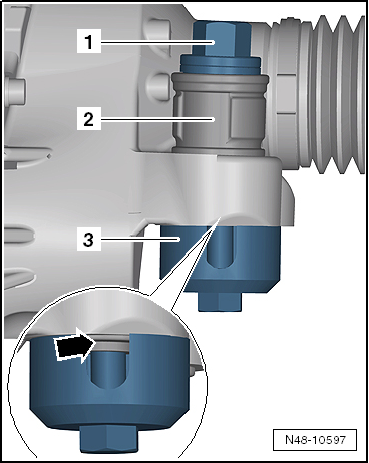
- PAS Housing Mount Assembly Tool - Nut -T10390/3-
- Bonded rubber bushing
- PAS Housing Mount Assembly Tool - Tube -T10390/2-
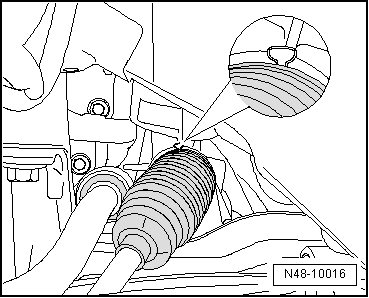
- Install the bonded rubber bushing all the way in until the rubber lip folds over the edge -arrow-.
Note
The bonded rubber bushing will move slightly backward after loosening the PAS Housing Mount Assembly Tool -T10390-.
- Mount the plate -1- on the bonded rubber bushing so that the edges and the flat surface interlock.
- Secure the plate -1- with the cable tie -2-.

Note
Tighten the cable tie secure so that the plate cannot move when the power steering gear is being installed.
- Install the power steering gear.
- Remove the cable tie from the steering gear.
Boot, Removing and Installing
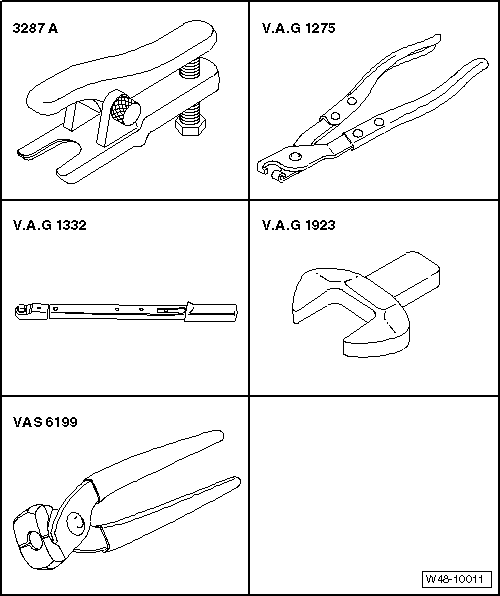
Special tools and workshop equipment required
- Hose Clip Pliers -VAG1275A-
- Torque Wrench 1332 40-200Nm -VAG1332-
- Torque Wrench 1332 Insert - Open Ring Wrench - 24mm -VAG1332/11-
- Locking Pliers -VAS6199-
Boot, Removing
Note
If the boot is faulty, moisture and dirt penetrates into steering gear. There must be a noticeable grease film present on steering rack in area of splines. If grease film is not present, steering gear must be replaced. Steering gear must also be replaced if there is corrosion or steering gear is damaged or worn out.
- Turn steering wheel into straight ahead position.
- Remove the wheel.
- Clean outside of steering gear in area of bellows.
While doing this, no dirt must enter the steering gear through the faulty boot.
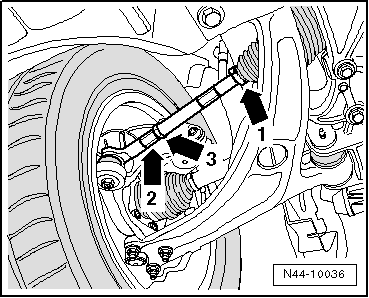
- Mark position of nut -arrow 3- on tie rod.
- Loosen the nut -arrow 3- while counterholding on tie rod end -arrow 2-.
- Loosen the spring clamp -arrow 1- from the boot using the Hose Clip Pliers -VAG1275A- and slide onto the tie rod.
- Remove clamp and pull the boot off of steering gear housing.
- Now twist tie rod out of tie rod end.
- Pull off the boot with spring clamp from tie rod.

Note
- If corrosion, damage, wear-out or first signs of soiling on steering rack can be seen, complete steering gear must be replaced.
- If no grease film is visible on steering rack, steering gear must also be replaced completely.
Boot, Installing
Caution
Do not lubricate the steering rack.
- Turn steering wheel into straight ahead position.
- Guide new clamp and boot onto tie rod.
- Install the tie rod up to the marking made during removal.
- Tighten lock nut -3- to tightening specification, counterhold on tie rod end -2- while doing this.
- Slightly grease the sealing surface of the bellow to the tie rod with Grease -G 052 168 A1- (from the repair kit, from Fuchs Renolit JP1619).

- Slide the boot -2- onto tie rod -1- as depicted in the illustration.
- Secure spring clamp on boot using Hose Clip Pliers -VAG1275A-.
- Slightly grease the sealing surface of the boot to the steering gear housing with Grease -G 052 168 A1- (from the repair kit, from Fuchs Renolit JP1619).
- Push the boot all the way onto the steering gear housing.
- Tighten new clamp using Locking Pliers -VAS6199- to the extent depicted in the illustration.
Install in reverse order of removal.
After the installation the vehicle must be measured.
- Perform a vehicle alignment.
- If both boots have been exchanged, then perform a basic setting for the Steering Angle Sensor -G85- using Vehicle Diagnostic Tester, in "Guided Fault Finding".
- Then perform basic setting of steering system via Vehicle Diagnostic Tester, in "Guided Fault Finding".

Tightening Specifications
| Component | Tightening Specification |
| Tie rod end to tie rod | 70 Nm |
Checking Play, Fastening and Joint Boots of Tie Rod Ends
- With vehicle raised (wheels hanging free), check play by moving tie rods and wheels. Play: no play
- Check fastening.
- Check boots are not damaged and are seated correctly.
Tie Rod, Removing and Installing
Special tools and workshop equipment required
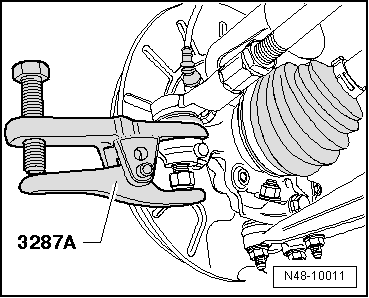
- Puller - Ball Joint -3287A-
- Hose Clip Pliers -VAG1275A-
- Torque Wrench 1332 40-200Nm -VAG1332-
- Torque Wrench Insert - Open Jaw -VAG1923-
- Locking Pliers -VAS6199-
Removing Tie Rod
- Turn steering wheel into straight ahead position.
- Clean outside of steering gear in area of boot.
Loosen the nut -arrow 3-, while counterholding on tie rod end -arrow 2-.
- Remove front wheel.
- Loosen the nut of the tie rod end, but do not remove yet.
To protect the thread, screw the nut on the pin a few turns.
- Press off tie rod end from wheel bearing housing with Puller - Ball Joint -3287A- and then remove nut.
- Loosen spring clamp (item -1- in illustration N44-10005. Refer to → Anchor) using Hose Clip Pliers -VAG1275A- from boot and slide onto tie rod.
- Remove clamp and pull the boot off of steering gear housing.
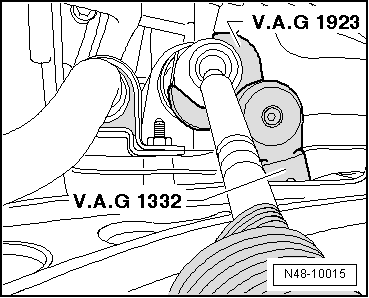
- Remove the tie rod from steering gear using Torque Wrench Insert - Open Jaw -VAG1923-.
Note
- If corrosion, damage, wear-out or first signs of soiling on steering rack can be seen, complete steering gear must be replaced.
- If no grease film is visible on steering rack, steering gear must also be replaced completely.
Installing Tie Rod
Caution
Do not lubricate the steering rack.
- Turn steering wheel into straight ahead position.
- Guide new clamp and boot onto tie rod.
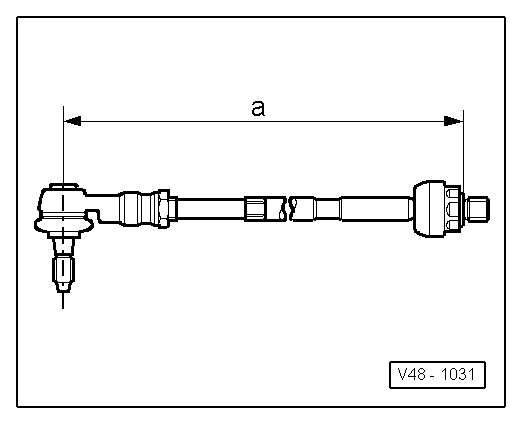
- Twist tie rod far enough into tie rod end until dimension -a- is obtained.
Dimension -a- = 367 +- 1 mm
- Rotate tie rod in steering rack and tighten.
- Slightly grease the sealing surface of the boot to the tie rod with Grease -G 052 168 A1- (from the repair kit, from Fuchs Renolit JP1619).
- Slide boot -2- onto tie rod -1-, pay attention to correct position when doing this.
- Secure spring clamp on boot using Hose Clip Pliers -VAG1275A-.
- Slightly grease the sealing surface of the boot to the steering gear housing with Grease -G 052 168 A1- (from the repair kit, from Fuchs Renolit JP1619).
- Slide boot onto steering gear housing until it stops.
- Tighten new clamp using Locking Pliers -VAS6199- to the extent depicted in the illustration.

Install in reverse order of removal.
After the installation the vehicle must be measured.
- Perform a vehicle alignment.
- If both tie rods have been exchanged, then perform a basic setting for the Steering Angle Sensor -G85- using Vehicle Diagnostic Tester, in "Guided Fault Finding" function.
- Then perform basic setting of steering system via Vehicle Diagnostic Tester, in "Guided Fault Finding" function.
Tightening Specifications
| Component | Tightening Specification |
| Tie rod to steering rack | 100 Nm |
| Tie rod end to tie rod | 70 Nm |
Tie rod end to wheel bearing
housing
|
50 Nm |
Special Tools
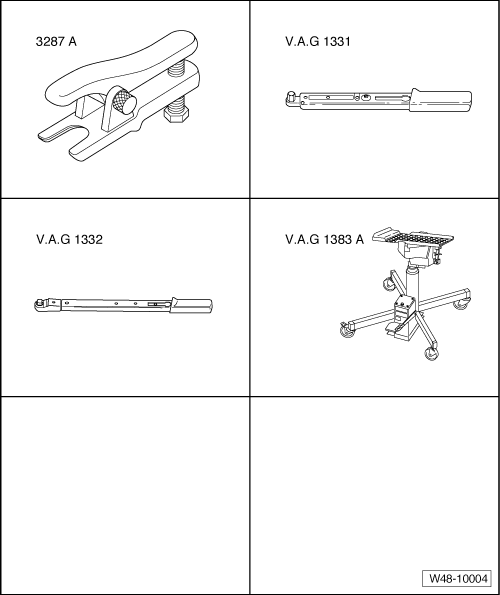
Special tools and workshop equipment required
- Torque Wrench 1331 5-50Nm -VAG1331-
- Torque Wrench 1332 40-200Nm -VAG1332-
- Engine and Gearbox Jack -VAS6931-
- Puller - Ball Joint -3287A-
- Puller - Ball Joint -3287A-
- Hose Clip Pliers -VAG1275A-
- Torque Wrench 1332 40-200Nm -VAG1332-
- Torque Wrench Insert - Open Jaw -VAG1923-
- Locking Pliers -VAS6199-
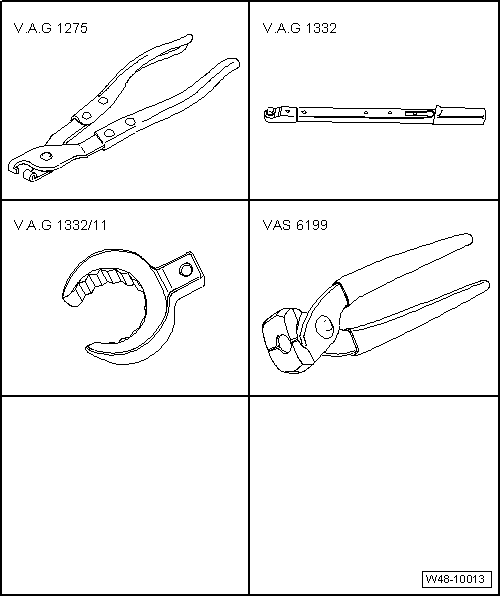
- Hose Clip Pliers -VAG1275A-
- Torque Wrench 1332 40-200Nm -VAG1332-
- Torque Wrench 1332 Insert - Open Ring Wrench - 24mm -VAG1332/11-
- Locking Pliers -VAS6199-
- PAS Housing Mount Assembly Tool -T10390-
Edition: K0059111221 - RF - 04/6/2015 - JLH
 Electro-Mechanical Steering Gear
Overview - Electro-Mechanical Steering Gear
Caution
If the universal joint is separated from the steering gear, the following
work cannot be performed:
Connect the battery.
Switching on the igniti ...

See More:
Volkswagen Tiguan Service and Repair Manual > Glass, Window regulators: Flush Bonded Windows
Tools
Note
The Cutting Tool for Bonded Windows -VAS6452- can be used instead of the
Flush Bonded Window Kit - VAG1474 A-.
Special tools and workshop equipment required
Flush Bonded Window Kit -VAG1474B-
Double Suction Lifter -VAG1344-
Bonded Window Tool Kit -VAG1351-
Window Removing Kit -VAG17 ...
Volkswagen Tiguan Owners Manual
Volkswagen Tiguan Service and Repair Manual
- Body exterior
- Body Interior
- General Paint Information
- Paint
- Brake System
- Suspension, Wheels, Steering
- Wheel and Tire Guide
- Towing Guide
- Wheel and Tire Guide General Information
- Communication
- Electrical Equipment General Information
- Electrical Equipment from 06/2011
- Heating, Ventilation and Air Conditioning
- Refrigerant R134a Servicing
- 6-Speed Manual Transmission 02Q, OBB, and OFB
