Volkswagen Tiguan Service and Repair Manual: Flush Bonded Windows
Tools
Note
The Cutting Tool for Bonded Windows -VAS6452- can be used instead of the Flush Bonded Window Kit - VAG1474 A-.
Special tools and workshop equipment required
- Flush Bonded Window Kit -VAG1474B-
- Double Suction Lifter -VAG1344-
- Bonded Window Tool Kit -VAG1351-
- Window Removing Kit -VAG1755-
- Cartridge Gun -VAG1628-
- Cartridge Heater -VAG1939-
- Window Cutter -VAG1561 A-
- Window Cutter - Offset Blade (2 pc.) -VAG1561/2-
- Window Cutter - Scraper -VAG1561/8-
- Gauge - Gap Adjustment -3371-
- Window Cutter - Blade (2 pc.) -VAG1561/19-
- Double Cartridge Gun -VAS5237-
Materials
Note
Correct material part numbers. Refer to the Parts Catalog.
- Two-Part Window Adhesive
- One-Part Window Adhesive
- Activator
- Glass Primer/Paint Primer
- Cleaning Solution
- Primer applicator
- Adhesive Remover
- Cutting Wire
Windshield, Servicing
Note
Before replacing windshield, see if it is possible to repair the glass.
Overview - Windshield
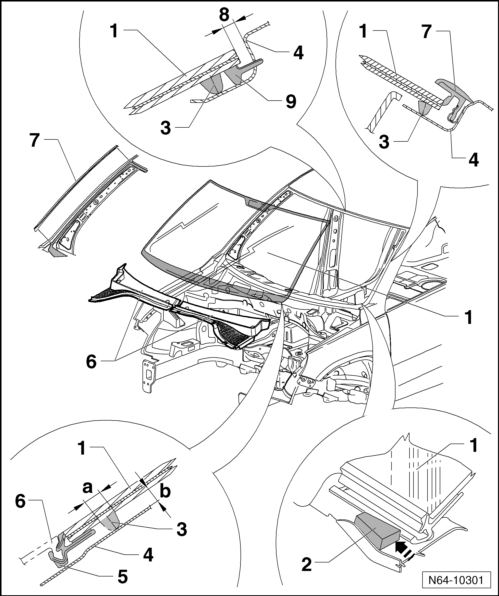
- Windshield
- Windshield, removing.
- Windshield, installing
- Window Adjuster
- -443 845 631 A-
- PUR Adhesive Sealant
- Bead diameter: width a = 7 mm, height b = 11 mm (including pre-coating, residual material on window glass and window flange)
- Minimum curing time.
- Body Flange
- Paint damage, repairing.
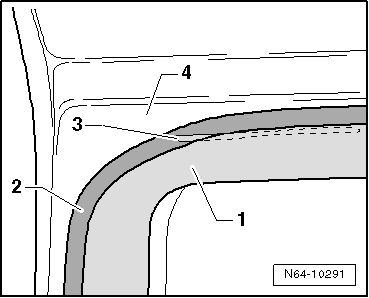
- Binding Profile
- Is a part of the windshield
- A new windshield must be installed if the binding profile is damaged
- Plenum Chamber Cover
- May only be pulled out of the retainer by hand.
- Plenum chamber cover, removing and installing.
- Drip Rail
- Removing and installing.
- Gap Dimension
- From window edge to roof edge
- Set a constant dimension of 3.5 mm using the Gauge - Gap Adjustment -3371-
- Sealing Lip
- Is a part of the windshield
- If sealing lip is damaged when cut out, a new windshield must be installed.
Windshield, Removing
- Remove the A-pillar trim.
- Remove the sun visors.
- Remove the interior rearview mirror.
- Loosen the headliner just enough so that it can be lowered and it is possible to cut out the windshield without damaging the headliner.
- Remove the headliner.
- Pull off left and right drip rails from engine hood, starting from retaining strips on A-pillar.
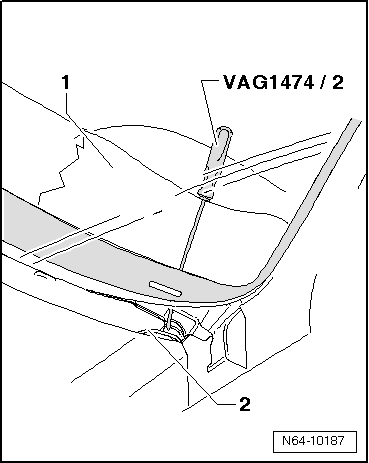
- Slide the Protective Backing - VAG1474/8--1- between the windshield and instrument panel.
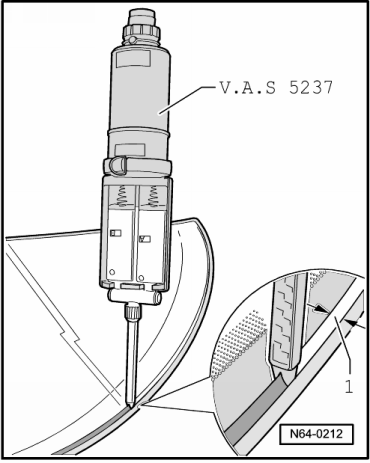
- Pull the cutting wire -2- with the Flush Bonded Window Kit - Awl -VAG1474/2- through the adhesive inside the passenger compartment.

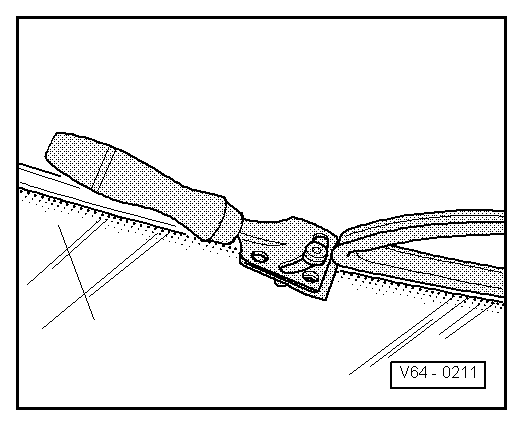
- Secure the end of the cutting wire on the inside with the Bonded Window Tool Kit - Pull Handle -VAG1351/1--3- so it cannot be pulled out.
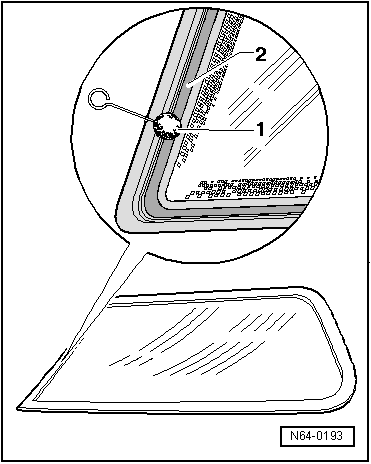
- Insert cutting cord -2- into window flange by aid of small tube -1-.
- Lay the cutting cord around the window
- Make sure the cutting cord is inserted under the corners of the windshield.
- Secure the other end of the wire in the Window Reel Device -VAG1654 A-.
- Position the Window Reel Device -VAG1654A- in "position I".
- Move the Window Reel Device -VAG1654A- accordingly to cut the window free.
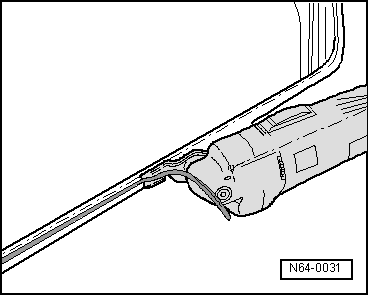
- While cutting free, press cutting cord against window using plastic wedge in order to have clearance from window flange and instrument cluster.
Windshield, Installing
- Undamaged window, preparing for glazing.
- New window, preparing for glazing.
- Body flange, preparing for glazing.
- Installation instructions.
- Minimum curing time.
Overview - Rear Window
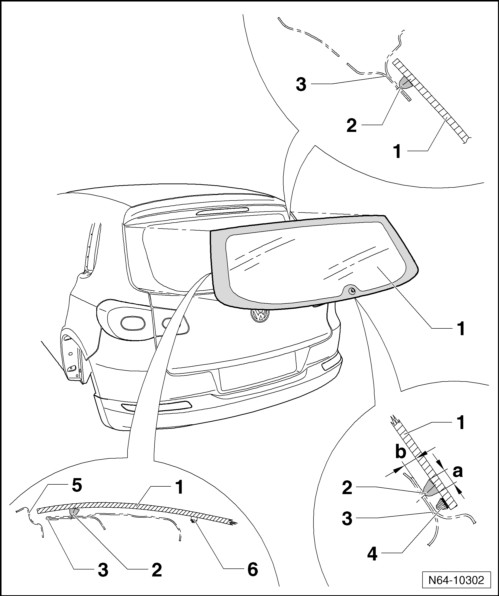
- Rear Window
- Rear window, removing.
- Rear window, installing.
- PUR Adhesive Sealant
- Bead diameter: width -a- = 6.5 mm, height b = 10 mm (including the pre-coating, residual material on the window and the window flange)
- Minimum curing time
- Rear Lid
- Spacer
- Side Panel
- Contact for Window Heater
Undamaged Window, Removing

- Remove the rear lid trim.
- Disconnect the electrical connectors -4- for the heated rear window -arrow- and press connector tabs onto window.
- Disconnect the connectors -3- for the roof antenna -arrow- and press the connector tabs onto the window.
- Remove the rear window wiper motor.

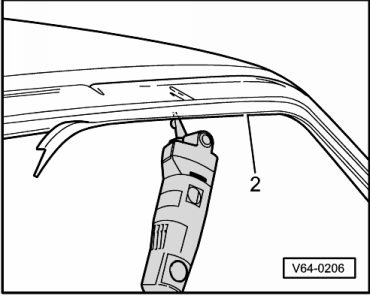
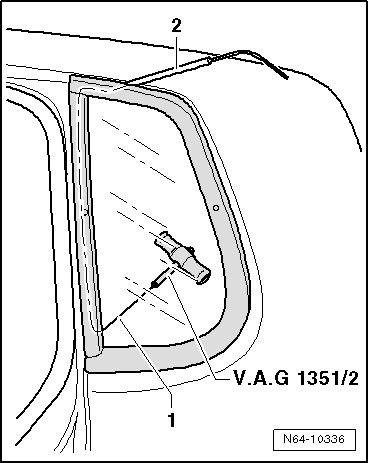
- Pull the cutting wire -1- with the Flush Bonded Window Kit - Awl -VAG1474/2- out of the Flush Bonded Window Kit -VAG1474A- in the lower curve of the rear window and through the adhesive material into the vehicle interior.
- Lay cutting cord -1- around rear window and pull other end of cord into interior.

- Secure one end of the wire on the Bonded Window Tool Kit - Pull Handle -VAG1351/1--2- to counterhold.
- Secure the other end of the wire to the Window Reel Device -VAG1654A-.
- Cut window free by moving the spooling tool accordingly.
- While cutting window free, push cutting cord with plastic wedge against window in order to have clearance at window flange.
Damaged Rear Window, Removing
- Protect the body and vehicle interior from glass splinters.
- Remove the glass pieces up to the adhesive.
- Remove the connections for the window defogger and antenna.
- Bond the flange -2- all around with fabric reinforced adhesive tape.
- Cut the adhesive (with glass residue) in the window opening with the Window Cutter -VAG1561A- and the Window Cutter -VAG1561-.
WARNING
Always wear protective eyewear and leather gloves
Rear Window, Installing
- Undamaged window, preparing for glazing.
- New window, preparing for glazing.
- Body flange, preparing for glazing.
- Installation instructions
- Minimum curing time.
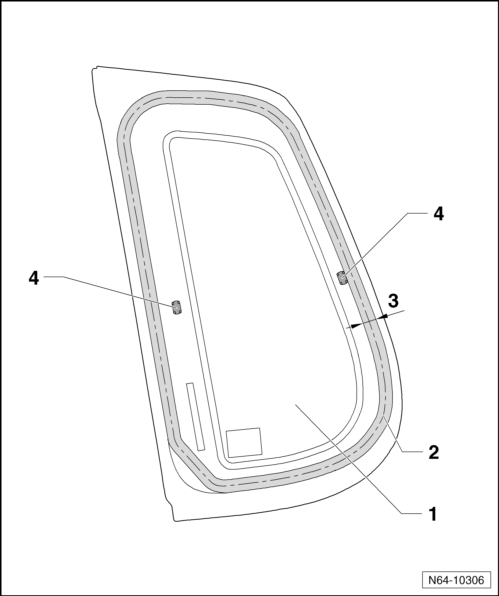
Overview - Side Window
- Side Window
- Side window, removing.
- Side window, installing.
- PUR Adhesive Sealant
- Bead diameter: width -a- = 6.5 mm, height -b- = 10 mm (including the pre-coating, residual material on the window and the window flange)
- Minimum Curing Time.
- Body Flange
- Seal
- Component part of side window.
- Clip
- Component part of side window.
- Rear Door Window Guide
Undamaged Side Window, Removing
Note
Removing and installing is described only for the left side window. Removing and installing right side window is derived accordingly from this.
- Loosen the luggage compartment trim panel at the top.
- Remove the C-pillar trim panel and the D-pillar trim panel.
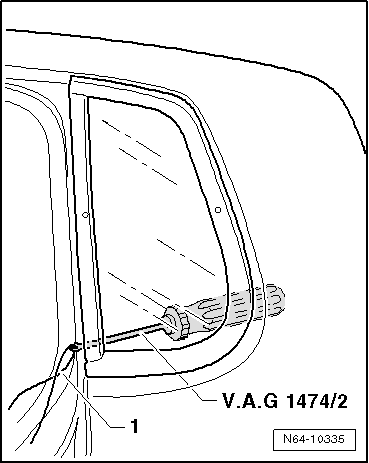
- Pull the cutting wire -1- with the Flush Bonded Window Kit - Awl - VAG1474/2- out of the Flush Bonded Window Kit - VAG1474 A- in the location shown in the illustration and through the adhesive material into the vehicle interior.
- Insert the cutting wire -1- into the window flange behind the seal using the small tube -2-.
- Secure one end of the wire -3- on the Bonded Window Tool Kit - Pull Handle -VAG1351/1- to counterhold.
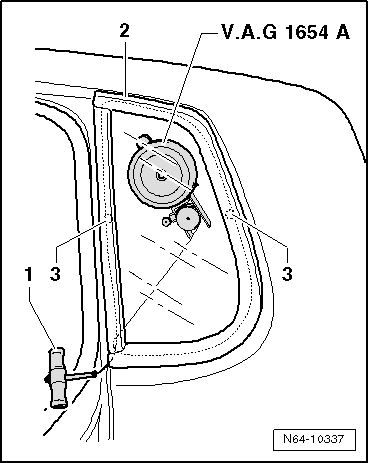
- Pull other end of cutting cord into interior.
- One suction cup is removed from the Window Reel Device - VAG1654-.
- Secure the other end of the wire to the Window Reel Device - VAG1654 A--4-.
- Move the Window Reel Device - VAG1654 A--4- accordingly to cut the window free.
Increased counter forces are used at the bracket -3- positions.
- While cutting window free, push cutting cord with plastic wedge against window in order to have clearance at window flange.
Damaged Side Window, Removing
The procedure for removing a broken side window is identical to removing a broken rear window.
Side Window, Installing
Undamaged window, preparing for glazing.
New window, preparing for glazing.
Body flange, preparing for glazing.
Installation Instructions.
Minimum curing time.
Undamaged Window, Preparing for Glazing
Note
- When re-using an undamaged window, cut the remaining adhesive sealant back to 1 to 2 mm shortly before re-bonding. Do not damage primer and ceramic coating when doing this.
- The remaining material serves as a base for the new adhesive sealant being applied.
WARNING
- Do not prime or use a cleaning solution on the adhesive surface. Keep the adhesive surface free of dirt and grease.
- Exception: If bonding is not performed immediately after the cutting back procedure, the remaining material must be activated using the activator.
New Window Without Pre-Coating, Preparing for Glazing
All windows as replacement parts are not pre-coated.
Note
The application area for the adhesive bead is not pre-coated and not primed.
- Clean an area 20 mm wide all around the edge of the window using cleaning solution.
- Then dry the window edge with a lint-free cloth.
WARNING
Ceramic application on window is not primer! It must be primed before the application of adhesive sealing material!
Now apply glass and paint primer -2- evenly in one stroke using the applicator -1-.
- Drying time is approximately 10 minutes
Body Flange, Preparing for Glazing
Cut the remaining material on the body flange back using the Window Cutter - U Blade (2 pc.) -VAG1561/3- but do not remove the remaining material completely.
Note
The remaining material serves as a base for the new adhesive sealant being applied. Keep the adhesive surfaces free of dirt and grease.
WARNING
- Activator must not come into contact with the paint or the paint will be damaged.
- Exception: if the bonding is not performed immediately after the cutting back procedure, the remaining material must be activated using the activator D 181 801 A1.
If the body flange is being repaired or partially replaced, the corresponding area must be cleaned and primed again before painting.
Note
It is possible that the laser weld seam does not lie in the area of the adhesive bead. In this case, the open weld seam must be sealed with window adhesive before bonding the window.
- If the laser weld seam -3- on the sheet metal flange -4- is not covered by the adhesive bead -1-, then coat the laser weld seam -3- with glass/paint primer -3- and fill the weld seam with window adhesive -1-.
Installation Instructions
General Installation Information for All Windows
- Apply the adhesive all around at a right angle to the window.
WARNING
The window must be installed within 10 minutes or the adhesive will not bond well.
Do not apply adhesive bead too thickly and do not press windows too firmly on to body flange. Adhesive will be visible in the gap area because the windows no longer have a sealing lip.
- With help of two Double Suction Lifter -VAG1344- install window in window opening, center and press in onto the spacing lip.
- Re-affix any stickers (for example, for airbag).
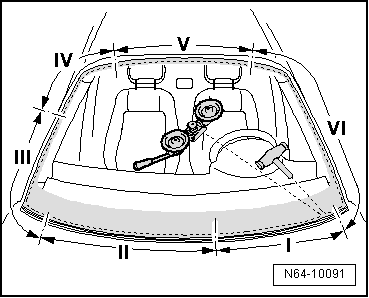
Windshield Installation Instructions
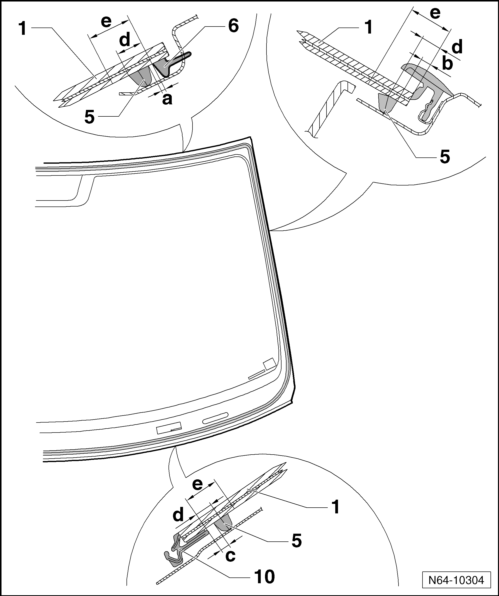
The windshield does not have markings for the glass/paint primer.
Apply the glass/paint primer as follows.
- Upper window edge: from rubber profile -6- 12 mm wide dimension -e-.
- Side window edge: starting from the window edge 12 mm wide dimension -e-.
- Lower window edge: from molding frame -10- 10 mm wide dimension -e-.
The windshield does not have markings for adhesive bead -5-.
The center of the adhesive bead is applied the following dimensions.
- Upper window edge: starting from rubber profile -6- 4 mm dimension -d-.
- Side window edge: starting from the window edge 6.5 mm dimension -d-.
- Lower window edge: starting from molding frame -10- 6 mm dimension -d-.
Windshield gap and height dimensions.
Rear Window Installation Information
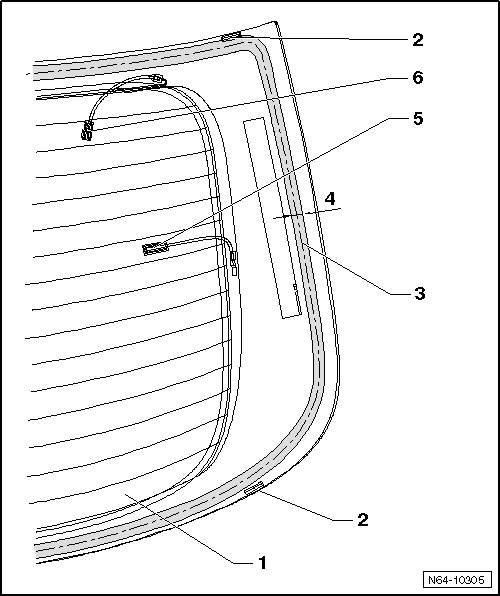
- Check whether height stops -2- are present.
- Rear window gap and height dimensions.
- Activator must not be applied onto distributing wire for window heater.
- There are markings -4- along the edge of the rear window for applying the adhesive sealant -3-.
- The adhesive bead is applied within this marking.
- Secure the rear window with tape during the curing time.
- Secure the connectors -5 and 6- when installing the glass with adhesive tape.
- If too much adhesive was applied and it spreads onto the window defroster, remove the excess.
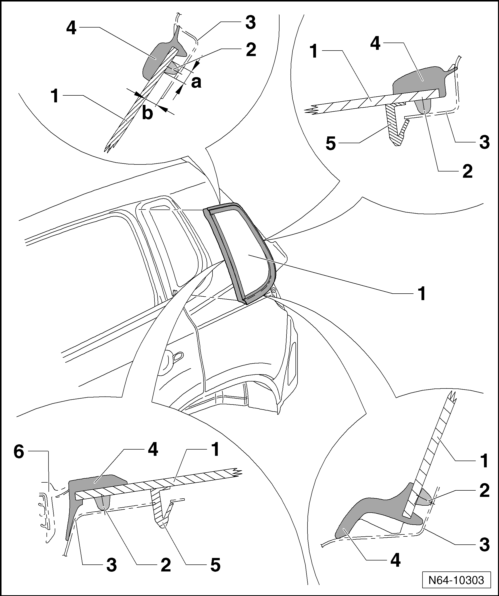
Side Glass, Installing
There are markings -3- along the edge of the side window for applying the adhesive sealant -2-.
The adhesive bead is applied within this marking.
The side glass -1- is attached to the side panel with clips -4-.
Minimum Curing Time
WARNING
There are special requirements for replacing bonded windows. This includes, for example, that a newly bonded windshield is safe for vehicle operation and also in case of an accident after a specified minimum curing time.
The minimum curing time for all windows is two hours for the two-part window adhesive.
Minimum curing time means the time from when the window is bonded to when the vehicle is put back into use. During this time, the vehicle must be on a level surface at room temperature (at least 15 ºC (59 ºF) ).
WARNING
The vehicle is operationally ready only after the minimum curing time has elapsed.
Adhesive Sealant, Removing from Window
- Adhesive remover is the recommended cleaning solution. Follow all safety precautions.
WARNING
When cleaning from inside the vehicle, do not press out on the window that was just installed.
- First clean paint surface coarsely using a dry cloth. Eliminate remaining soiling using adhesive removal solution.
- Clean the plastic trim: let the adhesive sealant harden for approximately 1 hour and then peel it off.

 Front Door Window
Tools
Special tools and workshop equipment required
Torque Wrench 1331 5-50Nm -VAG1331-
Torque Wrench 1783 - 2-10Nm -VAG1783-
Window Strip Roller -T10314-
Trim Removal Wedge -3409-
Overview
Note ...
See More:
Volkswagen Tiguan Owners Manual > Windshield wiper and washer: Rain sensor
Fig. 89 Windshield wiper lever: Adjusting
rain sensor Ⓐ.
Fig. 90 Sensitive rain sensor surface.
Read and follow the introductory information and
safety information first⇒Introduction
to the subject When switched on, the rain sensor automatically shortens or lengthens
the delay betwee ...
Volkswagen Tiguan Owners Manual
Volkswagen Tiguan Service and Repair Manual
- Body exterior
- Body Interior
- General Paint Information
- Paint
- Brake System
- Suspension, Wheels, Steering
- Wheel and Tire Guide
- Towing Guide
- Wheel and Tire Guide General Information
- Communication
- Electrical Equipment General Information
- Electrical Equipment from 06/2011
- Heating, Ventilation and Air Conditioning
- Refrigerant R134a Servicing
- 6-Speed Manual Transmission 02Q, OBB, and OFB
