Volkswagen Tiguan Service and Repair Manual: Front Door Window
Tools
Special tools and workshop equipment required
- Torque Wrench 1331 5-50Nm -VAG1331-
- Torque Wrench 1783 - 2-10Nm -VAG1783-
- Window Strip Roller -T10314-
- Trim Removal Wedge -3409-
Overview
Note
The illustration shows the right side. The left side is identical.
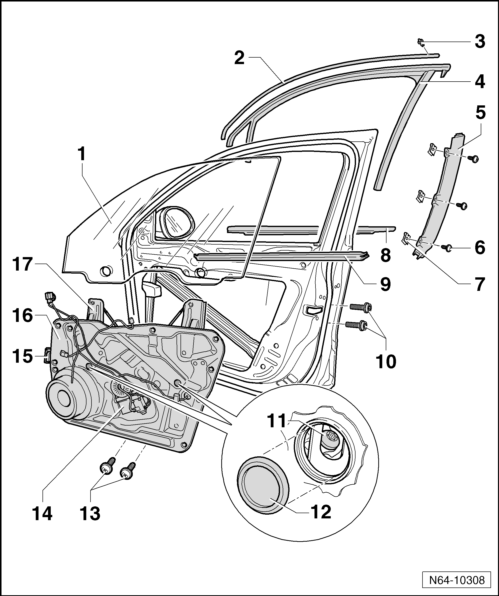
- Door Window
- Removing and installing.
- Trim Strip
- Placed into window guide.
- Removing.
- Clip
- For attaching the trim strip in the window guide.
- Window Guide
- Inserted on flange.
- Removing and installing.
- Version with and without trim strip.
- Trim
- Removing.
- Screw
- 2 Nm
- Quantity: 3
- Outer Window Shaft Seal
- Quantity: 3
- Outer Window Shaft Seal
- Inserted on flange
- Removing.
- Inner Window Shaft Seal
- Inserted on flange
- Version with and without trim strip
- Bolt
- 20 Nm
- For the door lock
- Quantity: 2
- Bolt (Left Thread).
- 8 Nm
- Quantity: 2
- Cap
- Quantity: 2
- Bolt
- 8 Nm
- Quantity: 10
- Window Regulator Motor
- Connector
- On the A-pillar
- Subframe
- Removing and installing.
- Window regulator is a component of the subframe.
- Window regulator motor is bolted to subframe from front.
- Window Regulator
- Component of subframe.
Door Window, Removing and Installing
Removing
Note
- The following describes the removal and installation of the right door window. Removing and installing the left door window is identical.
- Bolts -3- have a left-hand thread.
- Remove the front door trim panel.
- Pry the caps -2- out.
- Lower door window until clamping screws -3- of door window are accessible.
- Loosen the bolts -3- (do not remove, left-hand thread) and the press clamping brackets apart.
Note
If the work step is not possible due to a malfunction via the electrical window regulator -5-, window regulator motor -6- can be unscrewed to be able to slide window down.
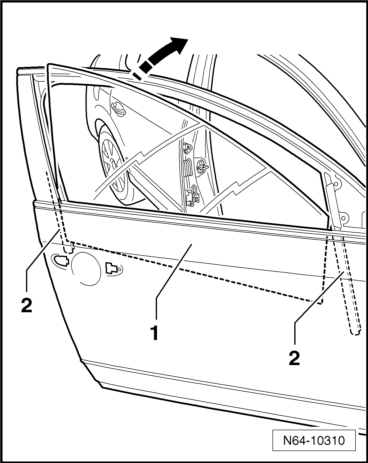
- Raise rear door window -1- and swing the door toward the front in the direction of -arrow-.
Installing
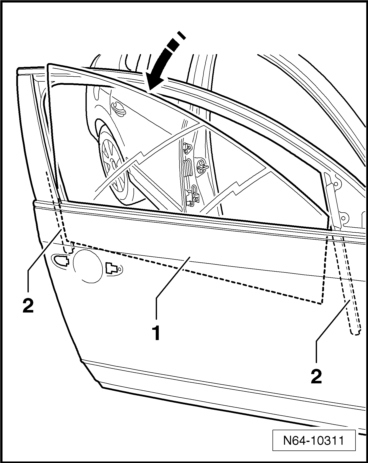
- Tilt the door window -1- into the door in the direction of the -arrow-. Make sure the door window is inserted correctly into the window guide -2-.
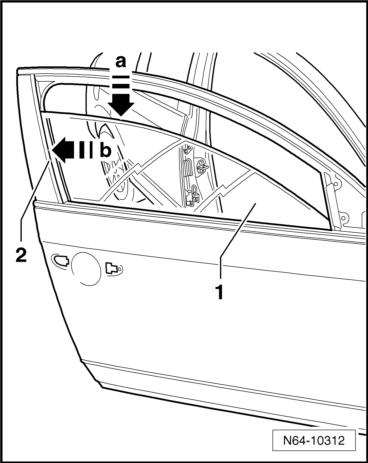
- Without using pressure, guide the door window into clamping brackets -arrow a-.
- Align the door window glass -1- to the window frame -2--arrow b-.

- Tighten the clamping bolts -3- (quantity: 2, left-hand thread, tightening specification: 8 Nm).
Note
Bolts -3- have a left-hand thread.
Continue by performing the steps used in removal in reverse order.
- A function test must be performed before door trim is installed.
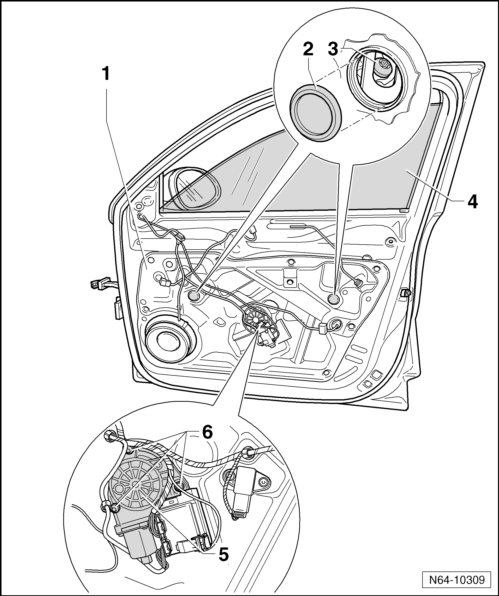
Window Regulator Motor, Removing and Installing
Removing

- Remove the front door trim panel.
- Fix window using adhesive tape so that it does not slip down.
- Disconnect all connectors -3-.
- Remove the three screws -2-.
- Remove window regulator motor with control module -1- from subframe.
Installing
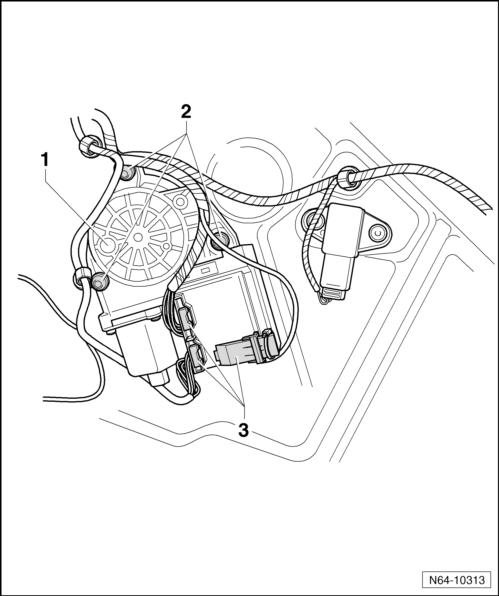
- Place window regulator motor on and pull door window lightly up and down so that splines are located better between motor and cable drum.
Tightening specification for window regulator motor screws -2-: 3.5 Nm
Note
Close the doors to perform the adaptation procedures.
- Let window regulator drive twice upward and downward to stop respectively. By doing this, window regulator motor is normed and ready for operation and activates pinch protection.
- Continue by performing the steps used in removal in reverse order.
Window Guide, Removing and Installing
Note
- The following describes removing and installing the right window guide. Removing and installing the left window guide is identical.
- Do not bend window shaft seal when removing!
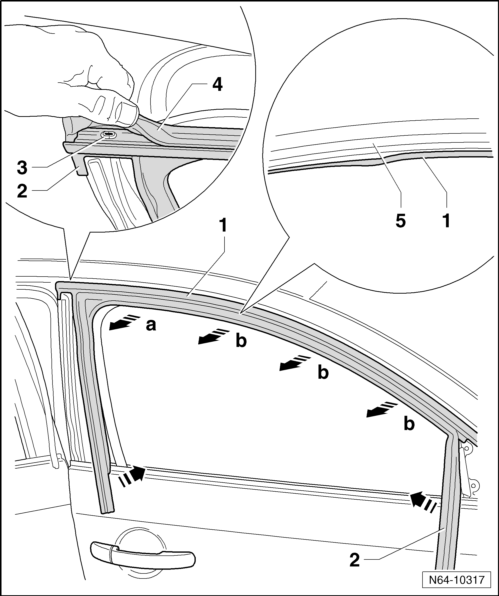
Window Shaft Seal, Removing
Note
The window shaft seal must not be bent when removing.
- Remove the exterior rearview mirror.
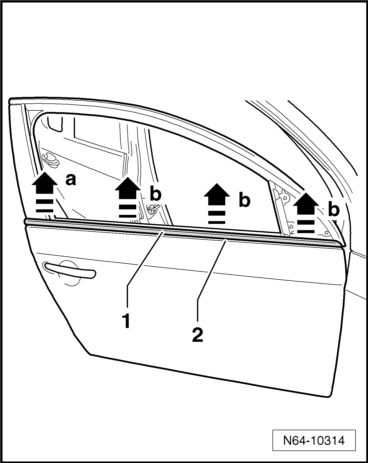
- Begin at the rear window guide -arrow a- and carefully lift the window shaft seal -1-.
- Remove the window shaft seal -1- evenly -b arrows- from the door flange -2-.
Window Shaft Seal, Installing
Note
The window shaft seal must not be knocked onto the door flange.
- Press the window shaft seal evenly onto the door flange by hand.
The exterior mirror and the window shaft strip are removed.
- Remove the door window.
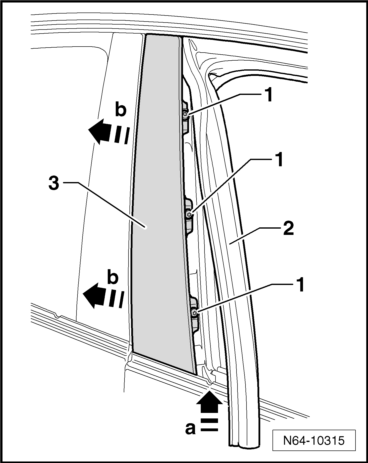
- Pull window guide -2- out of mount -arrows a-.
- Remove bolts -1- and pull off panel -3- in direction of B-pillar -arrow b-.
Trim, Installing
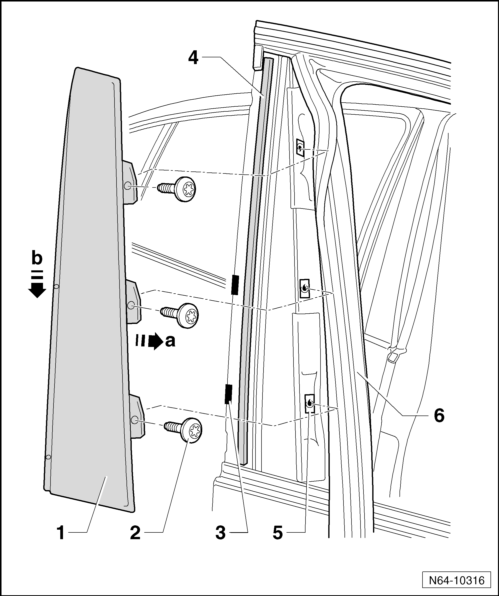
- Check spring clips -5-, seal -4- and intermediate bearings -3-for damage and completeness. Replace parts if necessary.
- Slide the trim -1- in -arrow a- on to the window frame.
- Slightly press the trim downward -arrow b-.
- Tighten the screws -2- (tightening specification: 2 Nm).
- Guide the window guide -6- into the mount.
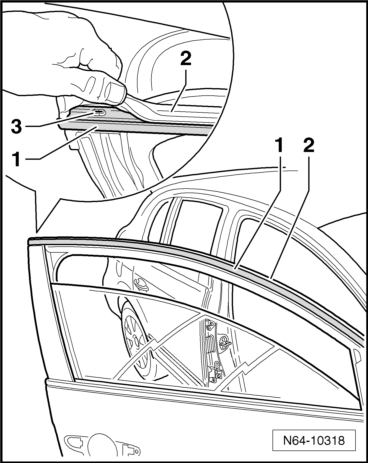
Window Guide, Removing
The exterior mirror, the window shaft strip and the trim have been removed.
- Pull the window guide -1- out of the front and rear mount -2--arrows-.
For Window Guides with Trim Strip
- Push window guide -1- in top rear area -4- slightly aside.
- Remove the clip -3-.
All Window Guides
- Fold sealing lip of window guide -1- from inside from window frame -5-.
- Starting in the rear -arrow a-, pull the window guide -2- off of the door flange evenly all around -b arrows-.
Installing
Install in reverse order of removal.
Tightening specification for screws -2-: 2 Nm
- A function test must be performed before door trim is installed.
Note
While installing window guide, make sure it is seated evenly (wind noise).
Window Guide Trim Strip, Removing and Installing
Removing
- Remove the window guide trim.
- Push window guide in top rear area -2- slightly aside.
- Remove the clip -3-.
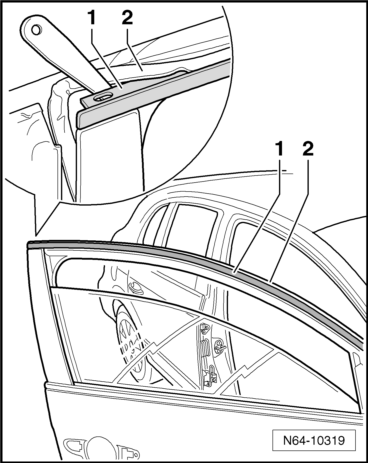
- Guide the Trim Removal Wedge -3409- in carefully between trim strip -1- and the window guide -2-.
- Slide the Trim Removal Wedge -3409- forward evenly between the trim strip -1- and window guide -2-.
Installing
- Spray a soap and water solution on the window guide.
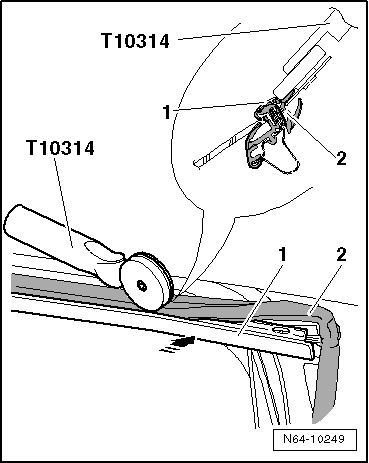
- Press the trim strip -1- by hand evenly -arrow- into the window guide -2-.
- Then press the window guide correctly into the trim strip mount using the Window Strip Roller -T10314-.
Installation is performed in reverse order of the removal.
 Flush Bonded Windows
Tools
Note
The Cutting Tool for Bonded Windows -VAS6452- can be used instead of the
Flush Bonded Window Kit - VAG1474 A-.
Special tools and workshop equipment required
Flush Bonded Window Kit -VAG1 ...
 Rear Door Window
Tools
Special tools and workshop equipment required
Torque Wrench 1331 5-50Nm -VAG1331-
Torque Wrench 1783 - 2-10Nm -VAG1783-
Window Strip Roller -T10314-
Trim Removal Wedge -3409-
Overview
Note ...
See More:
Volkswagen Tiguan Service and Repair Manual > Top Coats: Aquaplus Touch-Up System
Definition:
Touch-Up Additive for Aquaplus -LVM 030 000 A2-
Product Description
The touch-up Additive for Aquaplus is especially suited for painting Aquaplus
water-based base paint. This serves to simplify the touch-up process.
Application Instructions
Base Surface
Suitable base surfaces:
Prim ...
Volkswagen Tiguan Owners Manual
Volkswagen Tiguan Service and Repair Manual
- Body exterior
- Body Interior
- General Paint Information
- Paint
- Brake System
- Suspension, Wheels, Steering
- Wheel and Tire Guide
- Towing Guide
- Wheel and Tire Guide General Information
- Communication
- Electrical Equipment General Information
- Electrical Equipment from 06/2011
- Heating, Ventilation and Air Conditioning
- Refrigerant R134a Servicing
- 6-Speed Manual Transmission 02Q, OBB, and OFB
