Volkswagen Tiguan Service and Repair Manual: Shock Absorber and Coil Spring, FWD
Overview - Shock Absorber and Coil Spring, FWD
Note
Overview - Adaptive Chassis DCC Shock Absorber, FWD.
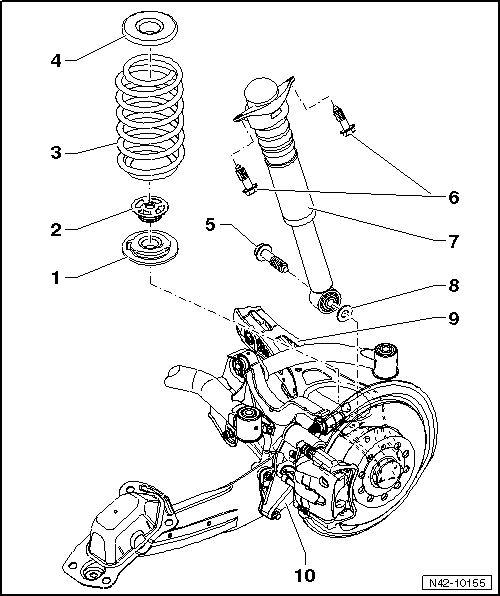
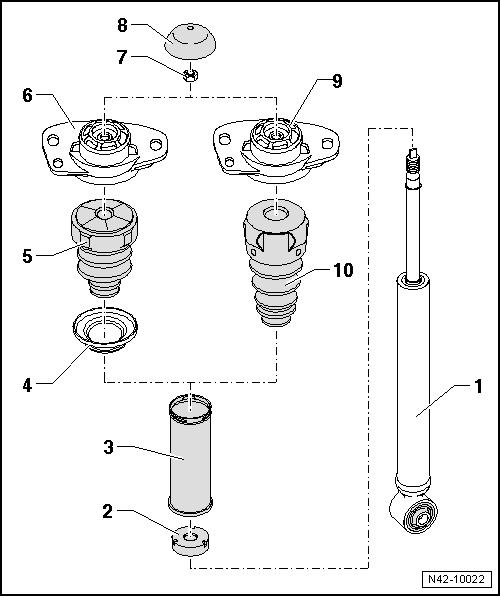
- Lower Spring Support
- Spring end rotated up to stop
- Assembly Aid
- Must not be used after removal
- Coil Spring
- There are different suspension versions.
- Removing and installing.
- Upper Spring Support
- Bolt
- 180 Nm
- Always replace if removed
- M14 x 1.5 x 85
- Bolt
- 50 Nm + 45º
- Always replace if removed
- M10 x 35
- Shock Absorber
- Removing and installing.
- There are different versions of the suspension.
- Washer
- Lower Transverse Link
- Removing and installing.
- Wheel Bearing Housing
- Removing and installing.
Coil Spring, Removing and Installing
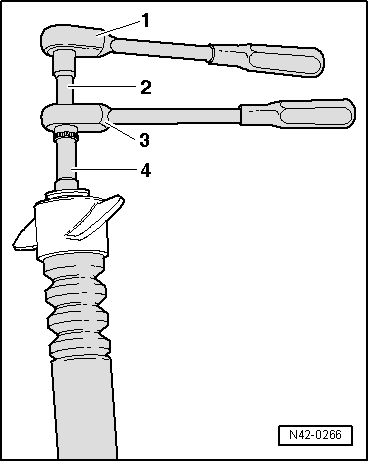
Special tools and workshop equipment required
- Spring Compressor Kit -VAG1752-
- Spring Compressor Kit - Spring Retainer with Inserts -VAG1752/3A-
- Spring Compressor Kit - Adapter Blocks -VAG1752/9-
Removing
- Remove the wheel.
- Insert spring compressor -3-.
WARNING
Make sure that coil spring is seated correctly in Spring Compressor Kit - Spring Retainer with Inserts -VAG1752/3A--2- (danger of accident).
- Use a wrench or a reversible ratchet to tighten spring compressor.
- Tension the coil spring far enough until it can be removed.
- Remove the spring.
- Spring Compressor Kit - Spring Retainer with Inserts -VAG1752/3A-
- Spring Compressor Kit - Adapter Blocks -VAG1752/9-
- Spring Compressor Kit - Spring Tensioner -VAG1752/1-
Installing
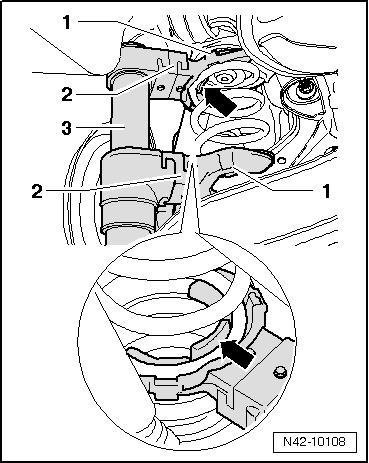
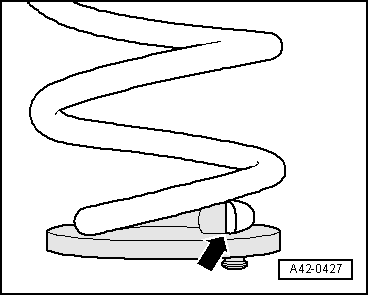
Observe installation position!
The spring start -arrow- must touch the stop of lower spring support.
- Insert the spring together with the spring support.
- Spring seat has a pin on bottom.
This pin is inserted into hole of lower transverse link -arrow-.
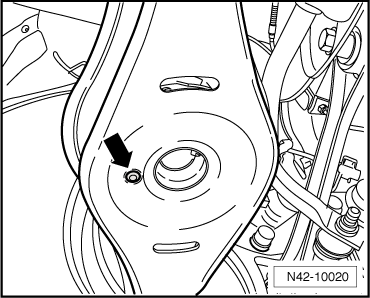
- Then insert spring seat at top into upper spring end.
- Relieve tension on spring, place upper spring seat onto tab of chassis when doing this.
- Remove spring tensioner.
- Install the wheel and tighten.
Shock Absorber, Removing and Installing
Note
Adaptive Chassis DCC Shock Absorber, FWD, Removing and Installing.
Special tools and workshop equipment required
- Torque Wrench 1332 40-200Nm -VAG1332-
Removing
- Remove the wheel.
- Remove the wheel housing liner.
- Remove coil spring.
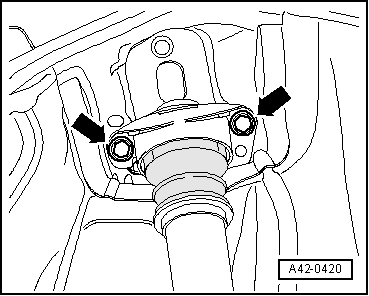
- Remove the bolts -arrows-.
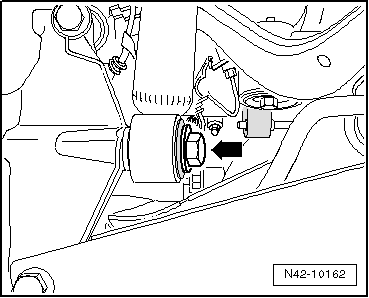
- Remove the bolt -arrow-.
- Remove the shock absorber.
Installing
Install in reverse order of removal. Note the following:
Only bolt the shock absorber to the wheel bearing housing when the dimension "a" is reached.
- Insert shock absorber and tighten bolts -arrows-.

- Tighten the bolt -arrow-.
- Install coil spring.
- Install the wheel housing liner.
- Install the wheel and tighten.

Tightening Specifications
| Component | Tightening Specification |
Shock absorber to body
|
50 Nm + 45º |
Shock absorber to wheel bearing
housing.
|
180 Nm |
Shock Absorber, Servicing
Note
Adaptive Chassis DCC Shock Absorber, FWD, Servicing.
- Shock Absorber
- Removing and installing.
- There are different suspension versions.
- Protective Cap
- Protective Pipe
- Support Ring
- Allocation. Refer to the Parts Catalog
- Stop Buffer
- For shock absorber with supporting ring -item 4-
- Allocation. Refer to the Parts Catalog.
- Shock Absorber Mount
- For shock absorber with supporting ring -item 4-
- Allocation. Refer to the Parts Catalog.
- Nut
- 25 Nm
- Always replace if removed
- M10 x 1.0
- Loosening and tightening.
- Cover
- Shock Absorber Mount
- For shock absorber without supporting ring -item 4-
- Allocation. Refer to the Parts Catalog.
- Stop Buffer
- For shock absorber without supporting ring -item 4-
- Allocation. Refer to the Parts Catalog.
Shock Absorber, Disassembling and Assembling
Special tools and workshop equipment required
- Torque Wrench 1332 40-200Nm -VAG1332-
- Shock Absorber Set -T10001-
Loosening and Tightening Bolted Connection for Shock Absorber Mount
- Ratchet (commercially available)
- Shock Absorber Set - Extension with Counter Holder 1 -T10001/9-
- Shock Absorber Set - Reversible Ratchet -T10001/11-
- Shock Absorber Set - Socket -T10001/1-
Tightening Specification
| Component | Tightening Specification |
Shock absorber mounting to
shock absorber
|
25 Nm |
 Wheel Bearing Housing, Trailing Arm, FWD
Overview - Wheel Bearing Housing, Trailing Arm, FWD
Cover
Mounting Bracket
Coupling Rod
Connects stabilizer to trailing link/wheel bearing housing
Bolt
90 Nm + 45º
Always replace if ...
 Stabilizer Bar, FWD
Overview - Stabilizer Bar, FWD
Stabilizer Bar
There are different suspension versions.
Removing and installing.
Bearing
Replace bearings always on both sides of vehicle
Clamp
Bo ...
See More:
Volkswagen Tiguan Service and Repair Manual > Heating, Ventilation: Adjustment Motors
Adjuster for Air Distribution Control Doors, Removing and Installing
Removing
Remove the instrument panel.
Unclip flexible shaft from adapter for controls.
Unscrew bolts -1- and remove the adjusting
unit for the air distribution doors.
Installing
The arrows on the gears must align.
Posit ...
Volkswagen Tiguan Owners Manual
Volkswagen Tiguan Service and Repair Manual
- Body exterior
- Body Interior
- General Paint Information
- Paint
- Brake System
- Suspension, Wheels, Steering
- Wheel and Tire Guide
- Towing Guide
- Wheel and Tire Guide General Information
- Communication
- Electrical Equipment General Information
- Electrical Equipment from 06/2011
- Heating, Ventilation and Air Conditioning
- Refrigerant R134a Servicing
- 6-Speed Manual Transmission 02Q, OBB, and OFB
