Volkswagen Tiguan Service and Repair Manual: Control Arm Bonded Rubber Bushing, Replacing
Special tools and workshop equipment required
- Wishbone Rubber Mount Assembly Tool - Tube -T10219/1-
- Wishbone Rubber Mount Assembly Tool - Drift -T10219/2-
- Press Plate -VW402-
- Press Piece - Rod -VW411-
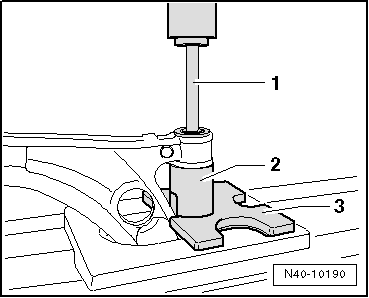
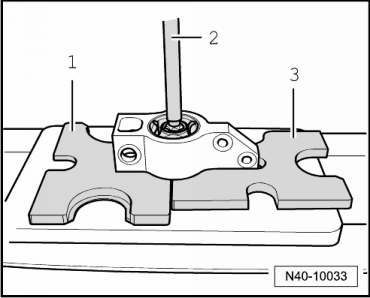
Pressing Out the Bonded Rubber Bushing
- Press out the bonded rubber bushings as shown.
- Press Piece - Rod -VW411-
- Wishbone Rubber Mount Assembly Tool -Tube -T10219/1-
- Press Plate -VW402-
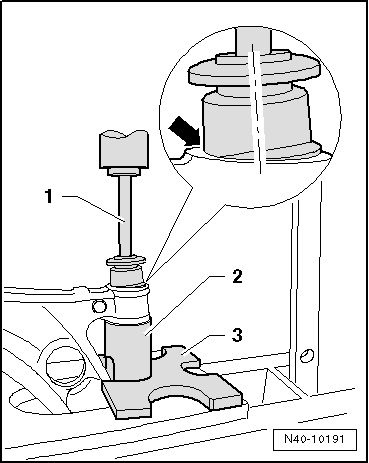
Installing the Bonded Rubber Bushings
Bonded rubber bushing must be installed at an angle to prevent damaging it when pressing in. Bonded rubber bushing settles straight while pressing in.
- Apply Installation Lubricant -G 294 421 A1- onto the outside of the bonded rubber bushing.
- Place bonded rubber bushing on at an angle (in direction of control arm), when doing this the lip -arrow- must slip into the hole as shown in the illustration.
- Wishbone Rubber Mount Assembly Tool - Drift -T10219/2-
- Wishbone Rubber Mount Assembly Tool - Tube -T10219/1-
- Press Plate -VW402-
- Press in bonded rubber bushings as far until core -1- and hole of control arm -2- are at the same height.
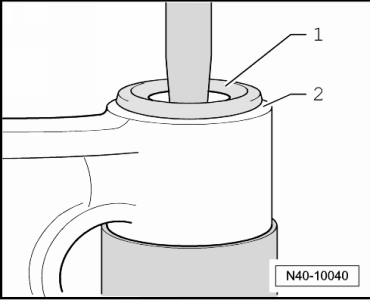
- Press the bearing back slightly in the control arm.
- Wishbone Rubber Mount Assembly Tool - Tube -T10219/1-
- Press Plate -VW402-
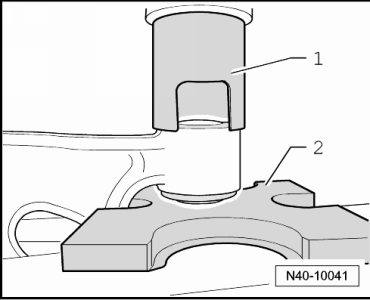
Dimensions -a and b- must be identical.

Mounting Bracket with Control Arm Bearing, Replacing
Special tools and workshop equipment required
- Press Piece - Guide Pin -VW439-
- Press Plate -VW401-
- Press Plate -VW402-
- Press Piece - Multiple Use -VW426-
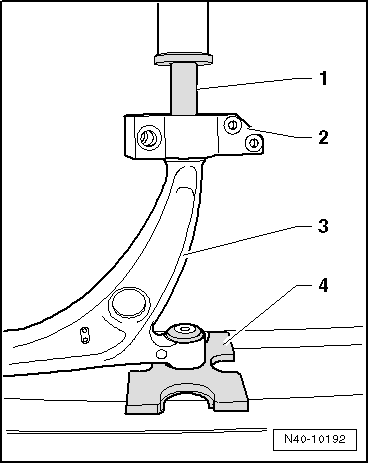
Pressing Off Mounting Bracket with Bearing for Control Arm
Bonded rubber bushing is available as a replacement part only with the mounting bracket.
- Press the mounting bracket with bonded rubber bushing off the control arm.
Note
Hold control arm firmly while pressing out.
- Press Plate -VW401-
- Press Piece - Guide Pin -VW439-
- Press Plate -VW402-
Pressing On Mounting Bracket with Bearing On Control Arm
- Thinly coat control arm hex head with Installation Lubricant -G 294 421 A1- (1:20).
- Carefully press bearing onto control arm as far as stop.
- Press Piece - Multiple Use -VW426-
- Mounting bracket with bonded rubber bushing
- Control arm
- Press Plate -VW401-
 Left Control Arm with Mounting Bracket, DSG and
Automatic Transmission, Removing and Installing
Left Control Arm with Mounting Bracket, DSG and
Automatic Transmission, Removing and Installing
Special tools and workshop equipment required
Locating Pins -T10096-
Engine and Gearbox Jack -VAS6931-
Removing
Turn the steering wheel in the straight position and remove the ignition
key so ...
 Stabilizer Bar, Removing and Installing
Special tools and workshop equipment required
Locating Pins -T10096-
Torque Wrench 1332 40-200Nm -VAG1332-
Engine and Gearbox Jack -VAS6931-
Puller - Ball Joint -3287A-
Removing
Remove front w ...
See More:
Volkswagen Tiguan Owners Manual > Refueling: Refueling checklist
Read and follow the introductory information and
safety information first⇒Introduction
to the subject The engine compartment of any motor vehicle is a hazardous area.
Never do any work on the engine or in the engine compartment unless you
- know exactly how to carry out the job,
- have t ...
Volkswagen Tiguan Owners Manual
Volkswagen Tiguan Service and Repair Manual
- Body exterior
- Body Interior
- General Paint Information
- Paint
- Brake System
- Suspension, Wheels, Steering
- Wheel and Tire Guide
- Towing Guide
- Wheel and Tire Guide General Information
- Communication
- Electrical Equipment General Information
- Electrical Equipment from 06/2011
- Heating, Ventilation and Air Conditioning
- Refrigerant R134a Servicing
- 6-Speed Manual Transmission 02Q, OBB, and OFB
