Volkswagen Tiguan Service and Repair Manual: Sun Shade Motor, Removing and Installing
Removing
- Remove the headliner.
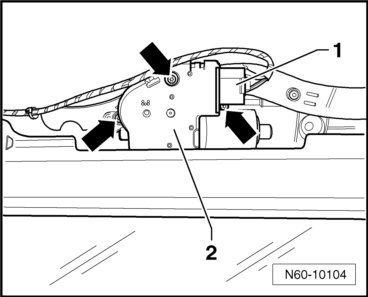
- Disconnect the electrical connector -1- on the sun shade motor -2-.
- Remove the bolts -arrow- from the sun shade motor -2-.
- Remove the sun shade motor -2-.
Installing
Install in reverse order of removal.
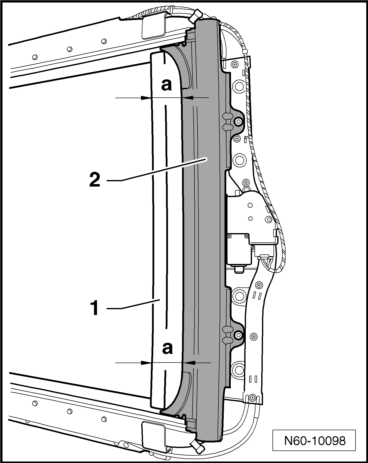
- Prior to installing the motor, make sure the sun shade is parallel by measuring -dimension a- between the shade arch -1- and the shade cartridge -2- .
Tightening Specification
Bolts 3.5 Nm
- After completing all the work, perform a sun shade motor adaptation.
Sun Shade, Removing and Installing
Removing
- Move the sun shade all the way into the open position.
Note
Using a commercially available hex socket head wrench, rotate shade motor into open direction to removal position if the electrical system malfunctions.
- Remove the headliner.
- Remove the rear glass panel.
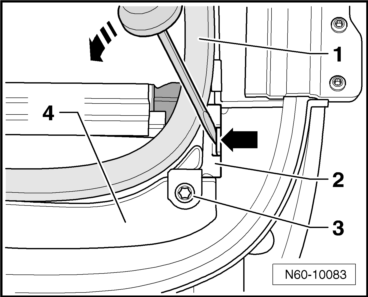
- Remove the screws -3- from the cap -2- (2 Nm).
- Unclip the cap retainer in direction of -arrow--2- from the rear lid using a screw driver -4- and fold the cap -2- up.
Do not remove the inner seal -1- .
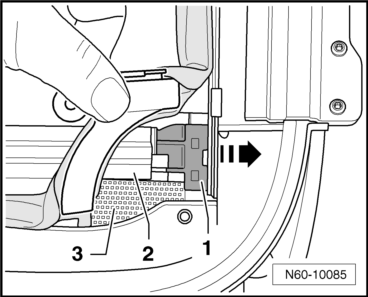
- Carefully lift the shade arch -2- together with the sun shade slide -1- .
Note
Be sure not to damage the shade material -3-
- Pull the sun shade slide -1- to the side in the direction of the -arrow- out of the sun shade arch -2- .
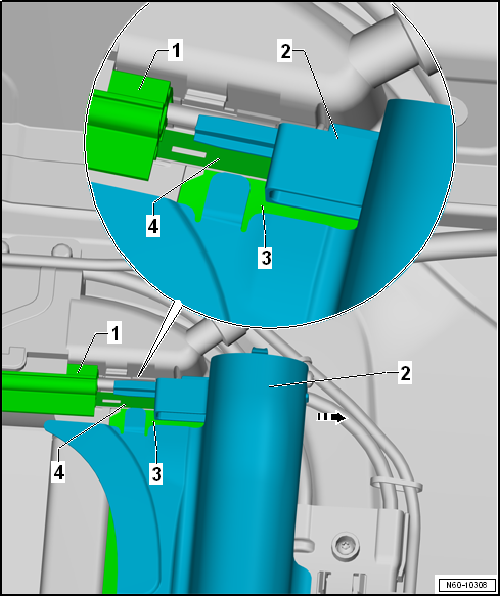
- Remove the screws for the shade cartridge -2- (3.5 Nm).
The following steps are to be performed with a second technician.
- Pull the sun shade cartridge -2- evenly in the direction of the arrow slightly downward so that it can get past the sun shade motor -3-.
Note
Be sure not to damage the shade material -3- .
- Remove the sun shade cartridge -2- and the sun shade steel band -4- parallel in the direction of the -arrow- from the sun shade rail -1- .
Remove the Sun Shade to Replace the Sun Shade Arch.
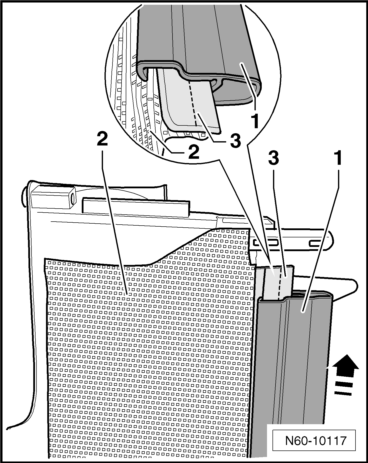
- Carefully remove the sun shade arch -1- in the direction of the -arrow- from the weather strip -3- of the sun shade material -2- .
- Press the new sun shade arch -1- carefully on the weather strip -3-.
Note
Be sure not to damage the shade material -2-
Installing
Note
- The replacement part is delivered in the sun shade cartridge.
- Do not lubricate the sun shade slide and cables.
- The following steps are to be performed with a second technician.
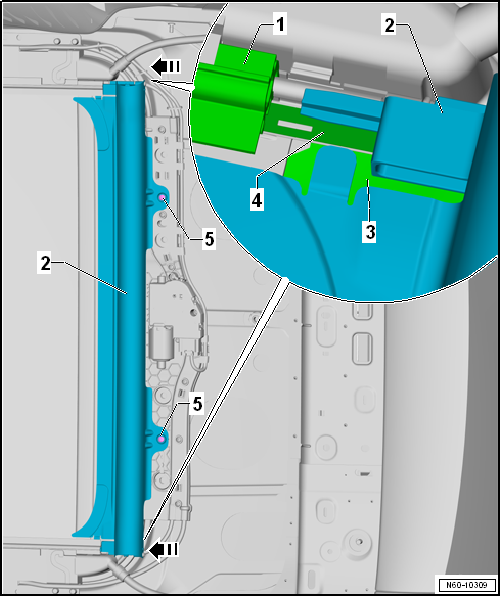
- Push the sun shade cartridge -2- and the sun shade steel band -4- parallel in the direction of the -arrow- into the sun shade rail -1- .
Slide the sun shade cartridge tab -2- under the sun shade rail -1-.
Note
- Be sure not to damage the shade material -3- .
- Tightening Specifications
- Sun shade cartridge screw -5-: 3.5 Nm
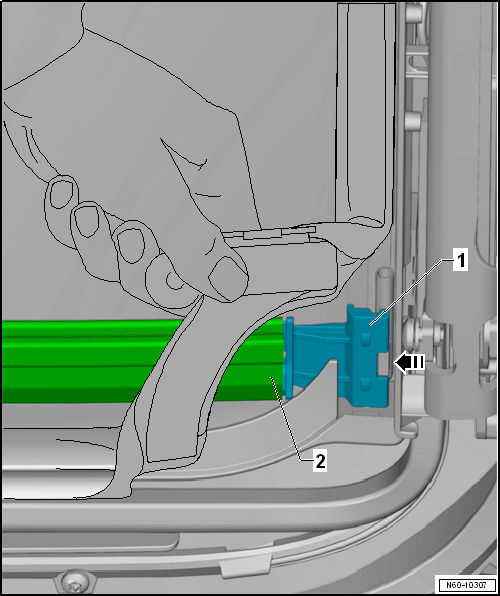
- Press the sun shade slide -1- in the direction of the -arrow- into sun shade arch -2-.
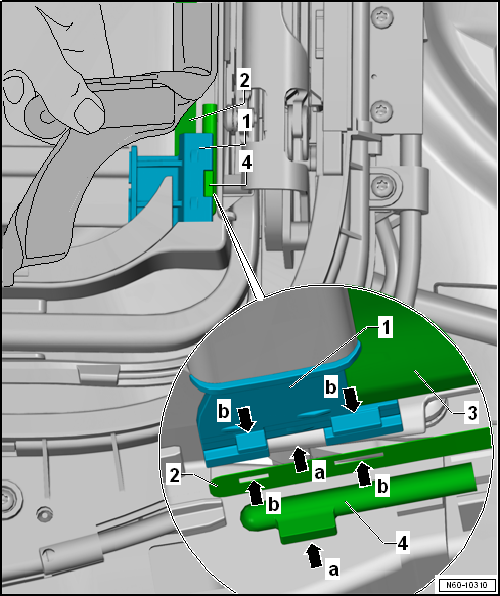
Note
The following steps are performed on one side first and then held together. Then a second technician assembles the other side.
- The opening -arrow a- in the sun shade glide -1- is aligned with the guide -arrow a- on the cable -4-.
- The steel band -2- is positioned so that the openings -b arrows- align with the guides -b arrows- in the sun shade glide -1-.
Tightening Specifications
Screw cap 2 Nm
Note
- Check the sun shade for ease of movement after installing. Using a commercially available hex wrench, manually move the sun shade drive on the motor and make sure there are not creases or folds in the sun shade material.
- Guide the sun shade all the way back by hand. The adaptation procedure begins at the rear position.
Installation is performed in reverse order of the removal.
- Install the headliner.
- Install the rear glass sunroof panel.
- After completing all the work, perform a sun shade motor adaptation.
Overview - Frame
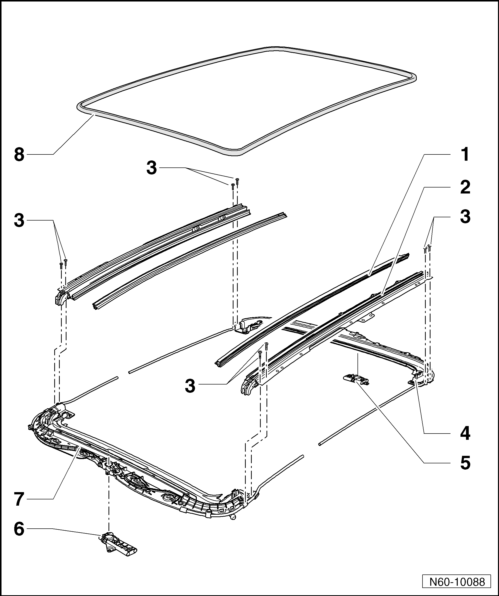
- Sun Shade Rail
- cannot be changed individually
- Guide Rail
- cannot be changed individually
- connected with the front part
- Bolt
- 2 Nm
- Rear Lid Part
- Removing and installing.
- Rear Motor Support
- Removing and installing.
- Front Motor Support
- Removing and installing.
- Front Section
- Cannot be changed individually
- Connected to the guide rail
- Inner Seal
- Replacing.
 Sunroof Motor, Removing and Installing
Removing
Remove front light and control unit.
WARNING
A flat cable is bonded to the brace in the lamp opening in some
versions. Loosen the flat cable from the brace and press it to the side when ...
 Rear Motor Support and Sun Shade Cable, Removing and Installing
Removing
Remove the headliner.
Remove the sun shade motor.
Remove the sun shade.
Remove the screws -arrows- for the cable
covers -1- and -2-
(2 Nm).
Remove the cable covers -1- and
-2- f ...
See More:
Volkswagen Tiguan Service and Repair Manual > Pressures, Checking: Refrigerant Circuit Pressures (with A/C Service Station), Checking
Test Requirements
Note
Check cooling performance. The A/C system is functioning correctly when
the air flowing from the instrument panel vents has a temperature of 70C
or lower.
Setting on Climatronic "LO".
Setting on A/C system "AC" on; "max"; "cold".
Connections with valve and service con ...
Volkswagen Tiguan Owners Manual
Volkswagen Tiguan Service and Repair Manual
- Body exterior
- Body Interior
- General Paint Information
- Paint
- Brake System
- Suspension, Wheels, Steering
- Wheel and Tire Guide
- Towing Guide
- Wheel and Tire Guide General Information
- Communication
- Electrical Equipment General Information
- Electrical Equipment from 06/2011
- Heating, Ventilation and Air Conditioning
- Refrigerant R134a Servicing
- 6-Speed Manual Transmission 02Q, OBB, and OFB
