Volkswagen Tiguan Service and Repair Manual: Bevel Box Components
Overview - Bevel Box Components
- Chapter "Bevel Box, Differentiating".
- Chapter "Overview - Bevel Box Components, 0AV"
- Chapter "Overview - Bevel Box Components, 0CN"
- Chapter "Right Seal, Replacing, for Right Flange Shaft, AWD"
- Chapter "Right Seal, Replacing, on Manual Transmission, Between Manual Transmission and Bevel Box, or Between Manual Transmission and Front Axle Differential Lock"
- Chapter "Seal between Bevel Box and Manual Transmission, Replacing"
- Chapter "Bevel Box Output Flange Seal, Replacing, 0AV (Bevel Box Removed)"
- Chapter "Bevel Box Output Flange Seal, Replacing, 0CN (Bevel Box Removed)"
Output Flange, Replacing; Output Flange Shim, Redetermining
- The bevel box is removed.
The adjustment is necessary whenever the output flange is being replaced. This creates the preload on the tapered roller bearing for the shaft bevel gear.
Bevel Box "0AV":
- Remove the output flange and remove the bearing inner race/tapered roller bearing from the output flange.
Bevel Box "0CN":
- Remove the output flange and remove the bearing inner race/tapered roller bearing from the output flange.
Continuation for All
- Measure the length of the shaft on the old and new output flange to get the difference.
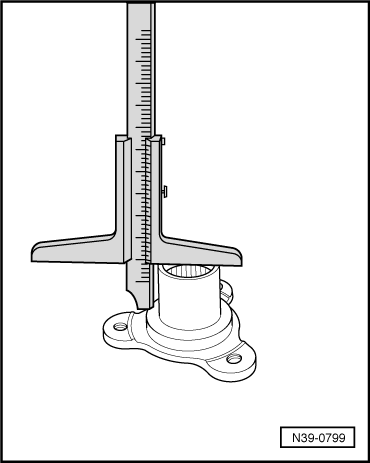
| Example: | ||
| Old output flange | 42.90 mm | |
| New output flange | 43.00 mm | |
| Difference | 0.10 mm | |
If the new output flange is longer- install a thinner shim.
If the previously mentioned output flange is longer- install a thicker shim.Allocation. Refer to the Parts Catalog.
Bevel Box "0AV":- Install the output flange.
Bevel Box "0CN":
- Install the output flange.
Continuation for All
- Install the bevel box.
Needle Bearing (Polygon Bearing) and Needle Bearing Seal on the Right Flange Shaft, Replacing
- Seal Installer - Crankshaft -VW204B-
- Puller - Flanged Shaft -T10037-
- Torque Wrench 1331 5-50Nm -VAG1331-
- Long Hex Socket -VAG1669-
- Press Plate -VW401-
- Press Plate -VW402-
- Not needed: Press Piece - Rod -VW407-
- Not needed: Press Piece - Rod -VW408A-
- Press Piece - Multiple Use -VW412-
- Not needed: Press Piece - 60mm -VW418A-
- Bearing Installer - Needle Bearing -T10047-
- Press Piece - Bushing -VW434-
- Rear Wheel Bearing Kit - Piece 5 -3253/5-
Removing
The right drive axle must be removed later in the procedure.
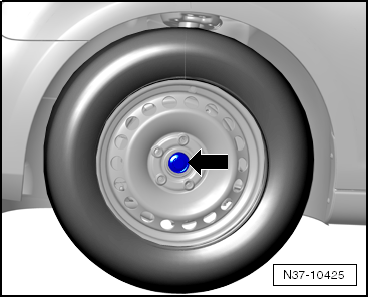
- With the vehicle still standing on its wheels, loosen the right front collar bolt -arrow- a maximum of 90º. Otherwise the wheel bearing will get damaged.
- Remove the noise insulation.
- Remove the heat shield -A- from the drive axle -C--arrows 1-.
The heat shield for the right drive axle is attached with 2 or 3 nuts.
CC, Passat with Parking/Auxiliary Heater
- If installed, remove coolant pipes -B- from bevel box and engine -arrow 2-.
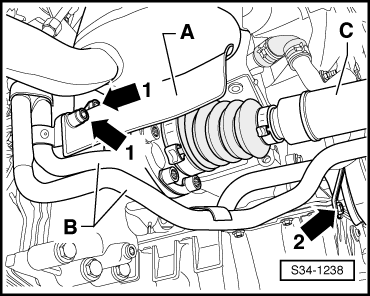
Note
Do not open the coolant system.
Continuation for All
- Remove the right drive axle -
- Place the Drip Tray or Used Oil Collection and Extraction Unit - SMN372500- underneath.
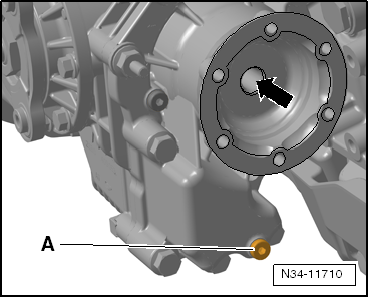
- Drain the fluid from the bevel box, bolt -A-.
- Then install new bolt and tighten.
- Use a Socket Wrench to remove the right flange shaft bolt. Insert two bolts in the flange and counterhold the flange shaft with the pry lever.
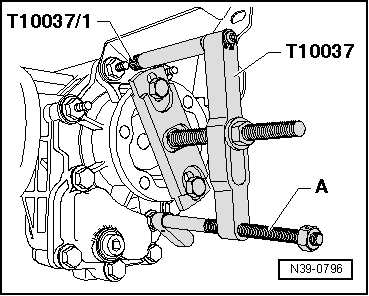
- Attach the Puller - Flanged Shaft -T10037- on the right flange shaft.

Note
To remove the right flange shaft, use the Puller - Flanged Shaft -T10037- to avoid damaging the bearing on flange shaft.
- If necessary, place a spacer (for example, Press Piece - Bushing -VW434-) between the transmission support and the Puller - Flanged Shaft - Knurled Nut -T10371/1-.
- Turn the Spindle-A- and line up the Puller so that is it parallel to the flange.
- Remove the right flange shaft.
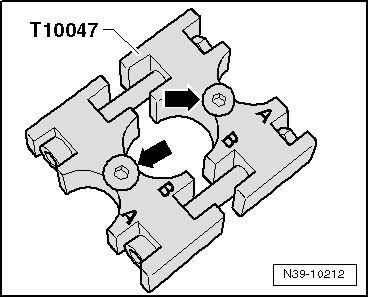
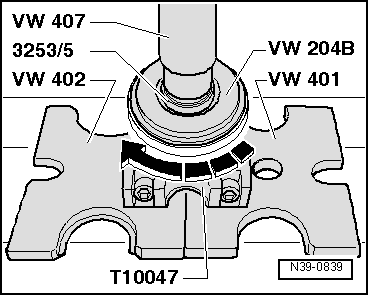
Mount the Bearing Installer - Needle Bearing -T10047- as follows:
- Line up both parts so that the markings "B" face each other.
- The depressions -arrows- must be under the bearing.
- Attach both halves to each other.
- Pry the locking ring -A- out of the needle bearing.
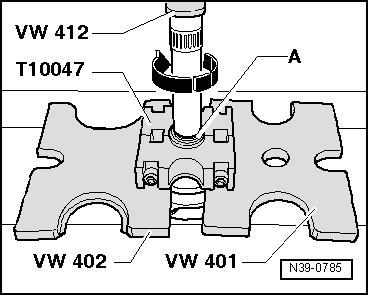
- So that the bearing contact surface on the shaft is not damaged, the shaft must be rotated during the pressing procedure -arrow-.
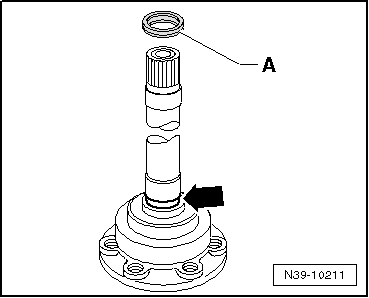
- Remove the seal -A- from the groove -arrow-.

Installing
- Coat the seal -A- with transmission fluid.
- Install the seal -A- into the groove -arrow- in the flange shaft.
Do not twist the seal.
- Install the Bearing Installer - Needle Bearing -T10047- ⇒ Fig. N39-10212.
- Press the flange shaft into the bearing.
- So that the bearing contact surface on the shaft is not damaged, the shaft must be rotated during the pressing procedure -arrow-.
- Secure the needle bearing with a new locking ring.
- Carefully install the flange shaft while rotating it at the same time.
- Attach the flange shaft with screw.
- Fill the gear oil in the bevel box.
- Install the right drive axle -C-.
CC, Passat with Parking/Auxiliary Heater
- Connect the coolant pipes -B- to the double bolts on the bevel box and then connect to the engine -arrow 2-.

Continuation for All
- Install the drive axle heat shield -A--arrows 1-.
The heat shield for the right drive axle is attached with 2 or 3 nuts.
- Install the noise insulation.
Tightening Specification
- Flange shaft (countersunk bolt).
Gear Oil
Gear Oil, Checking Level
- Chapter "Bevel Box Gear Oil Level, Checking"
- Chapter "Gear Oil in Bevel Box, Filling"
 Differential
Overview - Differential
Overview - Differential, Front Wheel Drive
Note
To install, heat the bearing inner races/tapered roller bearing to
approximately 100 ºC (212 ºF) with Inductive Heater -VA ...
 Special Tools
Special tools and workshop equipment required
Puller - Flanged Shaft -T10037-
Seal Installer - Flange Shaft -T10049-
Socket And Extended Bit -T10107A-
Torque Wrench 1331 5-50Nm -VAG1331-
Drip ...
See More:
Volkswagen Tiguan Service and Repair Manual > Wiring Harness and Connector Repairs: Antenna Wires, Repairing
Aerial Cable Repair Set -VAS6720-
Special tools and workshop equipment required
Repair Set, Aerial Cable -VAS6720-
Checking the Antenna Wire.
Replacing the Tool Head.
Cutting the Antenna Wire.
Removing the Insulation from the Shield.
Removing the Outer Jacket of Insulation.
Removing the Inner ...
Volkswagen Tiguan Owners Manual
Volkswagen Tiguan Service and Repair Manual
- Body exterior
- Body Interior
- General Paint Information
- Paint
- Brake System
- Suspension, Wheels, Steering
- Wheel and Tire Guide
- Towing Guide
- Wheel and Tire Guide General Information
- Communication
- Electrical Equipment General Information
- Electrical Equipment from 06/2011
- Heating, Ventilation and Air Conditioning
- Refrigerant R134a Servicing
- 6-Speed Manual Transmission 02Q, OBB, and OFB
