
Volkswagen Tiguan Service and Repair Manual: Overview - Heater and A/C Unit
Overview - Heater and A/C Unit, Climatic
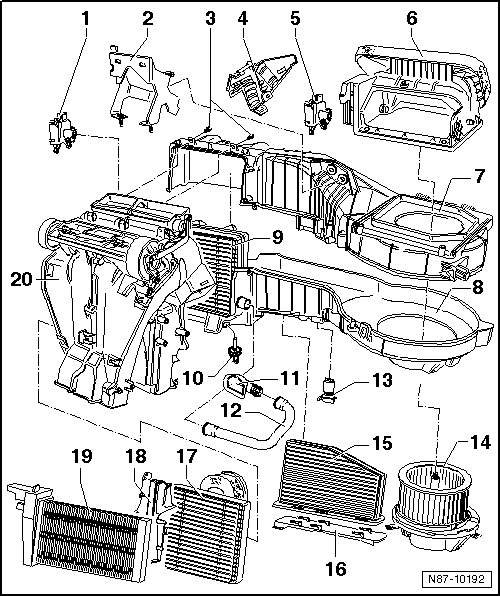
- Temperature Control Door Motor -V68-
- Check using the Vehicle Diagnostic Tester.
- Removing and installing.
- Replacing: initialize the basic setting using the Vehicle Diagnostic Tester.
- Bracket
- Bolts
- It is necessary to remove the bolts in order to separate the bracket from the air distribution and evaporator housing.
- Cover
- Recirculation Door Motor -V113-
- Check using the Vehicle Diagnostic Tester.
- Removing and installing
- Replacing: initialize the basic setting using the Vehicle Diagnostic Tester
- Air Intake Housing
- With air recirculation door
- Evaporator Housing Upper Section
- Evaporator Housing, Disassembling and Assembling.
- Evaporator Housing Lower Section
- Evaporator Housing, Disassembling and Assembling.
- Evaporator
- Removing and installing.
- Evaporator Temperature Sensor -G308- or Evaporator Vent Temperature
Sensor -G263-
- Check using the Vehicle Diagnostic Tester.
- Removing and installing.
Note
One or both of the component designations will appear, depending on software. The tasks are the same.
- Glove Compartment Cooling Connection
- To remove, the glove compartment must be removed.
- Installation position of glove compartment cooling connection.
- Glove Compartment Cooling Coolant Hose
- To remove, the glove compartment must be removed.
- Fresh Air Blower Series Resistor with Fuse -N24-
- Removing and installing.
- Fresh Air Blower -V2-
- Removing and installing.
- Dust and Pollen Filter
- With activated charcoal filter
- Removing and installing.
- Cover
- For dust and pollen filter
- Heater Core
- Removing and installing.
- Heater Core Trim Panel
- Auxiliary Heater Heating Element -Z35-
- Only on vehicles with a diesel engine without an auxiliary heater.
- Checking: using the Vehicle Diagnostic Tester under Heating, Ventilation and Air Conditioning; OBD-Capable Systems; Auxiliary Heater; Electrical Components.
- Removing and installing.
- Junction Box
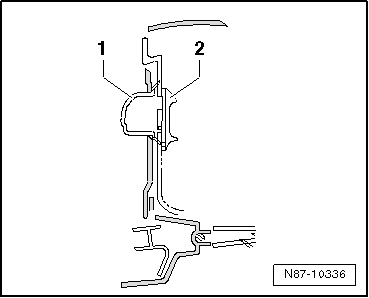
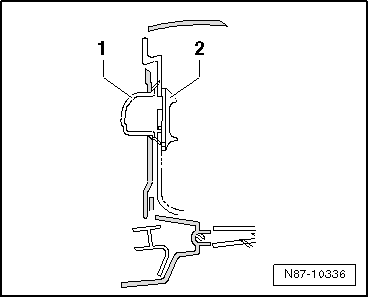
Installation Position of Glove Compartment Cooling Connection
- Connection
- Valve
Overview - Heater and A/C Unit, Electric-Manual Climate Control System
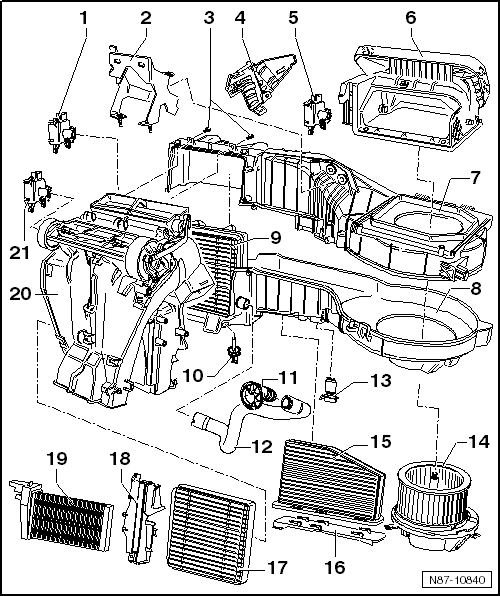
- Temperature Control Door Motor -V68-
- Check using the Vehicle Diagnostic Tester.
- Removing and installing.
- Replacing: initialize the basic setting using the Vehicle Diagnostic Tester.
- Bracket
- Bolts
- It is necessary to remove the bolts in order to separate the bracket from the air distribution and evaporator housing.
- Cover
- Recirculation Door Motor -V113-
- Check using the Vehicle Diagnostic Tester.
- Removing and installing.
- Replacing: initialize the basic setting using the Vehicle Diagnostic Tester.
- Air Intake Housing
- With air recirculation door
- Evaporator Housing Upper Section
- Evaporator Housing, Disassembling and Assembling.
- Evaporator Housing Lower Section
- Evaporator Housing, Disassembling and Assembling.
- Evaporator
- Removing and installing.
- Evaporator Temperature Sensor -G308- or Evaporator Vent Temperature
Sensor -G263-
- Check using the Vehicle Diagnostic Tester.
- Removing and installing.
Note
One or both of the component designations will appear, depending on software. The tasks are the same.
- Glove Compartment Cooling Connection
- To remove, the glove compartment must be removed.
- Installation position of glove compartment cooling connection.
- Glove Compartment Cooling Coolant Hose
- To remove, the glove compartment must be removed.
- Fresh Air Blower Series Resistor with Fuse -N24-
- Removing and installing.
- Fresh Air Blower -V2-
- Removing and installing.
- Dust and Pollen Filter
- With activated charcoal filter
- Removing and installing.
- Cover
- For dust and pollen filter
- Heater Core
- Removing and installing.
- Heater Core Trim Panel
- Auxiliary Heater Heating Element -Z35-
- Only on vehicles with a diesel engine without an auxiliary heater.
- Checking: using the Vehicle Diagnostic Tester under Heating, Ventilation and Air Conditioning; OBD-Capable Systems; Auxiliary Heater; Electrical Components.
- Removing and installing.
- Junction Box
- Air Distribution Door Motor -V428-
- Removing and installing.
Overview - Heater and A/C Unit, Climatronic
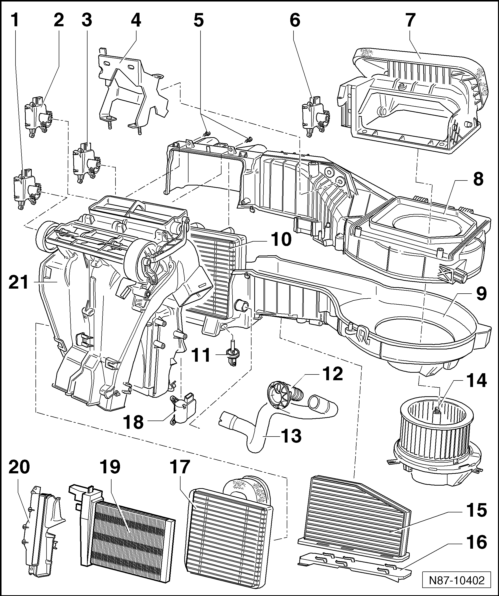
- Front Air Distribution Door Motor -V426-
- Check using the Vehicle Diagnostic Tester.
- Removing and installing.
- Replacing: initiate the basic setting using the Vehicle Diagnostic Tester.
- Left Temperature Control Door Motor -V158-
- Check using the Vehicle Diagnostic Tester.
- Removing and installing.
- Replacing: initiate the basic setting using the Vehicle Diagnostic Tester.
- Defroster Door Motor -V107-
- Check using the Vehicle Diagnostic Tester.
- Removing and installing.
- Replacing: initiate the basic setting using the Vehicle Diagnostic Tester.
- Bracket
- Bolts
- It is necessary to remove the bolts in order to separate the bracket from the air distribution and evaporator housing.
- Quantity: 4
- Fresh Air/Recirculating Air/Back Pressure Door Motor -V425- with Fresh
Air/Recirculating Air/Back Pressure Door Motor Position Sensor -G644-, from
June 2007
- Check using the Vehicle Diagnostic Tester.
- Removing and installing.
- Replacing: initiate the basic setting using the Vehicle Diagnostic Tester.
Note
- Through 12/2003 Fresh/Recirculated Air Door Motor -V154-
- From 01/2004 through 05/2007, Recirculation Door Motor -V113-
- Air Intake Housing
- With fresh air and recirculation door
- With back pressure door (Climatronic)
- Evaporator Housing Upper Section
- Evaporator Housing, Disassembling and Assembling.
- Evaporator Housing Lower Section
- Evaporator Housing, Disassembling and Assembling.
- Evaporator
- Removing and installing.
- Evaporator Vent Temperature Sensor -G263- or Evaporator Temperature
Sensor -G308-
- Check using the Vehicle Diagnostic Tester.
- Removing and installing.
- Glove Compartment Cooling Connection
- Installation position of glove compartment cooling connection.
- Glove Compartment Cooling Coolant Hose
- Fresh Air Blower -V2- with Fresh Air Blower Control Module -J126-
- Check using the Vehicle Diagnostic Tester.
- Fresh Air Blower -V2-, removing and installing.
- Fresh Air Blower Control Module -J126-, removing and installing.
- Dust and Pollen Filter
- With EVAP canister
- Removing and installing.
- Cover
- For the dust and pollen filter
- Heater Core
- Removing and installing.
- Right Temperature Control Door Motor -V159-
- Check using the Vehicle Diagnostic Tester.
- Removing and installing.
- Replacing: initiate the basic setting using the Vehicle Diagnostic Tester.
- Auxiliary Heater Heating Element -Z35-
- Only installed on vehicles with Diesel engine without auxiliary heater.
- Checking: using the Vehicle Diagnostic Tester under Heating, Ventilation and Air Conditioning; OBD-Capable Systems; Auxiliary Heater; Electrical Components.
- Removing and installing.
- Heater Core Trim Panel
- Junction Box
Installation Position of Glove Compartment Cooling Connection
- Connection
- Valve
Overview - Evaporator Housing
- Remove the heater and A/C unit.
- Disconnect the air distribution housing/evaporator housing from the heater and A/C unit.
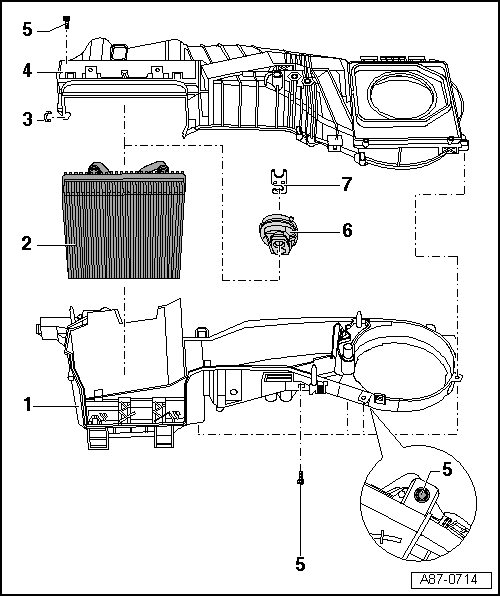
- Evaporator Housing Lower Section
- Disassembling and Assembling.
- Evaporator
- Check insulation, it must be completely present
- Removing and installing.
- Clamp
- Evaporator Housing Upper Section
- Disassembling and Assembling.
- Screw
- Seal/Insulation
- Expansion valve heat insulation
- Removing and installing.
- Bracket
- Removing and installing.
Evaporator, Removing and Installing
Removing
- Remove the heater and A/C unit.
- Disassemble the heater and A/C unit. For vehicles with Climatic.
- Disassemble the evaporator housing.
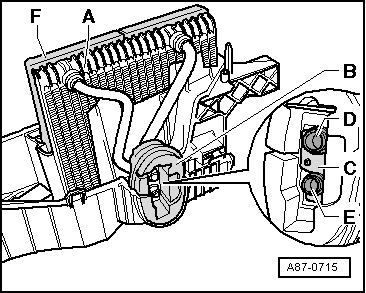
- Remove the evaporator -A- from the evaporator housing lower section.
Installing
Note
- Before inserting the evaporator, check condensation water drain and clean drain if necessary.
- Before inserting evaporator, clean evaporator housing and the evaporator, if necessary.
- When inserting evaporator -A- into lower section of evaporator housing, and when assembling both housing halves, make sure the seal -F- is not damaged.
- Check seal -F- (it must be glued all the way around) before inserting evaporator.
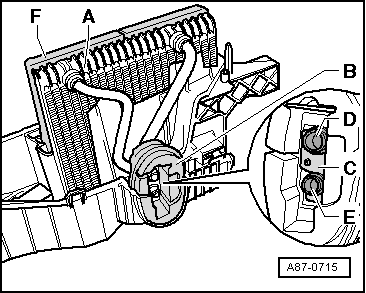
- Mount the bracket -C- and seal/insulation -B- on the evaporator connecting pipes -D- and -E-.
- Insert evaporator -A- into lower section of evaporator housing as shown in the illustration.
Note
- After assembling both housing halves, check the seal / insulation -B- for correct positioning on the holes for both refrigerant lines -D and E-.
- Check seating of bracket -C- on both refrigerant lines -D and E- for correct seating.
- If heat protection insulation -B- is missing or not installed correctly, it can cause reduced performance of the A/C system (change of adjusted control characteristics of expansion valve due to radiant heat).

 Auxiliary Heater Heating Element -Z35-, Checking
Checking the Auxiliary Heater Heating Element -Z35- with Peripheral
Components:
The Auxiliary Heater Heating Element -Z35- with peripheral components (load
signal for generator terminal DF, Low Heat ...
See More:
Volkswagen Tiguan Owners Manual > Trailer towing: Technical requirements
Read and follow the introductory information and
safety information first⇒Introduction
to the subject Use only a weight-carrying trailer hitch designed and approved
for the gross weight of the trailer you want to tow. The trailer hitch must be suitable
for your vehicle and trailer and mu ...
Volkswagen Tiguan Owners Manual
Volkswagen Tiguan Service and Repair Manual
- Body exterior
- Body Interior
- General Paint Information
- Paint
- Brake System
- Suspension, Wheels, Steering
- Wheel and Tire Guide
- Towing Guide
- Wheel and Tire Guide General Information
- Communication
- Electrical Equipment General Information
- Electrical Equipment from 06/2011
- Heating, Ventilation and Air Conditioning
- Refrigerant R134a Servicing
- 6-Speed Manual Transmission 02Q, OBB, and OFB
