Volkswagen Tiguan Service and Repair Manual: Refrigerant Circuit
System Overview - Refrigerant Circuit
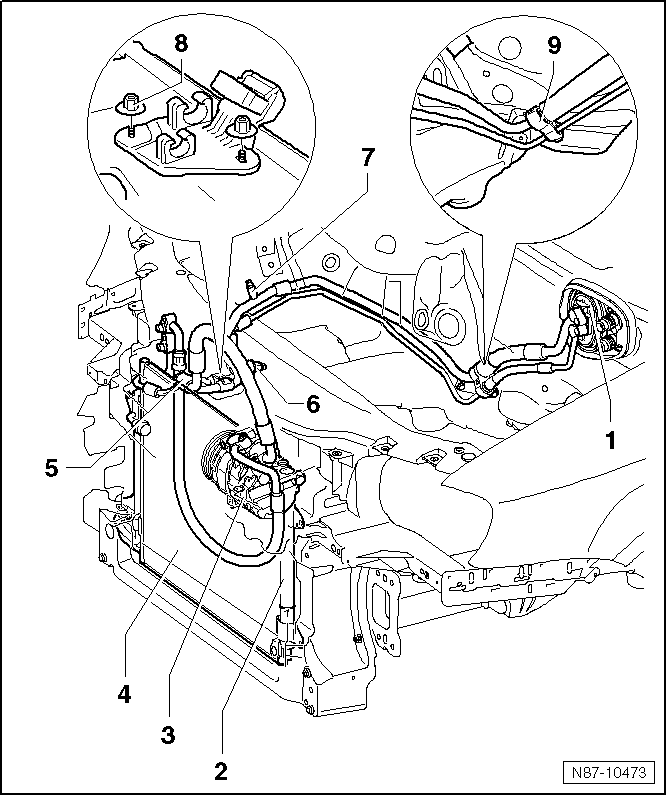
- Expansion Valve
- Function and removal.
- Receiver/Dryer with Dryer
Note
Under certain conditions, receiver/dryer with dryer is no longer to be replaced after each time the refrigerant circuit is opened.
- Removing and installing.
- A/C Compressor
- Removing and installing.
- Condenser
- Removing and installing.
- Bracket
- High Pressure Sensor -G65-
- Removing and installing.
- Evacuating and Charging Valve
- Environmentally hazardous draining of refrigerant is an offense punishable by law.
- Capacities.
- Nut
- 2.5 Nm
- Quantity: 2
- Retaining Bracket
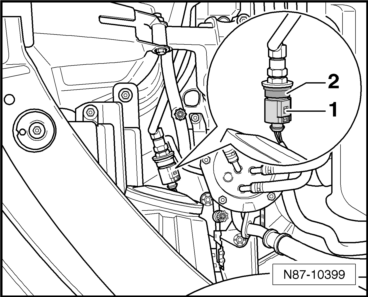
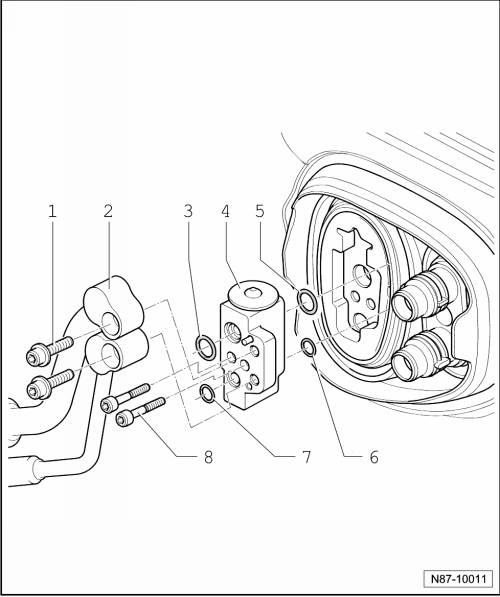
High Pressure Sensor -G65-, Removing and Installing
Special tools and workshop equipment required
- Torque Wrench 1331 5-50Nm -VAG1331-
- Commercially available extra-long 12 edge socket, 1/2" 24- wrench size (Dimensions DxL 32x82 mm
Removing
Note
- The High Pressure Sensor -G65--2- may be installed in a different location near the condenser depending on the engine version.
- To loosen, counterhold the side of the refrigerant line with a suitable tool.
- Remove the engine cover.
- Disconnect the connector -1- from the High Pressure Sensor -G65--2-.
- Remove the High Pressure Sensor -G65--1- from the refrigerant line connection.
Note
Replace the O-ring.
Installing
Install in reverse order of removal.
- Replace the O-ring.
To tighten, counterhold the side of the refrigerant line with a suitable tool.
Tightening specification 8 +- 1 Nm
Expansion Valve, Removing and Installing
The expansion valve atomizes the streaming refrigerant. It controls the flow rate so that the vapor is gaseous only at the evaporator outlet, depending on the heat transmission.
Special tools and workshop equipment required
- Torque Wrench 1331 5-50Nm -VAG1331-
- Engine Bung Set -VAS6122-
- A/C Service Station
Removing
Note
- Extract the refrigerant beforehand using the A/C Service Station.
- The previously used service stations can still be used.
- All open refrigerant circuit components must be sealed with suitable plugs to prevent any humidity from entering them.
- On some vehicles, the connecting pipe should be removed from the charge air cooler.
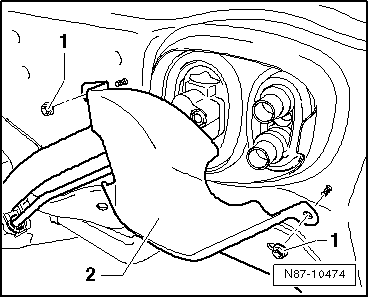
Only for Vehicles with a Heat Shield in Front of the Expansion Valve:
- Remove the nuts -1- (9 +-1.3 Nm).
- Remove the heat shield -2-.
- Place the Shop Crane - Drip Tray -VAS6208- under the engine.
The cooling system is under pressure when the engine is warm. There is a risk of scalding from hot steam and coolant. Burns on the skin and other parts of the body are possible. Wear safety gloves. Wear protective eyewear. Reduce the pressure: cover the coolant reservoir cap with a cloth and carefully open.
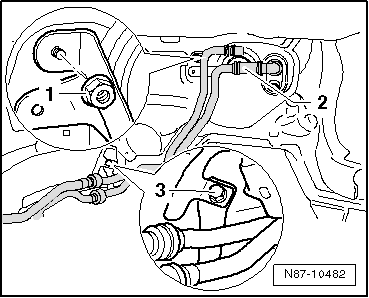
- Disconnect the heater core coolant pipe -2-.
- Remove the nut -1- (9 +- 1.3 Nm) and bolt -3- (9 +-1.3 Nm).
- Lightly pull the coolant pipe in the direction of the engine.
All Vehicles
- Extract the refrigerant using the A/C Service Station.
Danger or frostbite due to refrigerant coming out under pressure.Frostbite on the skin and other parts of the body is possible.Wear safety gloves.Wear protective eyewear.Extract refrigerant and open the refrigerant circuit immediately.If more than 10 minutes elapse after extracting the refrigerant and the refrigerant circuit was not opened, extract the refrigerant again. Pressure develops in the refrigerant circuit due to evaporation.
- Remove the bolts -1- and the refrigerant pipes -2- from the expansion valve.
- Remove the bolts -8- and the expansion valve -4-.
- Bolts
- 10 +- 1 Nm
- Quantity: 2
- Refrigerant Lines on Expansion Valve
- O-Ring
- 13.7 mm; 2.5 mm
- Expansion Valve
- O-Ring
- 14 mm; 1.82 mm
- Coat with refrigerant oil when installing
- O-Ring
- 10.8 mm; 1.82 mm
- Coat with refrigerant oil when installing
- O-Ring
- 9.5 mm; 2.5 mm
- Cylindrical Combination Bolt
- 5 Nm
Installing
- Install in reverse order of removal.
Functions
- The expansion valve atomizes the streaming refrigerant and controls the flow rate so that the vapor is gaseous only at the evaporator outlet, depending on the heat transmission.
Condenser, Removing and Installing
Special tools and workshop equipment required
- Torque Wrench 1331 5-50Nm -VAG1331-
- A/C Service Station
Note
- Extract the refrigerant beforehand using the A/C Service Station.
- The previously used service stations can still be used.
- All open refrigerant circuit components must be sealed with suitable plugs to prevent any humidity from entering them.
Removing
Perform the following work first:
- Turn off all electrical equipment.
- Turn off the ignition.
- Remove the key.
Note
Environmentally hazardous draining of refrigerant is an offense punishable by law.
Danger or frostbite due to refrigerant coming out under pressure.Frostbite on the skin and other parts of the body is possible.Wear safety gloves.Wear protective eyewear.Extract refrigerant and open the refrigerant circuit immediately.If more than 10 minutes elapse after extracting the refrigerant and the refrigerant circuit was not opened, extract the refrigerant again. Pressure develops in the refrigerant circuit due to evaporation.
- Remove the refrigerant lines on the condenser (12 +- 1 Nm) and seal off.
- Remove the radiator.
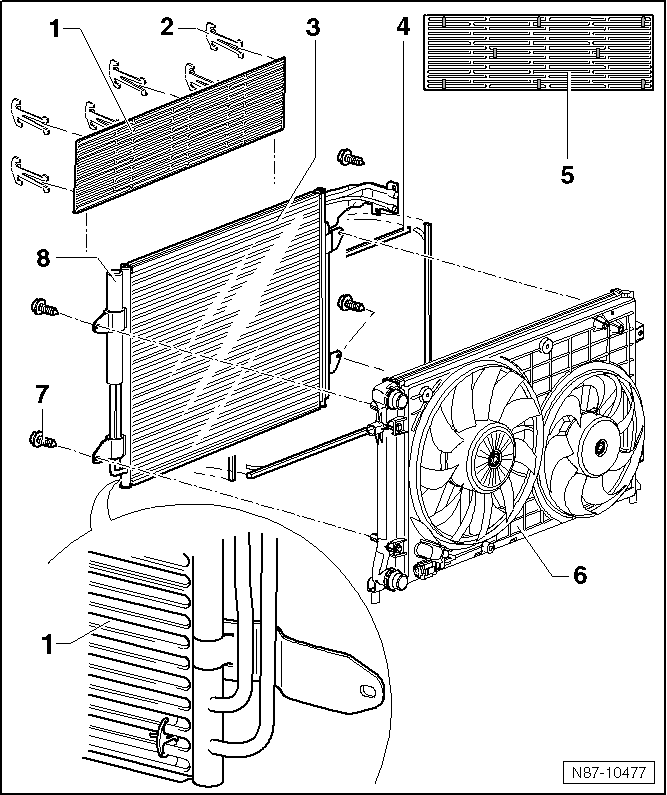
- Grille
- Only for vehicles with rough terrain equipment.
- Installation only with 28º front end
- Clip
- Quantity: 8
- Condenser
- Secure to radiator with 4 bolts
- Sealing Strips
- Adhere the upper sealing strips from above onto the 6th row of fins on the condenser before installing.
- Adhere the lower sealing strips from below onto the 1st row of fins on the condenser before installing.
- Before assembly, attach side sealing strips to outer edge of condenser.
- Clip Installation Diagram
- Radiator
- Bolts
- 5 +- 0.5 Nm
- Quantity: 4
- Receiver/Dryer with Dryer
Under certain conditions, receiver/dryer with dryer is no longer to be replaced after each time the refrigerant circuit is opened.
- Removing and installing.
Installing
- Install in reverse order of removal.
Receiver/Dryer, Removing and Installing
Receiver/Dryer with Dryer, Removing and Installing, Showa
Note
Under certain conditions, receiver/dryer with dryer is no longer to be replaced after each time the refrigerant circuit is opened.
Special tools and workshop equipment required
- Torque Wrench 1331 5-50Nm -VAG1331-
- A/C Service Station
Removing
Note
- See notes. Refer to → Chapter "Working on the Refrigerant Circuit".
- Extract the refrigerant beforehand using the A/C Service Station.
- The previously used service stations can still be used.
- All open refrigerant circuit components must be sealed with suitable plugs to prevent any humidity from entering them.
- There are different bumper covers on this vehicle due to the model change between 06/2011 and 07/2011.
- Extract the refrigerant using the A/C Service Station, only then open the refrigerant circuit.
- On vehicles through 06/2011, also remove the radiator grille.
- Remove the bumper cover.
- Loosen the ATF cooler and lay it on its side (vehicle specific).
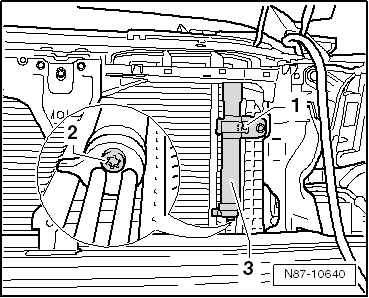
Danger or frostbite due to refrigerant coming out under pressure.Frostbite on the skin and other parts of the body is possible.Wear safety gloves.Wear protective eyewear.Extract refrigerant and open the refrigerant circuit immediately.If more than 10 minutes elapse after extracting the refrigerant and the refrigerant circuit was not opened, extract the refrigerant again. Pressure develops in the refrigerant circuit due to evaporation.
- Remove the clamp bolt -1- (7 Nm).
- Remove the bolt -2-.
- Remove the receiver/dryer with the dryer.
Installing
Install in reverse order of removal.
Note
First tighten the bolt -2- to 4.2 Nm +- 0.7 Nm and then the bolt -1- to 7 Nm.
Dryer Bag/Dryer Cartridge, Removing and Installing
Dryer Bag, Removing and Installing, Modine
Special tools and workshop equipment required
- Commercially available pick-up tool
Removing
- Extract the refrigerant using the A/C Service Station, only then open the refrigerant circuit.
- Remove the cooler packet from the brackets and tilt it towards the rear.
- Loosen the ATF cooler and lay it on its side (vehicle specific).
- Remove the Safety Warning label on the cap.
- Remove the cap.
Danger or frostbite due to refrigerant coming out under pressure.Frostbite on the skin and other parts of the body is possible.Wear safety gloves.Wear protective eyewear.Extract refrigerant and open the refrigerant circuit immediately.If more than 10 minutes elapse after extracting the refrigerant and the refrigerant circuit was not opened, extract the refrigerant again. Pressure develops in the refrigerant circuit due to evaporation.
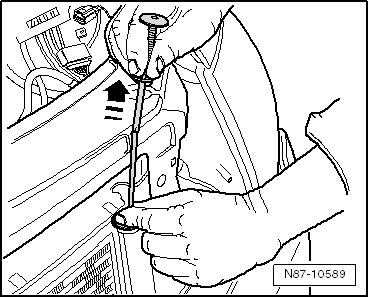
- Remove the ring -arrow- and remove the coolant reservoir cap -1- with the help of a M12 bolt from the condenser -2-.
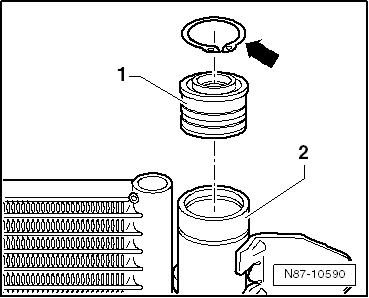
- Remove the dryer bag using a commercially available pick-up tool in the direction of - arrow- from the condenser.
- Make a 2 mm diameter welding wire with the following dimensions.
- 380 mm
- maximum 7 mm
- maximum 6 mm
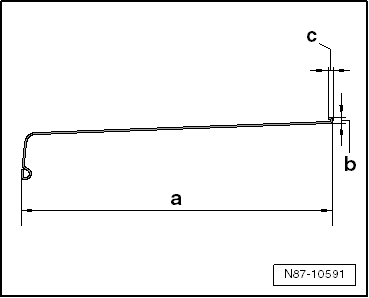
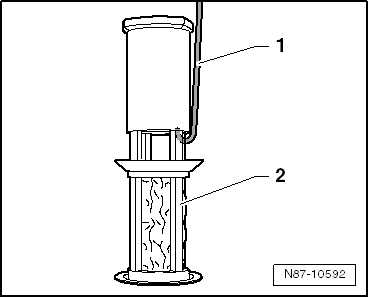
Hook the welding wire to the strainer exactly as illustrated to prevent damaging the condenser.
- Carefully remove the filter (strainer) -2- from the condenser with the welding wire -1-.
Installing
- Install the new strainer in the condenser.
- Guide the dryer bag into the condenser.
Perform remaining installation operations in reverse order of removal.
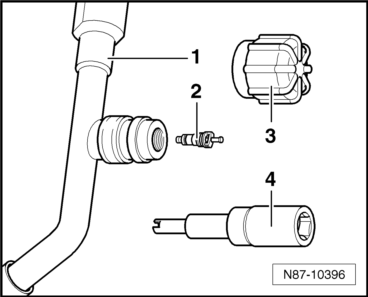
Evacuating and Charging Valve, Removing and Installing, Low and High Pressure Side
Special tools and workshop equipment required
- Torque Wrench 1783 - 2-10Nm -VAG1783-
- Torque Wrench 1783 - 1/4" Drive Ratchet -VAS6234-
- Refrigerant Sockets -T10364-
- A/C Service Station
- Extract the refrigerant circuit using A/C Service Station, only then replace the valve -2-.
Note
- Environmentally hazardous draining of refrigerant is an offense punishable by law.
- To prevent the ingress of dampness, all components of the refrigerant circuit which have been opened must be sealed with suitable plugs.
Danger or frostbite due to refrigerant coming out under pressure.Frostbite on the skin and other parts of the body is possible.Wear safety gloves.Wear protective eyewear.Extract refrigerant and open the refrigerant circuit immediately.If more than 10 minutes elapse after extracting the refrigerant and the refrigerant circuit was not opened, extract the refrigerant again. Pressure develops in the refrigerant circuit due to evaporation.
- Remove the cap -3-.
- Remove the valve insert -2- (2.4 +- 0.2 Nm) with the Refrigerant Sockets -T10364--4- from the refrigerant line -1-.
 Component Location Overview - A/C System
Component Location Overview - in Front Vehicle Interior
Component Location Overview - Inside Front Passenger Compartment, Climatic
Note
A data plate on the lock carrier indicates the refrigerant used ...
 A/C Compressor
Overview - A/C Compressor Power Unit
Screw
22 +- 1 Nm
Screw
25 +- 2 Nm
Quantity: 3
Alignment Sleeve
Quantity: 2
Overview - Belt Pulley
Overview - Belt Pulley, Denso
Note
T ...
See More:
Volkswagen Tiguan Service and Repair Manual > Front Heater and A/C Unit: Heater Core, Removing and Installing
Special tools and workshop equipment required
Shop Crane - Drip Tray -VAS6208-
Hose Clamps - Up To 25mm -3094-
Commercially available compressed-air gun
Engine Bung Set -VAS6122-
Removing
Depending on the engine, the air intake hose between the air filter and
turbocharger also needs to be ...
Volkswagen Tiguan Owners Manual
Volkswagen Tiguan Service and Repair Manual
- Body exterior
- Body Interior
- General Paint Information
- Paint
- Brake System
- Suspension, Wheels, Steering
- Wheel and Tire Guide
- Towing Guide
- Wheel and Tire Guide General Information
- Communication
- Electrical Equipment General Information
- Electrical Equipment from 06/2011
- Heating, Ventilation and Air Conditioning
- Refrigerant R134a Servicing
- 6-Speed Manual Transmission 02Q, OBB, and OFB
