Volkswagen Tiguan Service and Repair Manual: Component Location Overview - A/C System
Component Location Overview - in Front Vehicle Interior
Component Location Overview - Inside Front Passenger Compartment, Climatic
Note
A data plate on the lock carrier indicates the refrigerant used and capacity.
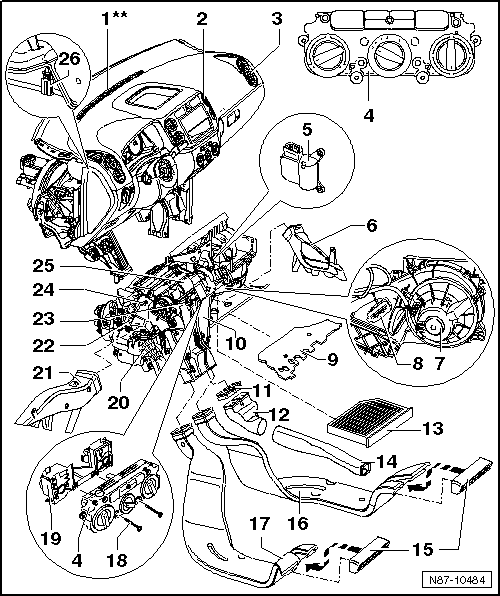
- Instrument Panel
- Center Vent
- Removing.
- Vent
- Removing.
- Climatic Heater and A/C Controls
- With Fresh Air/Recirculation Door Switch -E159-
- Also with Immediate Heating Button -E537- in vehicles with auxiliary heater
- With Rear Window Defogger Button -E230-
- With Fresh Air Blower Switch -E9-
- On vehicles with seat heating also with Heated Driver Seat Adjuster -E94- and Heated Front Passenger Seat Adjuster -E95-
- With A/C Control Module -J301-
- Removing and installing.
- Recirculation Door Motor -V113-
- Checking using the Vehicle Diagnostic Tester.
- Removing and installing.
- Replacing: initiate the basic setting using the Vehicle Diagnostic Tester.
- Right Footwell Vent
- Removing and installing.
- Fresh Air Blower -V2-
- Removing and installing.
- Fresh Air Blower Series Resistor with Fuse -N24-
- Removing and installing.
- Partition from Heater
- Removing.
- Evaporator Temperature Sensor -G308- or Evaporator Vent Temperature
Sensor -G263-
- Removing and installing.
- Closure Caps
- Only in vehicles without air duct to vent installed in center console at rear
- Air Routing
- To remove, the center console must be removed first.
- Dust and Pollen Filter
- With EVAP canister
- Removing and installing.
- Connection
- For the center console air duct
- To remove, the center console must be removed first.
- Air Outlet Grille
- Right Footwell Rear Channel
- Removing and installing.
- Left Footwell Rear Channel
- Removing and installing.
- Screw
- Quantity: 8
- Adapter for Controls
- Heater Core
- Removing and installing.
- Left Footwell Vent
- Removing and installing.
- Temperature Control Door Motor -V68-
- Checking using the Vehicle Diagnostic Tester.
- Removing and installing.
- Replacing: initiate the basic setting using the Vehicle Diagnostic Tester.
- Flexible Shaft
- Removing and installing.
- Footwell Vent Temperature Sensor -G192-
- Removing and installing.
- Heater and A/C Unit
- Removing and installing.
- Disassembling and assembling.
- Center Vent Temperature Sensor -G191-
- Removing and installing.
Component Location Overview - Front Vehicle Interior Components, Climatronic
Note
A data plate indicates the refrigerant used and capacity.
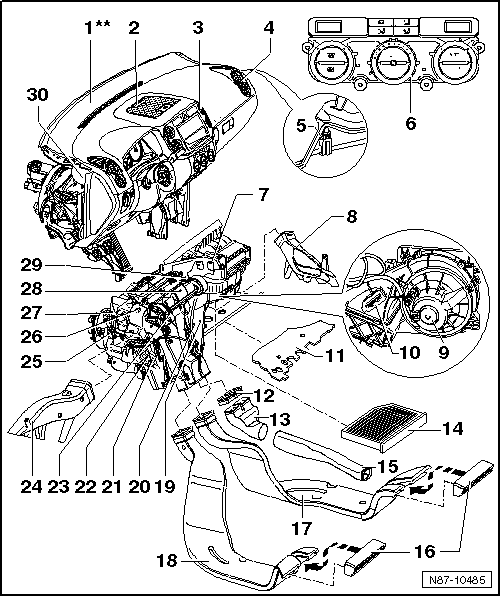
- Instrument Panel
- Removing and installing.
- Sunlight Photo Sensor -G107- or Sunlight Photo Sensor 2 -G134-
- Check using the Vehicle Diagnostic Tester.
- Tasks: Controls temperature door and fresh air blower depending on light intensity
- Emergency running in the event of failure: the Climatronic Control Module -J255- utilizes a fixed value.
- Removing and installing.
- Center Vent
- Removing and installing.
- Vent
- Removing and installing.
- Right Vent Temperature Sensor -G151-
- Check using the Vehicle Diagnostic Tester.
- Removing and installing.
- Climatronic Control Module -J255-
- The Climatronic Control Module -J255- and the Front A/C Display Control Head -E87- are one component that cannot be disassembled.
- Check using the Vehicle Diagnostic Tester.
- Removing and installing.
- Replacing: initialize the basic setting using the Vehicle Diagnostic Tester.
- Fresh Air/Recirculating Air/Back Pressure Door Motor -V425- with Fresh
Air/Recirculating Air/Back Pressure Door Motor Position Sensor -G644-, from
June 2007
- Check using the Vehicle Diagnostic Tester.
- Replacing: initialize the basic setting using the Vehicle Diagnostic Tester.
- Removing and installing.
Note
- Through 12/2003 Fresh/Recirculated Air Door Motor -V154-
- From 01/2004 through 05/2007, Recirculation Door Motor -V113-
- Right Footwell Vent
- Removing and installing.
- Fresh Air Blower -V2- with Fresh Air Blower Control Module -J126-
- Check using the Vehicle Diagnostic Tester.
- Fresh Air Blower -V2-, removing and installing.
- Fresh Air Blower Control Module -J126-, removing and installing.
- Connector
- Partition from Heater
- Removing.
- Closure Caps
- Only in vehicles without the air guide to the vent installed in the rear center console
- Air Routing
- To remove, the center console must be removed first.
- Dust and Pollen Filter
- With activated charcoal filter
- Removing and installing.
- Connection
- Depending on vehicle equipment
- For center console air guide
- To remove, the center console must be removed first.
- Air Outlet Grille
- Depending on vehicle equipment
- Right Footwell Rear Channel
- Removing and installing.
- Left Footwell Rear Channel
- Removing and installing.
- Evaporator Temperature Sensor -G308- or Evaporator Vent Temperature
Sensor -G263-
- Check using the Vehicle Diagnostic Tester.
- Removing and installing.
Note
One or both of the component designations will appear, depending on software. The tasks are the same.
- Temperature Control Door Motor -V159-
- Check using the Vehicle Diagnostic Tester.
- Removing and installing.
- Replacing: initiate the basic setting using the Vehicle Diagnostic Tester.
- Auxiliary Heater Heating Element -Z35-
- Only installed on vehicles with a diesel engine without an auxiliary heater
- Checking: using the Vehicle Diagnostic Tester under Heating, Ventilation and Air Conditioning; OBD-Capable Systems; Auxiliary Heater; Electrical Components.
- Removing and installing.
- Heater Core
- Removing and installing.
- Front Air Distribution Door Motor -V426-
- Check using the Vehicle Diagnostic Tester.
- Removing and installing.
- Replacing: initiate the basic setting using the Vehicle Diagnostic Tester.
- Left Footwell Vent
- Removing and installing.
- Left Temperature Control Door Motor -V158-
- Check using the Vehicle Diagnostic Tester.
- Removing and installing.
- Replacing: initiate the basic setting using the Vehicle Diagnostic Tester.
- Left Footwell Vent Temperature Sensor -G261-
- Check using the Vehicle Diagnostic Tester.
- Removing.
- Defroster Door Motor -V107-
- Check using the Vehicle Diagnostic Tester.
- Removing and installing.
- Replacing: initiate the basic setting using the Vehicle Diagnostic Tester.
- Heater and A/C Unit
- Removing and installing.
- Disassembling and Assembling.
- Right Footwell Vent Temperature Sensor -G262-
- Check using the Vehicle Diagnostic Tester.
- Removing.
- Left Vent Temperature Sensor -G150-
- Check using the Vehicle Diagnostic Tester.
- Removing and installing.
 Air Conditioning
...
 Refrigerant Circuit
System Overview - Refrigerant Circuit
Expansion Valve
Function and removal.
Receiver/Dryer with Dryer
Note
Under certain conditions, receiver/dryer with dryer is no longer to be
replace ...
See More:
Volkswagen Tiguan Owners Manual > Engine oil: Engine oil specifications
Read and follow the introductory information and
safety information first⇒Introduction
to the subject The engine oil used must conform to exact specifications.
Using the proper engine oil is important for the functionality and service life
of the engine. Your engine was factory-filled wit ...
Volkswagen Tiguan Owners Manual
Volkswagen Tiguan Service and Repair Manual
- Body exterior
- Body Interior
- General Paint Information
- Paint
- Brake System
- Suspension, Wheels, Steering
- Wheel and Tire Guide
- Towing Guide
- Wheel and Tire Guide General Information
- Communication
- Electrical Equipment General Information
- Electrical Equipment from 06/2011
- Heating, Ventilation and Air Conditioning
- Refrigerant R134a Servicing
- 6-Speed Manual Transmission 02Q, OBB, and OFB
