Volkswagen Tiguan Service and Repair Manual: Heater
Overview - Heater
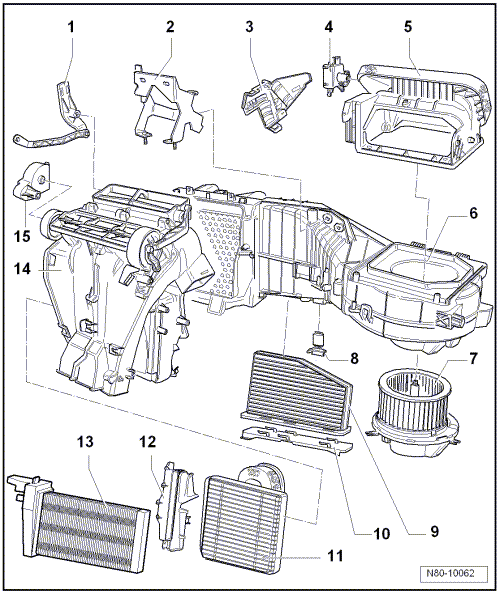
- Temperature Control Door Adjuster
- Removing and installing.
- Bracket
- Cover
- Fresh/Recirculated Air Door Motor -V154-
- Check using the Vehicle Diagnostic Tester.
- Removing and installing.
- Replacing: initialize the basic setting using the Vehicle Diagnostic Tester.
- Air Intake Housing
- With air recirculation door
- Heater
- Disassembling and Assembling.
- Fresh Air Blower -V2-
- Removing and installing.
- Fresh Air Blower Series Resistor with Fuse -N24-
- Removing and installing.
- Dust and Pollen Filter
- Removing and installing.
- Cover
- For dust and pollen filter
- Heater Core
- Removing and installing.
- Heater Core Trim Panel
- Auxiliary Heater Heating Element -Z35-
- A 3-stage Auxiliary Heater Heating Element -Z35- is installed here. It is activated by the respective engine control module via a relay.
- Only installed on vehicles with a diesel engine without an auxiliary heater
- Removing and installing.
- Air Distribution Housing
- Removing and installing.
- Adjuster for Air Distribution Doors
- Removing and installing.
Heater, Removing and Installing
Special tools and workshop equipment required
- Torque Wrench 1331 5-50Nm -VAG1331-
- Hose Clamps - Up To 25mm -3094-
- Shop Crane - Drip Tray -VAS6208-
- Engine Bung Set -VAS6122-
- -Commercially Available Compressed-Air Gun-
Removing
Note
To improve accessibility, additional components (depending on the engine version) such as the engine cover must be removed.
- Remove the instrument panel.
- Loosen the clips -2- and remove the intermediate defrost piece -1- from the heater and A/C unit.
- Remove the intermediate piece -3- from the heater and A/C unit.
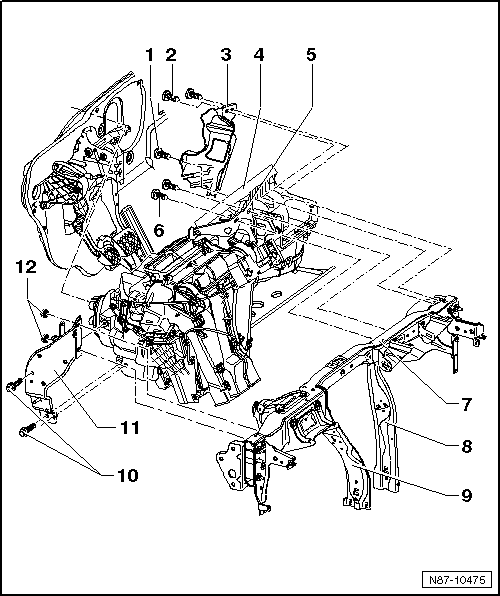
- Remove the subframe.
- Remove the rear channels from the right and left footwells.
- Place the Shop Crane - Drip Tray -VAS6208- under the engine.
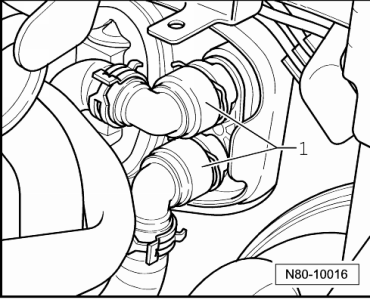
- Mark the coolant hoses -1-.
The cooling system is under pressure when the engine is warm. There is a risk of scalding from hot steam and coolant. Burns on the skin and other parts of the body are possible.Wear safety gloves.Wear protective eyewear.Reduce the pressure: cover the coolant reservoir cap with a cloth and carefully open.
- Clamp off the coolant hoses -1- using the Hose Clamps - Up To 40mm -3093- and disconnect the coolant hoses to the heater core.
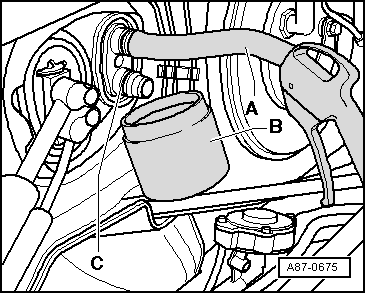
- Connect a section of the hose -A- to the upper connection on the heater core.
- Hold a container -B- under the lower connection -C-.
- Using a compressed air gun, carefully blow residual coolant out of heater core at heater core connection.
- Cover the carpet inside the passenger compartment with waterproof foil and water absorbing paper.
All cable ties and other wiring harness fasteners that were released or cut open when removing the A/C unit are to be reattached in the same position during installation.
The heater wiring harness is removed with the heater.
The tunnel supports -8 and 9- are welded to the subframe -7-.
- Remove the subframe.
- Disconnect the connectors from the heater.
- Remove the bolts -6- from the bracket -5-.
- Remove the bolts -10- and nuts -12- and bracket -11-.
- Remove the bolts -1 and 2- from the cable bracket -3-.
Note
- All cable ties and other wiring harness fasteners that were released or cut open when removing the A/C unit are to be reattached in the same position during installation.
- Pull the heater on the driver side slightly away from the bulkhead to access the bolt -1-.
- When removing the heater, make sure both coolant pipes leading to the heater core do not get caught, bent or damaged on the plenum chamber or noise insulation pan.
- Pay attention to the wiring harness; pulling too hard can damage the individual wire connections.
- Remove the heater.
Note
When removing the bolts, make note of the lengths and allocation.
- Screw
- 4.5 +- 0.7 Nm
- Bolts
- 4.5 +- 0.7 Nm
- Quantity: 2
- Wiring Bracket
- Heater
- Bracket
- Bolts
- 8 Nm
- Subframe
- Right Support
- Secure it to the subframe
- Left Support
- Secure it to the subframe
- Bolts
- 9 +- 1.3 Nm
- Quantity: 2
- Bracket
- Nut
- 9 +- 1.3 Nm
- Quantity: 2
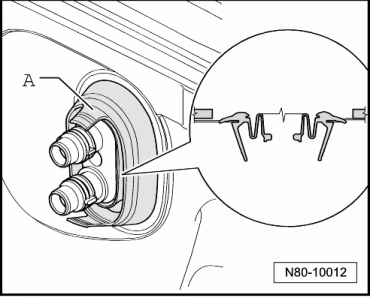
Seal Between Heater and Engine Compartment
Note
Observe the installation position of the seal -A- during assembly.
Installing
Install in reverse order of removal while noting the following:
Note
A second technician is needed to install the heater.
- When inserting the heater, have the second technician guide the coolant pipes to heater core through the seal (from engine compartment out).
- Fill the coolant.
Heater, Disassembling and Assembling
Disassembling

- Remove the heater.
- Remove the air distribution housing.
- Loosen the clips -2- and the bolts -arrows- from the heater.
- Remove the heater.
Assembling
Assemble in reverse order of removal.
 Component Location Overview - Heating
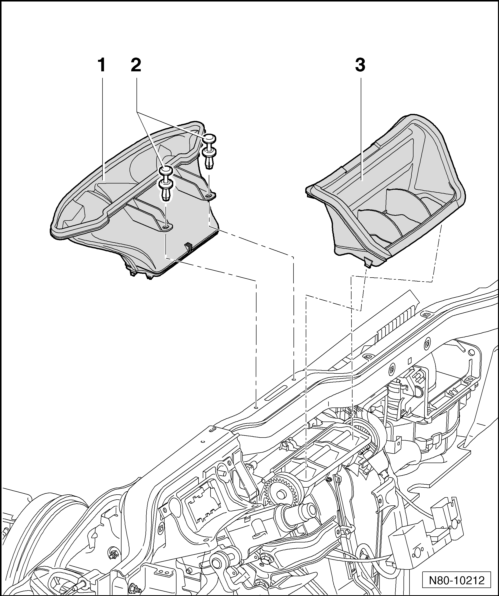
Component Location Overview - in Front Vehicle Interior
Instrument Panel
Center Vent
Vent, Removing.
Front Passenger Vent
Vent, Removing.
Heating and Ventilation Controls
With F ...
 Adjustment Motors
Adjuster for Air Distribution Control Doors, Removing and Installing
Removing
Remove the instrument panel.
Unclip flexible shaft from adapter for controls.
Unscrew bolts -1- and remove the adjust ...
See More:
Volkswagen Tiguan Owners Manual > Lights: Introduction to the subject
In this chapter you will find information on the following subjects:⇒ Indicator
lights
⇒ Turn signal lever and high beam switch ⇒ Switching lights on and off
⇒ Lights and Vision features ⇒ Lights and Vision features
⇒ Coming home and Leaving home feature (orientation li ...
Volkswagen Tiguan Owners Manual
Volkswagen Tiguan Service and Repair Manual
- Body exterior
- Body Interior
- General Paint Information
- Paint
- Brake System
- Suspension, Wheels, Steering
- Wheel and Tire Guide
- Towing Guide
- Wheel and Tire Guide General Information
- Communication
- Electrical Equipment General Information
- Electrical Equipment from 06/2011
- Heating, Ventilation and Air Conditioning
- Refrigerant R134a Servicing
- 6-Speed Manual Transmission 02Q, OBB, and OFB
