Volkswagen Tiguan Service and Repair Manual: Rear Parking Aid
General Information
Note
- Familiarity with the function and operation of the parking aid is needed if there are customer concerns.
- Refer to Owner's Manual.
The rear parking aid system, or PDC (Park Distance Control), assists the driver while backing-up by indicating acoustically the distance to an obstruction behind the vehicle. The parking assistance switches on automatically whenever Reverse gear is engaged.
There are differences in vehicles with rear parking aid and those with front parking aid or parallel parking assist. The front parking aid is part of the parallel parking assistance. Information on the park assist sensors is found in.
The rear parking aid system consists of:
- Rear Parking Aid Control Module -J446-
- Rear Parking Aid Warning Buzzer -H15-
- Left Rear Parking Aid Sensor -G203-
- Left Rear Parking Aid Sensor -G204-
- Right Rear Center Parking Aid Sensor -G205-
- Right Rear Parking Aid Sensor -G206-
Malfunction Recognition and Malfunction Indicator:
The parking aid system is equipped with OBD, which assists in Fault Finding.
Use the Vehicle Diagnostic Tester in "Guided Fault Finding".
To check the entire parking aid system, perform the output diagnostic test mode.
Overview - Rear Parking Aid
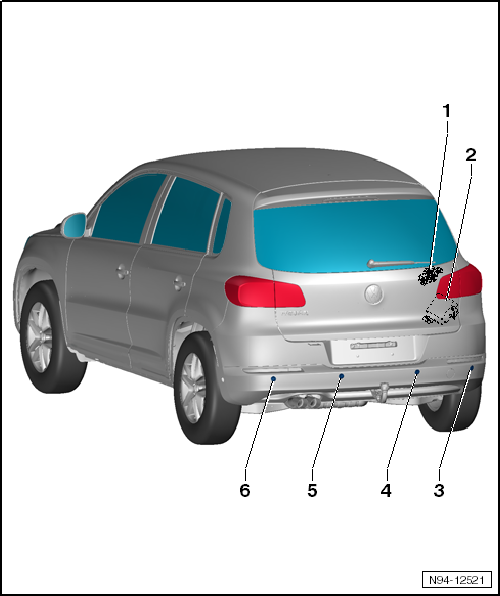
- Rear Parking Aid Warning Buzzer -H15-
- Component location: in the luggage compartment behind the right side trim panel
- Removing and Installing.
- Rear Parking Aid Warning Buzzer -H15- Volume, Adjusting.
- Rear Parking Aid Control Module
- Component location: on vehicles without front parking aid and/or parallel parking assistance: behind the right trim panel near the tail lamps
- Removing and installing.
- Component location: for vehicles with front parking aid and/or parallel parking assistance: in the driver footwell, behind the instrument panel relay panel on the left.
- Removing and Installing.
Note
- The Parking Aid Control Module -J446- controls the parking assistance functions on vehicles equipped with parking assistance in the rear bumper cover only.
- The Parallel Parking Assistance Control Module -J791- controls the parking assistance functions on vehicles that are also equipped with front parking aid and/or parallel parking assistance.
- Right Rear Parking Aid Sensor -G206-
- Component location: in the rear bumper cover
- Removing and installing.
- Right Rear Inner Parking Aid Sensor -G335-
- Component location: in the rear bumper cover
- Removing and installing.
- Left Rear Inner Parking Aid Sensor -G334-
- Component location: in the rear bumper cover
- Removing and installing.
- Left Rear Parking Aid Sensor -G203-
- Component location: in the rear bumper cover
- Removing and installing.
Rear Parking Aid Control Module
General Information
The Parking Aid Control Module -J446- controls the parking assistance functions on vehicles equipped with a parking assistance in the rear bumper cover only. The Parking Aid Control Module -J446- is located behind the right side trim panel near the tail lamp.The Parallel Parking Assistance Control Module -J791- controls the parking assistance functions on vehicles that are also equipped with front parking aid or parallel parking assistance. The Parallel Parking Assistance Control Module -J791- is located behind the instrument cluster.
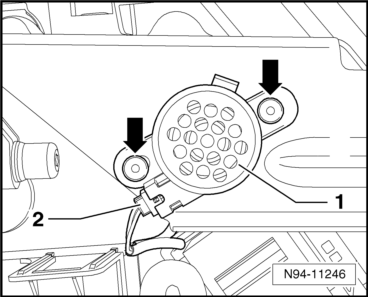
Rear Parking Aid Control Module -J446-, Removing and Installing
Removing
- Switch off the ignition and all electrical consumers and remove the ignition key.
- Remove the right side trim panel inside the luggage compartment.
- Disconnect the connector -2-.
- Remove both expanding rivets -arrows- and remove the Parking Aid Control Module -J446--1-.
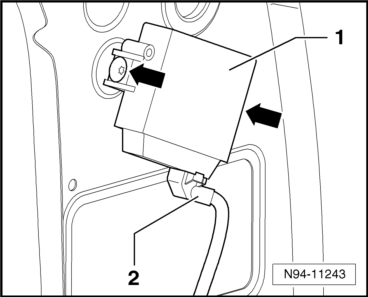
Installing
Install in reverse order of removal.
Rear Parking Aid Control Module -J446-, Coding
- Code the rear Parking Aid Control Module -J446- using the Vehicle Diagnostic Tester.
Lowering Audio System Volume, Adjusting
Lowering the audio system volume can be adjusted with this function.
- Adjust the lowering audio system volume using the Vehicle Diagnostic Tester.
Parking Aid, Adjusting Optical Illustration
This function adjusts the optical illustration for the parking aid.
- Adjust the parking aid visual display using the Vehicle Diagnostic Tester.
Rear Parking Aid Sensor
Rear Parking Aid Sensor, Removing and Installing
The following four sensors are located in rear bumper cover:
- Left Rear Parking Aid Sensor -G203-
- Left Rear Inner Parking Aid Sensor -G334-
- Right Rear Inner Parking Aid Sensor -G335-
- Right Rear Parking Aid Sensor -G206-
Note
The removal and installation of the rear parking aid sensors is performed the same way for all sensors.
Removing
- Switch off the ignition and all electrical consumers and remove the ignition key.
Caution
Always follow the sequence for removing the sensor.
Otherwise, the sensor may be damaged. Hairline cracks which lead to sensor failure can develop if too much force is used on the sensor.
First remove the sensor from the bracket and then disconnect the connector from the sensor.
- Remove the rear bumper cover.
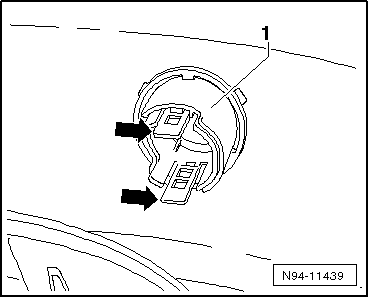
- Push the retainers -arrows- on the sensor bracket -1- toward the outside and pull the sensor -2- out of the bracket with the wires still connected.
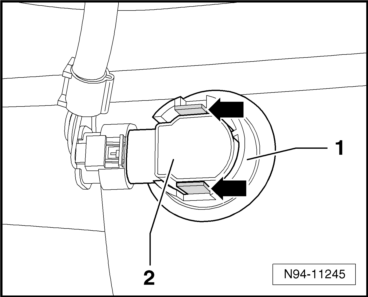
Note
- When removing the sensor, make sure that the decoupling ring (black silicone ring) remains on the sensor head and does not remain in the bracket or get lost.
- Do not bend the decoupling ring.
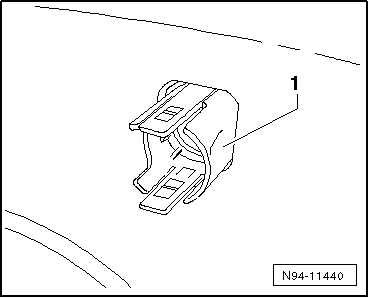
- Disconnect the connector -2- and remove the sensor -1-.
Installing
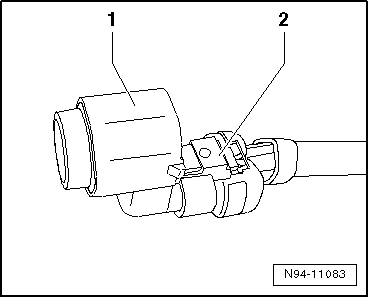
Install in reverse order of removal. Note the following:
Caution
A damaged coupling ring can cause malfunctions.
Do not bend the decoupling ring.
Replace damaged decoupling rings.
Note
- When installing the sensor, make sure the decoupling ring is correctly mounted on the sensor head and that it does not fall off or roll up when being inserted into the sensor bracket.
- Both locking mechanisms on the sensor mount must audibly engage when installing the sensor.
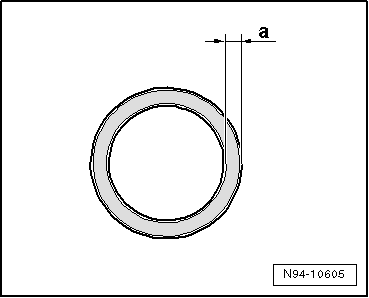
- Make sure the sensor is seated correctly in the bracket after installation. Dimension -a- for the circular gap between the sensor head and bumper cover must be visibly even all around on the outer side of the bumper cover.
Rear Parking Aid Sensor Mount, Replacing
General Information
The sensor mounts in the rear bumper cover are made of two pieces and they are clipped into the bumper cover. The new sensor mounts must be painted to match the color of the bumper cover before installing.
- Rear bumper cover sensor mount, painting.
- Parking aid sensor mount allocation to installation location in rear bumper cover.
- Sensor mount in rear bumper cover, removing and installing.
Rear Bumper Cover Parking Aid Sensor Mount, Painting
The new sensor mounts must be painted to match the color of the bumper cover before installing. The following requirements must be observed when painting the sensor mounts to ensure the parking aid system will work correctly.
- Use isopropyl alcohol to de-grease the new sensor mounts in the area to be painted -1-.
- Paint the sensor mounts in the area to be painted -1- the same color as the bumper cover.
Note
Only paint the inside of the sensor mount in the indicated area. If this is not observed, it may lead to difficulty when assembling or malfunctions in the parking aid system.
Parking Aid Sensor Mount Allocation to Installation Location in Rear Bumper Cover
Sensor mounts are designed in different shapes and must be matched to the respective component location in the rear bumper cover.
Parking Aid Sensor Mount Allocation in Inner Side of Rear Bumper Cover:
- OR - Outer Right
- RRC - Rear Right Center
- LRC - Left Rear Center
- LR - Outer Rear

Parking Aid Sensor Mount in Rear Bumper Cover, Removing and Installing
Removing
- Remove the parking aid sensor from the rear bumper cover.
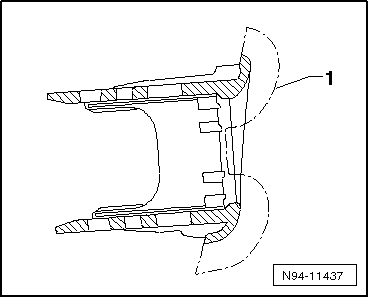
- Squeeze both retainers -arrows- to release the outer ring -1-.
- Remove the outer ring -1- from the sensor mount toward the rear.
- Pull the sensor mount -1- toward the outside and out of the hole in the bumper cover.
Installing
Install in reverse order of removal. Note the following:
Note
Make sure the openings for the sensor connection are facing in the right direction when installing the sensor mount as illustrated. The sensors wires will be too short if the sensor bracket is installed in the wrong direction.
Rear Parking Aid Warning Buzzer -H15-
Rear Parking Aid Warning Buzzer -H15-, Removing and Installing
The Rear Parking Aid Warning Buzzer -H15- is located behind the right side trim panel.
Removing
- Remove the right side trim panel inside the luggage compartment.
- Disconnect the connector -1-.
- Loosen the expanding rivets -arrows- and remove the Rear Parking Aid Warning Buzzer -H15--1-.
Installing
Install in reverse order of removal.
Rear Parking Aid Warning Buzzer -H15- Volume, Adjusting, Vehicles without Parallel Parking Assistance
The Rear Parking Aid Warning Buzzer -H15- is located behind the right side trim panel.On vehicles with front parking aid or parallel parking assistance, the Parallel Parking Assistance Control Module -J791- controls the parking aid functions. For this reason, the Rear Parking Aid Warning Buzzer -H15- is adjusted via the Parallel Parking Assistance Control Module -J791- on vehicles with parallel parking assistance or front parking aid.
Rear Parking Aid Warning Buzzer -H15- Tone, Adapting, Vehicles without Parallel Parking Assistance
The Rear Parking Aid Warning Buzzer -H15- is located behind the right side trim panel.
- For vehicles without parallel parking assistance, adjust the Rear Parking Aid Warning Buzzer -H15- tone using the Vehicle Diagnostic Tester.
 Access/Start Authorization, KESSY
General Information
Caution
To disconnect and connect the battery, always follow the procedure as
described in the repair manual.
Note
Additional information:
Refer to the Owner's Manual.
Refer to ...
 Front Parking Aid
General Information
Note
Familiarity with the function and operation of the parking aid is needed
if there are customer concerns.
Refer to Owner's Manual.
The front parking aid system, or PDC (P ...
See More:
Volkswagen Tiguan Owners Manual > Tires and wheels: Glossary of tire and loading terminology
Read and follow the introductory information and
safety information first⇒Introduction
to the subject Accessory weight
The combined weight (in excess of those standard items which may be replaced)
of automatic transmission, electro-mechanical power steering, power brakes, power
windows, ...
Volkswagen Tiguan Owners Manual
Volkswagen Tiguan Service and Repair Manual
- Body exterior
- Body Interior
- General Paint Information
- Paint
- Brake System
- Suspension, Wheels, Steering
- Wheel and Tire Guide
- Towing Guide
- Wheel and Tire Guide General Information
- Communication
- Electrical Equipment General Information
- Electrical Equipment from 06/2011
- Heating, Ventilation and Air Conditioning
- Refrigerant R134a Servicing
- 6-Speed Manual Transmission 02Q, OBB, and OFB
