Volkswagen Tiguan Service and Repair Manual: Windshield Washer System
General Information
Note
Additional information:- Refer to the Owner's Manual.
- Refer to Self Study Program; No 404; The Tiguan.
- Refer to → Wiring diagrams, Troubleshooting & Component locations
Note
Two different versions of the washer fluid reservoir may be installed depending on the vehicle equipment. Vehicles with headlamp washer system is shown in the following illustrations.
Overview - Windshield Washer System
Note
Two different versions of the washer fluid reservoir may be installed depending on the vehicle equipment. Vehicles with headlamp washer system is shown in the illustration.
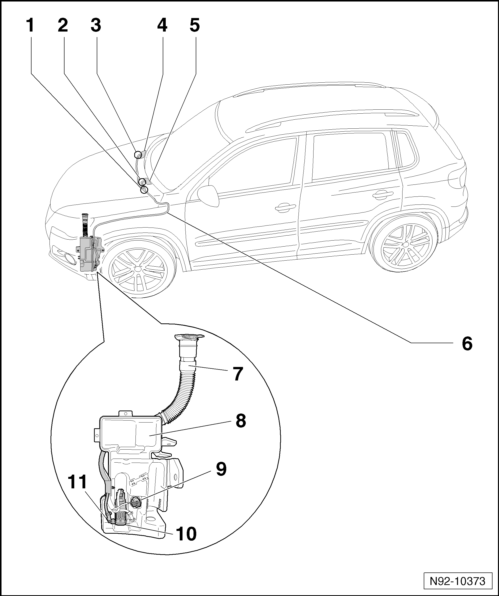
- Y-Connection
- Divides washer fluid line to the windshield washer spray nozzles.
- Elbow
- Connection at spray nozzle for windshield washer system, left
- Overview - washer fluid hose couplings.
- Elbow
- Connection at spray nozzle for windshield washer system, right
- Overview - washer fluid hose couplings.
- Right Spray Nozzle for Windshield Washer System
- Removing and installing.
- Adjusting.
- Left Spray Nozzle for Windshield Washer System
- Removing and installing.
- Adjusting.
- Hose
- Hose repair.
- Connecting Pipe with Filler Tube to Reservoir
- Removed and installed together with reservoir.
- Tank for Window Washer System
- Removing and installing.
- Tightening specification for the bolts and nuts that secure the reservoir to the body: 8 Nm
- Windshield Washer Fluid Level Sensor -G33-
- No replacement part
- Removing and installing.
- Windshield and Rear Window Washer Pump -V59-
- Removing and installing.
- Angle Coupling
- Connection to Windshield and Rear Window Washer Pump -V59-
- Overview - washer fluid hose couplings.
No Illustration:
- Bolts: windshield washer fluid reservoir to body - 8 Nm
- Bolt: horn retaining plate to longitudinal member - 20 Nm
Tank for Window Washer System
Windshield Washer Fluid Reservoir, Removing and Installing
Note
Two different versions of the washer fluid reservoir may be installed depending on the vehicle equipment. The reservoir on a vehicle with a headlamp washer system is shown in the following illustrations. Removing and installing a reservoir on a vehicle without a headlamp washer system is identical.
Removing
- Switch off the ignition and all electrical consumers and remove the ignition key.
- Remove the front bumper cover.
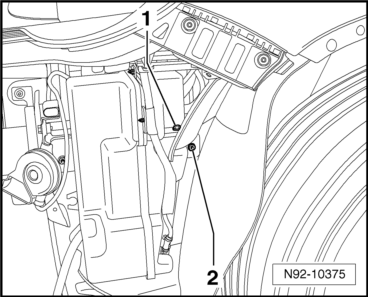
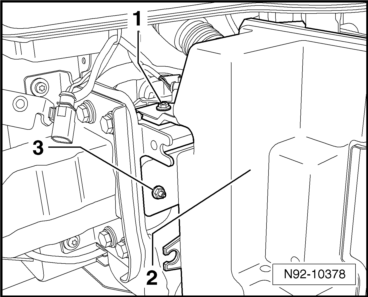
- Unclip the connecting tube with the filler tube -1- from the bracket -2-.

- Remove the bolt -1- and nut -2-.
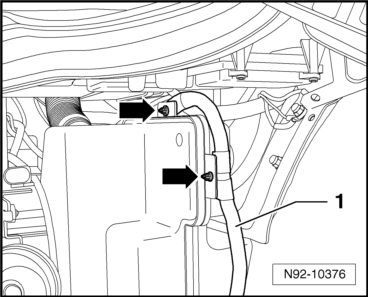
- Unclip the wiring harness -1- from both retainers -arrows- on the windshield washer fluid reservoir.
Note
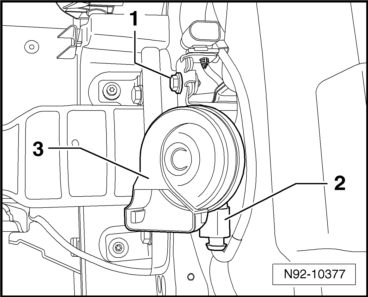
The horn must be removed in order to access the front mountings for the washer fluid reservoir.
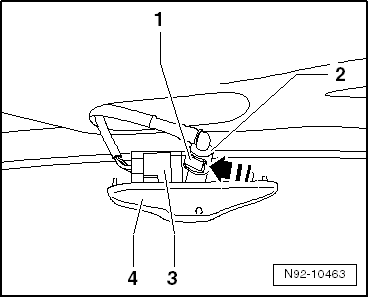
- Remove the bolt -1-, disconnect the connector -2- and remove the horn -3-.
- Remove the bolt -1- and nut -3-.
- Remove the washer fluid reservoir -2-, while being careful of connected wires, and lay it to the side.
Note
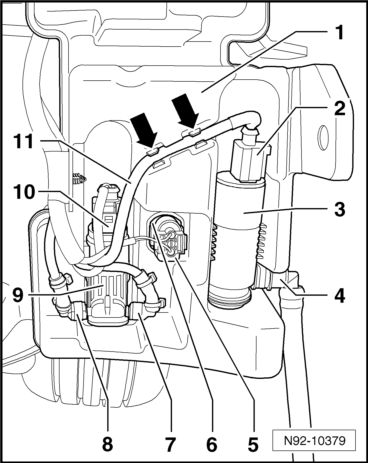
In order to prevent interchanging washer fluid line connections at Windshield and Rear Window Washer Pump -V59-, connections at pump and hose lines are color-coded. The hose connections must be connected to the corresponding colored pump connections during installation.
- Turn the clips on the hose connections -7- and -8- to unlock them and then pull the hose connections -7- and -8- off the Windshield and Rear Window Washer Pump -V59--9-.
- Catch any draining washer fluid in a suitable container.
- Turn the clips on the hose connection -4- to unlock them and then pull the hose connection -4- off the Headlamp Washer Pump -V11--3-.
- Disconnect the connector -5- from the Windshield Washer Fluid Level Sensor -G33--6-.
- Unclip the wiring harness -11- from the reservoir -arrows-.
- Pull the Headlamp Washer Pump -V11--3- out of the reservoir and disconnect the connector -2-.
- Pull the Windshield and Rear Window Washer Pump -V59--9- out of the reservoir and disconnect the connector -10-.
- Remove the reservoir -1-, together with the connecting tube and filler tube, from the vehicle.
Installing
Install in reverse order of removal. Note the following:
Note
When installing, position the horn so that it does not touch any of the surrounding components.
- Tighten all threaded connections to the tightening specifications given in the assembly overview.
- Bleed the headlamp washer system after completing the assembly work.
Windshield and Rear Window Washer Pump -V59-
Windshield and Rear Window Washer Pump -V59-, Removing and Installing
Note
Depending on equipment, location of Windshield and Rear Window Washer Pump -V59- may differ slightly from illustrations. Removal is identical.Removing
- Switch off the ignition and all electrical consumers and remove the ignition key.
- Remove the left front wheel housing liner.
Note
In order to prevent interchanging washer fluid line connections at Windshield and Rear Window Washer Pump -V59-, connections at pump and hose lines are color-coded. The hose connections must be connected to the corresponding colored pump connections during installation.
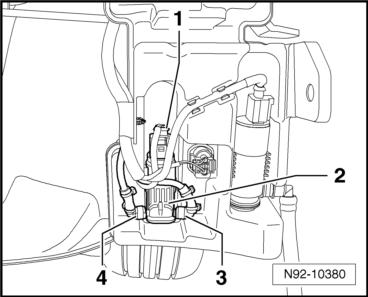
- Turn the clips on the hose connections -3- and -4- to unlock them and then pull the hose connections -3- and -4- off the Windshield and Rear Window Washer Pump -V59--2-.
- Catch any draining fluid in a suitable container.
- Pull the Windshield and Rear Window Washer Pump -V59--2- out of the reservoir.
- Disconnect the connector -1-.
Installing
Install in reverse order of removal. Note the following:
- Tighten all threaded connections to the tightening specifications given in the assembly overview.
- Bleed the headlamp washer system after completing the assembly work.
Windshield Washer Fluid Level Sensor -G33-
Windshield Washer Fluid Level Sensor -G33-, Removing and Installing
The Windshield Washer Fluid Level Sensor -G33- is not available as a separate replacement part. If the Windshield Washer Fluid Level Sensor -G33- needs to be replaced, the washer fluid reservoir must be replaced with the Windshield Washer Fluid Level Sensor -G33-.
Windshield Washer Fluid Reservoir, Removing and Installing.
Spray Nozzles, Windshield Washer System
Spray Nozzles for Windshield Washer System, Removing and Installing
Removing
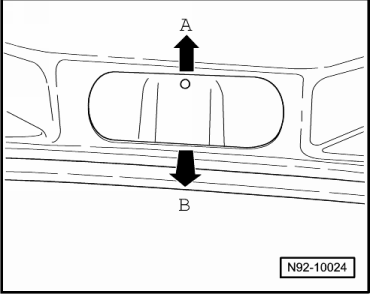
- Push the nozzle first upward -arrow A- and then toward the rear and pull it out -arrow B-.
- Release the hose clip -1- in the direction of -arrow- and remove the hose connection -2- from the spray nozzle.
- If the vehicle has heated spray nozzles, disconnect the connector -3- and remove the spray nozzle -4-.
Installing
- Connect the connector -3- to the spray nozzle.
- Attach the hose -2- to the spray nozzle and secure it with the clip -1-.
- Insert the spray nozzle -4- into the opening starting at the top until it clicks into place.
- Adjust the spray nozzles.

Windshield Washer System Spray Nozzles, Adjusting
Note
In the case of an uneven spray pattern due to contaminants in the spray nozzle, the spray nozzle must be removed and rinsed with water against the spray direction. It is then permitted to blow compressed air opposite the spray direction. Do not use any objects to clean the spray nozzles!
- Adjusting washer nozzles for front windshield washer system .
 Windshield Wiper System
General Information
Caution
Always follow the procedure as described in the Repair Manual when
disconnecting and connecting the battery.
NoteAdditional information:
Refer to the Owner's Manual.
Re ...
 Rear Window Wiper System
General Information
Caution
Always follow the procedure as described in the Repair Manual when
disconnecting and connecting the battery.
NoteAdditional information:
Refer to the Owner's Manual.
Re ...
See More:
Volkswagen Tiguan Owners Manual > Consumer information: Radio antenna and reception
Read and follow the introductory information and
safety information first⇒Introduction
to the subject If the radio and navigation systems were installed at the factory,
the radio antenna may be installed in different locations in the vehicle:
On the inside of the rear window with the r ...
Volkswagen Tiguan Owners Manual
Volkswagen Tiguan Service and Repair Manual
- Body exterior
- Body Interior
- General Paint Information
- Paint
- Brake System
- Suspension, Wheels, Steering
- Wheel and Tire Guide
- Towing Guide
- Wheel and Tire Guide General Information
- Communication
- Electrical Equipment General Information
- Electrical Equipment from 06/2011
- Heating, Ventilation and Air Conditioning
- Refrigerant R134a Servicing
- 6-Speed Manual Transmission 02Q, OBB, and OFB
