Volkswagen Tiguan Service and Repair Manual: "Premium 8" Radio System
General Information
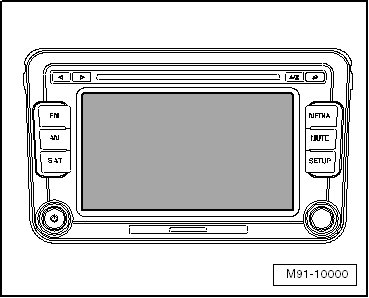
Radio Premium 8
Note
- Familiarity with the function and operation is needed if there are customer concerns. Refer to the Owner's Manual.
- Anti-theft code is equipped with protection code number.
- When performing servicing or Fault Finding see Vehicle Diagnostic Tester.
- After connecting the Battery -A-, check all the vehicle accessories such as the radio, the clock and the convenience electronics.
The "Premium 8" radio has the following features:
- Display: TFT (thin film transistor), touch screen
- Integrated 6-disc CD changer
- SD Card Reader
- UHV Low/Premium
- Optional integrated Radio System, Satellite -R146-
- 4 speaker channels, each with 20 W
- Connection for Multimedia System Control Module -J650-
- Connection for the External Audio Source Connection -R199-
- Connection for an external CD Changer -R41-
- Connectable external sound amplifier (Amplifier -R12-)
- OPS (Optical Parking System)
- A/C information shown in the radio display
- Optional support for the multifunction steering wheel
- Convenience coding
- TIM (traffic information memory)
The integrated CD changer can play the following formats:
- Audio CD
- CD-R
- CD-R
- MP3
It is not possible to play the following formats:
- 8 cm CDs
- "Mix CDs" (CDs containing files and audio files)
The internal CD changer has a transportation safeguard, which must be deactivated when a new Radio -R- is installed. Likewise, the transportation safeguard must be switched on, before a removed Radio -R- can be shipped. The Radio -R- must be connected to a power supply when doing this.
The antenna is located in rear window on sedan models. The antennas on the wagon model are located in the rear side window and in the roof antenna. The antenna system includes an integrated diversity function inside the Radio -R-.
TroubleshootingThe "Premium 8" is equipped with OBD.
For troubleshooting, use the Vehicle Diagnostic Tester in the "Guided Fault Finding" function.Repairing Antenna Wires
A new repair concept has been developed for repairing antenna wires. Instead of a complete antenna wire, connecting wires of different lengths and various adapter leads are now available as replacement parts.Repairing antenna wires.
Overview - "Premium 8" Radio System
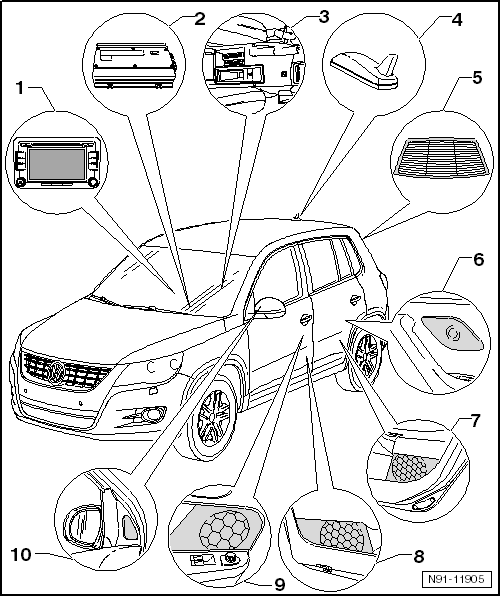
- Radio -R-
- Connectors.
- Transport protection, activating/deactivating.
- Removing and installing.
- Amplifier -R12-
- Under the left front seat
-
- In center console
- External Multimedia Device Interface -R215-.
- CD Changer -R41-.
- External Audio Source Connection -R199-.
- Satellite Tuner Antenna -R172-
- Roof Antenna
- Antenna systems.
- Antenna -R11-/Radio Antenna 2 -R93-
- Antenna systems.
- Rear Treble Speaker
- Inside the left and right rear doors
- Speaker systems.
- Rear Bass Speaker
- Inside the left and right rear doors
- Speaker systems.
- Front Bass Speaker
- Inside the left and right front doors
- Speaker systems.
- Front Midrange Speaker
- Inside the left and right front doors
- Speaker systems.
- Front Treble Speaker
- Inside the left and right mirror triangle/A-pillar
- Speaker systems.
"Premium 8", Connector
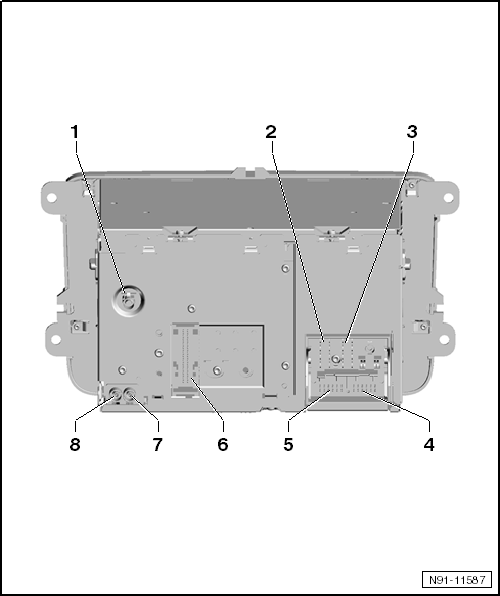
- Antenna Connection
- SAT
- Antenna systems.
- 8-Pin Multi-Pin Connector 1, Speaker Outputs
- Terminal assignment.
- 8-Pin Multi-Pin Connector 2, CAN Bus, Voltage Supply
- Terminal assignment.
- 12-Pin Multi-Pin Connector 3, Telephone
- Terminal assignment.
- Multi-Pin Connector 4, 12-pin, CD Changer -R41-/External Audio Source
Connection -R199-/ External Multimedia Device Interface -R215-
- Terminal assignment.
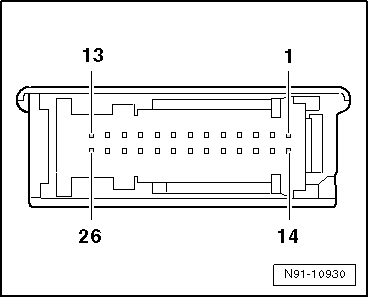
- 26-Pin multi-Pin Connector 5, Video and LF Input
- Terminal assignment.
- Antenna Connection
- FM2
- Antenna systems.
- Antenna Connection
- AM/FM
- Antenna systems.
8-Pin Multi-Pin Connector 1, Speaker Outputs
- Right Rear Speaker (+)
- Right Front Speaker (-)
- Left Front Speaker (+)
- Left Rear Speaker (+)
- Right Rear Speaker (-)
- Right Front Speaker (-)
- Left Front Speaker (+)
- Left Rear Speaker (-)

8-Pin Multi-Pin Connector 2, CAN Bus, Voltage Supply
- CAN Bus (High)
- CAN Bus (Low)
- Terminal 31
- Terminal 30
- Anti-Theft Alarm System (SAFE), Terminal 30

12-Pin Multi-Pin Connector 3, Telephone
- Microphone Input (-)
- Right Audio Output (+)
- Audio Output Ground
- Microphone Output (-)
- Telephone, Low Frequency Signal Input Left (-)
- Telephone, Low Frequency Signal Input Right (-)
- Microphone Input (+)
- Left Audio Output (+)
- Microphone Output (+)
- Telephone, Mute
- Telephone, Low Frequency Signal Input Left (+)
- Telephone, Low Frequency Signal Input Right (+)

Multi-Pin Connector 4, 12-Pin, CD Changer -R41-/External Audio Source Connection -R199-/ Multimedia System Control Module -J650-
- Left audio input (+) External Audio Source Connection -R199-/Multimedia System Control Module -J650-
- Audio input ground External Audio Source Connection -R199-/Multimedia System Control Module -J650-
- Audio ground from CD Changer -R41-
- Terminal 30 to the CD Changer -R41-
- Not assigned
- DATA OUT to the CD Changer -R41-
- Right audio Iinput (+) External Audio Source Connection -R199-/Multimedia System Control Module -J650-
- Audio left from CD Changer -R41-
- Audio right from CD Changer -R41-
- Control signal to CD Changer -R41-
- DATA IN from the CD Changer -R41-
- CLOCK from the CD Changer -R41-
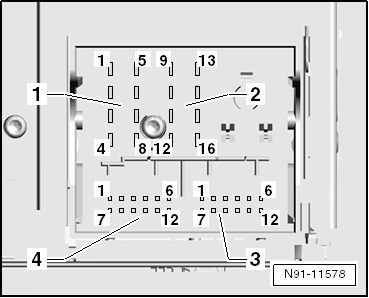
26-Pin Multi-Pin Connector 5, Video and LF Input
- Ground Shield
- Video Output LF Right
- Video Output Ground
- Video Output Sync
- Video Output Green
- Ground Shield
- Video Input LF Right
- Video Input Ground
- Video Input Sync
- Video Input Green
- Video Output LF Ground
- Video Output LF Left
- Video Output RGBS (-)
- Video Output LF Ground
- Video Output LF Left
- Video Output RGBS (-)
- Video Output Blue
- Video Output Red
- Video Output LF (-)
- Video Input LF Left
- Video Input RGBS (-)
- Video Input Blue
- Video Input Red
Transportation Safeguard, Activating and Deactivating
The transport protection must be activated before shipping the "Premium 8" and must be deactivated whenever a new "Premium 8" is installed. This is done electronically using the buttons on the Radio -R-. After activating the transport protection, the internal CD changer is in the "transportation position".
Transportation Safeguard, Activating
Status: "ON" The wire connections must be connected to the Radio -R-.
- Press and hold the buttons -arrows- together for at least five seconds.

"CDC transport protection activated" appears in the radio display once the CD changer has reached its transportation position.
Transportation Safeguard, Deactivating
- Connect and install the Radio -R-.
- Press and hold the buttons -arrows- together for at least five seconds.
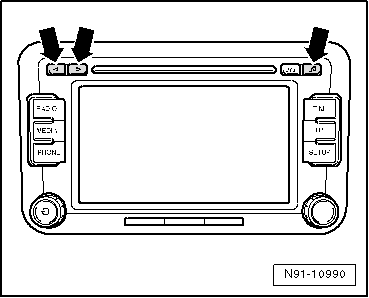
"CDC transport protection activated" appears in the radio display.
Underneath the "deactivating" button also appears.
- Press "deactivate" on the touch screen.
Now the transport protection is deactivated.
Electronic Anti-Theft Protection
General Information
The Radio -R- is equipped with anti-theft coding, which operates in conjunction with the instrument cluster.
After disconnecting the radio power supply, the Radio -R- is ready for use again once the power supply is connected. The radio code does not need to be entered again. The requirement is that the anti-theft coding must be activated for the first time and that the Radio -R- is reconnected in the same vehicle.
Use the Vehicle Diagnostic Tester to get the anti-theft code.
Note
The Vehicle Diagnostic Testermust be "online" (connected to the network) in order to get the anti-theft code and the user must be authorized to access radio codes.
Electronic Anti-Theft Protection, Deactivating
Reactivating a locked Radio -R- is only possible by entering the correct anti-theft code for anti-theft coding.
Using the Vehicle Diagnostic Tester to Get the Anti-Theft Code:
- Connect the Vehicle Diagnostic Tester.
- Select the Guided Fault Finding mode.
- Use the GO TO button to select the "function/component selection" and the following menu options one after the other:
- Body
- Electrical Equipment
- 01-OBD-capable system
- Corresponding radio system
- Radio system functions
- Radio code inquiry
Authorization will be requested from the system: Then the operating data, the VIN and the Radio -R- device number will be automatically read out.
Note
The Vehicle Diagnostic Tester may not be able to read the Radio -R- device number when a new Radio -R- is installed. In this case, enter the serial number manually. The serial number can be found on a sticker on the Radio -R- and is also stamped into the side of the unit.
The Vehicle Diagnostic Tester will display the anti-theft code.Manually enter the anti-theft code in the Radio -R-.
Deactivating the Electronic Anti-Theft Protection- Switch on the Radio -R-.
An input screen appears.
- Enter the correct anti-theft code using the keyboard on the input screen.
- Press the input button to confirm in the entry.
Use the correction button to erase an incorrect code.
If the wrong code number was entered when overriding the anti-theft coding, first "SAFE" blinks in the display and "1000" appears again. The entire procedure can now be repeated one more time. The number of tries is shown in the display. If a wrong code number is entered again, the Radio -R- will lock up for approximately one hour. This lock is indicated by the word "SAFE" appearing continuously in the display. After one hour, then the procedure for deactivating the anti-theft system can be repeated. Remember: Always two attempts, after that the Radio -R- will be locked for one hour."Premium 8", Adapting Components
Procedure
- Connect the Vehicle Diagnostic Tester.
- Select the Guided Fault Finding mode.
- Use the GO TO button to select the "function/component selection" and the following menu options one after the other:
- Body
- Electrical Equipment
- 01-OBD-capable system
- Corresponding radio system
- Radio system functions
 "Premium 7" Radio System
General Information
Premium 7 Radio
Note
Familiarity with the function and operation is needed if there are
customer concerns. Refer to the Owner's Manual.
Anti-theft coding is equipped with prot ...
 "RNS 300" Radio Navigation System
General Information
RNS 300 Radio Navigation System
Note
The part number for the radio/navigation is on a label located on the
radio/navigation housing.
If radio navigation system is replaced, al ...
See More:
Volkswagen Tiguan Owners Manual > Climate control / Heating and air conditioning: Introduction to the subject
In this chapter you will find information on the following subjects:⇒ Controls
⇒ Air conditioner operation ⇒ Air vents
⇒ Air recirculation Manual air conditioning (AC) and Climatronic
Your vehicle is equipped either with a Manual A/C climate control system
or with a Climatroni ...
Volkswagen Tiguan Owners Manual
Volkswagen Tiguan Service and Repair Manual
- Body exterior
- Body Interior
- General Paint Information
- Paint
- Brake System
- Suspension, Wheels, Steering
- Wheel and Tire Guide
- Towing Guide
- Wheel and Tire Guide General Information
- Communication
- Electrical Equipment General Information
- Electrical Equipment from 06/2011
- Heating, Ventilation and Air Conditioning
- Refrigerant R134a Servicing
- 6-Speed Manual Transmission 02Q, OBB, and OFB
