Volkswagen Tiguan Service and Repair Manual: Drive Axle
Overview - Drive Axle
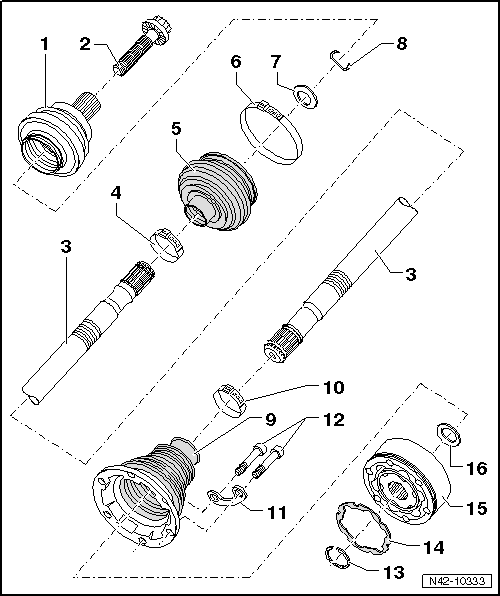
- Outer CV joint
- Replace only as a complete unit.
- Removing.
- Installing: Using a plastic hammer, drive onto the shaft as far as the stop
- Bolt
- Always replace if removed
- There are different versions.
WARNING
- There are two types of twelve-point bolts, with and without ribs. Distinguishing characteristics.
- When installing a twelve-point bolt, always check what type of twelve-point bolt is to be used.
- Use the correct tightening specification for the specific bolt.
- The tightening specification for a twelve-point bolt "with" ribs is 70 Nm + 90º.
- The tightening specification for a twelve-point bolt "without" ribs is 200 Nm + 180º.
- Allocation. Refer to the Parts Catalog.
- Drive Axle
- Allocation. Refer to the Parts Catalog.
- Clamp
- Always replace if removed
- Tensioning.
- CV Boot
- Check for tears and scuffing
- Material: Hytrel polyelastomer
- Clamp
- Always replace if removed
- Tensioning.
- Plate Spring
- With inner spline
- Installation position.
- Circlip
- Always replace if removed
- Insert in shaft groove
- CV Boot for CV Joint
- Material: Hytrel polyelastomer
- Without vent hole
- Check for tears and scuffing
- Drive off CV joint using drift
- Coat the sealing surface with -D 454 300 A2- before installing it on the CV joint
- Clamp
- Always replace if removed
- Tensioning.
- Backing Plate
- Internal Multi-Point Bolt
- 40 Nm
- First tighten to 10 Nm in a diagonal sequence, then tighten to tightening specification in a diagonal sequence
- M8 x 48
- After disassembly, always replace bolts
- Circlip
- Always replace if removed
- Remove and install using Circlip Pliers -VW161A-
- Seal
- Always replace if removed
- Bonding surface on CV joint must not have any grease or oil on it.
- Inner CV Joint
- Replace only as a complete unit.
- Removing.
- Installing.
- Checking.
- Plate Spring
- With inner spline
- Installation position.
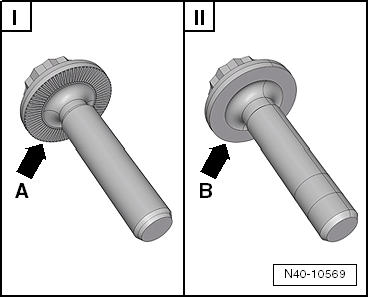
Difference between A Twelve-Point Bolt with Ribs and A Twelve-Point Bolt without Ribs
The contact surfaces -arrow A- and -arrow B- are different on the two-point bolts.
- Twelve-point bolt with ribs -arrow A-
- Twelve-point bolt without ribs -arrow B-

Twelve-Point Bolt with Ribs, Loosening and Tightening, Driveshaft Threaded Connection
Special tools and workshop equipment required
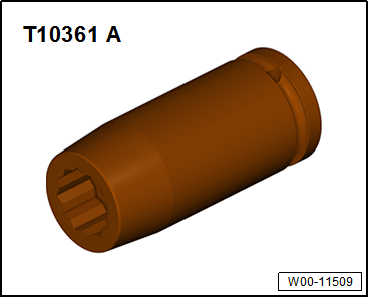
- Socket - AF 24 mm -T10361A-
- Digital Torque Wrench -VAG1756A-
Difference between A Twelve-Point Bolt with and A Twelve-Point Bolt without Ribs
The contact surfaces -arrow A- and -arrow B- are different on the two-point bolts.
- Twelve-point bolt with ribs -arrow A-
- Twelve-point bolt without ribs -arrow B-

Caution
The wheel bearing must not be under load when the drive axle threaded connection on the wheel side is loose.
If the wheel bearings are under the load of the vehicle weight, the wheel bearing will be damaged. This reduces the service life of the wheel bearings.
The drive axle bolt may be loosened maximum 90º when the vehicle is standing on its wheels.
Vehicles without a drive axle must not be moved, otherwise the wheel bearing will be damaged. If a vehicle must be moved, be sure to note the following:
- Install an outer joint in place of the drive axle.
- Tighten the outer joint to 120 Nm.
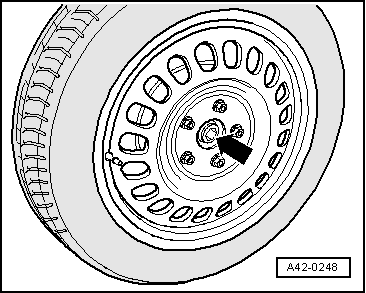
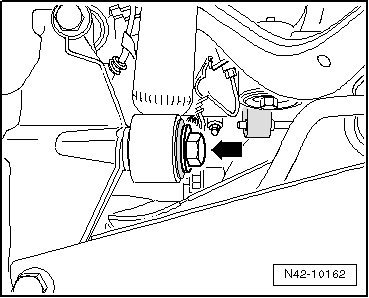
Loosening the Twelve-Point Bolt
- With vehicle still standing on its wheels, loosen the 12-point bolt a maximum of 90º, otherwise wheel bearing will be pre-damaged.
- Raise vehicle enough that wheels hang freely.
- Apply the brakes (second mechanic required).
- Remove the twelve-point bolt -arrow-.
Twelve-Point Bolt, Installing
- Replace the 12-point bolt.
Note
Wheels must not yet touch the ground when tightening the drive axle or the wheel bearing can be damaged.
- Apply the brakes (second technician required).
- Tighten the twelve-point bolt to 70 Nm.
- Lower the vehicle onto its wheels.
- Tighten the twelve-point bolt an additional 90º.
Twelve-Point Bolt without Ribs, Loosening and Tightening, Driveshaft Threaded Connection
Special tools and workshop equipment required
- Socket AF 24 mm -T10361A-
- Digital Torque Wrench -VAG1756A-
Difference between A Twelve-Point Bolt with Ribs and A Twelve-Point Bolt without Ribs
The contact surfaces -arrow A- and -arrow B- are different on the two-point bolts.
- Twelve-point bolt with ribs -arrow A-
- Twelve-point bolt without ribs -arrow B-
Caution
The wheel bearing must not be under load when the drive axle threaded connection on the wheel side is loose.
If the wheel bearings are under the load of the vehicle weight, the wheel bearing will be damaged. This reduces the service life of the wheel bearings.
The drive axle bolt may be loosened maximum 90º when the vehicle is standing on its wheels.
Vehicles without a drive axle must not be moved, otherwise the wheel bearing will be damaged. If a vehicle must be moved, be sure to note the following:
- Install an outer joint in place of the drive axle.
- Tighten the outer joint to 120 Nm.
Loosening the Twelve-Point Bolt
- With vehicle still resting on wheels, loosen 12-point bolt with Socket AF 24 mm -T10361A- maximum 90º, otherwise, wheel bearing will be damaged.
- Raise vehicle enough that wheels hang freely.
- Apply the brakes (second mechanic required).
- Remove the twelve-point bolt -arrow-.
Twelve-Point Bolt, Installing
- Replace the 12-point bolt.

Note
Wheels must not yet touch the ground when tightening the drive axle or the wheel bearing can be damaged.
- Apply the brakes (second mechanic required).
- Tighten the twelve-point bolt to 200 Nm.
- Lower the vehicle onto its wheels.
- Turn the twelve-point bolt an additional 180º.
Drive Axle, Removing and Installing
Special tools and workshop equipment required
- Torque Wrench 1332 40-200Nm -VAG1332-
- Drive Shaft Remover -T10520-
Caution
When disassembling and performing repairs on a vehicle, the drive axles must not hang down loosely and contact the stops in the joint by over bending.
Removing
- Loosen the drive axle bolt on the wheel hub:
- Twelve-point bolt with ribs.
- Twelve-point bolt without ribs.
Caution
The wheel bearing must not be under load when the drive axle threaded connection on the wheel side is loose.If the wheel bearings are under the load of the vehicle weight, the wheel bearing will be damaged. This reduces the service life of the wheel bearings.
The drive axle bolt may be loosened maximum 90º when the vehicle is standing on its wheels.Vehicles without a drive axle must not be moved, otherwise the wheel bearing will be damaged. If a vehicle must be moved, be sure to note the following:
- Install an outer joint in place of the drive axle.
- Tighten the outer joint to 120 Nm.
- Remove wheel.
- Remove coil spring.
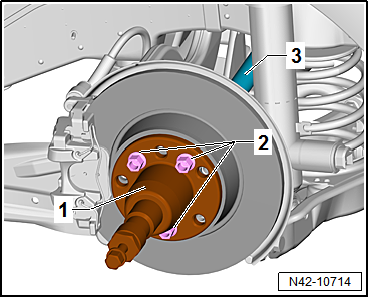
- Remove the bolts -arrows- for the lower transverse link -1- and tie rod -2- from the wheel bearing housing.
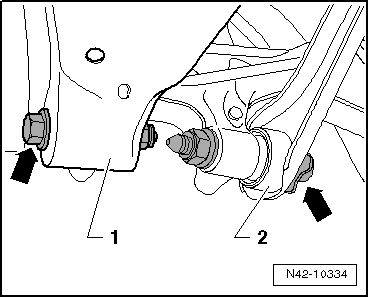
- Remove the bolt -arrow-.
- Loosen input shaft at transmission flange.
- Swing wheel bearing housing upward and remove driveshaft from inner splines.
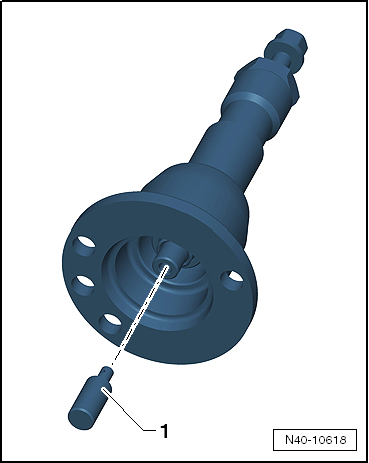
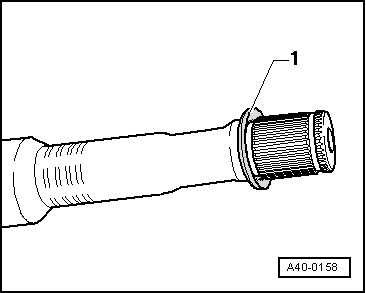
If the drive axle cannot be pulled out of the wheel bearing, then the drive axle can be pushed out of the wheel bearing using the Drive Shaft Remover -T10520-.
Before using the Drive Shaft Remover -T10520-, make sure that the thrust piece -1- is installed.
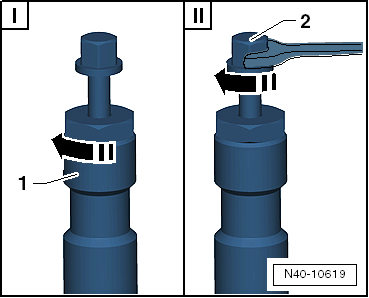
Using the Drive Shaft Remover -T10520-:
- Secure the Drive Shaft Remover -T10520--1- with three wheel bolts -2- on the wheel hub, so that the drive axle -3- can be pressed out.
- Follow the specified sequence exactly.
- Tighten the knurled nut -1- hand-tight.
- Only turn the bolt -2- using a wrench and press out the driveshaft using the Drive Shaft Remover -T10520-.
Note
At the end of the tasks or to set back, the spindles must be brought back into the original position so that the hydraulic operation can be used.
- Remove the drive axle.
Installing
Install in reverse order of removal while noting the following:
- Position the drive axle inner joint and tighten the bolts in a diagonal sequence to 10 Nm.
- Tighten multi-point socket head bolts diagonally to 40 Nm
- Tighten the drive axle/wheel hub bolt:
- Twelve-point bolt with ribs.
- Twelve-point bolt without ribs.
Caution
The vehicle must not be resting on the wheels when doing so.
When the bolt is loose, the wheel bearing can be damaged by the vehicle's weight.
Difference between A Twelve-Point Bolt with ribs and A Twelve-Point Bolt without Ribs
The contact surfaces -arrow A- and -arrow B- are different on the two-point bolts.
- Twelve-point bolt with ribs -arrow A-
- Twelve-point bolt without ribs -arrow B-

Bolting at wheel bearing housing may only occur when the dimension between wheel hub center and lower edge of wheel housing, measured before assembly, is achieved.
Tightening Specifications
| Component | Tightening Specification |
Drive axle to wheel hub
"twelve-point bolt with ribs"
|
70 Nm + 90º |
Drive axle to wheel hub
"twelve-point bolt without ribs"
|
200 Nm +180º |
Drive axle to rear final drive
flange shaft
|
40 Nm
|
Drive Axle, Disassembling and Assembling
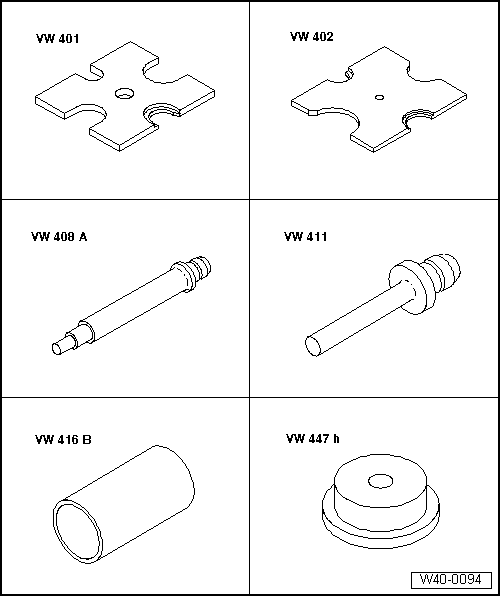
Special tools and workshop equipment required
- Press Plate -VW401-
- Press Plate -VW402-
- Press Piece - Rod -VW408A-
- Press Piece - Rod -VW411-
- Press Piece - 37mm -VW416B-
- Press Piece - Multiple Use -VW447H-
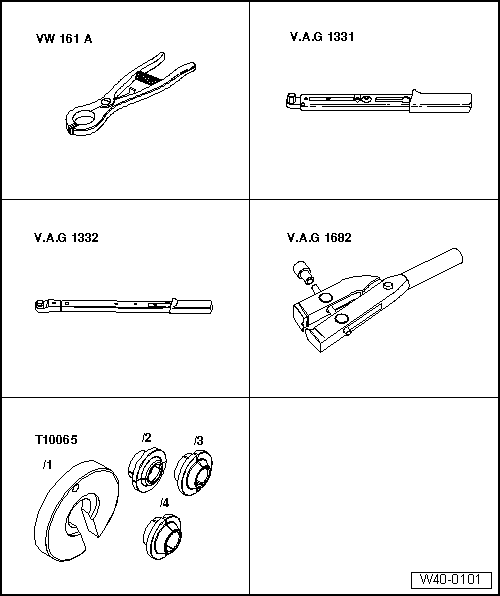
- Circlip Pliers -VW161A-
- Torque Wrench 1331 5-50Nm -VAG1331-
- Torque Wrench 1332 40-200Nm -VAG1332-
- Clamping Pliers -VAG1682A-
- Tripod Joint Tool -T10065-
Disassembling
Outer CV Joint, Pressing Off
- Clamp the drive axle with protective jaws in a vise clamp.
- Fold back boot.
- Drive CV joint from drive axle using a drift -A-.
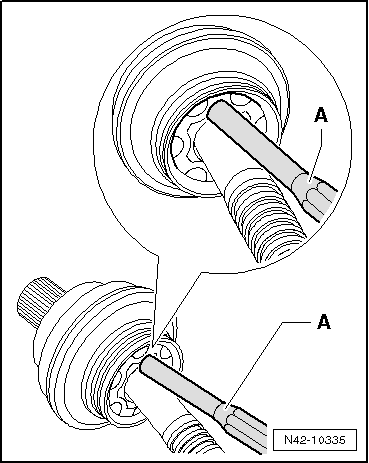
Drift must be placed precisely on star of CV joint.
Driving Joint On
- Drive onto shaft with plastic hammer until the circlip engages.
Inner CV Joint, Removing
- Press off the CV boot from joint using drift.
- Remove the circlip.
- Remove both clamps and slide joint boot toward outer joint.
Assembling
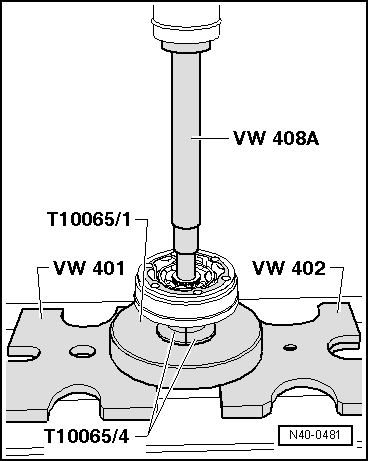
Dished Washer Installation Position, Inner and Outer Joint
- Plate spring
- Press on joint until stop.
- Install the circlip.
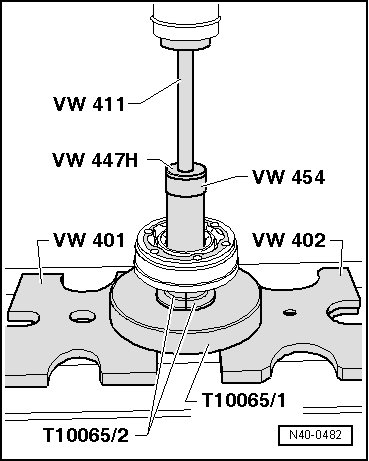
Pressing On the Inner CV Joint
Note
Chamfer on inner diameter of ball hub (splines) must face the contact shoulder on the drive axle.
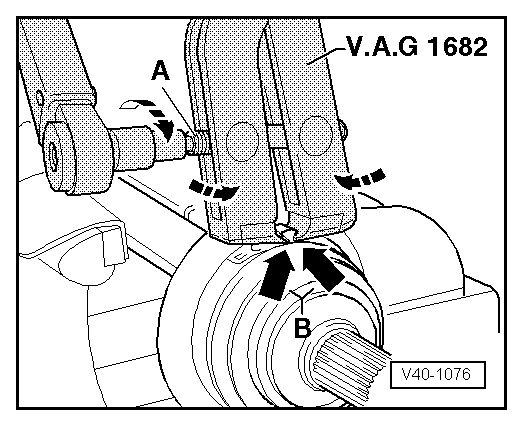
Tightening Clamp On Outer Joint
- Attach the Clamping Pliers -VAG1682A- as illustrated. Be sure that edges of clamping pliers are seated in corners -arrows B- of hose clamp.
- Tension clamp by turning spindle with a torque wrench (do not tilt clamp tool).
Note
- The hard material of the CV boot (compared to rubber) makes it necessary to use a stainless steel hose clamp. It is only possible to tighten the hose clamp with Clamping Pliers -VAG1682A-.
- Tightening specification: 25 Nm
- Use torque wrench -C- with adjustment range 5...50 Nm (for example Torque Wrench 5-50Nm -VAG1331-).
- Make sure the threads on the spindle -A- on the pliers move easily. Lubricate with MOS 2 grease, if necessary.
- If it does not move freely, for example due to dirt in thread, the required clamp tension will not be achieved at the specified torque.
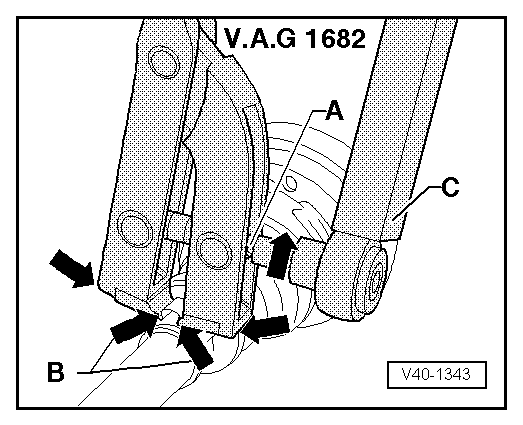
Tensioning Clamp on Small Diameter
Inner CV Joint, Checking
Removing
It is necessary to disassemble the joint whenever replacing the grease or if the ball surfaces show wear or damage.
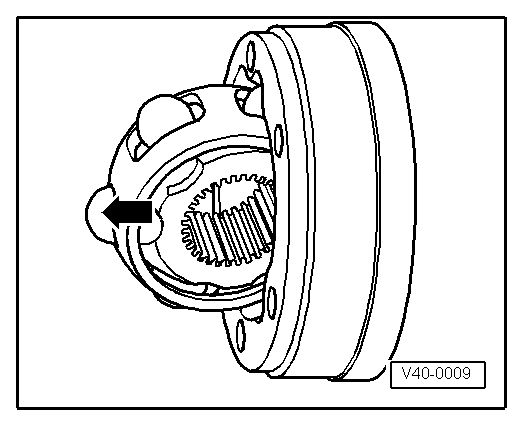
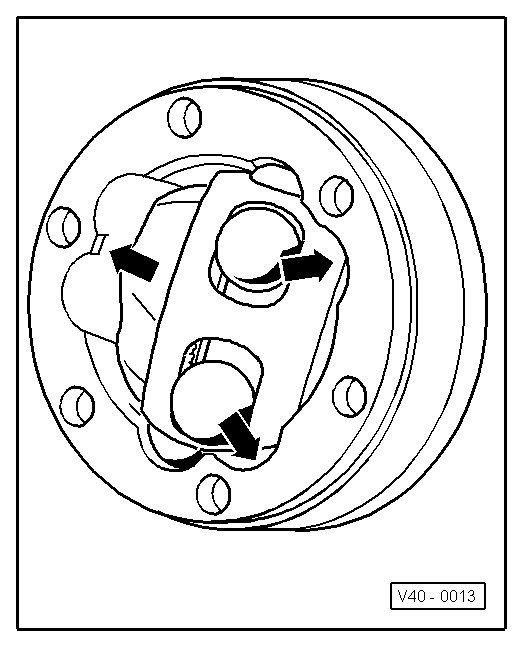
- Swivel the ball hub and ball bearing cage.
- Remove the joint in the direction of the -arrow-.
- Remove the balls from the cage.
Note
Ball hub and joint piece are paired. Do not interchange.
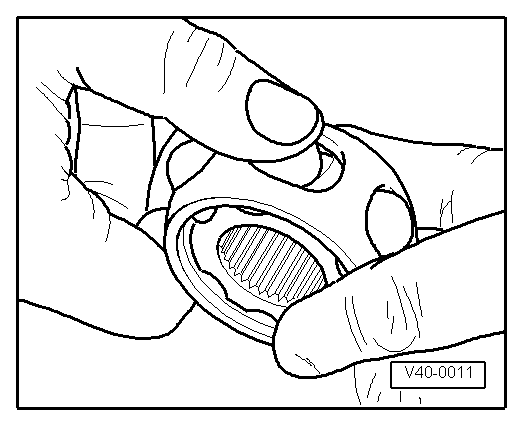
- Flip out ball hub from ball cage via running path of ball -arrows-.
- Check joint piece, ball hub, ball cage and balls for small broken off depressions (pitting build-up) and chafing.
Excessive circumferential backlash in joint makes itself noticed via tip-in shock. Joint must be replaced in such cases. Flattening and running marks of balls are no reason to replace joint.
Installing
- Insert ball hub into ball cage via two chamfers. The installation position is at random. Press balls into cage.
Ball hub has 2 different distances between ball tracks, a larger and a smaller.
- Insert hub with cage and balls upright into joint piece, a smaller space -b- must face toward open side of joint piece when doing this.
- Also note chamfer on inner diameter of ball hub, it must be visible after swiveling in.

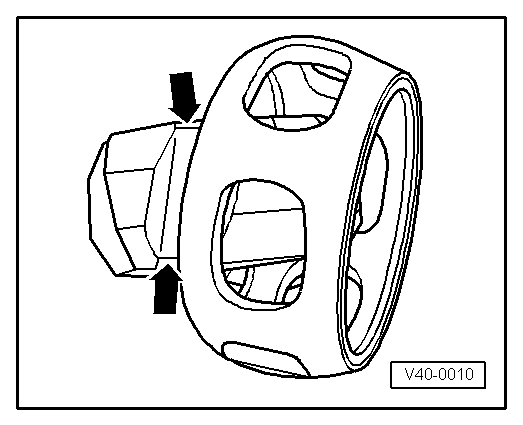
- Swing in ball hub; to do so, swing out hub far enough out of cage -arrows- (as depicted in illustration).
- Swing in hub with balls by pressing forcefully onto cage -arrow-.
- Check the CV joint for function.

CV joint is properly assembled, if ball hub can be slid back and forth by hand over whole compensation length.
Special Tools
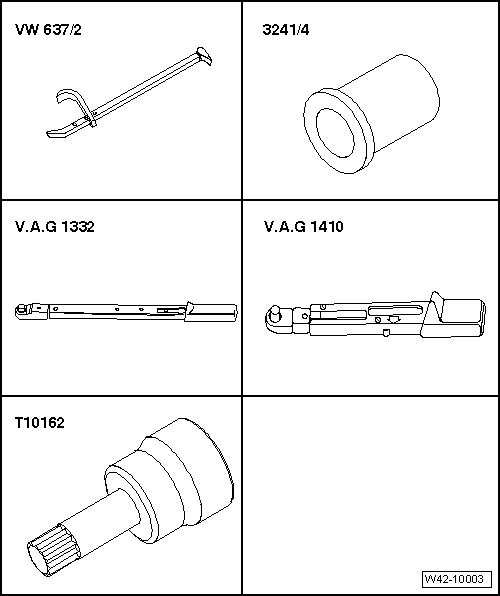
Special tools and workshop equipment required
- Puller - Grease Cap -VW637/2-
- Seal Installer - Camshaft Installer Kit -3241-
- Torque Wrench 1332 40-200Nm -VAG1332-
- Torque Wrench 1410 -VAG1410-
- Socket - XZN 18mm -T10162 A-
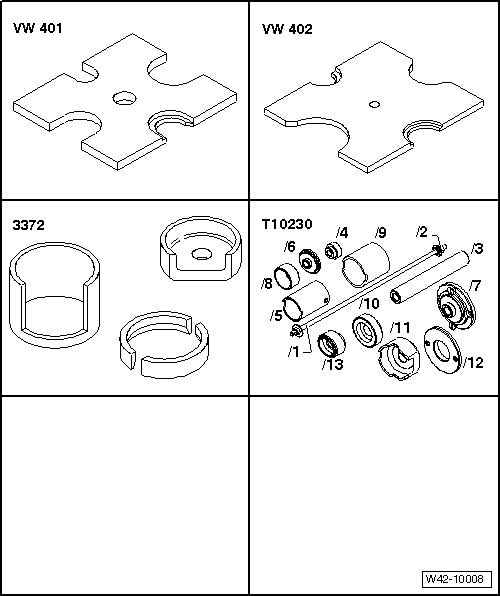
- Press Plate -VW401-
- Press Plate -VW402-
- Front Subframe Mount Kit -3372-
- Hydraulic Press - Bushing Assembly Tool Kit -T10230-
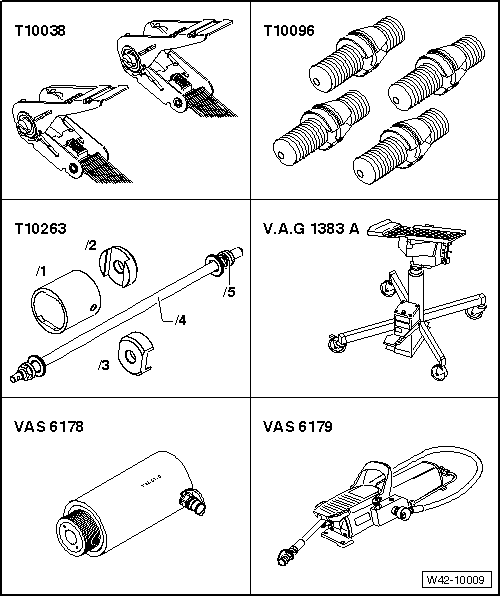
- Tensioning Strap -T10038-
- Locating Pins -T10096-
- Hydraulic Press - Rear Subframe Bushing Tool Kit -T10263-
- Engine and Gearbox Jack -VAS6931-
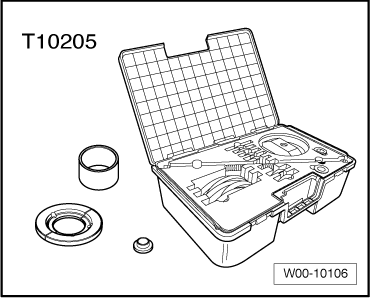
- Hydraulic Press -VAS6178- with Bearing Installer - Wheel Hub/Bearing Kit- Pressure Head -T10205/13-
- Pneumatic/Hydraulic Foot Pump -VAS6179-
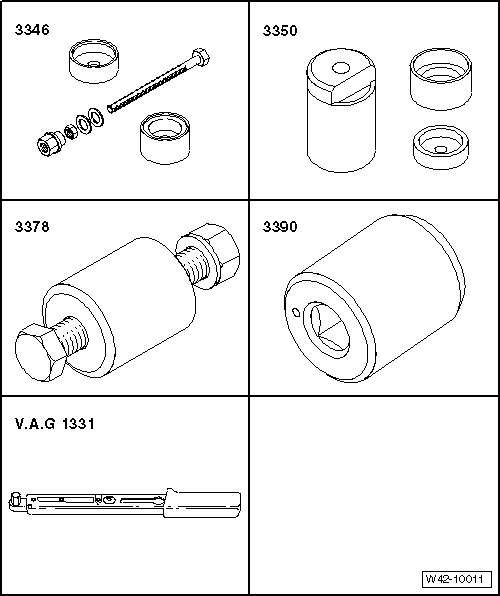
- Bearing Installer - Control Arm -3346-
- Bearing Installer - Carrier Bearing -3350-
- Fitting Sleeve -3378-
- Torque Adapter -3390-
- Torque Wrench 1332 40-200Nm -VAG1332-
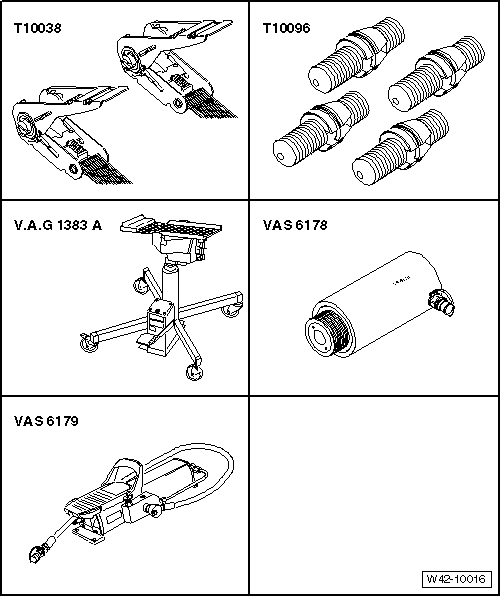
- Tensioning Strap -T10038-
- Locating Pins -T10096-
- Engine and Gearbox Jack -VAS6931-
- Hydraulic Press -VAS6178- with Bearing Installer - Wheel Hub/Bearing Kit- Pressure Head -T10205/13-
- Pneumatic/Hydraulic Foot Pump -VAS6179-
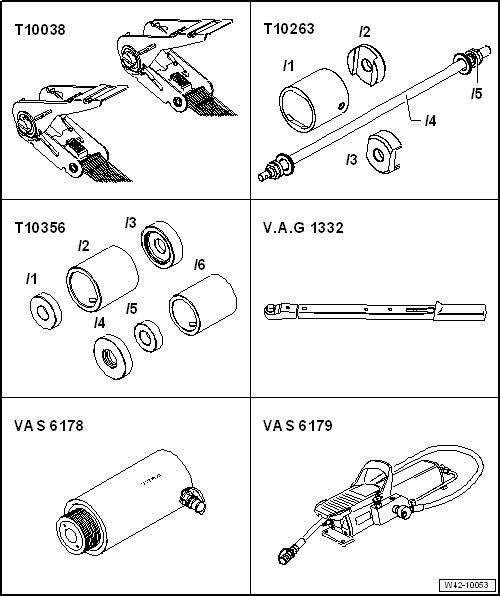
- Tensioning Strap -T10038-
- Hydraulic Press - Rear Subframe Bushing Tool Kit -T10263-
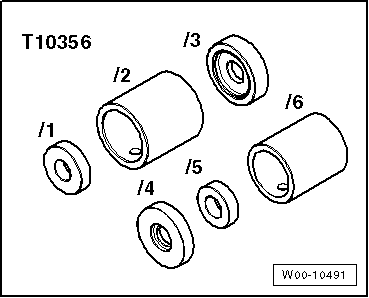
- Subframe Bushing Assembly Tool Kit -T10356-
- Engine and Gearbox Jack -VAS6931-
- Hydraulic Press -VAS6178- with Bearing Installer - Wheel Hub/Bearing Kit- Pressure Head -T10205/13-
- Pneumatic/Hydraulic Foot Pump -VAS6179-
- Press Plate -VW401-
- Press Plate -VW402-
- Press Piece - Rod -VW408A-
- Press Piece - Rod -VW411-
- Press Piece - 37mm -VW416B-
- Press Piece - Multiple Use -VW447H-
- Circlip Pliers -VW161A-
- Torque Wrench 1331 5-50Nm -VAG1331-
- Torque Wrench 1332 40-200Nm -VAG1332-
- Clamping Pliers -VAG1682A-
- Tripod Joint Tool -T10065-
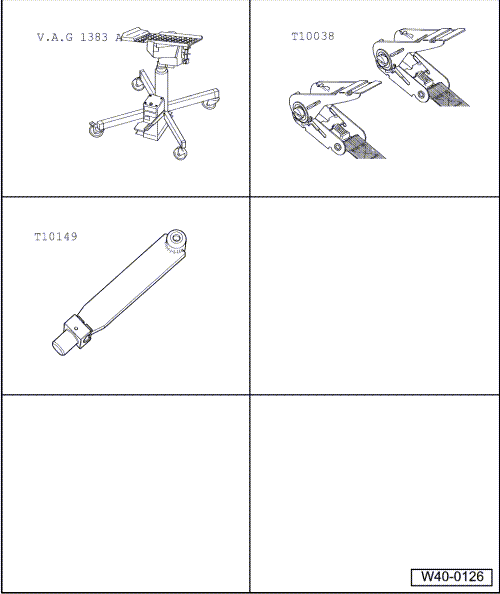
- Engine and Gearbox Jack -VAS6931-
- Tensioning Strap -T10038-
- Engine/Gearbox Jack Adapter - Wheel Hub Support -T10149-
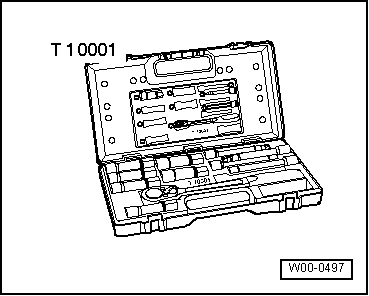
- Shock Absorber Set -T10001-
- Bearing Installer - Wheel Hub/Bearing Kit -T10205-
- Subframe Bushing Assembly Tool Kit -T10356-
- Socket - AF 24 mm -T10361A-
- Drive Shaft Remover -T10520-

- Spring Compressor Kit -VAG1752-
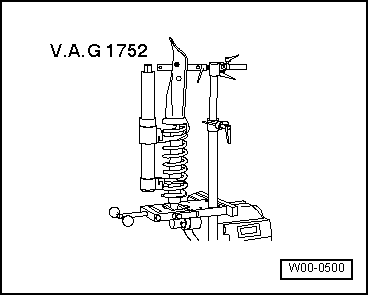
- Spring Compressor Kit - Spring Retainer with Inserts -VAG1752/3A-
- Digital Torque Wrench -VAG1756A-
- Spring Compressor Kit - Adapter Blocks -VAG1752/9-
 Stabilizer Bar, AWD
Overview - Stabilizer Bar, AWD
The -arrow- points in the direction of travel.
Stabilizer Bar
There are different suspension versions.
Removing and installing.
Bearing
Replace bearings ...

See More:
Volkswagen Tiguan Service and Repair Manual > Electrical Equipment from 06/2011: Instruments
Instrument Cluster
General Information
Note
Additional information:
Refer to Self Study Program; No 404; The Tiguan.
The following components are integrated in the instrument cluster:
Instrument Cluster Control Module -J285-
Anti-Theft Immobilizer Control Module -J362-
Speedometer
Tachometer
F ...
Volkswagen Tiguan Owners Manual
Volkswagen Tiguan Service and Repair Manual
- Body exterior
- Body Interior
- General Paint Information
- Paint
- Brake System
- Suspension, Wheels, Steering
- Wheel and Tire Guide
- Towing Guide
- Wheel and Tire Guide General Information
- Communication
- Electrical Equipment General Information
- Electrical Equipment from 06/2011
- Heating, Ventilation and Air Conditioning
- Refrigerant R134a Servicing
- 6-Speed Manual Transmission 02Q, OBB, and OFB
