Volkswagen Tiguan Service and Repair Manual: Control Arm with Mounting Bracket, Removing and Installing
Volkswagen Tiguan Service and Repair Manual / Suspension, Wheels, Steering / Front Suspension / Subframe, Stabilizer Bar and Control Arms / Control Arm with Mounting Bracket, Removing and Installing
Special tools and workshop equipment required
- Torque Wrench 1332 40-200Nm -VAG1332-
- Locating Pins -T10096-
Removing
- Remove the wheel.
- Remove the lower noise insulation.
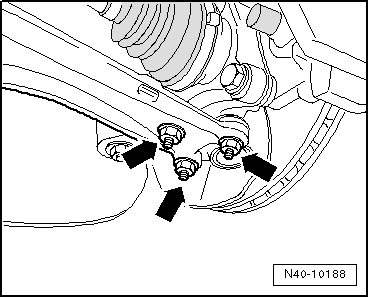
- Remove the nuts -arrows-.
- Remove the wheel bearing housing with the ball joint from the control arm.
- Secure position for mounting bracket.
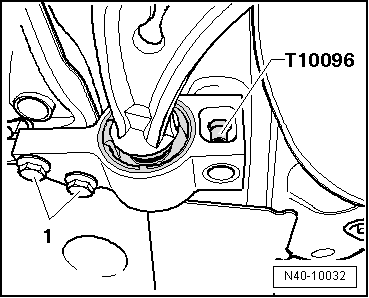
- Replace bolt -1- for left side, -2- for right side using Locating Pins -T10096- and tighten locating pins to 20 Nm.

Note
Locating Pins -T10096- may only be tightened to a maximum of 20 Nm, since otherwise the threads of the locating bolts will be damaged.
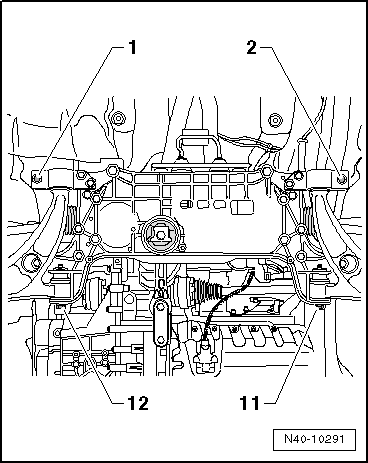
- Now unscrew -11- for left side of vehicle, -12- for right side of vehicle.
- Remove the bolts -1-.
- Remove control arm with mounting bracket.

Installing
- Insert control arm with mounting bracket into subframe.
- Insert bolts -11 and 12- but do not tighten.

- Insert bolts -1- and tighten.
- Now replace Locating Pin -T10096- with a new bolt and tighten it.
- Bolt control arm tightly to ball joint -arrows-.

- Bolt the control arm onto the subframe in curb weight position -11 and 12-.
Install in reverse order of removal.
- Install lower noise insulation.
Note
Make sure the ball joint boot is not damaged or twisted.
Tightening Specifications
| Component | Tightening Specification |
Mounting bracket to body
|
70 Nm + 180º |
Ball joint to aluminum
control arm:
|
60 Nm |
Ball joint to sheet steel
control arm
|
100 Nm |
Control arm to subframe
|
70 Nm + 180º |
 Ball Joint, Checking
Axial Play, Checking
Forcefully pull control arm down in the direction of
-arrow- and press it up again.
Radial Clearance, Checking
Forcefully push the lower part of wheel inward and outward in ...
 Left Control Arm with Mounting Bracket, DSG and
Automatic Transmission, Removing and Installing
Left Control Arm with Mounting Bracket, DSG and
Automatic Transmission, Removing and Installing
Special tools and workshop equipment required
Locating Pins -T10096-
Engine and Gearbox Jack -VAS6931-
Removing
Turn the steering wheel in the straight position and remove the ignition
key so ...
See More:
Volkswagen Tiguan Owners Manual > Exterior views: Rear view
Fig. 3 Vehicle rear overview.
Key to ⇒ Fig. 3 :
Roof antenna ⇒ Consumer information
cell phone
Navigation
High-mounted brake light
Rear window
Rear window defroster
Rear window wiper ⇒ Windshield wiper
and washer
Taillights ⇒ Lights ...
Volkswagen Tiguan Owners Manual
Volkswagen Tiguan Service and Repair Manual
- Body exterior
- Body Interior
- General Paint Information
- Paint
- Brake System
- Suspension, Wheels, Steering
- Wheel and Tire Guide
- Towing Guide
- Wheel and Tire Guide General Information
- Communication
- Electrical Equipment General Information
- Electrical Equipment from 06/2011
- Heating, Ventilation and Air Conditioning
- Refrigerant R134a Servicing
- 6-Speed Manual Transmission 02Q, OBB, and OFB

© 2018-2026 Copyright www.vwtiguan.org - 0.0704