Volkswagen Tiguan Service and Repair Manual: Interior Rearview Mirror
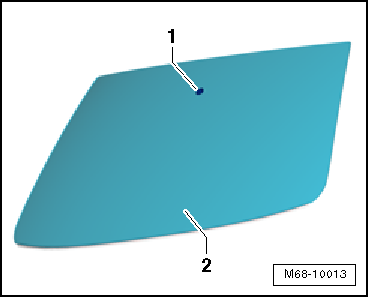
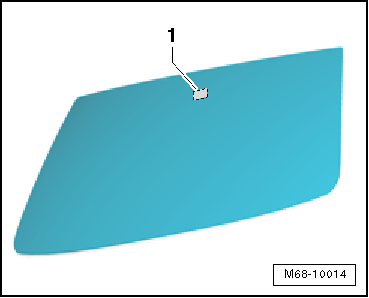
Overview - Manual Dimming Interior Rearview Mirror

- Baseplate
- Baseplate for mirror base
- Bonded to the windshield
- Servicing.
- Interior Rearview Mirror
- Manual dimming
- Removing and Installing.
Manual Dimming Interior Rearview Mirror, Removing and Installing
Removing
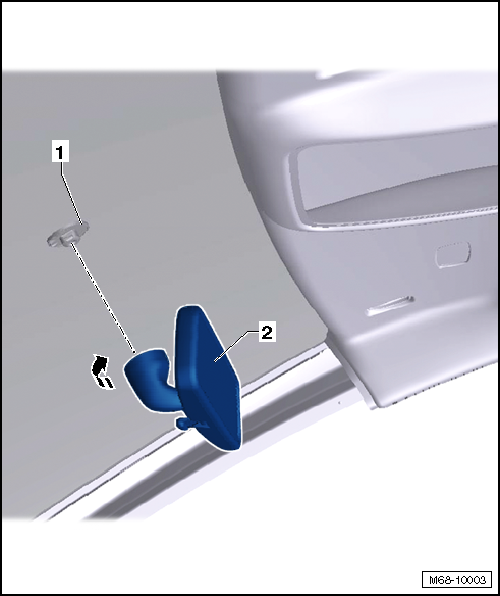
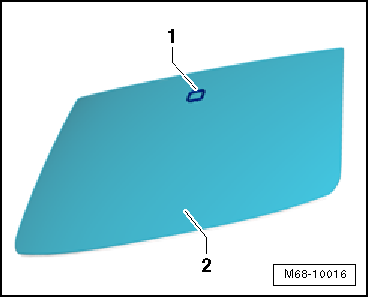
- Turn the interior rearview mirror -2- 90º (1/4 rotation) counter-clockwise -arrow-.
- Remove the interior rearview mirror -2- from the bonded baseplate -1-.
Installing
Note
Check all the fasteners for damage and replace if necessary.
Install in reverse order of removal.
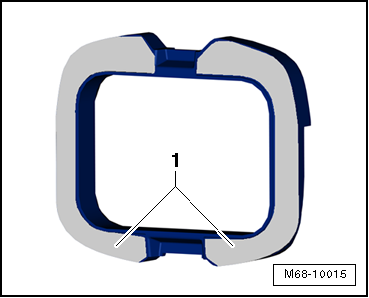
Manual Dimming Interior Rearview Mirror Retaining Plate, Servicing
Materials
- Glass/Metal Adhesive Set -D 000 703 A1-
Special tools and workshop equipment required
- Window scraper (commercially available) -1-

- Blade (commercially available) -2-
Attaching
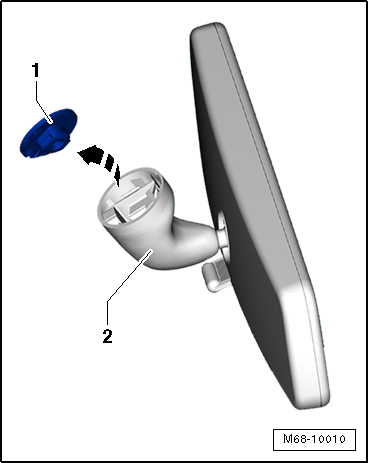
- Remove the baseplate -1- from the mirror base -2- in the direction of the -arrow-.
- Remove the PUR adhesive sealant from the baseplate -1- with a wire brush.
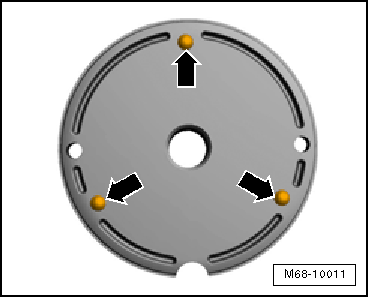
- Sand off the three spacer knobs -arrows- on the adhesive surface. Use 360 - 400 grit sand paper on the flat surface.
- Keep the sanded surface free of dirt and grease.
- Remove the PUR adhesive sealant as well as the old glass/paint primer up to the ceramic layer from the windshield with a scraper.
Caution
Do not damage the ceramic layer. Scratches always remain visible.
- Clean the adhesive surface with Adhesive Remover -D 002 000 10- or Cleaning Solution -D 009 401 04-.
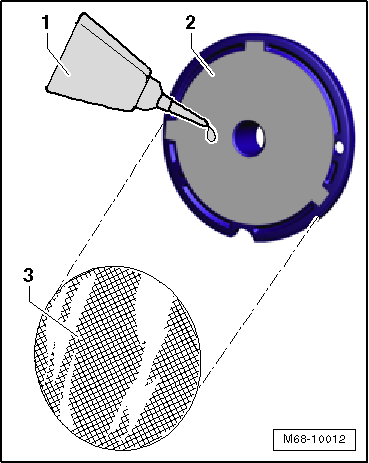
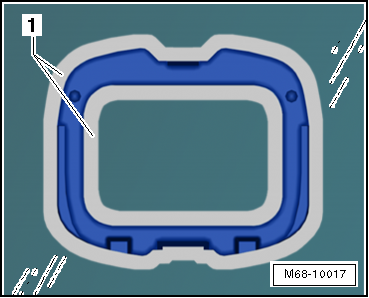
- Cut the nylon mesh -3- taken from the Glass/Metal Adhesive Set -D 000 703 A1- to the exact size of the baseplate -2-.
Note
Protective gloves (rubber gloves) should be worn.
- Apply adhesive -1- from the Glass/Metal Adhesive Set -D 000 703 A1- evenly over the baseplate -2-.
- Place the nylon mesh -3- on the baseplate -2-.
- With the adhesive tube -1- dab more adhesive onto the nylon mesh -3-.
Note
- Pay attention to the adhesive working time.
- 30 seconds are available from laying the nylon mesh on the adhesive to pressing on the windshield.
- Press the baseplate -1- onto the windshield -2- and hold for 15 seconds (without using force).
Note
The interior rearview mirror can be installed after 15 minutes.
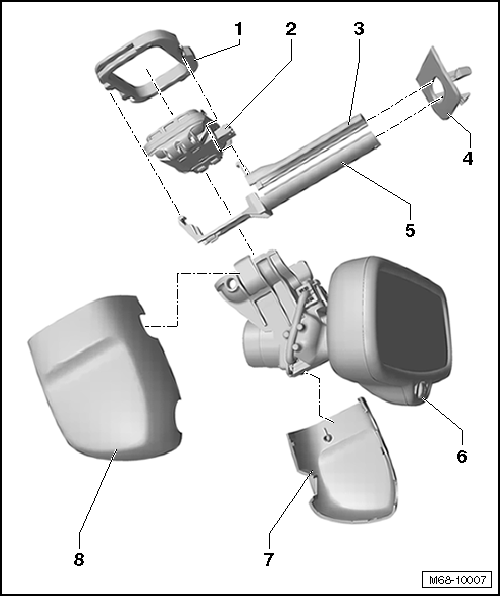
Overview - Automatic Dimming Interior Rearview Mirror
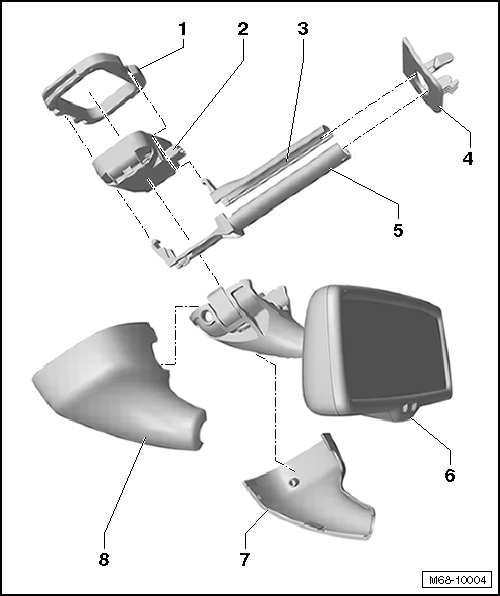
- Baseplate
- Baseplate for mirror base
- Bonded to the windshield
- Interior Rearview Mirror Baseplate, Servicing
- Rain/Light Recognition Sensor -G397-
- Sensor, removing and installing.
- Sensor, coding
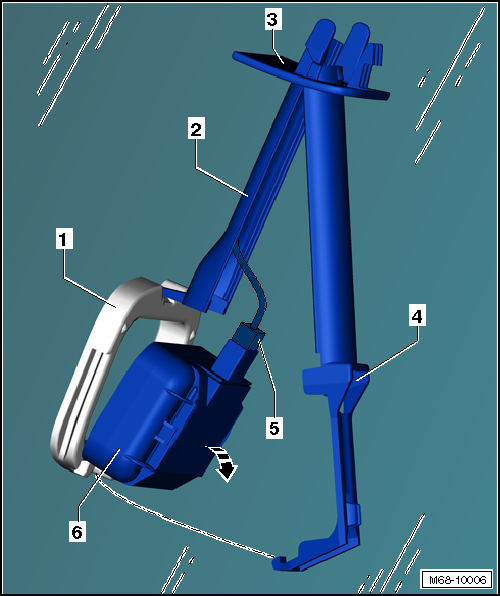
- Upper Wiring Guide
- Attached to the retaining plate -item 1-
- Installed in the trim -item 4-
- Trim
- Roof trim panel trim
- Lower Wiring Guide
- Attached to the retaining plate -item 1-
- Installed in the trim -item 4-
- Interior Rearview Mirror
- With automatic dimming function
- Removing and Installing.
- Right Mirror Base Trim
- Left Mirror Base Trim
Automatic Dimming Interior Rearview Mirror, Removing and Installing
Removing
Special tools and workshop equipment required
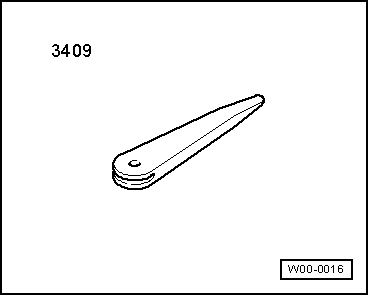
- Trim Removal Wedge -3409-

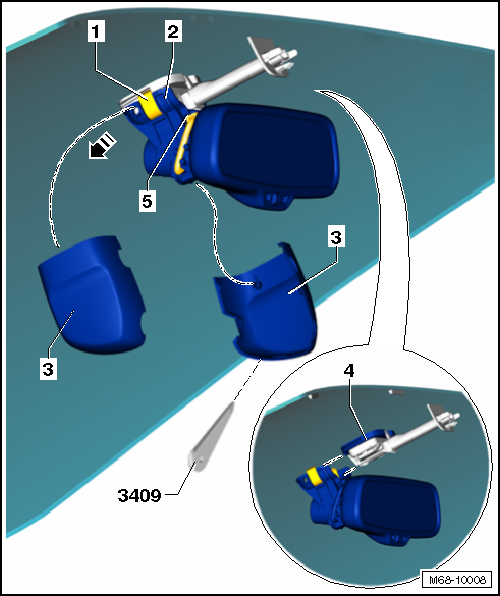
- Switch off the ignition.
- Loosen the retainers for the caps -3- using the Trim Removal Wedge -3409-.
- Remove the caps -3- from the mirror base -2-.
- Disconnect the connector for the automatic dimming function -5-.
- Loosen the clips -1- on both sides with a screwdriver.
- Push the mirror base with the interior rearview mirror -2- downward off of the baseplate -4-.
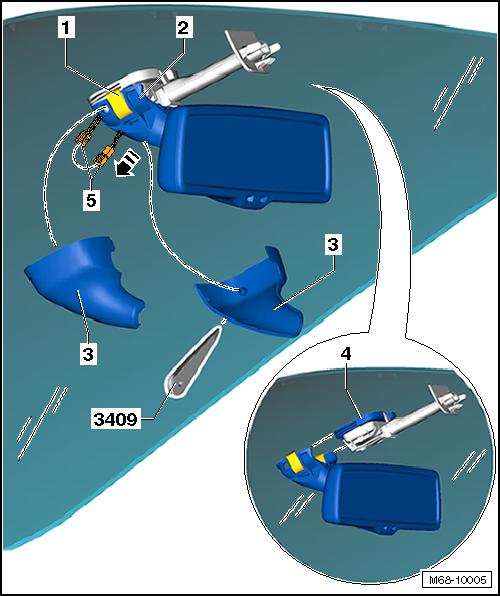
- Remove the lower cable guide -4- from the retainer with the baseplate -1-.
- Remove the lower cable guide -4- from the trim for the roof trim panel -3-.
- Disconnect the connector -5- for the rain sensor -6-.
- Remove the rain sensor -6- from the baseplate -1- in the direction of the -arrow-.
- Remove the upper cable guide -2- from the retainer with the baseplate -1-.
- Remove the upper cable guide -2- from the trim for the roof trim panel -3-.
- Remove the trim for the roof trim panel -3- downward from the roof trim panel. Guide the connector and the wiring harness -5- through the trim while doing this.
Installing
- Install in reverse order of removal.
Automatic Dimming Interior Rearview Mirror Retaining Plate, Servicing
Note
- Removal of windshield is no longer necessary, as with previous repair procedure.
- At the same time, it is possible to use the old, detached mirror base.
Windshield, Preparing
- All adhesive and primer reside must be removed up to ceramic coating -1-.
- Clean the adhesive surface using Cleaning Solution -D 009 401 04-.
- Maintain a "drying time" of at least 10 minutes.
- Apply the Glass/Paint Primer -D 009 200 02- on the ceramic coating -1-.
- Let it dry for 10 minutes to maximum one hour.
Preparing the Fallen Retaining Plate
Remove the remaining adhesive:
- Prepare the adhesive surface -1- by "wet-sanding" with fine emery paper (800-1200 grit) until water remains (does not bead and run off) on adhesive surface.
- Then clean using Cleaning Solution -D 009 401 04-.
- Maintain a "drying time" of at least 10 minutes.
Baseplate, Bonding

- Apply the Two-Part Polyurethane Adhesive -D 180 KD2 A1- directly onto the sanded and cleaned adhesive surface -1- on the baseplate.
- Adhesive diameter: approximately 2.5 to 3.0 mm.
- Press the baseplate -1- onto the windshield -2- immediately after applying the adhesive.
- Align the baseplate -1- on its designated position on ceramic coating and secure using adhesive tape.
Excess Adhesive, Cleaning and Removing
- Carefully remove the adhesive tape 0.5 to 1 hours after attaching the mirror base.
- Carefully remove the excess soft adhesive -1- all around using spatula.
- Then remove any remaining excess adhesive using a primer applicator or cloth, saturated with Cleaning Solution -D 009 401 04-.
Note
The interior rearview mirror can be installed 2.5 hours after gluing on the retaining plate.
Overview - Interior Rearview Mirror Automatic Dimming Function with Automatic High Beam Assist Control Module -J844- from 05/2011
- Baseplate
- Baseplate for mirror base
- Bonded to the windshield
- Interior Rearview Mirror Baseplate, Servicing
- Rain/Light Recognition Sensor -G397-
- Sensor, removing and installing.
- Sensor, coding.
- Upper Wiring Guide
- Attached to the retaining plate -item 1-
- Installed in the trim -item 4-
- Trim
- Roof trim panel trim
- Lower Wiring Guide
- Attached to the retaining plate -item 1-
- Installed in the trim -item 4-
- Interior Rearview Mirror
- With Driver Assistance Systems Front Camera -R242- and Automatic High Beam Assist Control Module -J844-
- Removing and Installing.
- The Automatic High Beam Assist Control Module -J844- is installed in the interior rearview mirror and cannot be replaced separately. If there is damage, the entire interior rearview mirror must be replaced.
- After installing a new interior rearview mirror the coding must be performed: code the Automatic High Beam Assist Control Module -J844- using the Vehicle Diagnostic Tester.
- Right Mirror Base Trim
- Left Mirror Base Trim
Automatic Dimming Interior Rearview Mirror with Automatic High Beam Assist Control Module -J844-, Removing and Installing
Removing
Special tools and workshop equipment required
- Trim Removal Wedge -3409-
- Switch off the ignition.
- Loosen the retainers for the caps -3- using the Trim Removal Wedge -3409-.
- Remove the caps -3- from the mirror base -2-.
- Disconnect the connector for the automatic dimming function -5-.
- Loosen the clips -1- on both sides with a screwdriver.
- Push the mirror base with the interior rearview mirror -2- downward off of the baseplate -4-.
- Remove the lower cable guide -4- from the retainer with the baseplate -1-.
- Remove the lower cable guide -4- from the trim for the roof trim panel -3-.
- Disconnect the connector -5- for the rain sensor -6-.
- Remove the rain sensor -6- from the baseplate -1- in the direction of the -arrow-.
- Remove the upper cable guide -2- from the retainer with the baseplate -1-.
- Remove the upper cable guide -2- from the trim for the roof trim panel -3-.
- Remove the trim for the roof trim panel -3- downward from the roof trim panel. Guide the connector and the wiring harness -5- through the trim while doing this.

Installing
- Install in reverse order of removal.
Automatic Dimming Interior Rearview Mirror Baseplate with Automatic High Beam Assist Control Module -J844-, Servicing
Note
- Removal of windshield is no longer necessary, as with previous repair procedure.
- At the same time, it is possible to use the old, detached mirror base.
- The repair is described in → Chapter "Automatic Dimming Interior Rearview Mirror Retaining Plate, Servicing".
Interior Rearview Mirror and Driver Assistance Systems Front Camera -R242- Cap, Removing and Installing
Removing
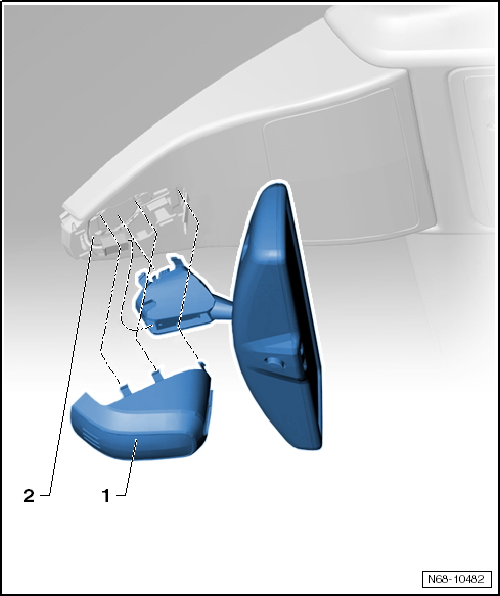
- Switch off the ignition.
- Press the cap -1- lightly inward on both sides in the region of the latching mechanisms and carefully remove from the retaining plate -2-.
- Disconnect the connector.
- Carefully push the interior rearview mirror with mirror base downward and off from the retaining plate -2-.
- Carefully loosen the Driver Assistance Systems Front Camera -R242- cover from the mounts.
Installing
Note
Check all the fasteners for damage and replace if necessary.
Install in reverse order of removal.

 Storage Compartments, Covers and Trim
Tools
Required Special Tools and Testing Equipment
Trim Removal Wedge -3409-
Torque Wrench 1783 - 2-10Nm -VAG1783-
Torque Wrench 1331 5-50Nm -VAG1331-
Footwell Trim, Removing and Installin ...
See More:
Volkswagen Tiguan Service and Repair Manual > Communication: Antenna Systems, RCD 300, 500 RNS 300 and Premium 7
General Information
Antenna System.
Vehicles without radio have no rear window antenna and a
"dummy" antenna without any connections is
installed on the roof.
"RCD 300", "RCD 310" and "RCD 500" radios have a rear window antenna
with a right antenna amplifier as well as a roof antenna with a ...
Volkswagen Tiguan Owners Manual
Volkswagen Tiguan Service and Repair Manual
- Body exterior
- Body Interior
- General Paint Information
- Paint
- Brake System
- Suspension, Wheels, Steering
- Wheel and Tire Guide
- Towing Guide
- Wheel and Tire Guide General Information
- Communication
- Electrical Equipment General Information
- Electrical Equipment from 06/2011
- Heating, Ventilation and Air Conditioning
- Refrigerant R134a Servicing
- 6-Speed Manual Transmission 02Q, OBB, and OFB
