Volkswagen Tiguan Service and Repair Manual: Trim Moldings and Trim
Tools
Special tools and workshop equipment required
- Torque Wrench 1783 - 2-10Nm -VAG1783-
- Wiring Harness Repair Set - Hot Air Blower -VAS1978/14A-
- Adhesive Strip Remover -VAS6349-
Plenum Chamber Cover
Overview

- Right Plenum Chamber Cover
- Removing
- Installing
- Left Plenum Chamber Cover
- Removing
- Installing
- Binding Profile
- Windshield component
- Molded Foam Part
- Seal
- Clip
- Quantity: 3
Removing
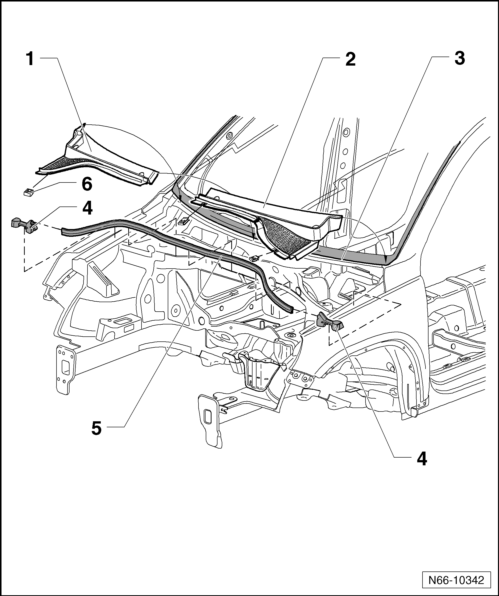
- Remove the wiper arms.
- Pull off the seal -5- on the entire length of the plenum chamber cover -1 and 2-.
- Pull the retaining clips -6- from the plenum chamber cover.
- Pull out plenum chamber covers -1 and 2- starting at center carefully upward from windshield binding profile -3-. Always begin with the top plenum chamber cover.
Installing
Caution
Do not use any tools when installing the plenum chamber into the binding profile.

- Spray the windshield binding profile -3- with a soup solution to make easier to install the plenum chamber covers -1 and 2-.
- Place plenum chamber covers -1 and 2- onto binding profile -3- and clip it into binding profile starting from the center using light pressure. Begin with plenum chamber cover lying on bottom.
- Secure the plenum chamber cover with the retaining clips -6-.
- Install seal -5- on to plenum chamber cover and windshield wipers.
Note
- In new front windshields, an insert is installed in the binding profile. This insert must be removed before installing the plenum chamber cover.
- Inspect the foam pieces -4- for damage; replace if necessary.
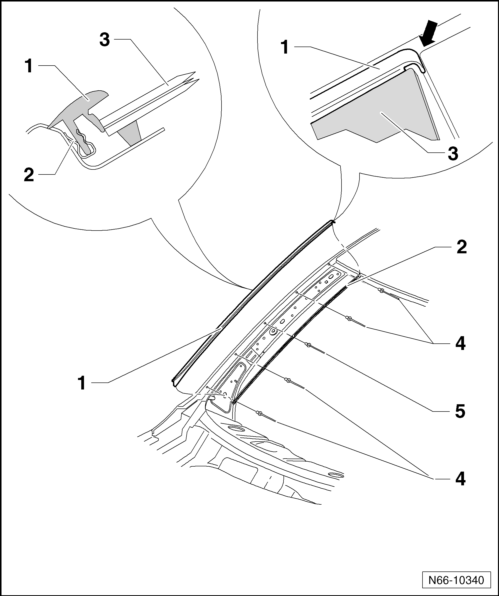
Drip Rail
Note
Removal and installation are described only for the left drip rail. The removal and installation of the right drip rail are derived accordingly from this.
Overview

- Drip Rail
- Removing.
- Installing.
- Retaining Strip
- Only with the windshield removed, removing and installing
- Windshield
- Pop Rivet
- Quantity: 4
- Pop Rivet
- Quantity: 1
- First mount the pop rivet; it positions the retaining strip
Removing

- Lift drip rail -1- from retaining strip -2- starting from top.
Installing
Body Side Moldings
Overview
Note
- The illustration shows the left side. The right side is identical.
- It is not possible to remove the body side moldings without damaging them.
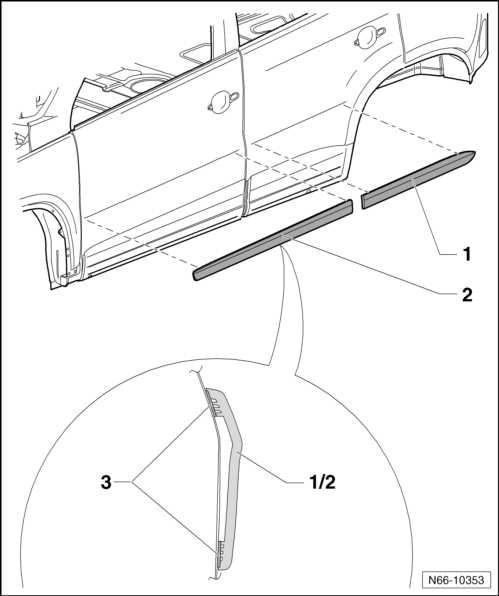
- Front Door Body Side Molding
- PP/EPDM material
- Self-adhesive
- Removing.
- Installing.
- Rear Door Body Side Molding
- PP/EPDM material
- Self-adhesive
- Removing.
- Installing.
- Adhesive Tape
Removing

- Before removing, heat the body side moldings -1/2- around the adhesive tape -3- using the Hot Air Blower - VAG1416- and remove the moldings.
Installing
Note
- The description applies to the left side. The right side is identical.
- Only remove the protective film right before assembly. Processing temperature workshop temperature.
- The waiting period after installing body side moldings is approximately 4 hours at a temperature of approximately 21 ºC (69.8 ºF)

- Remove any adhesive residue using Adhesive Strip Remover - VAS6349-.
- Clean adhesion surface thoroughly with adhesive remover D 002 000 10 immediately prior to bonding on the side protective moldings.
The adhesive surface must be free of dust, grease and adhesive residue.
- Before installing, remove the protective foil from the adhesive tape -3-.
- Mount the body side moldings -1/2- onto the vehicle and firmly press it in the area of the adhesive tape -3-.
Front and Rear Door Cover
Overview
Note
- The illustration shows the left side. The right side is identical.
- It is not possible to remove the bonded covers without damaging them.

- Front Door Cover
- Self-adhesive
- Removing.
- Installing.
- Front Door
- Rear Door
- Grommet
- Rear Door Cover
- Self-adhesive
- Removing.
- Installing.
- Adhesive Tape
- Screw
- Tightening specification: 2 Nm
- 3 for the rear cover
- Screw
- Tightening specification: 2 Nm
- 2 for the front cover
Removing
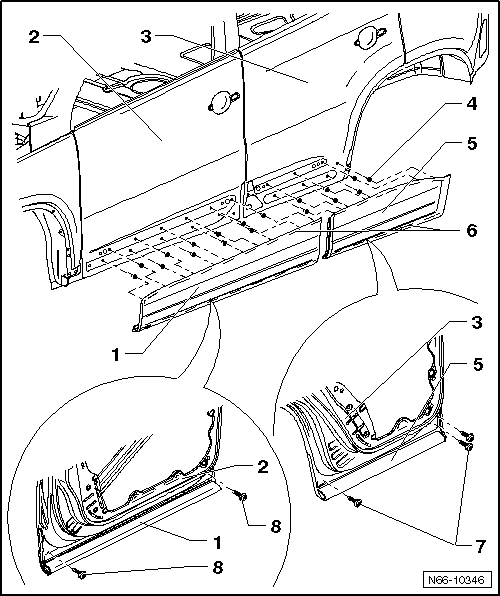
- Remove the bolts -7/8- on the inside of the door -2/3-.
- Before removing, heat the cover -1/5- in the area of the adhesive tape -6- using Hot Air Blower - VAG1416-.
- Pull the cover -1/5- out of the grommets -4-.
Installing
Note
- Only remove the protective film right before assembly. Processing temperature workshop temperature.
- The waiting period after installing body side moldings is approximately 4 hours at a temperature of approximately 21ºC.

- Remove any adhesive residue using Adhesive Strip Remover - VAS6349-.
- Inspect the grommets -4- for damage; if necessary, replace.
- Clean adhesion surface thoroughly with Adhesive Remover -D 002 000 10- immediately prior to bonding onto the cover.
The adhesive surface must be free of dust, grease and adhesive residue.
- Before installing, remove the protective foil from the adhesive tape -6-.
- Mount the cover -1/5- onto the vehicle and firmly press it in the area of the adhesive tape -6-.
- Remove the screws -7/8- on the inside of the door -2/3-.
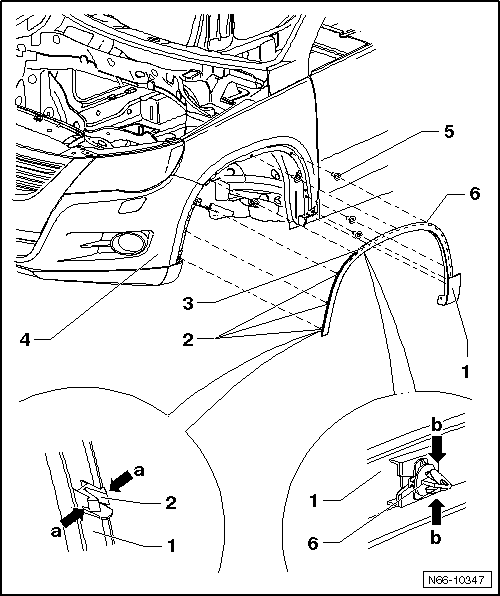
Wheel Covers, Removing and Installing
Wheel Cover, Front, Removing
Note
- The illustration shows the left side. The right side is identical.
- It is not possible to remove the body side moldings without damaging them.

- Remove the front wheel housing liner.
- Press the catches -2- together -arrows a- and remove them from the bumper -4-.
- Before removing, heat the wheel cover -1- in the area of the adhesive tape -3- using a Hot Air Blower - VAG1416-.
- Press the clips -6- out of the grommets -5--arrows b-.
- Remove the wheel cover -1- from the vehicle.
Wheel Cover, Front, Installing
Note
- The description applies to the left side. The right side is identical.
- Only remove the protective film right before assembly. Processing temperature workshop temperature.
- The waiting period after installing the wheel covers is approximately four hours at a temperature of approximately 21 ºC (69.8 ºF).
- Remove any adhesive residue using Adhesive Strip Remover -VAS6349-.
- Inspect the grommets -5- for damage and replace them if necessary.
- Inspect the grommets -5- for damage and replace them if necessary.
The adhesive surface must be free of dust, grease and adhesive residue.
- Before installing, remove the protective foil from the adhesive tape -3-.
- Press the cover -1- and the clips -6- into the grommets -5- on the vehicle.
- Press the catches -2- into the bumper -4-.
- Firmly press the cover in the area of the adhesive tape -3-.
Wheel Cover, Rear, Removing
Note
- The illustration shows the left side. The right side is identical.
- It is not possible to remove the body side moldings without damaging them.
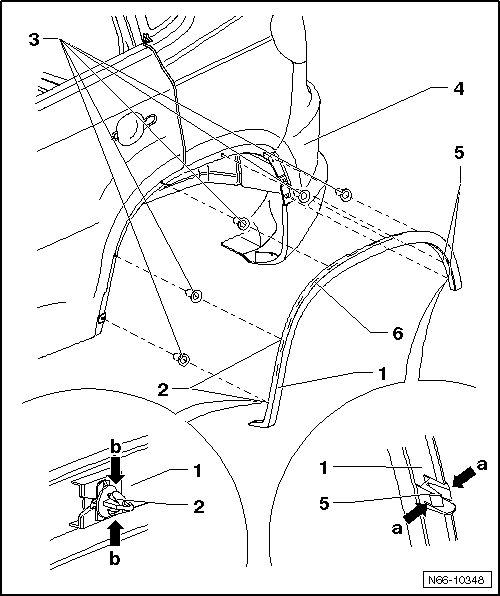
- Remove the rear wheel housing liner.
- Press the catches -5- together -arrows a- and remove them from the bumper -4-.
- Before removing, heat the wheel cover -1- in the area of the adhesive tape -6- using a Hot Air Blower - VAG1416-.
- Press the clips -2- out of the grommets -3--b arrows-.
- Remove the wheel cover -1- from the vehicle.
Rear Wheel Cover, Installing
Note
- The description applies to the left side. The right side is identical.
- Only remove the protective film right before assembly. Processing temperature workshop temperature.
- The waiting period after installing the wheel covers is approximately four hours at a temperature of approximately 21 ºC (69.8 ºF)

- Remove any adhesive residue using Adhesive Strip Remover - VAS6349-.
- Inspect the grommets -3- for damage and replace them if necessary.
- Clean adhesion surface thoroughly with adhesive remover D 002 000 10 immediately prior to bonding onto the cover.
The adhesive surface must be free of dust, grease and adhesive residue.
- Before installing, remove the protective foil from the adhesive tape -6-.
- Press the cover -1- with the clips -2- into the grommets -3- on the vehicle.
- Press the cover -1- with the clips -2- into the grommets -3- on the vehicle.
- Press the catches -5- into the bumper -4-.
- Firmly press the cover in the area of the adhesive tape -6-.
 Roof Railing
Tools
Special tools and workshop equipment required
Torque Wrench 1331 5-50Nm -VAG1331-
Overview - Roof Railing
Roof Railing
Removing.
Installing.
Bolt
Upper Conical Washer
Upper Con ...
 Other Attachments
Volkswagen R GmbH "R-Line" optional equipment
Note
More information about special attachments can be obtained from the
Volkswagen R GmbH Hotline.
Safety Precautions
Note
The special attachments wer ...
See More:
Volkswagen Tiguan Owners Manual > Child safety and child restraints: Securing the child restraint with LATCH/UCRA lower
universal anchorages
Fig. 78 Markings for the LATCH/UCRA
lower universal anchorages on the seat.
Read and follow the introductory information and
safety information first⇒Introduction
to the subject LATCH is used in the United States for Lower Anchors and Tethers
for Children. In Canada, Universal Child Res ...
Volkswagen Tiguan Owners Manual
Volkswagen Tiguan Service and Repair Manual
- Body exterior
- Body Interior
- General Paint Information
- Paint
- Brake System
- Suspension, Wheels, Steering
- Wheel and Tire Guide
- Towing Guide
- Wheel and Tire Guide General Information
- Communication
- Electrical Equipment General Information
- Electrical Equipment from 06/2011
- Heating, Ventilation and Air Conditioning
- Refrigerant R134a Servicing
- 6-Speed Manual Transmission 02Q, OBB, and OFB
