Volkswagen Tiguan Owners Manual: Changing light bulbs in the front bumper
Volkswagen Tiguan Owners Manual / Do it yourself / Changing light bulbs / Changing light bulbs in the front bumper

Fig. 203 In right front bumper: Removing light assembly.
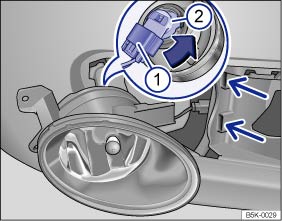
Fig. 204 Replacing light bulb in headlight.
 Read and follow the introductory information and
safety information first⇒
Read and follow the introductory information and
safety information first⇒ Introduction
to the subject
Introduction
to the subject | Please carry out each step only in the order specified: | |
|---|---|
| 1. | Please review and follow the checklist ⇒ Information on light bulb replacement . |
| 2. | Remove the wire bracket from the vehicle tool kit and secure it in the opening in the cover ⇒ Fig. 203 . Pull the cover upward in the direction of the arrow. |
| 3. | Remove the screw ⇒ Fig. 203① using the screwdriver in the vehicle tool kit ⇒ Vehicle tool kit . |
| 4. | Remove the headlight. |
| 5. | Release the connector ⇒ Fig. 204① and disconnect it. |
| 6. | Turn the bulb holder ⇒ Fig. 204② counterclockwise in the direction of the arrow until it stops and remove it toward the rear with the bulb. |
| 7. | Replace the burned out light bulb with a new bulb of the same type. |
| 8. | Insert the bulb holder into the headlight assembly and turn it clockwise until it stops. |
| 9. | Connect the connector ⇒ Fig. 204① on the bulb holder ⇒ Fig. 204② . You must hear the connector click into place. |
| 10. | Insert the headlight. |
| 11. | Tighten the screw ⇒ Fig. 203① with the screwdriver. |
| 12. | Install cover in the bumper ⇒ Fig. 203 . |
 Replacing light bulbs in the Xenon headlight
Fig. 202 In the engine compartment:
cover ① on the left headlight for the turn signal bulb holder ② and the cornering
light bulb holder ③.
Read and follow the introductory information and
...
 Replacing light bulbs in taillight in the rear hatch
Fig. 205 In the rear lid: removing the
cover and the bulb holder.
Fig. 206 Bulb holder with backup light
bulb ②.
Read and follow the introductory information and
safety information first⇒I ...
See More:
Volkswagen Tiguan Owners Manual > Consumer information: Radio antenna and reception
Read and follow the introductory information and
safety information first⇒Introduction
to the subject If the radio and navigation systems were installed at the factory,
the radio antenna may be installed in different locations in the vehicle:
On the inside of the rear window with the r ...
Volkswagen Tiguan Owners Manual
Volkswagen Tiguan Service and Repair Manual
- Body exterior
- Body Interior
- General Paint Information
- Paint
- Brake System
- Suspension, Wheels, Steering
- Wheel and Tire Guide
- Towing Guide
- Wheel and Tire Guide General Information
- Communication
- Electrical Equipment General Information
- Electrical Equipment from 06/2011
- Heating, Ventilation and Air Conditioning
- Refrigerant R134a Servicing
- 6-Speed Manual Transmission 02Q, OBB, and OFB

© 2018-2026 Copyright www.vwtiguan.org - 0.1023