Volkswagen Tiguan Service and Repair Manual: Checking with Expansion Valve and Receiver/Dryer, with Internally Regulated A/C Compressor
Note
- Connecting service station.
- Observe test requirements.
- Bring engine speed up to 2000 RPM.
- Observe manometer battery.
Note
Switching pressures and design of refrigerant circuit switches are vehicle-specific.
The pressures should be measured at the service connections. The location of these connections is vehicle-specific.
Specified Values
High-pressure side:
Increasing from initial pressure (when connecting the pressure gauges) to a maximum of 20 bar (290 psi).
Low-pressure side:
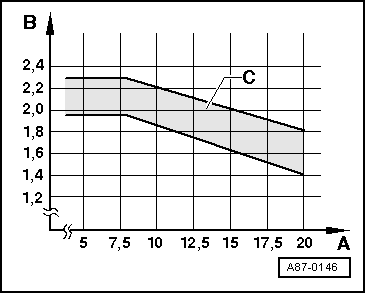
Decreasing from initial pressure (when connecting pressure gauges) to the value in the graph.
- High pressure in bar (psi)
- Low pressure in bar (psi)
- Permissible tolerance range
| Possible deviation from specification | Possible cause of fault | Corrective action |
|
Not enough refrigerant in circuit or expansion valve malfunctioning. |
|
|
|
Note
If no malfunction can be found and the function of the A/C system is not correct after repeating the test, flush (clean) refrigerant circuit with refrigerant R134a. If that is not possible in this workshop, flush the refrigerant circuit with compressed air and remove moisture with nitrogen.
| Possible deviation from specification | Possible cause of fault | Corrective action |
|
|
|
Note
If the function is not correct after flushing the refrigerant circuit, the expansion valve must be replaced.
| Possible deviation from specification | Possible cause of fault | Corrective action |
|
|
|
Note
Always replace receiver/dryer in case of this malfunction.
| Possible deviation from specification | Possible cause of fault | Corrective action |
|
|
|
Note
If the function of the A/C system is not correct when the test is repeated, re-install old expansion valve and flush refrigerant circuit with compressed air and nitrogen. Then replace A/C compressor and receiver/dryer.
| Possible deviation from specification | Possible cause of fault | Corrective action |
|
|
|
| Possible deviation from specification | Possible cause of fault | Corrective action |
|
|
|
Note
- If A/C system function is not OK when the test is repeated, flush (clean) refrigerant circuit. Then replace A/C compressor and receiver/dryer.
- With this malfunction, evaporator may ice up although quantity of refrigerant in circuit is OK.
| Possible deviation from specification | Possible cause of fault | Corrective action |
|
To much refrigerant oil in the circuit. |
|
|
Note
- Overfilling with refrigerant oil can occur in the event, for example, the compressor has been replaced without adjusting the quantity of refrigerant oil.
- If the A/C compressor is not replaced, the refrigerant oil should be drained from the A/C compressor via the oil drain plug. Out of the entire quantity of refrigerant oil, 50 grams should be put in the A/C compressor and the rest in the refrigerant circuit. Refer to vehicle-specific repair manual.
Checking with Expansion Valve and Receiver/Dryer, without Regulated A/C Compressor
Test Requirements
- Radiator and condenser are clean (clean if necessary).
- The ribbed belt for the A/C compressor and alternator tensioned correctly.
- All air ducts, covers and seals are OK and installed correctly.
- The doors reach their end position.
- The engine is warm.
- Evaporator and heater not drawing in secondary air (at maximum fresh-air blower speed).
With engine running and A/C system set to maximum cooling output, pay attention to the following points:
- The fresh air blower is running.
- The coolant fan must be running or it must be switched on.
- The recirculation/fresh air door must be in the "recirculation" position.
- Ambient temperature is greater than 15 0C.
- The A/C Evaporator Temperature Switch -E33- is installed correctly and its switch temperatures are correct.
Checking
- Turn off the ignition.
- Connect pressure gauge battery (A/C service station).
- Take pressure gauge readings. There are two possible results A and B.
| Ambient Temperature in ºC (ºF) | Pressure in Refrigerant Circuit in Bar (psi) Positive Pressure |
| 15 (60) | 3.9 (57) |
| 20 (68) | 4.7 (68) |
| 30 (86) | 6.7 (97) |
| 40 (104) | 9.1 (132) |
A- The pressure in the refrigerant circuit is lower than the pressure specified in the table. There is not enough refrigerant in the circuit.
- Search for leak with leak detection device.
- The pressure release valve is open, check coolant fan activation according to the wiring diagram.
Check refrigerant pipes and hoses to see if they are bent too sharply (cross-section constrictions) or have external damage. If no malfunction is found, flush refrigerant circuit.
B - The pressure in the refrigerant circuit matches the table or is higher.
- Start the engine.
- Set A/C system to maximum cooling output.
- Open doors.
- Open vents in instrument panel.
The A/C compressor is driven by the engine via the magnetic clutch using the ribbed belt.
Note
- If the A/C compressor is not driven, check A/C Clutch -N25- voltage supply.
- If the voltage supply is OK, repair the magnetic clutch.
If the A/C compressor is driven, check refrigerant circuit:
- Bring engine speed up to 2000 RPM.
- Observe manometer battery
Specified Values
High-pressure side:
Increasing from pressure with engine not running to a maximum of 20 bar (290 psi).
Low-pressure side:
Decreasing from pressure with engine not running down to 1.3 bar (18.9 psi).
 Checking with Restrictor and Reservoir, with Internally Regulated A/C
Compressor
Checking with Restrictor and Reservoir, with Internally Regulated A/C
Compressor
Note
Connecting service station
Observe test requirements
Bring engine speed up to 2000 RPM.
Pay attention to the A/C service station pressure gauge.
Note
Switching pressures for refr ...
 Checking with Restrictor, Reservoir and A/C Compressor Regulator Valve
-N280-, Externally Regulated A/C Compressor
Checking with Restrictor, Reservoir and A/C Compressor Regulator Valve
-N280-, Externally Regulated A/C Compressor
Note
Connecting service station.
Observe test requirements.
Bring engine speed up to 2000 RPM.
Pay attention to the A/C service station pressure gauge.
Note
Switching pressures for actu ...
See More:
Volkswagen Tiguan Service and Repair Manual > Top Coats: Aquaplus System (Pearl Effect and Heliochrome)
Definition:
Water-Based Pearl Effect Base Paint -LPW 040 ...-
Water-Based Heliochrome Base Paint -LHW 046 ...-
Water-Based Pearl Effect Mixed Paint -LWM 076 ...-
Product Description
The Aquaplus System is a high-quality water-soluble basepaint system based on
special PU dispersions.
The basepa ...
Volkswagen Tiguan Owners Manual
Volkswagen Tiguan Service and Repair Manual
- Body exterior
- Body Interior
- General Paint Information
- Paint
- Brake System
- Suspension, Wheels, Steering
- Wheel and Tire Guide
- Towing Guide
- Wheel and Tire Guide General Information
- Communication
- Electrical Equipment General Information
- Electrical Equipment from 06/2011
- Heating, Ventilation and Air Conditioning
- Refrigerant R134a Servicing
- 6-Speed Manual Transmission 02Q, OBB, and OFB
