Volkswagen Tiguan Service and Repair Manual: Halogen Headlamps
General Information
Note
- Always switch off headlamps and remove ignition key before working on headlamps.
- Familiarity with the function and operation of the lighting system is required if there are customer concerns.
- Additional information:
- Refer to the Owner's Manual.
- Refer to Self Study Program; No 404; The Tiguan.
Vehicle electrical system control is equipped with OBD which assists Fault Finding the headlamps.
Use the Vehicle Diagnostic Tester in "Guided Fault Finding".Overview - Halogen Headlamps
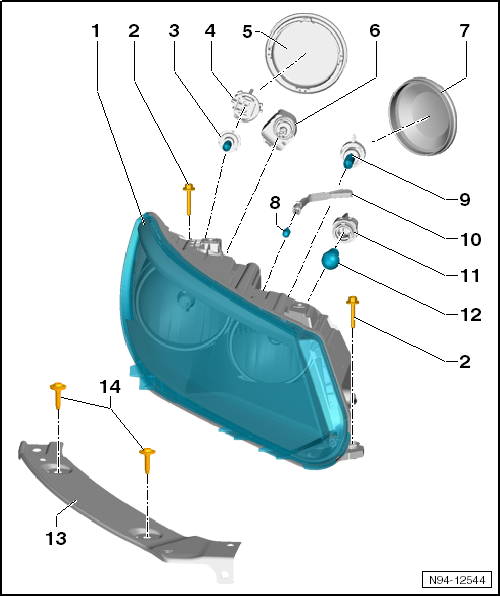
- Headlamp
- Removing and installing.
- Headlamp installation position, correcting.
- Headlamp mounting tabs, servicing.
- Headlamp Bolts to Body
- 4 Nm
- 6 x 40
- Left Low Beam Headlamp Bulb -M29- or Right Low Beam Headlamp Bulb -M31-
- H7 12V, 55W Bulb
- Replacing.
- Bulb Socket with Grip
- For Left Low Beam Headlamp Bulb -M29- or Right Low Beam Headlamp Bulb -M31-
- Cap
- Headlamp Range Control Positioning Motor
- Removing and installing.
- Cap
- Left Position Lamp Bulb -M1- or Right Position Lamp Bulb -M3-
- Bulb 12V, 5W
- Replacing.
- Left High Beam Headlamp Bulb -M30- and Right High Beam Headlamp Bulb
-M32-, Left Daytime Running Lamp Bulb -L174- and Right Daytime Running Lamp
Bulb -L175-
- Two-filament bulb with high beam and daytime running lamp functions
- Bulb H12 12V, 15/55 W
- Replacing.
- Bulb Socket with Grip
- For Left Position Lamp Bulb -M1- or Right Position Lamp Bulb -M3-
- Bulb Socket with Grip
- For Left Front Turn Signal Bulb -M5- and Right Front Turn Signal Bulb -M7-
- Left Front Turn Signal Bulb -M5- and Right Front Turn Signal Bulb -M7-
- Bulb 12V, PY21W
- Replacing.
- Carrier
- Bolts: Headlamp to Carrier
- 4 Nm
- M6 x 14
Halogen Headlamps, Removing and Installing
Special tools and workshop equipment required
- Torque Wrench 1331 5-50Nm -VAG1331-
Note
- It is not necessary to disconnect the battery ground cable.
- The following illustrations show removing and installing the left headlamp. Removing and installing the right headlamp is identical.
- If one headlamp is removed, it must always be adjusted after installation.
Removing
- Switch off the ignition and all electrical consumers and remove the ignition key.
- Remove the front bumper cover.
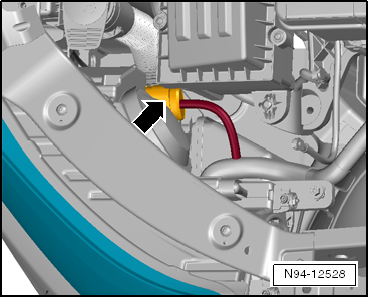
- Disconnect the connector -arrow-.
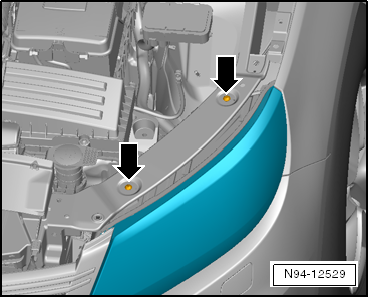
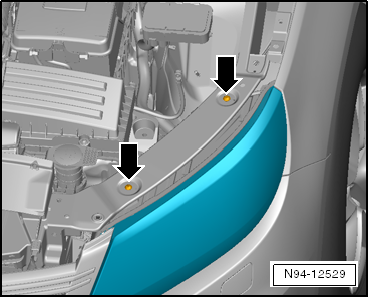
- Remove the two bolts -arrows-.
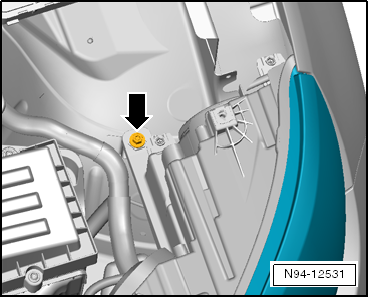
- Remove the front bolt -arrow- from the headlamp.
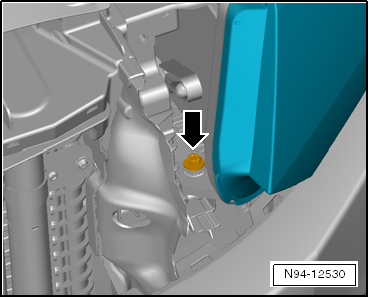
- Remove the rear bolt -arrow- from the headlamp and pull the headlamp forward and out of the body.
Installing
Install in reverse order of removal. Note the following:
- Tighten all threaded connections to the tightening specifications given in the assembly overview.
- Make sure the gap around the headlamp is even all the way around.
If headlamp has an uneven gap dimension to the body, installation position must be corrected.
- Check the headlamp functions.
Note
If one headlamp is removed, it must always be adjusted after installation.
- Check the headlamp adjustment and adjust the headlamp if necessary.
Headlamp Installation Position, Correcting
Special tools and workshop equipment required
- Torque Wrench 1331 5-50Nm -VAG1331-
Note
- It is not necessary to remove the front bumper to adjust the headlamps.
- Illustrations depict right headlamp
When checking the installation position of the headlamp, if the gaps between the headlamp and body are uneven, the headlamp position must be corrected.
- Switch off the ignition and all electrical consumers and remove the ignition key.
- Remove the front bumper cover.
- Loosen the 2 bolts -arrows-.
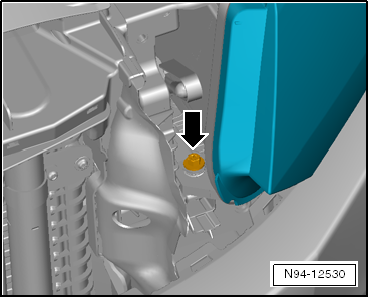
- Loosen the front bolt -arrow- on the headlamp.
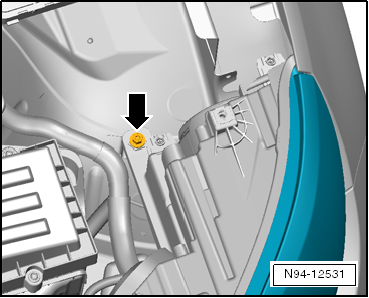
- Loosen the rear bolt -arrow- on the headlamp.
- Loosen or tighten the adjustment bushings -arrow- on the front and back of the headlamp until the lamp is flush with the body.
- Tighten the threaded connections to the tightening specifications given in the assembly overview.
- Make sure the headlamp gap dimensions are even and adjust if necessary.
- Check the headlamp functions.
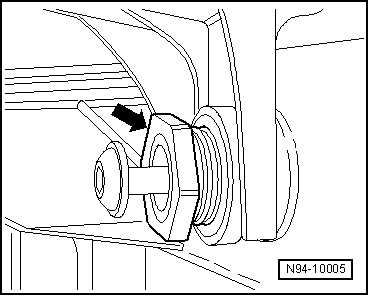
Note
If a headlamp is removed or adapted to the body, it must always be adjusted after installation or adaptation.
- Check the headlamp adjustment and adjust the headlamp if necessary.
Halogen Headlamp Bulb, Replacing
Low Beam Headlamp Bulb, Replacing
Note
- The following illustrations show replacing the low beam headlamp bulb on a removed headlamp.
- It is not necessary to remove the headlamp in order to remove the low beam headlamp bulb.
- Illustrations depict replacement of left low beam headlamp bulb. Replacing the low beam headlamp bulb in the right headlamp is identical.
Removing
- Switch off the ignition and all electrical consumers and remove the ignition key.
- Turn the cap -1- all the way in the direction of -arrow- and remove it.
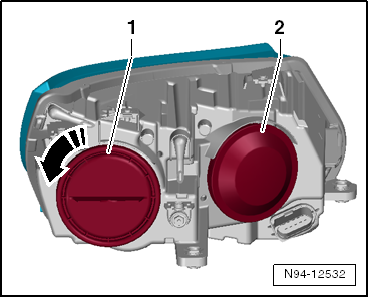
- Turn the bulb socket -1- all the way in the direction of -arrow- and remove it from the headlamp together with the low beam headlamp bulb.
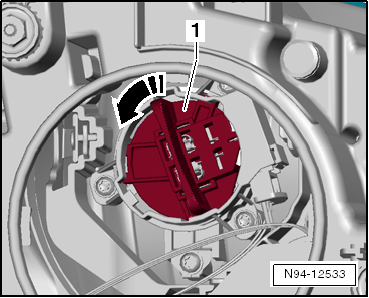
Note
The electric connection on the low beam headlamp bulb is disconnected at the same time.
- Pull the low beam headlamp bulb -2- in the direction of -arrow- straight out of the bulb socket with the grip -1-.
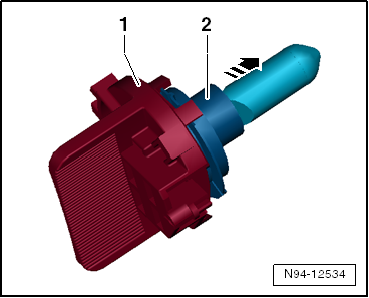
Low beam headlamp bulb 12V, 55W
Installing
Caution
Make sure the cap fits correctly when installing it. Water getting in the headlamp will cause damage.
Note
Do not touch the glass when installing a bulb. Fingers will leave traces of grease on the glass which, when the light is switched on, will evaporate and cloud the glass.
Install in reverse order of removal. Note the following:
- Check the headlamp functions.
- Check the headlamp adjustment and adjust the headlamp if necessary.
High Beam Headlamp Bulb and Daytime Running Lamp Bulb, Replacing
Note
- The Left High Beam Headlamp Bulb -M30- or the Right High Beam Headlamp Bulb -M32- is a two-filament bulb and functions also as the Left Daytime Running Lamp Bulb -L174- or the Right Daytime Running Lamp Bulb -L175-.
- The following illustrations show replacing the high beam headlamp/daytime running lamp bulb on a removed headlamp.
- It is not necessary to remove the headlamp in order to replace a high beam headlamp/daytime running lamp bulb.
- The illustrations show replacing high beam headlamp/daytime running lamp bulb on a left headlamp. Replacing the right high beam headlamp/daytime running lamp bulb is identical.
Removing
- Switch off the ignition and all electrical consumers and remove the ignition key.
- Remove the cap -2-.
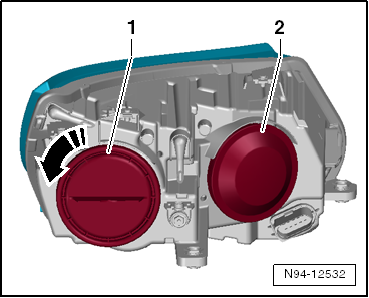
- Turn the bulb socket -1- all the way in the direction of -arrow- and remove it from the headlamp together with the high beam headlamp/daytime running lamp bulb.
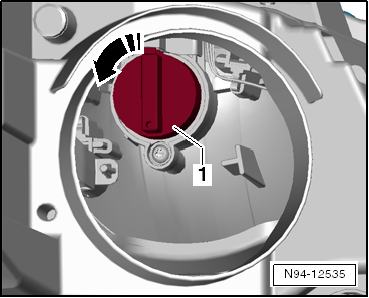
Note
- The electric connection on the high beam headlamp bulb is disconnected at the same time.
- The high beam headlamp/daytime running lamp bulb and the bulb socket are a single piece and cannot be disassembled.
High beam headlamp bulb 12V, 55W
Installing
Caution
Make sure the cap fits correctly when installing it. Water getting in the headlamp will cause damage.
Note
Do not touch the glass when installing a bulb. Fingers will leave traces of grease on the glass which, when the light is switched on, will evaporate and cloud the glass.
Install in reverse order of removal. Note the following:
- Check the headlamp functions.
- Check the headlamp adjustment and adjust the headlamp if necessary.
Position Lamp Bulb, Replacing
Note
- For reasons of clarity, the following illustrations show the procedure for replacing the position lamp bulb on a removed headlamp.
- The headlamp does not need to be removed to replace the position lamp bulb.
- Illustrations show the procedure for replacing the position lamp bulb in left headlamp. Replacing the position lamp bulb in the right headlamp is identical.
Removing
- Switch off the ignition and all electrical consumers and remove the ignition key.
- Remove the cap -2-.
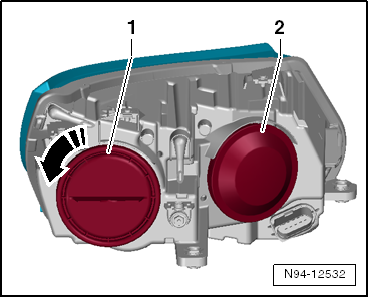
- Unlock the ball head -1- from the retainer in the bulb housing in the direction of -arrow-.
- Remove the bulb socket with the handle -1- to the rear and out of the headlamp housing. Pay attention to the wires still connected.
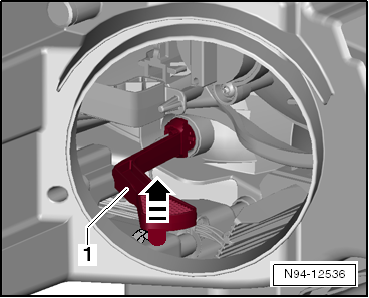
- Pull the position lamp bulb -2- in the direction of -arrow- straight out of the bulb socket with the grip -1-.
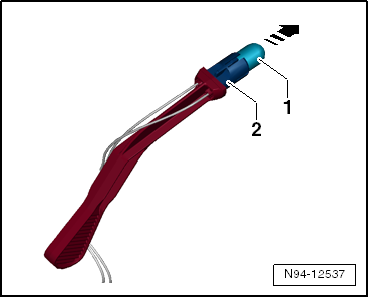
Position lamp bulb: 12V, W5W
Installing
Caution
Make sure the cap fits correctly when installing it. Water getting in the headlamp will cause damage.
Note
Do not touch the glass when installing a bulb. Fingers will leave traces of grease on the glass which, when the light is switched on, will evaporate and cloud the glass.
Install in reverse order of removal. Note the following:
- Make sure the ball head on the grip is engaged correctly in the headlamp housing after installing the position lamp bulb in the headlamp.
- Check the headlamp functions.
Front Turn Signal Bulb, Replacing
Note
- For reasons of clarity, the following illustrations show the procedure for replacing the front turn signal bulb on a removed headlamp.
- It is not necessary to remove the headlamp in order to replace a front turn signal bulb.
- Illustrations show the procedure for replacing the front turn signal bulb in the left headlamp. Replacing the front turn signal bulb in the right headlamp is identical.
Removing
- Switch off the ignition and all electrical consumers and remove the ignition key.
- Remove the bulb socket with the position lamp bulb grip.
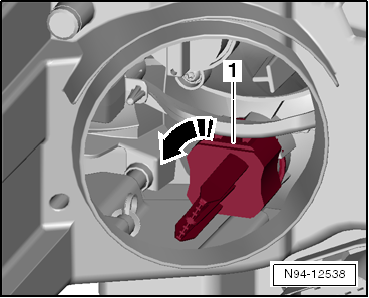
- Turn the bulb socket with the grip -1- all the way in the direction of -arrow-.
- Remove the bulb socket with the grip -1- together with the front turn signal bulb from the headlamp. Pay attention to the wires still connected.
- Press the front turn signal bulb -2- into the socket and turn it in the direction of -arrow- at the same time and remove it from the socket -1-.
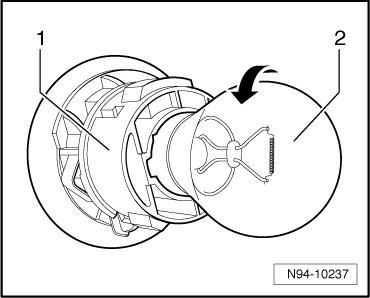
Rear turn signal bulb: 12V, PY21W
Installing
Caution
Make sure the cap fits correctly when installing it. Water getting in the headlamp will cause damage.
Note
Do not touch the glass when installing a bulb. Fingers will leave traces of grease on the glass which, when the light is switched on, will evaporate and cloud the glass.
Install in reverse order of removal. Note the following:
- Check the headlamp functions.
Headlamp Range Control Positioning Motor
Headlamp Range Control Positioning Motor, Removing and Installing
The Left Headlamp Beam Adjustment Motor -V48- and/or Right Headlamp Beam Adjustment Motor -V49- is installed next to the low beam headlamp bulb in the headlamp.
Note
- If the motors are removed and installed again or replaced, check the headlamp adjustment and adjust it again if necessary.
- The following figures show the removal and installation of the left headlamp control motor. The removal and installation of the right headlamp control motor are identical.
Removing
- Remove the headlamp.
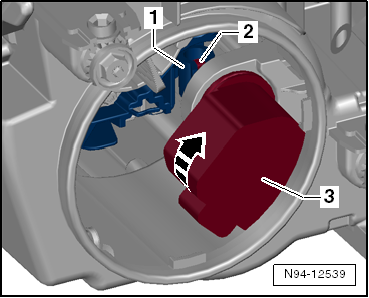
- Turn the cap -1- all the way in the direction of -arrow- and remove it.
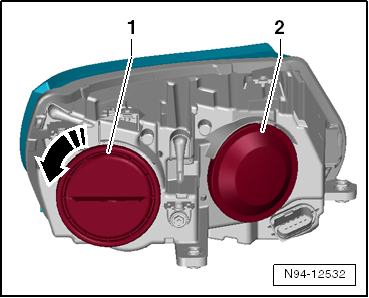
- Turn the headlamp beam adjustment motor -3- in the direction of -arrow- to the stop.
- Tilt the ball head of the control motor -2- downward out of the mount in the headlamp -1- and remove the control motor -3- from the headlamp housing.
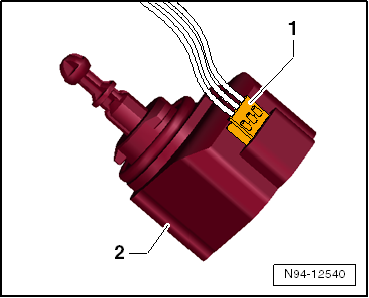
- Disconnect the connector -1- from the motor -2-.
Installing
Install in reverse order of removal. Note the following:
- Connect the connector to the motor and insert the headlamp beam adjustment motor into the headlamp in the installation position.
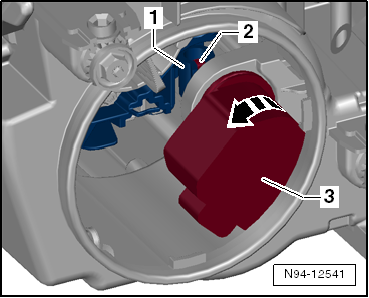
- Tilt the ball head of the headlamp beam adjustment motor -2- from underneath into the mount -1- while pulling the reflector backward.
- Insert the control motor -3- into its mount and lock it by turning in the direction of -arrow- to the stop.
Caution
During installation, ensure proper seating of the cap. Water getting in the headlamp will cause damage.
- Check the headlamp functions.
- Check and correct headlamp adjustment, if necessary.
Headlamp Mounting Tabs, Servicing
General Information
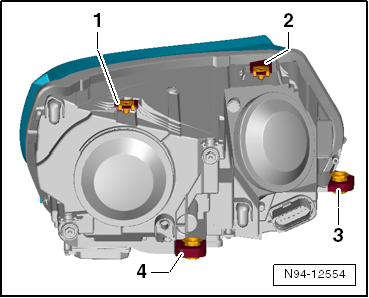
If the tabs -1- and -2- at the top, the inner tab -3- or the rear tab -4- are damaged or broken off, then can be repaired using a repair kit. It is not necessary to replace the entire headlamp.
Note
- Check whether there is no further damage on the headlamp that makes installation of the repair set superfluous.
- The repair kits for Halogen headlamps and HID headlamps are the same.
- The left and right headlamps have different repair kits. Refer to the Parts Catalog.
Repairing the outer tabs at the top -1-.
Repairing the inside tabs at the top -2-.
Repair the tab on the inside -3-.
Repairing the rear tab -4-.
Tabs, Repairing, Upper, Outer
- Switch off the ignition and all electrical consumers and remove the ignition key.
- Remove the headlamps:
- Headlamps with Halogen bulbs.
- HID Headlamp with Cornering Lamp and LED Daytime Running Lamp.
- HID Headlamp with Dynamic High Beam Control.
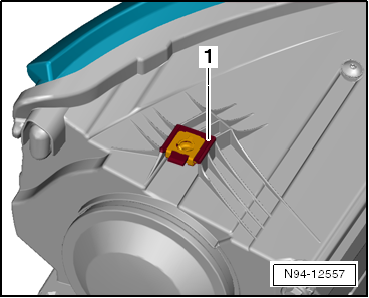
- Remove the mounting point -1- far enough until the new mounting point is even.
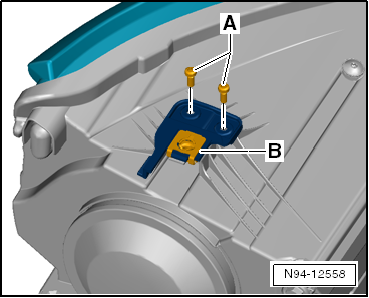
- Mount the repair tab -B- on the bulb socket on the headlamp and tighten the 2 screws -A- to 0.5 Nm.
- Install the headlamp.
- Check and correct headlamp adjustment, if necessary.
Upper Inner Tabs, Repairing
- Switch off the ignition and all electrical consumers and remove the ignition key.
- Remove the headlamps:
- Headlamps with Halogen bulbs.
- HID Headlamp with Cornering Lamp and LED Daytime Running Lamp.
- HID Headlamp with Dynamic High Beam Control.
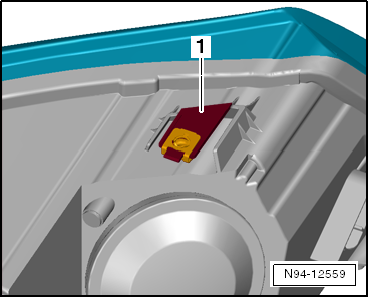
- Remove the mounting point -1- far enough until the new mounting point is even.
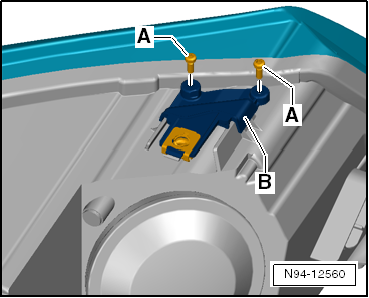
- Mount the repair tab -B- on the bulb socket on the headlamp and tighten the 2 screws -A- to 0.5 Nm.
- Install the headlamp.
- Check and correct headlamp adjustment, if necessary.
Inner Headlamp Mounting Tab, Repairing
- Switch off the ignition and all electrical consumers and remove the ignition key.
- Remove the headlamps:
- Headlamps with Halogen bulbs.
- HID Headlamp with Cornering Lamp and LED Daytime Running Lamp.
- HID Headlamp with Dynamic High Beam Control.
- Remove the rest of the old tabs -1- from the headlamp.
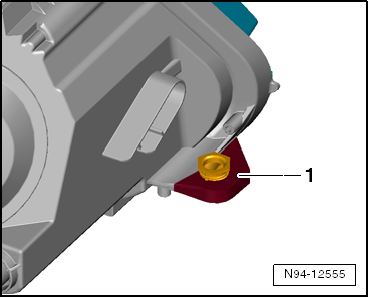
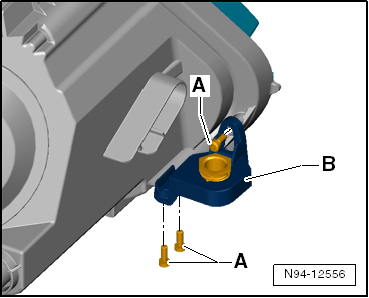
- Mount the repair tab -B- on the bulb socket on the headlamp and tighten the 2 screws -A- to 0.5 Nm.
- Install the headlamp.
- Check and correct headlamp adjustment, if necessary.
Tab, Repairing, Rear
- Switch off the ignition and all electrical consumers and remove the ignition key.
- Remove the headlamps:
- Headlamps with Halogen bulbs.
- HID Headlamp with Cornering Lamp and LED Daytime Running Lamp.
- HID Headlamp with Dynamic High Beam Control.
- Remove the rest of the old tabs -1- from the headlamp.
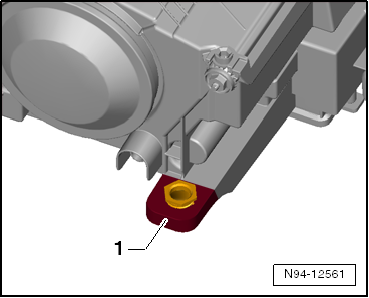
Note
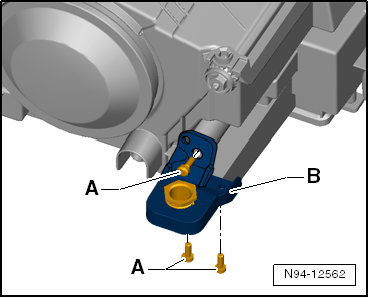
- The repair tab has two alternative holes for the upper screw -A-.
- Use the hole offset on the side when repairing headlamps with masked continuous high beam. Use the hole in the center when repairing all other headlamps.
- Push the tab -B- all the way onto the headlamp and tighten the three screws -A- to 0.5 Nm.
- Install the headlamp.
- Check and correct headlamp adjustment, if necessary.
Headlamp, Adjusting
- Adjust the headlamp.
 Exterior Lights, Switches
Electrical Components
When metal objects are touched an electric shock can result. The reason for
this the electrostatic charge of the human body. This charge can cause
malfunctions when electrical ...
 HID Headlamp with Cornering Lamp and LED Daytime Running Lamp
General Information
Note
Always switch off headlamps with gas-discharge lamps and remove ignition
key before working on headlamps.
Automatic vertical headlamp aim control of headlamps with gas-di ...
See More:
Volkswagen Tiguan Owners Manual > Instrument cluster: Introduction to the subject
More information:
Warning and indicator lights ⇒ Warning and indicator lights
Volkswagen Information System ⇒ Volkswagen Information System
Display of the selected gears (automatic transmission) ⇒ Shifting
Service reminder information ⇒BookletWarranty and Maint ...
Volkswagen Tiguan Owners Manual
Volkswagen Tiguan Service and Repair Manual
- Body exterior
- Body Interior
- General Paint Information
- Paint
- Brake System
- Suspension, Wheels, Steering
- Wheel and Tire Guide
- Towing Guide
- Wheel and Tire Guide General Information
- Communication
- Electrical Equipment General Information
- Electrical Equipment from 06/2011
- Heating, Ventilation and Air Conditioning
- Refrigerant R134a Servicing
- 6-Speed Manual Transmission 02Q, OBB, and OFB
