Volkswagen Tiguan Service and Repair Manual: Battery, Checking
General Information
WARNING
Risk of injury. Follow all Warnings and Safety Precautions.
Caution
In order to prevent damage to the battery or vehicle, observe battery type descriptions and notes.
Note
For each respective vehicle. Refer to for information regarding the battery.
Batteries, Checking
Battery with Visual Indicator, Checking
WARNING
Risk of injury. Follow all Warnings and Safety Precautions.
Perform Battery Checks in the Following Sequence:
- Visual inspection.
- Check the visual indicator.
WARNING
Do not check or charge batteries that have a visual indicator that is bright yellow. Jump starting must not be used!
There is a risk of explosion during testing, charging or jump starting.
These batteries must be replaced.
- Check the battery using the Battery Tester -VAS6161-.
- Depending on the battery test result, "perform a current draw test".
AGM Battery, Checking
Perform Battery Checks in the Following Sequence:
- Visual inspection.
- Check the battery using the Battery Tester -VAS6161-.
Visual Inspection
WARNING
Risk of injury. Follow all Warnings and Safety Precautions.
Prior to performing any measurements or tests, perform a visual check of the battery condition, battery terminals and secure mounting of battery.
Note
For each vehicle. Refer to for information regarding the battery.
Caution
- An improperly secured battery can lead to damage.
- Excessive vibration due to an improperly secured battery will reduce the battery service life, and the battery hold-down bracket could damage the battery housing and lead to electrolyte leakage.
- Check the battery for secure fitting, if necessary tighten the mounting bolt to the tightening specification.
By Performing Visual Inspection, it can be Determined:
- If the battery case is damaged. Acid can leak out if the case is damaged. Battery acid that has leaked out can cause severe damage to the vehicle. Acid that has leaked onto any part of the vehicle should be immediately treated with acid neutralizer or soap solution.
- If the battery terminals (battery wiring connections) are damaged. If the battery terminals are damaged, contact with battery terminals clamps cannot be guaranteed. When connecting the battery pole shoes, keep in mind that the tightening specification from the "Electrical Equipment" repair manual for the corresponding vehicle is used. If the battery post clamps are not correctly installed and secured, the wiring may burn. Substantial malfunctions to the electrical system are a consequence. Safe operation of the vehicle can no longer be guaranteed.
Visual Display in Battery Cover, Checking
3-Color Visual Indicator, Checking
WARNING
Risk of injury. Follow all Warnings and Safety Precautions.
Visual Indicator General Information
Applies to all original equipment batteries with index "1J0" , "7N0" and "3B0" and to all replacement batteries, part number 191 915 105 AB, and beginning with index "000 915 105 AX".The visual indicator shows the electrolyte level and the battery state of charge.
To obtain an accurate reading, gently tap the charge indicator with a screwdriver handle or rock vehicle slightly. By doing this, the air bubbles that occur normally during battery charging (even during vehicle operation) that adversely affect charge indicator reading will be displaced. The visual indicator will be more accurate.Note
- Air bubbles can especially form under visual indicator when a battery is charged, including when charged while driving. This will cause an incorrect display.
- The display is valid for only that one battery cell in which the visual indicator is located. An exact assessment of battery condition should always be confirmed by performing battery charge test → Chapter "Battery Tester -VAS6161-".
- The visual indicator may be located on different locations on the battery.
There Are Three Possible Color Indications:
- "Green": Battery is sufficiently charged.
- "Black": Insufficiently charged, less than 65% or discharged.
- "Colorless or light yellow", battery must be replaced.
WARNING
Do not check or charge batteries that have a visual indicator that is bright yellow. Jump starting must not be used!
There is a risk of explosion during testing, charging or jump starting.
These batteries must be replaced.
"2 Color" Visual Indicator, Checking
WARNING
Risk of injury. Follow all Warnings and Safety Precautions.
Visual Indicator General Information
The general introduction of the "2-color" display began as a running change in 2009. The color "green" for the state of charge was discontinued on the "2-color".The visual indicator shows the battery acid level.
It is no longer possible to read the battery state of charge using the visual indicator. It is necessary to perform a battery test. Refer toTo obtain an accurate reading, gently tap the charge indicator with a screwdriver handle or rock vehicle slightly. By doing this, the air bubbles that occur normally during battery charging (even during vehicle operation) that adversely affect charge indicator reading will be displaced. Thereby, the color indicator of the visual indicator is more accurate.
Note
- Air bubbles can especially form under visual indicator when a battery is charged, including when charged while driving. This will cause an incorrect display.
- The display is valid for only that one battery cell in which the visual indicator is located. An exact assessment of battery charge is only possible by performing a battery test.
- The visual indicator may be located on different locations on the battery.
Two Visual Indicators Are Possible:
- "Black", the electrolyte level is OK
- "Bright yellow", the electrolyte level is too low. The Battery must be replaced.
WARNING
Do not check or charge batteries that have a visual indicator that is bright yellow. Jump starting must not be used!
There is a risk of explosion during testing, charging or jump starting.
These batteries must be replaced.
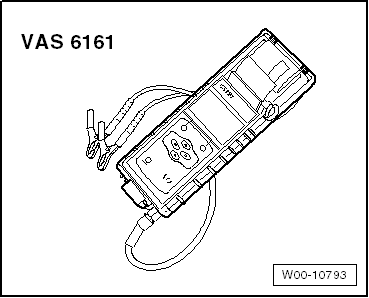
Battery Tester -VAS6161-
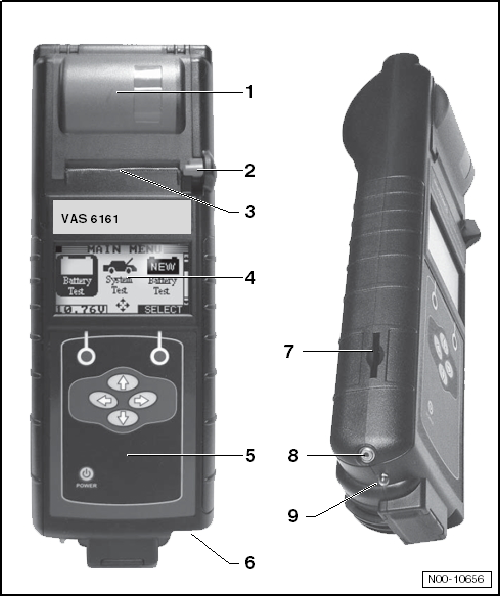
Battery Tester -VAS6161- Device Description
- Integrated printer
- Operating lever for the paper tray
- Paper slot
- LCD screen with main menu
- ON/OFF switch
- Connection for the battery tester cable
- Slot for the memory card
- Infrared temperature sensor
- PC file transmitter
General Description
WARNING
Risk of injury. Follow all Warnings and Safety Precautions.
It is not necessary to disconnect or remove the battery when using the Battery Tester -VAS6161-.
The Battery Tester -VAS6161- does not load the battery. It is working according to the principle of dynamic conductivity.
All battery types are stored in the tester.
The data can be stored on a SD memory card.
The Battery Tester -VAS6161- can be updated via an interface or a SD card, so that all battery data from Volkswagen is always current.
The integrated temperature sensor increases the quality of the measurements.
An optional 2D scanner is available to carry over the data from the battery 2D code.
Note
Read the Battery Tester -VAS6161- Operating Instructions.
Battery Test, Performing using Battery Tester -VAS6161-
Special tools and workshop equipment required
- Battery Tester -VAS6161-
WARNING
Risk of injury. Follow all Warnings and Safety Precautions.
Testing the Battery
WARNING
Do not check or charge batteries that have a visual indicator that is bright yellow. Jump starting must not be used!
There is a risk of explosion during testing, charging or jump starting.
These batteries must be replaced.
- Turn off the ignition and all electrical consumers.
- Battery with visual indicator, checking visual indicator.
- Switch on the unit.
- Clamp the red clamp "+" of the tester to the positive terminal.
- Clamp the black clamp "-" on the tester to the negative terminal.
Note
Make sure the test clamps make good contact!
- Select the following:
- Check the original batteries in the warranty mode.
- Check the replacement batteries in the service mode.
Note
- The test is over after approximately 10 seconds.
- The results of the test are output through the printer.
- It is not necessary to let the tester cool down before performing the next measurement.
Warranty Test, Performing
WARNING
Do not check or charge batteries that have a visual indicator that is bright yellow. Jump starting must not be used!There is a risk of explosion during testing, charging or jump starting.
These batteries must be replaced.- Select "Warranty Test".
- Select "inside the vehicle" or "outside of the vehicle".
- Select "at the battery pole" or "at the battery jump start terminal".
- Scan in the battery 2D code or manually select battery type and current strength.
- Measure the temperature. Hold the temperature sensor approximately 5 cm above the battery pole until the temperature is stable.
- Start the test.
- Print out the test report if necessary.
Maintenance Test, Performing
WARNING
Do not check or charge batteries that have a visual indicator that is bright yellow. Jump starting must not be used!There is a risk of explosion during testing, charging or jump starting.
These batteries must be replaced.- Select "Maintenance Test".
- Connect the scanner.
Note
If there is no scanner, manually enter the VIN on the printed test results.
- Scan the VIN.
- Select "at the battery pole" or "at the battery jump start terminal".
- Scan in the battery 2D code or manually select the type and manufacturer in the menu.
- Measure the temperature. Hold the temperature sensor approximately 5 cm above the terminal connection until the temperature is stable.
- Start the test.
- Print out the test report if necessary.
Service Test, Performing
Note
- The printed test results can differ depending on the software version.
- Read the Battery Tester -VAS6161- Operating Instructions.
WARNING
Do not check or charge batteries that have a visual indicator that is bright yellow. Jump starting must not be used!There is a risk of explosion during testing, charging or jump starting.
These batteries must be replaced.- Select "Service Test".
- Select "at the battery pole" or "at the battery jump start terminal".
- Select the type of battery: "standard", "AGM", "2*6V" or "Gel".
- Select the "CCA", "JIS", "DIN", "SAE", "IEC" or "EN".
- Select battery value.
- Measure the temperature. Hold the temperature sensor approximately 5 cm above the battery pole until the temperature is stable.
- Start the test.
- Print out the test report if necessary.
Explanation of Test Results
- Type of test.
- Battery test result.
- Measured voltage
- Measured cold start value.
- Cold start nominal value set on the tester
- Measured battery temperature
- Batter installed location
- Location of the battery terminal set on the tester
- Selected battery.
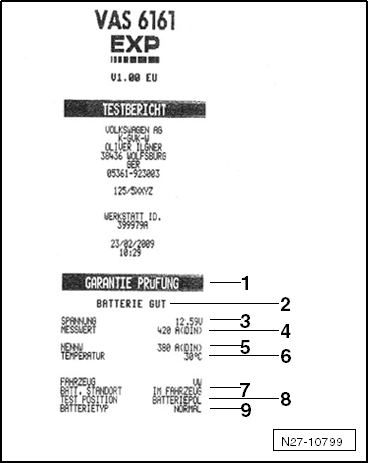
Note
The printed test results are required for warranty claims.
Evaluating Test Results
Evaluating Battery Test Results for Warranty and Service Tests
| Battery Test Result | Measure |
| Battery good | No measure on the battery |
| Battery good - recharge | Charge battery. If necessary, search for the cause of the discharging |
| Perform a current draw test | Perform a current draw test. Charge the battery completely and test again. |
| Replace the battery. | Disconnect the battery and test again. The result "replace the battery" can occur due to a weak cable contact. |
| Battery cell faulty - replace | Replace the battery. |
| Check the connection | Connect the cable directly to the battery and not to the battery jump start terminal. |
| Battery depleted | Replace the battery. |
Evaluating Battery Test Results for Maintenance Test
| Battery Test Result | Measure |
| Battery good | No measure |
| Charge the battery immediately. | Fully charge the battery. |
| Mark as defective | Mark as defective. |
| Check the tester connection | Disconnect the battery and test again. The result "check the tester connection" can occur because the cable contact is weak. |
| Check the connection | Connect the cable directly to the battery and not to the battery jump start terminal. |
| Noises | Wait until the measured value appears in the display. |
| Battery depleted | Replace the battery. |
Midtronics Battery Tester -MCR340VKT-
General Information
WARNING
Risk of injury.Read and follow the Safety Precautions when working with batteries.
Dispose of electrolyte (sulfuric acid/water mixture) safely. Electrolyte must be taken to approved locations that accept it. Follow local disposal ordinances.Do not check gas batteries. Danger of explosion.
WARNING
Batteries that have a light yellow visual indicator do not have to be tested or charged. Jump starting must not be used!There is a risk of explosion during testing, charging or jump starting.
These batteries must be replaced.Note
To prevent damaging the battery or the vehicle, pay attention to the battery type and notes.Only Volkswagen approved battery testers may be used to test batteries in Volkswagen vehicles. Use the Midtronics Battery Tester -MCR340VKT- in the USA and Canada.
Read the safety precautions, set- up and operating instructions that come with the Midtronics Battery Tester -MCR340VKT- and follow them exactly.Refer to Self Study Program; Vehicle Batteries for more information.
The following charging and analysis procedures apply to all batteries, all battery installed locations (engine compartment or luggage compartment) and all battery purposes (for the starter or for the second/convenience battery).Always follow the Safety Precautions, the instructions for setting up the battery tester, the display menu/display buttons, LEDs and the procedures in the MCR340V Operating Instructions.
Note
Always read all sub-chapters, notes and instructions for testing batteries.
Battery, Testing using Midtronics Battery Tester -MCR340VKT-
Requirements
WARNING
Read and follow the Safety Precautions when working with batteries.Batteries that have a light yellow visual indicator do not have to be tested or charged. Jump starting must not be used!
There is a risk of explosion during testing, charging or jump starting.These batteries must be replaced.
- Read the General Description.
- Visually check the battery.
- Open the hood or open the cover if the battery is installed somewhere else.
- Determine if it is a "Standard" battery or an "AGM" battery.
- Remove the covers on the battery positive and negative terminals.
- Use a fender protector or some type of cover before using any equipment inside the engine compartment or inside the passenger compartment.
- Close all the doors.
Note
- The battery temperature must be at least 10 ºC (50 ºF).
- Refer to the Battery Tester Charger Kit -VASRX3000- Operating Instructions for more information.
Performing the Test
WARNING
Batteries that have a light yellow visual indicator do not have to be tested or charged. Jump starting must not be used!There is a risk of explosion during testing, charging or jump starting.
These batteries must be replaced.- Turn off the ignition and all electrical consumers.
- Check the visual indicator.
- Switch on the unit.
- Clamp the red clamp "+" of the tester to the positive terminal.
- Clamp the black clamp "-" on the tester to the negative terminal.
Note
Make sure the test clamps make good contact!
- Select "inside the vehicle" or "outside of the vehicle".
- Select "Warranty Test".
Note
If the test results are needed to process a warranty claim, use the print function on the Midtronics Battery Tester -MCR340VKT-.
- Determine if it is a "Standard" battery or an "AGM" battery.
- Enter the battery DIN value taken from the battery label. If the label does not state a DIN value, then enter the SAE value.
- Enter the DIN value into the tester and then perform the battery test. Refer to MCR340V Operating Instructions.
- If using an SAE value, go into the menu under "other" and change "DIN" to "SAE". Refer to MCR340VKT Operating Instructions.
Note
Always use the DIN value on the battery label. Otherwise the test result will be incorrect.
Evaluating Test Results
Battery Test Result
| Battery Test Result | Measure |
| Battery good | None |
| Good - charge | Charge battery. |
| Use in charge | Charge battery. |
| Replace the battery. | Replace the battery. |
| Battery cell defective | Replace the battery. |
Midtronics Battery Tester -MCR340VKT-, Troubleshooting
Sometimes the display shows the malfunction or the messages based on the condition.The following is a list of the most frequent displayed messages together with suggested solutions.
Note
Refer to the MCR340V Operating Instructions for messages not listed here.
| Display Message | Measure |
| No display |
|
| System noises |
|
Wait a few minutes and then perform the test again.
Note
If the test was performed at the battery jump start terminal and the message still does not go away, then perform the test directly on the battery.
Current Draw Test
WARNING
Batteries that have a light yellow visual indicator do not have to be tested or charged. Jump starting must not be used!There is a risk of explosion during testing, charging or jump starting.
These batteries must be replaced.Note
- Make sure the correct charging mode is set on the charger so the current draw test is not inaccurate.
- Battery Charger -VAS5095A-.
- Battery Charger -VAS5900-.
- Battery Charger -VAS5903-.
In order to receive an indication as quickly as possible of the battery condition of discharged batteries, a conclusion can be made during the charging process using the battery current draw as to whether the battery should be replaced or charged completely.
Note
In the case of the Battery Tester -VAS6161-, the current draw test must always be conducted when the test result "conduct current draw test" appears in the display.
Always Perform A Current Draw Test When:
- the test result from the Battery Tester with Printer -VAS5097A- shows the following:
- Starting power sufficient
- Starting power insufficient
- Starting power very insufficient
- Not able to test - charge the battery and test again
- and in cases in which the unit does not switch on (no LED, no printout)
or
- the test result from the Battery Tester -VAS6161- shows the following:
- Perform a current draw test
By checking a battery's current draw capacity during the charging procedure, it can be determined in a short time whether a partially discharged or severely discharged battery (refer to → Chapter "Severely Discharged Batteries") can become operable again by further charging.
Test Prerequisites
- When charging a battery, the battery temperature must be at least ≥ +10 ºC (+50 ºF).
- The charger must be able to deliver at least 30 A charge current, for example as on the battery chargers -VAS5095A-, -VAS5900-and -VAS5903-.
- When charging using the Battery Charger -VAS5095A-, the battery current draw must be measured with a current probe, for example, Test Instrument Set - Current Clamp - 100A -VAS6356/4A-. The Battery Charger -VAS5900- and the Battery Charger -VAS5903- indicate the current draw on the device. The Battery Charger -VAS5900- automatically performs the menu- guided current draw test.
- Connect the battery to the battery charger and start the charging process.
- Measure the battery charge current after five minutes.
Test Result
When current draw A is greater than 10% of nominal capacity Ah (for example, > 6.1 A at 61 Ah battery), fully charge the battery and retest.
Note
On the Eos with two 6V AGM batteries, the charge current must only be greater than 5% of the battery nominal capacity in amp. As an example for Eos: the 50 Ah battery must have a charge current greater than 2.5 A after charging for five minutes.
- Charge the battery completely when the charge current is greater than 10% of the nominal capacity (note exception for Eos in the note above).
- After resting the battery for two hours, perform a battery test.
If the charge current is less than 10% of the nominal capacity (two 6 V batteries in the Eos 5%) five minutes after starting the test (that is, for a 50 Ah battery < 5A), then replace the battery. Fill out the battery check sheet for warranty and goodwill cases.
 Battery
Battery General Information
WARNING
Risk of injury. Follow all Warnings and Safety Precautions.
Caution
In order to prevent damage to the battery or vehicle, observe battery type
descriptions and no ...

See More:
Volkswagen Tiguan Owners Manual > Airbag system: Advanced Airbag System components
Read and follow the introductory information and
safety information first⇒Introduction
to the subject The front passenger seat in your vehicle has a lot of very important
parts of the Advanced Airbag System in it ⇒ How the Advanced Airbag System components
work together... . These pa ...
Volkswagen Tiguan Owners Manual
Volkswagen Tiguan Service and Repair Manual
- Body exterior
- Body Interior
- General Paint Information
- Paint
- Brake System
- Suspension, Wheels, Steering
- Wheel and Tire Guide
- Towing Guide
- Wheel and Tire Guide General Information
- Communication
- Electrical Equipment General Information
- Electrical Equipment from 06/2011
- Heating, Ventilation and Air Conditioning
- Refrigerant R134a Servicing
- 6-Speed Manual Transmission 02Q, OBB, and OFB
