Volkswagen Tiguan Service and Repair Manual: Tires, Dismounting
- Remove the valve insert.
Note
- If equipped handle the glued-on wheel trim carefully. Surface slightly scratched.
- Replace the damaged rim wheel trim.
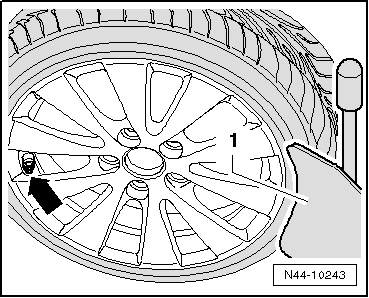
- Place the press-off blade -1- over the tire valve -arrow- and maximum 2 cm away from rim flange.
- Remove the balance weight and any dirt from the rim.
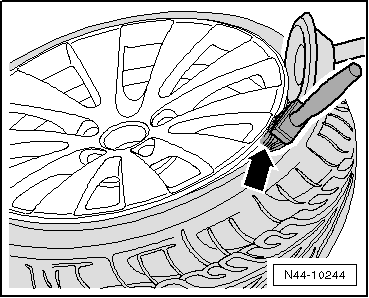
- Press off both tire beads all the way around and thoroughly apply tire mounting paste between the tire and rim flange -arrow-.
Note
Avoid strong braking or acceleration maneuvers during the first 100 to 200 km. Otherwise due to the tire mounting paste the tires can distort on the rim.
Tire Sealant, Removing
- Place the wheel on a flat surface.
- Remove the valve insert.
Caution
Tire sealant is harmful to health.
eye and skin irritation as well as allergies are possible.
- Wear safety gloves.
- Wear protective eyewear.
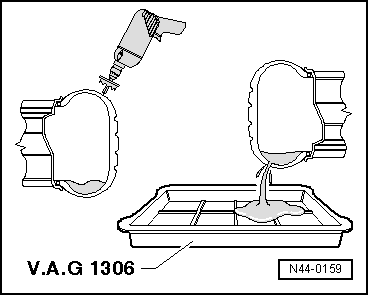
- Using a drill or cutting bit, carefully drill a hole in the tire shoulder area.
- Hold the wheel over a drip tray and let the sealant flow out.
- Remove the tire from the rim.
- Clean the rim.
Tires, Dismounting
Tires, Dismounting, Wheels without and with Tire Pressure Monitoring System
- If equipped check the tire pressure monitoring sensor with the vehicle diagnostic tester and if necessary replace.
Note
- When cleaning disc wheel (rim), the tire pressure monitoring sensor (if equipped) must not come into contact with water or be blown with pressurized air.
- If equipped handle the glued-on wheel trim carefully. Surface slightly scratched.
- Replace the damaged rim wheel trim.
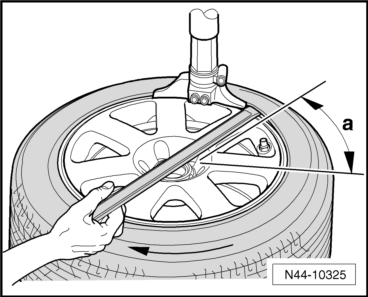
- Place the wheel with tire on the tire dismounting/mounting machine.
- Turn the wheel until the tire valve or the tire pressure monitoring sensor is a minimum of 30º before the mounting head.
- Pry the upper tire bead with the tire iron over the assembly carrier.
- Remove the tire iron.
- Let tire mounting device run clockwise until upper tire bead lies completely above the rim flange.
- Turn the wheel until the tire valve or the tire pressure monitoring sensor is a minimum of 30º before the mounting head.
- Pry the lower tire bead with the tire iron over the assembly carrier.
- Insert the plastic mounting lever.
- Remove the tire iron.
- Hold the lower tire bead from the outside above the wheel rim flange with the plastic lever -1-. Let the tire mounting device run clockwise until the tire is completely off the wheel rim.
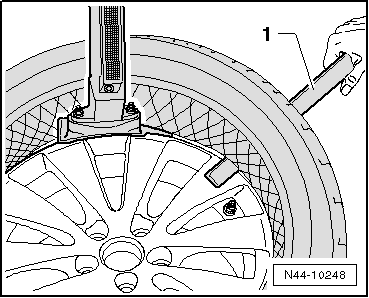
Note
- Check the tire pressure monitoring sensor for loose or damaged parts. If threaded connections are loose, the union nut, valve insert, seal, sealing washer and valve cap must be replaced by new parts from the repair set. Refer to Parts Catalog.
- Replace the tire pressure monitoring sensor is damaged.
Tires, Dismounting, Run-Flat Tires and Ultra High Performance Tires
- Only trained personnel can perform the assembly work on run-flat tires and ultra high performance tires.
- If equipped check the tire pressure monitoring sensor with the vehicle diagnostic tester and if necessary replace.
Note
- When cleaning disc wheel (rim), the tire pressure monitoring sensor must not come into contact with water or be blown with pressurized air.
- If equipped handle the glued-on wheel trim carefully. Surface slightly scratched.
- Replace the damaged rim wheel trim.
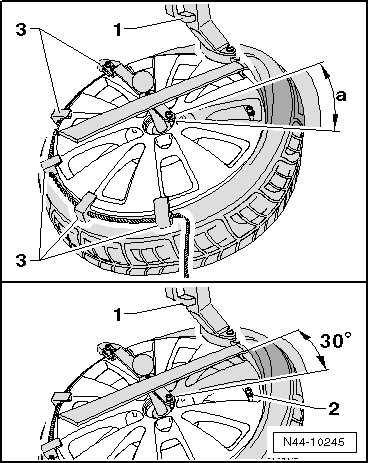
- Turn the wheel until the tire valve or the tire pressure monitoring sensor is a minimum of 30º before the mounting head.
- Insert the hold-down device -3- aligned with the mounting head -1- on the window edge.
- Pry the upper tire bead with the tire iron over the assembly carrier.
- Remove the tire iron.
- Let tire mounting device run clockwise until upper tire bead lies completely above the rim flange.
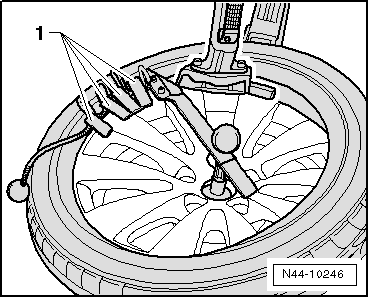
This slides the press holders -1- against the mounting head. This allows them to be removed again easily.
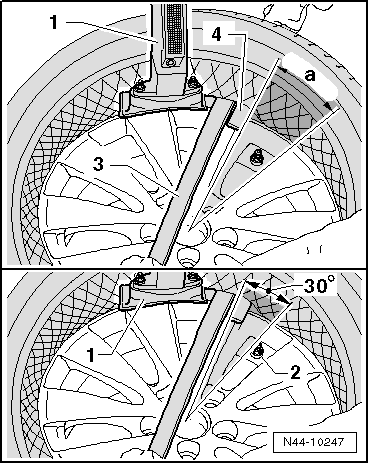
- Turn the wheel until the tire valve or the tire pressure monitoring sensor is a minimum of 30º before the mounting head.
- Now pry tire bead over mounting finger of mounting head using tire iron -3-.
- Pry the lower tire bead with the tire iron over the assembly carrier.
- Insert the plastic mounting lever -4-.
- Remove the tire iron -3-.
- Hold the lower tire bead from the outside above the wheel rim flange with the plastic lever -1-. Let the tire mounting device run clockwise until the tire is completely off the wheel rim.
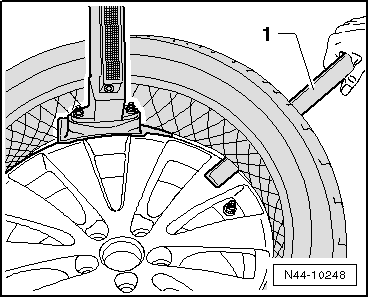
Note
- Check the tire pressure monitoring sensor for loose or damaged parts. If threaded connections are loose, the union nut, valve insert, seal, sealing washer and valve cap must be replaced by new parts from the repair set. Refer to Parts Catalog.
- Replace the tire pressure monitoring sensor is damaged.
Tires, Bringing to Mounting Temperature
Caution
There is a risk of damaging tires with strong heat.
- Never heat the tires with a heater or a hot air gun.
- Warm tires with warm water or warm air (maximum 50 ºC (86 ºF)).
The optimum mounting temperature of a tire is between 15 ºC and 30 ºC (59 and 86 ºF) on the inside of the tire. The temperature of the tire surface during the warm-up phase should not be considered as the interior temperature of the tire.
- Store cold tires one day before installing in the workshop on an insulated surface a wood pallet or something similar. Store the tires separately so that the surrounding air can warm them quickly.
Warm-Up Time for Urgent Cases
- Tires with an interior temperature over 0 ºC (32 ºF): minimum of two hours at minimum 19 ºC (66.2 ºF)
- Tires with an interior temperature under 0 ºC (32 ºF): minimum of two and a half hours at minimum 19 ºC (66.2 ºF)
Clean up condensation occasionally with a cloth.
Tires, Mounting
Tires, Mounting, Wheels without and with Tire Pressure Monitoring System
- Only trained personnel can perform the assembly work on run-flat tires.
- If equipped check the tire pressure monitoring sensor with the vehicle diagnostic tester and if necessary replace.
Bring the tires to the mounting temperature.
Note
- When cleaning disc wheel (rim), the tire pressure monitoring sensor (if equipped) must not come into contact with water or be blown with pressurized air.
- If equipped handle the glued-on wheel trim carefully. Surface slightly scratched.
- Replace the damaged rim wheel trim.
- Clean the rim.
- Insert new tire valve with Valve Fitting Tool -VAS6459-.
- Coat rim flanges, tire beads and inside of upper tire beads thoroughly with tire mounting paste.
- Place the inner side of the tire on the rim.
- Turn the rim until the tire valve of the tire pressure monitoring sensor aligns with the mounting head.
- Push the tires between the tire valve or the tire pressure monitoring sensor and the mounting head into the bed in direction of -arrow-.
- Let the tire dismounting/mounting machine run clockwise until the mounting head is in front of the tire valve or the tire pressure monitoring sensor. Slide the lower tire bead over the rim flange.
- Turn the rim until the tire valve of the tire pressure monitoring sensor aligns with the mounting head.
- Let the tire dismounting/mounting machine run clockwise until the mounting head is in front of the tire valve or the tire pressure monitoring sensor. Slide the upper tire bead over the rim flange.
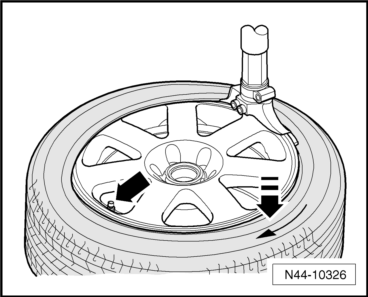
Caution
There is a risk of damaging the rim due through too high spring pressure.
Never set the spring pressure over 3.3 bar (47.86 psi).
- Inflate the tire to maximum pressure of 3.3 bar (47.86 psi) (spring pressure).
- If tire beads do not make contact completely on disc wheel edge, then release air, press off tire bead once more and coat rim flange thoroughly again with tire mounting paste.
- When the tire bead makes contact on the bead seat, increase the pressure to 4 bar (58 psi).
- If the tire bead does not make complete contact with the bead seat, dismount the tire and mount it again.
- Turn the valve insert.
- Fill the tire with the specified tire pressure.
- Balance the tire.
Note
Avoid strong braking or acceleration maneuvers during the first 100 to 200 km (62.13 to 124.27 miles). Otherwise due to the tire mounting paste the tires can distort on the rim.
Tires, Mounting, Run-Flat Tires and Ultra High Performance Tires
- Only trained personnel can perform the assembly work on run-flat tires and ultra high performance tires.
- If equipped check the tire pressure monitoring sensor with the vehicle diagnostic tester and if necessary replace.
Bring the tires to the mounting temperature.
Note
- If equipped handle the glued-on wheel trim carefully. Surface slightly scratched.
- Replace the damaged rim wheel trim.
- Clean the rim.
- Insert new tire valve with Valve Fitting Tool -VAS6459-.
- Coat rim flanges, tire beads and inside of upper tire beads thoroughly with tire mounting paste.
- Place the inner side of the tire on the rim.
- Turn the rim until the tire valve of the tire pressure monitoring sensor aligns with the mounting head.
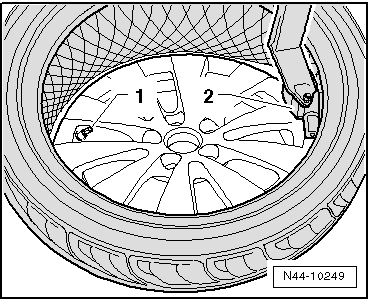
- Let the tire dismounting/mounting machine run clockwise until the mounting head is in front of the tire valve or the tire pressure monitoring sensor -arrow-. Slide the lower tire bead over the rim flange.
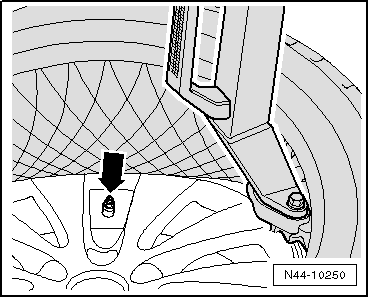
- Turn the rim until the tire valve of the tire pressure monitoring sensor -1- aligns with the mounting head -2-.
- Install the hold-down device -3- on the rim.
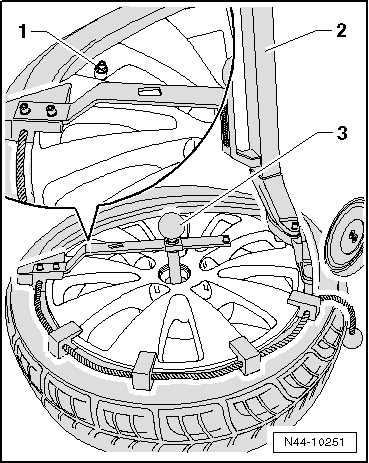
- Let the tire dismounting/mounting machine run clockwise until the mounting head is in front of the tire valve or the tire pressure monitoring sensor. Slide the upper tire bead over the rim flange.
- Remove the hold-down device from the wheel rim flange.
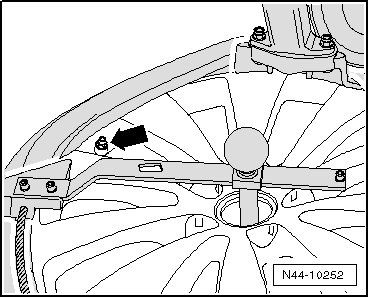
Caution
There is a risk of damaging the rim due through too high spring pressure.
Never set the spring pressure over 3.3 bar (47.86 psi).
- Inflate the tire to maximum pressure of 3.3 bar (47.86 psi) (spring pressure).
- If tire beads do not make contact completely on disc wheel edge, then release air, press off tire bead once more and coat rim flange thoroughly again with tire mounting paste.
- When the tire bead makes contact on the bead seat, increase the pressure to 4 bar (58 psi).
- If the tire bead does not make complete contact with the bead seat, dismount the tire and mount it again.
- Turn the valve insert.
- Fill the tire with the specified tire pressure.
- Balance the tire.
Note
Avoid strong braking or acceleration maneuvers during the first 100 to 200 km (62.13 to 124.27 miles). Otherwise due to the tire mounting paste the tires can distort on the rim.
Tires and Rims, Matching
- If necessary repair flat spots from standing.
- Dismount the tire.
- Turn the tire about 180º against the rim.
- Inflate the tire to 4 bar (58 psi).
- Tension the wheel with the tire on the balancing machine.
- Check the tire and wheel radial and lateral run-out.
- If the radial and lateral run-out are within the specified values, balance the wheel to 0.
- If the radial and lateral run-out are outside the specified values, match the tire and rim again and rotate the tire 90º relative to the rim.
- Check the tire and wheel radial and lateral run-out again.
- If the radial and lateral run-out are within the specified values, balance the wheel to 0.
- If the radial and lateral run-out are outside the specified values, match the tire and rim again and rotate the tire 180º relative to the rim.
- Check the tire and wheel radial and lateral run-out again.
- If the radial and lateral run-out are within the specified values, balance the wheel to 0.
- If the radial and lateral run-out are still outside the specified values check the rim for radial and lateral run-out.
- In the radial and lateral run-out of the rim is within the specified values, replace the tire.
 Tires, Mounting
...
 Wheel, Balancing
Wheel, Balancing on Stationary Balancing Machine
Before beginning balancing, the following requirements must be fulfilled.
The tire pressure must be OK.
The tire profile must not be worn on one sid ...
See More:
Volkswagen Tiguan Owners Manual > Jump-starting: Checklist
Switch off the headlights (if they are
on).
In the vehicle with the dead battery,
switch on the heater fan and the rear window defroster. This helps to minimize
voltage spikes when the cables are disconnected.
With the engine running, remove the jumper cables in reverse order
...
Volkswagen Tiguan Owners Manual
Volkswagen Tiguan Service and Repair Manual
- Body exterior
- Body Interior
- General Paint Information
- Paint
- Brake System
- Suspension, Wheels, Steering
- Wheel and Tire Guide
- Towing Guide
- Wheel and Tire Guide General Information
- Communication
- Electrical Equipment General Information
- Electrical Equipment from 06/2011
- Heating, Ventilation and Air Conditioning
- Refrigerant R134a Servicing
- 6-Speed Manual Transmission 02Q, OBB, and OFB
