Volkswagen Tiguan Service and Repair Manual: Door Components
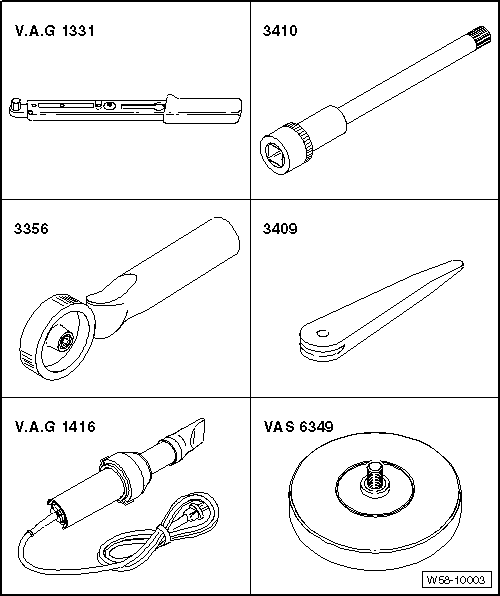
Tools
Special tools and workshop equipment required
- Torque Wrench 1331 5-50Nm -VAG1331-
- Cylinder Head Bolt Socket -3410-
- Roller -3356-
- Trim Removal Wedge -3409-
- Wiring Harness Repair Set - Hot Air Blower -VAS1978/14A-
- Adhesive Strip Remover -VAS6349-
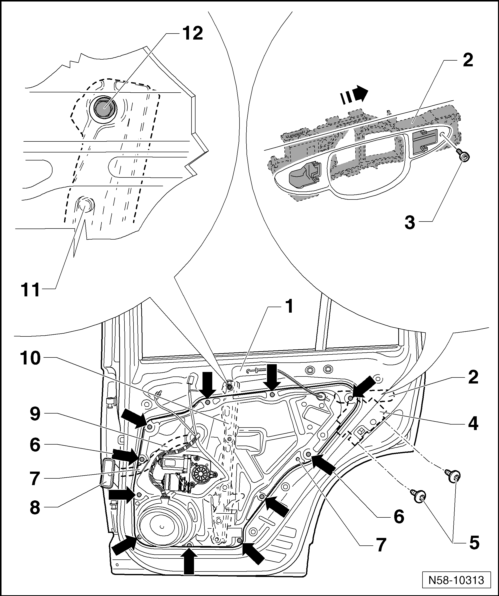
Overview - Subframe
Note
The illustration shows the right side. The left side is identical.
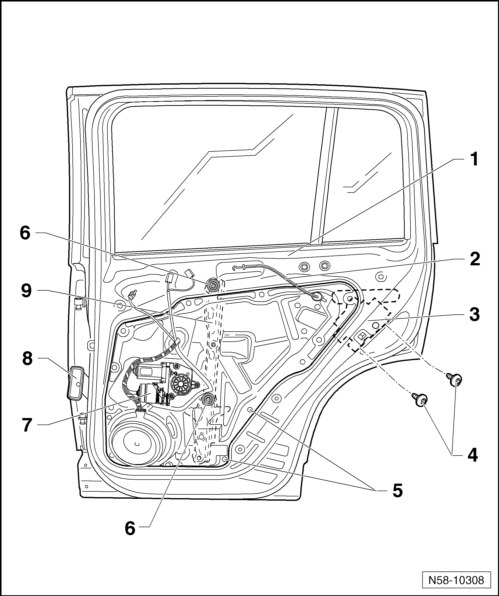
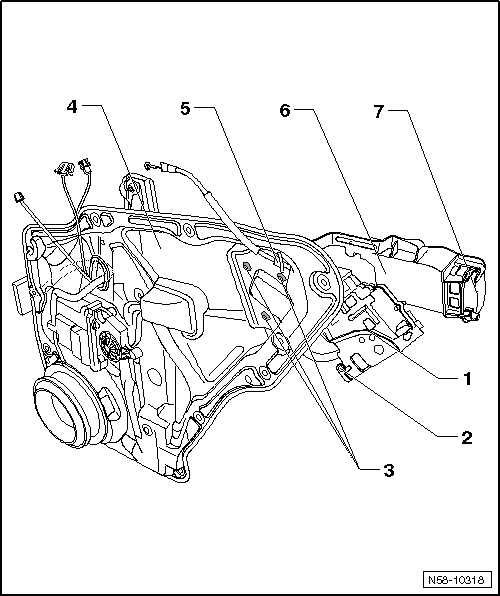
- Subframe
- Release Cable
- From the internal mechanism to the door lock
- Door Lock
- Bolt
- 20 Nm
- Quantity: 2
- Bolt
- 8 Nm
- Quantity: 10
- Cover Caps for Assembly Opening
- Quantity: 2
- Window Regulator Motor
- Removing
- Connector
- To the B-pillar
- Window Regulator
Subframe, Removing and Installing
Note
- Removing and installing is described only for the right subframe. Removing and installing the left subframe is derived accordingly from this
- The removal and installation of the subframe is different on the sedan and wagon.
The window regulator, door lock and speaker are secured to the subframe.
The door lock can only be removed with the subframe.
The subframe can only be removed when the door window has been detached at the window regulator clamping screws. To do this, the window must be lowered to the level of the installation holes in the subframe and the clamping screws must be loosened.
If it is not possible to drive down the door window by the electrical window regulator, first the exact cause of malfunction must be determined.
The convenience system DTC memory must be checked with a Vehicle Diagnostic Tester.
If electrical malfunction is present, repair this malfunction first.
If there is an electrical malfunction due to window regulator motor, it can be unscrewed from subframe and door window can be slid by hand into the necessary work position.
Removing

- Remove the door trim panel.
- Door handle, removing.
- Pry out the caps -5-.
- Lower door window until spreader pin -4- and spreader plug -3- are accessible in window regulator cut-out.
- Install a 5 mm bolt (approximately. 70 mm long) into the spreader pin -4- and pull bolt out of spreader plug -3-.
- Screw in a 8 mm bolt (approximately. 80 mm long) into spreader plug -3- and pull spreader plug -3- out of window regulator mount -2-.
Note
When screwing the bolt into spreader plug, do not use excessive force on the plug otherwise it may fall inside into the door.
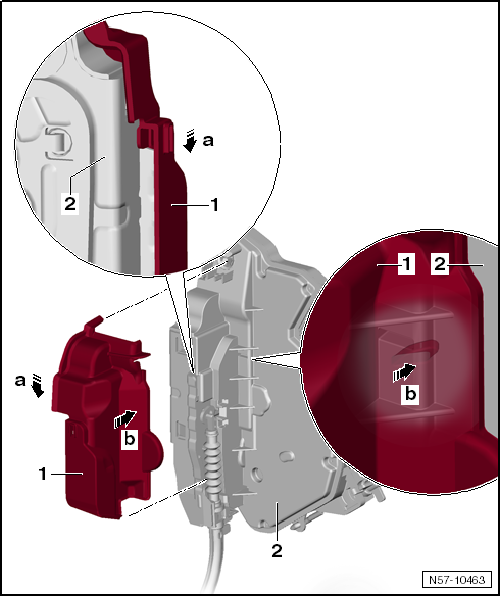
- Disengage the retainer on the protective sleeve -6- on the B-pillar -arrow a- and remove the protective sleeve.
- Open the locking mechanism of the B-pillar connector -8- by swiveling it downward -arrow b- and disconnect the connector.
- Remove the bolt -12-.
- Remove the screws -5- for the door lock -4-.
- Remove the bolt -3- for the mounting bracket -2-.
- Slide mounting bracket in direction of -arrow- to disengage hook of mounting bracket from door.
- Remove the bolts -7- and -arrows-.
- Guide the electrical connector -3- into door.
- Pull off lower area of subframe from door in direction of -arrow a-.
- Pull the subframe downward at an angle toward the hinge pillar in direction of -arrow b- and out of the door. First, the upper section of the window regulator -5- must be guided out of the door, then the door lock -2-.
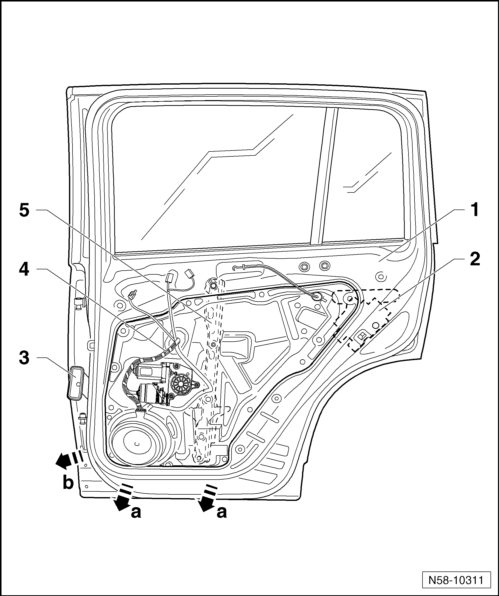
Installing
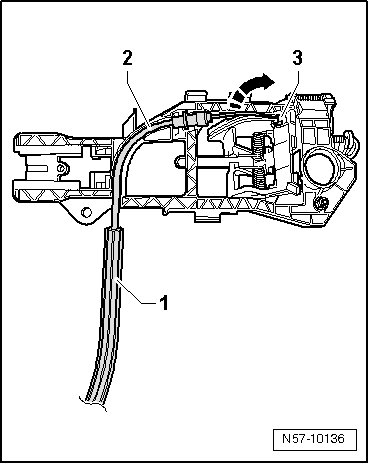
- Insert subframe -1- upward in direction of -arrow a- at an angle into door.
- Guide door lock -2- and wiring harness -3- in door to the corresponding component locations.
- Lift the subframe in direction of -arrow b- together with the window regulator -6- into the installation position.
- Place the subframe in the lower area of the door in direction of -arrows c-.
- Align the subframe-1- in the door cutout using the centering pins-7-.
- Install all bolts. First tighten the bolts -6-.
- Tighten the remaining bolts -arrows- in any desired sequence.
Tightening specifications for bolts -6 and arrows-: 8 Nm.
- Tighten the bolt -12- for the window regulator -11-. Tightening specification: 8 Nm.
- Install the door window.
- Tighten bolts -5- for door lock.
Tightening specifications for bolt -5-: 20 Nm.
- Continue by performing the steps used in removal in reverse order.
A function test must be performed before door trim is installed.
Overview - Door Handle and Door Lock
Note
The illustration shows the right side. The left side is identical.
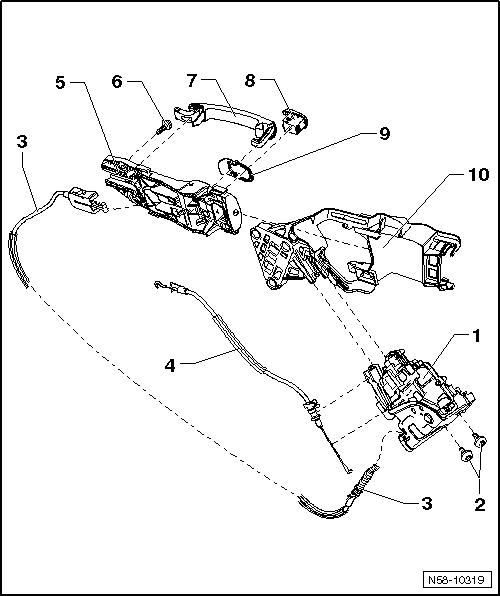
- Door Lock
- Door lock can only be removed in conjunction with subframe
- Removing and installing.
- Bolt
- 20 Nm
- Cable
- To lock release mechanism of exterior door handle
- Cable
- For unlocking the lock by the interior door mechanism
- Bracket
- Mounting bracket is bolted from outside and inserted on angled mounting bracket
- Bolt
- Door Handle with Backing Plate
- Removing and installing.
- Cap
- Removing and installing.
- Backing Plate
- Bracket
- Inserted on and engaged on the door lock
Cap, Removing and Installing
Tools
Special tools and workshop equipment required
- Lock Cylinder Housing Assembly Tool -T10389-
Removing
Note
The following describes removing and installing the right cap. Removing and installing the left cap is derived accordingly from this.
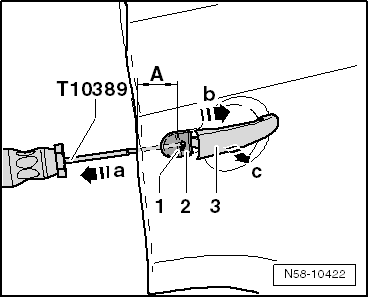
- Guide the Lock Cylinder Housing Assembly Tool - T10389- 110 mm -dimension A- into the door and behind the locking bracket.
- Pull the locking bracket -1- back 5 mm in direction of -arrow a-.
- Slightly pull the door handle -3- from the outer door panel in direction of -arrow b-.
- Remove the cap -2- from the door handle mounting bracket at a right angle in direction of -arrow c-.
Note
The door handle touches the outer door panel.
Installing
- Gently remove the door handle -3- slightly from the outer door panel in direction of -arrow c-.
- Place the cap -2- at a right angle onto the door handle mounting bracket.
- Guide the Lock Cylinder Housing Assembly Tool - T10389- 100 mm -dimension A- into the door to the locking bracket.
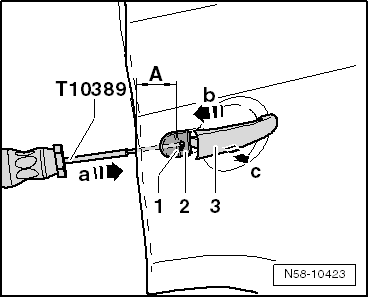
Note
While installing, the cap is pressed into the outer door panel.
- Push the locking hook forward approximately 5 mm in direction of -arrow b-.
Installation is performed in reverse order of the removal.
Then, always perform a function test with door opened.
Door Handle, Removing and Installing
Note
The following describes the removal and installation of the right door handle. Removing and installing the left door handle is identical.
The door handle touches the outer door panel.
When removing the door handle, the mounting bracket mount fold to the inside. When installing, the chamfer on the door handle "automatically" attaches the handle to the bracket.
Removing
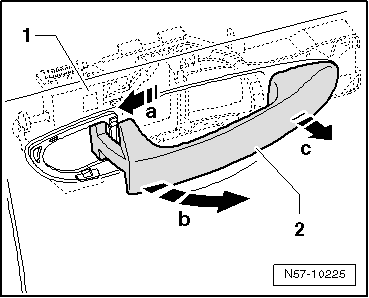
- Remove the cap.
- Pull door handle -2- slightly toward rear in direction of -arrow a- out of mount of mounting bracket.
- Swivel door handle around in direction of -arrow b-.
- Remove door handle at right angle in direction of -arrow c- to door from mounting bracket -1-.
Installing
Note
- The door handle touches the outer door panel.
- When removing the door handle, the mounting bracket mount folded to the inside. When installing, the chamfer on the door handle "automatically" attaches the handle to the bracket.

- Insert the door handle -1- into the mounting bracket -2- at a right angle to the door -arrow a-.
- Swing door handle -1- into door in direction of -arrow b-.
- Slide door handle slightly toward front in direction of -arrow c- into mount in mounting bracket.
Install the cap.
Then, always perform a function test with door opened.
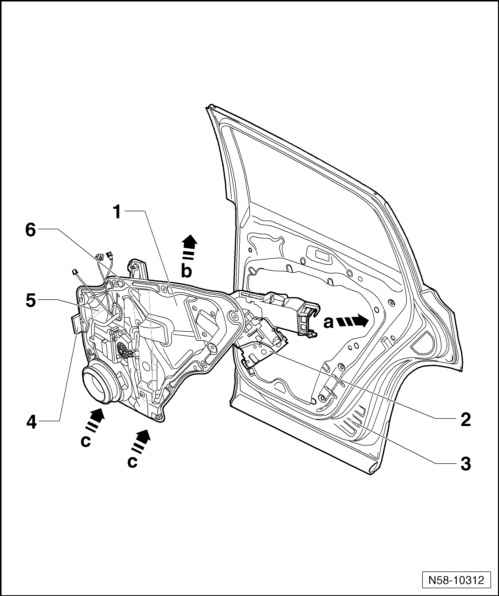
Door Lock, Removing and Installing
Note
The following describes removing and installing the right door lock. Removing and installing the left door lock is derived accordingly from this.
Removing
- Remove the subframe.
- Rotate the subframe -4- around and disconnect the connector -2- from the door lock -1-.
- Drive the clips -3- out using a drift.
- Using a screwdriver, pry off door lock -1- with angled mounting bracket -6- and mounting bracket -7- from subframe.
- At the same time, guide the release -5- out of the subframe.
- Remove the mounting bracket.
- Remove the bracket.
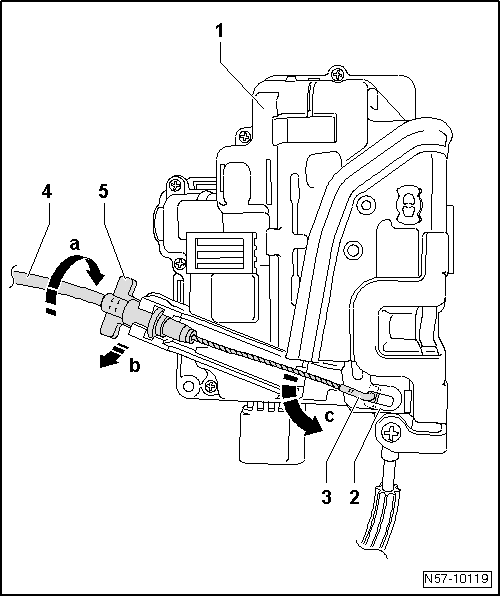
- Turn the retainer -5- in direction of -arrow a- to release.
- Lift retainer -5- out of mount -arrow b-.
- Swivel cable -4- 90º -arrow c- and remove nipple -3- from eyelet -2-.
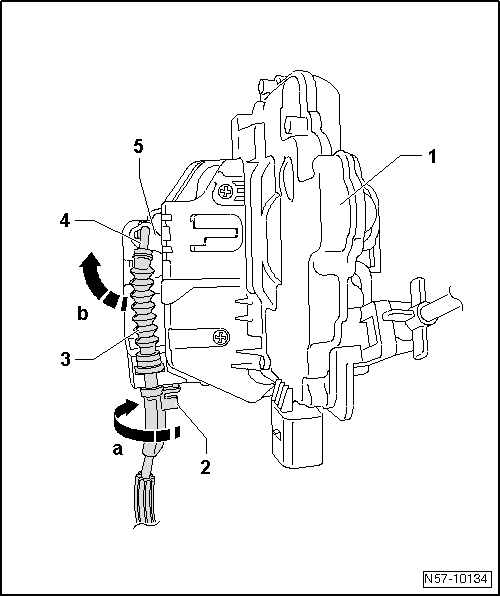
- Rotate lock -1- around.
- Engage retainer -2- by rotating in direction of -arrow a-.
- Remove retainer -2- from mount.
- Swivel cable -3- in direction of -arrow b- and remove nipple -4- from eyelet -5-.
Installing
Note
Make sure to install the cover before installing the door lock.
- Push the cover -1- onto the guide -2- in direction of -arrow a-.
- Lock the cover -1- into the center of the door lock -2- in direction of -arrow b-.
Installation is performed in reverse order of the removal.
Then a function test must be performed with door open, since the door cannot be opened if release is not correctly adjustment or clipped in
Bracket, Removing and Installing
Removing

- Remove the subframe.
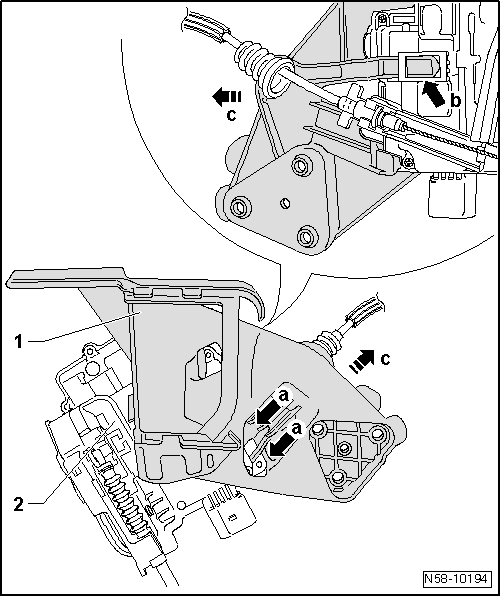
- Press down locking mechanism on mounting bracket -5--arrow a-.
- Slide mounting bracket -1- in direction of -arrow b- until mounting points -6- in guide of angled mounting bracket -2- are visible.
- Remove mounting bracket from angled mounting bracket.
- Remove cable -1- out of guide in mounting bracket -2-.
- Swivel cable -1- in direction of -arrow- and remove nipple -3- from eyelet.
Installing

- Secure the cable nipple -3- in the eyelet and swivel the cable -1- opposite the direction of the -arrow- onto the mounting bracket.
- Secure cable -1- in guide in mounting bracket -2-.

- Guide mounting points -6- of mounting bracket -1- into guides of angled mounting bracket -5-.
- Slide the bracket into the retainer until the it engages -arrow a-.
Bracket, Removing and Installing
Removing
- Remove the subframe.
- Disengage catches -arrows a-.
- Pull off angled mounting bracket -1- from door lock -2- in direction of -arrow c-.
Installing

- Slide angled mounting bracket into mount of lock -arrow b-.
- Engage angled mounting bracket -1- and door lock -2- with each other -arrows a-.
Internal Door Seals
The inner door seals are equipped at the factory with sealant, applied to the door flange and then rolled on.
Note
- When the seal is removed, the sealant spreads on the inner side of the seal and the sides bend up slightly. If the seal is reinstalled, the sealing ability and secure fit can no longer be guaranteed.
- For this reason, every completely removed seal must be replaced with a so-called "hammer-stroke seal".
- With partially removed seals, press the edges of the seal together before installing.
Inner Door Seal, Removing and Installing
Note
The following describes removing and installing the right inner door seal. Removing and installing the left inner door seal is identical.
Removing

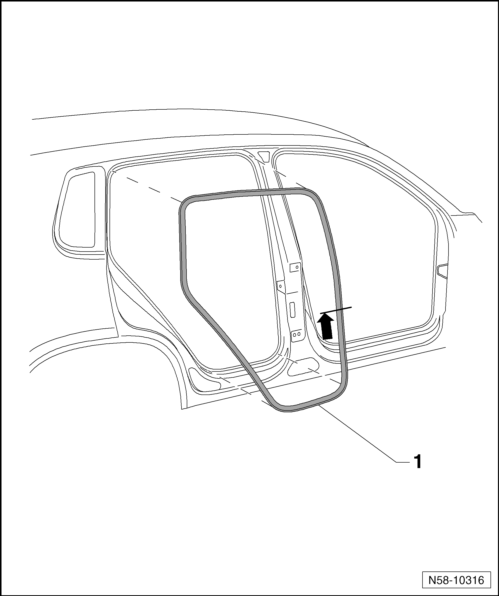
- Remove the pillar trim in order to remove the inner door seal.
- Remove the sill panel strip.
- Pull off inner door seal -1- from body flange.
Installing
- Align the inner door seal -1- with the vulcanized point -arrow - at the height of the lower hinge.
- Start installing the inner door seal in the upper curve of the door opening.
Outer Door Seal, Removing and Installing
Note
- The following describes removing and installing the right outer door seal. Removing and installing the left outer door seal is identical.
- Only remove the protective film right before assembly. Processing temperature approximately 20 ºC (68 ºF).
Removing
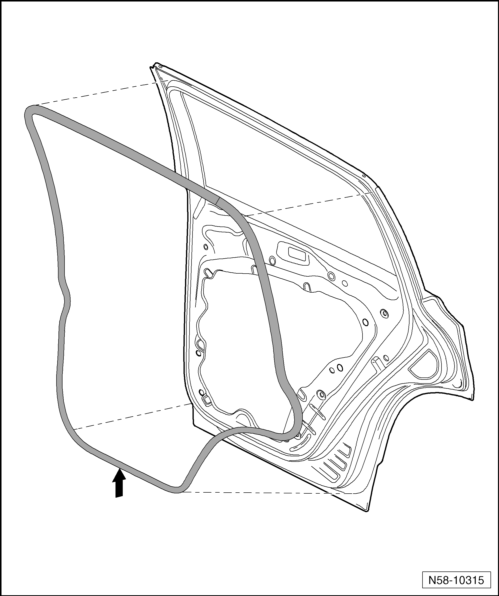
- Pull off outer door seal from door.
Installing

- If there is adhesive residue, remove it with the Adhesive Strip Remover -VAS6349-.
- Thoroughly clean the adhesive surface with the Adhesive Remover -D 002 000 10-right before installing the outer door seal.
The adhesive surface must be free of dust, grease and adhesive residue.
- Align outer door seal with vulcanized point -arrow- at the height of the lower hinge.
- Remove the protective film and apply the seal to the door. Do not stretch the outer door seal excessively so that the seal is not too long at the end.
- Start installing the outer door seal in the upper curve of the door opening.
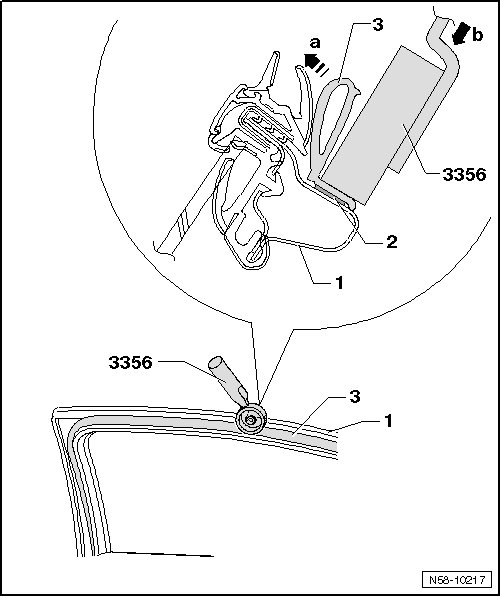
- Press the entire adhesive surface of the seal -3- firmly onto the door all around -1- using the Roller -3356-.
- This way, the seal is pressed to the side in direction of -arrow a- so that the Roller -3356- comes into direct contact with the seal contact surface.
The force -arrow b- of the application roller only really reaches the adhesive surface -2- as described above.
- If the seal has become too long, cut it back to the correct length and press on the joint area.
- If small areas of the seal -3- loosen again, press them back on with the Roller - 3356-.
Note
To ensure that the outer door seal does not loosen or slide again, do not close the door for 2 hours.
Overview - Noise Insulation
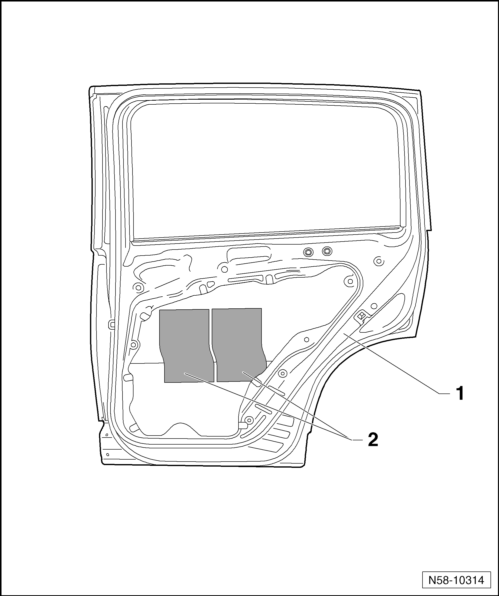
- Door
- Insulation
Self-adhesive
Installing:
- Cut to fit as necessary and align between the door edges.
- Warm using the Wiring Harness Repair Set - Hot Air Blower -VAS1978/14A- and then press firmly onto the outer door panel.
Special Tools

Special tools and workshop equipment required
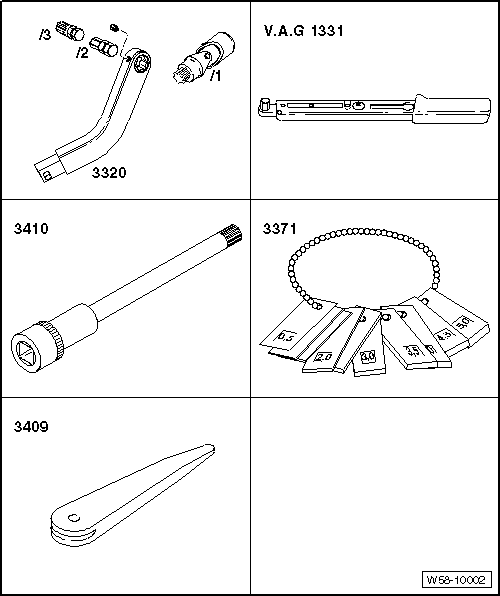
Special tools and workshop equipment required
- Wrench - Door Adjusting -3320-
- Joint for 3320 Tool -3320/1-
- Wrench - Door Adjusting - Box Wrench -3320/2-
- Wrench - Door Adjusting - Box Wrench -3320/3-
- Torque Wrench 1331 5-50Nm -VAG1331-
- Cylinder Head Bolt Socket -3410-
- Gauge - Gap Adjustment -3371-
- Trim Removal Wedge -3409-
- Torque Wrench 1331 5-50Nm -VAG1331-
- Cylinder Head Bolt Socket -3410-
- Roller -3356-
- Trim Removal Wedge -3409-
- Wiring Harness Repair Set - Hot Air Blower -VAS1978/14A-
- Adhesive Strip Remover -VAS6349-

Lock Cylinder Housing Assembly Tool -T10389-
 Rear Door
Tools
Special tools and workshop equipment required
Wrench - Door Adjusting -3320-
Door Adjusting Wrench - Joint -3320/1-
Wrench - Door Adjusting - Box Wrench -3320/2-
Wrench - Door Adjusting - B ...
 Sunroof
...
See More:
Volkswagen Tiguan Service and Repair Manual > Interior Lights, Switches: Horn
High Tone Horn -H2- and Low Tone Horn -H7-
High Tone Horn -H2- and Low Tone Horn -H7-, Removing and Installing
Special tools and workshop equipment required
Torque Wrench 1331 5-50Nm -VAG1331-
The horns are attached on the left side (High Tone Horn -H2-) and right side
(Low Tone Horn -H7-) next ...
Volkswagen Tiguan Owners Manual
Volkswagen Tiguan Service and Repair Manual
- Body exterior
- Body Interior
- General Paint Information
- Paint
- Brake System
- Suspension, Wheels, Steering
- Wheel and Tire Guide
- Towing Guide
- Wheel and Tire Guide General Information
- Communication
- Electrical Equipment General Information
- Electrical Equipment from 06/2011
- Heating, Ventilation and Air Conditioning
- Refrigerant R134a Servicing
- 6-Speed Manual Transmission 02Q, OBB, and OFB
