Volkswagen Tiguan Service and Repair Manual: Central Locking
Component Location Overview - Central Locking Components
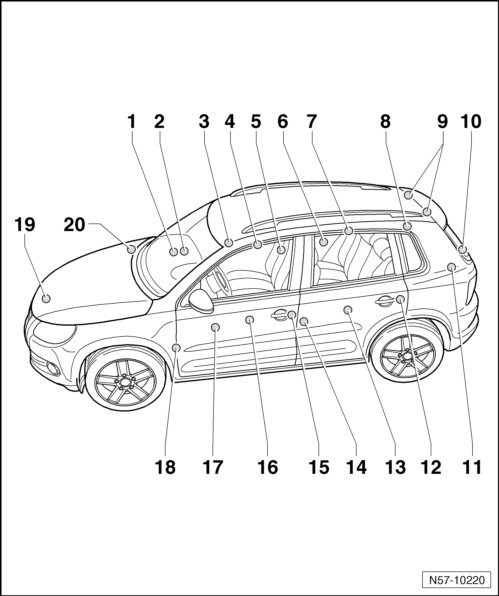
- Comfort System Central Control Module -J393-
- Installed location: under the instrument panel on the front passenger side
- Removing.
- Connector Station
- Component location: right A-pillar.
- Loosen the boot on the pillar to disconnect the connector.
- Front Passenger Door Control Module -J387-
- Integrated in window regulator motor.
- Removing.
- Front Passenger Central Locking Lock Unit -F221-
- Door lock is secured to subframe.
- Electrical central locking system is integrated in door lock.
- Removing
- Connector Station
- Component location: right B-pillar
- To disconnect the connector, loosen the boot at the pillar
- Right Rear Door Control Module -J389-
- Integrated in window regulator motor.
- Removing.
- Right Rear Central Locking Lock Unit -F223-
- Door lock is secured to subframe.
- Electrical central locking system is integrated in door lock.
- Removing.
- Fuel Filler Door Unlock Motor -V155-
- Installed location: on the fuel filler door unit
- Rear Lid Connector Station
- Installed location: behind the luggage compartment trim panel on the left side
- Removing and installing.
- Release Button In Rear Lid Handle -E234-
- Rear Lid Lock Unit -F256-
- Component location: bolted to the rear lid
- Removing and installing.
- Left Rear Central Locking Lock Unit -F222-
- Door lock is secured to subframe.
- Electrical central locking system is integrated in door lock.
- Removing.
- Left Rear Door Control Module -J388-
- Integrated in window regulator motor.
- Removing.
- Connector Station
- Component location: left B-pillar
- To disconnect the connector, loosen the boot at the pillar
- Driver Central Locking Lock Unit -F220-
- Door lock is secured to subframe.
- Electrical central locking system is integrated in door lock.
- Removing.
- Driver Door Control Module -J386-
- Integrated in window regulator motor.
- Removing.
- Central Window Regulator Switch In Driver Door -E189-
- Component location: installed in the door trim panel.
- Window regulator central switch, removing and installing.
- Connector Station
- Component location: left A-pillar
- Loosen the boot on the pillar to disconnect the connector.
- Engine Hood Contact Switch -F266-
- Contact Switch, Removing and installing.
- Component location: on the latch
- Lid Latch, Removing and installing.
- Alarm Horn -H12-
- Component location: inside the plenum chamber
- Removing.
Remote Control Key Battery, Foldable, Removing and Installing
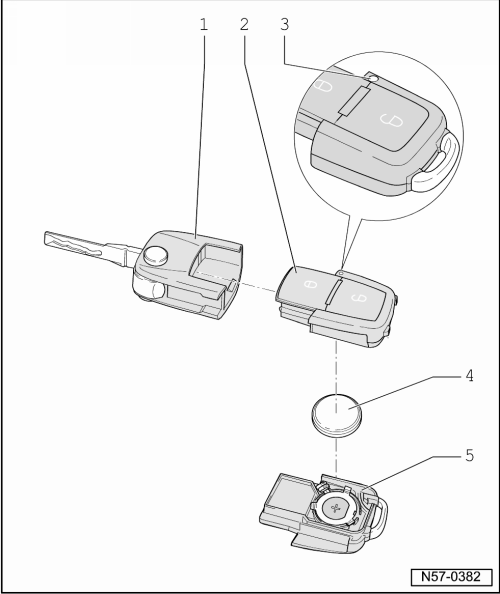
- Key with Variable Code Transponder
- Radio Frequency Unit - Upper Section
- Version also with 3 buttons
- LED
- This LED must blink when operating the remote control
- If LED does not blink when remote control is operated, the battery is completely discharged and must be replaced:
- Battery
- Battery, removing.
- Battery, installing.
- Radio Frequency Unit - Lower Section
Removing
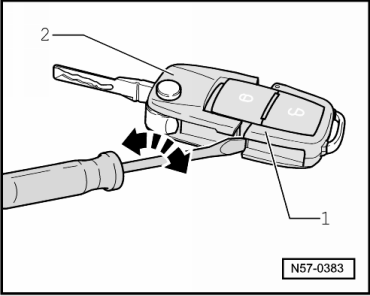
- Insert screwdriver in the slot between radio-frequency unit -1- and key -2-.
- Turn the screwdriver in the direction of the -arrow- to remove the radio frequency unit from the key.
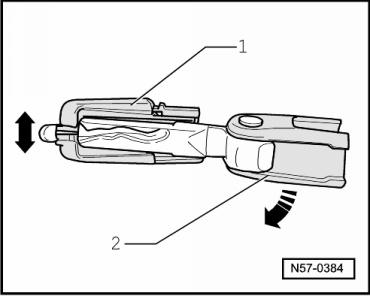
- Press radio frequency unit -1- apart with key bit on key -2-.
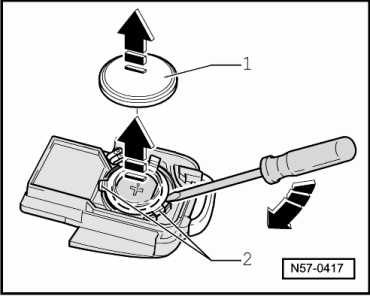
- Use a screwdriver to unclip battery -1- out of holders -2- in direction of -arrow-.
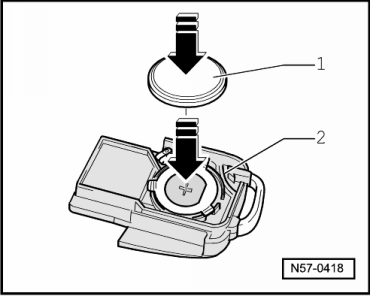
Installing
Note
- Before installing the battery, one of the buttons must be pushed.
- This resets the radio-frequency unit, and it can now recognize the new battery.
Keep the correct polarity and position when installing the batteries.
- Place battery -1- in radio-frequency unit -2- with positive terminal downward (positive terminal is marked in housing).
- Press the battery lightly to secure it in the radio frequency unit.
- Install the cover on the radio frequency unit without damaging the seal.
- Then lock radio-frequency unit with key.
Keys, Adapting
The keys are adapting using the Vehicle Diagnostic Tester.
- Select "Guided Fault Finding" on the Vehicle Diagnostic Tester.
- Select "Function/Component Selection" using the GO TO button.
Special Tools
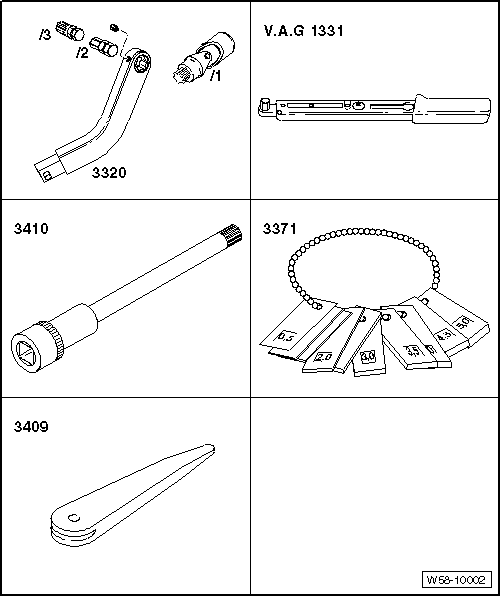
Special tools and workshop equipment required
- Wrench - Door Adjusting -3320-
- Joint for 3320 Tool -3320/1-
- Wrench - Door Adjusting - Box Wrench -3320/2-
- Wrench - Door Adjusting - Box Wrench -3320/3-
- Roller - 3356-
- Torque Wrench 1331 5-50Nm -VAG1331-
- Gauge - Gap Adjustment -3371-
- Cylinder Head Bolt Socket -3410-
- Trim Removal Wedge -3409-
- Torque Wrench 1331 5-50Nm -VAG1331-
- Cylinder Head Bolt Socket -3410-
- Roller -3356-
- Trim Removal Wedge -3409-
- Wiring Harness Repair Set - Hot Air Blower -VAS1978/14A-
- Adhesive Strip Remover -VAS6349-
Lock Cylinder Housing
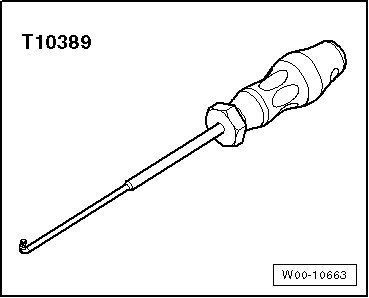
- Assembly Tool -T10389-
 Door Components
Tools
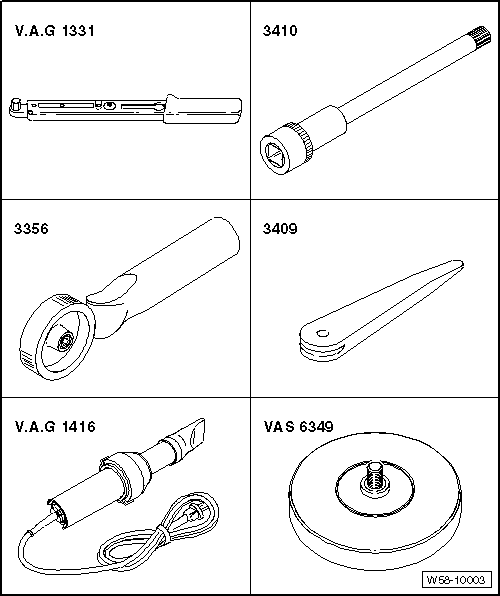
Special tools and workshop equipment required
Torque Wrench 1331 5-50Nm -VAG1331-
Cylinder Head Bolt Socket -3410-
Roller -3356-
Trim Removal Wedge -3409-
Wiring Harness Repair Set - Hot A ...
 Rear doors
...
See More:
Volkswagen Tiguan Service and Repair Manual > Rear Suspension: Shock Absorber and Coil Spring, FWD
Overview - Shock Absorber and Coil Spring, FWD
Note
Overview - Adaptive Chassis DCC Shock Absorber, FWD.
Lower Spring Support
Spring end rotated up to stop
Assembly Aid
Must not be used after removal
Coil Spring
There are different suspension versions.
Removing and installing. ...
Volkswagen Tiguan Owners Manual
Volkswagen Tiguan Service and Repair Manual
- Body exterior
- Body Interior
- General Paint Information
- Paint
- Brake System
- Suspension, Wheels, Steering
- Wheel and Tire Guide
- Towing Guide
- Wheel and Tire Guide General Information
- Communication
- Electrical Equipment General Information
- Electrical Equipment from 06/2011
- Heating, Ventilation and Air Conditioning
- Refrigerant R134a Servicing
- 6-Speed Manual Transmission 02Q, OBB, and OFB
