Volkswagen Tiguan Service and Repair Manual: Safety Precautions, General Information
Safety Precautions
Safety Precautions when Painting Vehicles with Electric Drive
Caution
Risk of damaging the battery cells at too high of drying temperatures!
- Observe the maximum drying time of 30 minutes at a drying temperature of +80 ºC (176 ºF).
- Observe the maximum drying time of 45 minutes at a drying temperature of +60 ºC (140 ºF).
- Protect all high-voltage components from direct infrared radiation when IR drying.
Golf 2009 Blue-e-motion
The above named drying information applies only to the Golf MY 2009 blue-e-motion. For this vehicle the high-voltage battery must be removed before heated drying.
General Information
Factory Paint Paint Structure
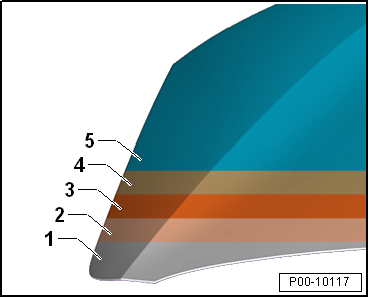
Structure of a Solid-Color Paint System, Conventional
Approximately 80-120 um thick
- Steel Panel
- Zinc Phosphate Coating
- Electrophoretic Dip Primer
- Intermediate Filler
- Two-Part Solid Top Coat
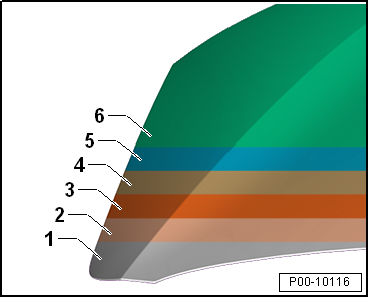
Structure of a Solid-Color Paint System, Water-Based Paint
Approximately 80-130 um thick
- Steel Panel
- Zinc Phosphate Coating
- Cathodic Electrophoretic Painting
- Water-Based Filler
- Water-Based Paint
- Two-Part Clear Coat
Structure of a Metallic and Pearl Color Paint System, Water-Based Paint
Approximately 80-130 um thick
- Steel Panel
- Zinc Phosphate Coating
- Cathodic Electrophoretic Painting
- Water-Based Filler
- Water-Based Metallic/Pearl Color Base Coat
- Two-Part Clear Coat

Structure of a Two-Coat Paint System, Conventional
Approximately 100 um thick
- Steel Panel
- Zinc Phosphate Coating
- Cathodic Electrophoretic Painting
- Intermediate Filler
- Solid Top Coat
- Two-Part Clear Coat

Structure of a 2010 Paint Process Paint System, Water-Based Paint
Approximately 80-120 um thick
- Steel Panel
- Zinc Phosphate Coating
- Cathodic Electrophoretic Painting
- Water-Based Paint (Functional Coating)
- Two-Part Clear Coat
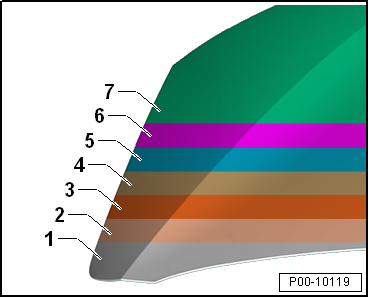
Structure of a Three-Coat Paint System, Water-Based Paint
Approximately 80-140 um thick
- Steel Panel
- Zinc Phosphate Coating
- Cathodic Electrophoretic Painting
- Water-Based Filler
- Water-Based Paint (Pigmented Basic Color)
- Water-Based Paint (Effect Coating)
- Two-Part Clear Coat
Note
- The approximate specification for the layer thickness can vary depending on the color and illustrates the differences in vertical and horizontal surfaces.
- The specifications can be exceeded on individual vehicles when painting a second or multiple times. This however does not have to be mentioned.
Customer Service Paint Paint Structure
Galvanized Sheet Metal on Both Sides
Previous attempts to match flanges have led to the use of only galvanized sheet metal on both sides. Only here do the cathodic protection and the zinc coating barrier effect work optimally together. The cut edges that are poorly protected with paint (thinning edges) are additionally protected.
Note
- Make sure that
- all metal edges are properly deburred when performing a body collision repair
- the zinc and cataphoretic layer is completely present on the interior surfaces that are not painted.
- the inner weld flange and sanded-through areas are reworked with Inox Spray -D 007 600 A1-.
Smoothing Work
To reestablish the contour of the body surfaces, the smoothing materials today in car body construction and in the paint finishing system are considered to be essential. Pay attention to the different preparations for the base surface.
Product Information:
- Refer to → Chapter "Filling Paste".
Primer
The primer is the most important component of the corrosion protection system, because it prevents water and oxygen from accessing the metal surface. Original replacement parts are normally coated with a black cataphoretic primer. The primer type is dependent on the area of application.
Note
- Sanded-through areas or weld seams are to be recoated as quickly as possible with a corrosion protection primer.
- The cataphoretic primer is not UV and acid resistant. Therefore replacement parts must also be painted from the inside.
- After a corrosion repair, insulate the bare metallic base surface with Two-Part Wash Primer -LHV 043 000 A2- and then fill with Two-Part HS Performance Filler.
Product Information:
- Refer to → Chapter "Primer Metal".
- Refer to → Chapter "Plastic Primer".
Filler
The filler contributes to corrosion protection to a lesser extent. A suitable filler is, however, essential in service.
Tasks:
- Filler protects the body from stone impact. Therefore pay attention to the appropriate layer thickness in the stone chip protection area.
- Filler serves as surface preparation. Sanding scratches can be smoothed out.
- Colored filler improves the coverage of colors with poor covering properties.
Product Information:
- Refer to → Chapter "Filler".
PVC Sealed Seams and Underbody Protection
Note
- When repairing, the seam sealant is to be returned to replicate stock visual appearance and layer thickness.
- Sealing seams near attachments to be installed must be applied smoothly In order to avoid damage and malfunctions.
- Water drain holes must remain free.
- All threaded pins and weld nuts with M-threads, as well as all other pins and contact surfaces for the assembly must be functional after the sealant application.
- The sealing material cannot be applied on blank sheet metal, but rather on filled surfaces.
To prevent any water from entering the flange, the notch is sealed with paste-like, solvent-free PVC in critical areas on the body. A PVC coating of different thickness is sprayed on specified areas on the underbody and in the wheel housings to protect against stone impact and engine humming.
Note
- Before sealing/applying underbody protection, always insulate the surface with primer and filler.
- After a corrosion repair, insulate the bare metallic base surface with Two-Part Wash Primer -LHV 043 000 A2- and then fill with Two-Part HS Performance Filler.
- For the underbody protection, pay attention to the specified layer thickness.
Product Information:
- Refer to → Chapter "Underbody Protection".
- Refer to → Chapter "Stone Chip Protection".
- Refer to → Chapter "Sealing Materials".
Top Coat/Base Paint
For the top coat/base paint, the decorative application is the prime consideration. This contributes to corrosion protection to a lesser extent.
Depending on the pigment content, the colors have different coverage. Observe the manufacturer's instructions.
Product Information:
- Refer to → Chapter "Top Coats".
Clear Lacquer
For the clear lacquer, the decorative application is the prime consideration. The clear lacquer also contributes to corrosion protection to a lesser extent. The clear lacquer protects the top coat/base paint against UV radiation and environmental pollution such as acidic bird droppings.
Product Information:
- Refer to → Chapter "Clear Coats".
Conservation Wax/Cavity Sealant
The conservation wax/cavity sealants play a decisive role for corrosion protection. Depending on the area of application, different materials are available in customer service. The exceptional protective effects of these materials is based on the following characteristics:
- Hydrophobic (water repellent)
- Good adhesion
- No rust formation
- Water vapor permeability approximately 1,500 times lower than with a paint coating of the same thickness
Product Information:
- Refer to → Chapter "Preservation".
- Refer to → Chapter "Wax Underbody Protection".
Reduced Paint Structure in Engine Compartment and Inner Hood
Note
The paintwork in the "engine compartment and the inner hood" may differ from the paint structure and color on the exterior paintwork. This variation is production-related and should not be deemed defective.
Repair Instructions for the Underbody and Stone Chip Protection
Note
- The underbody and stone chip protection structure must be restored back to its original layer strength and appearance during a repair.
- Water drain holes must remain free.
- All threaded pins and weld nuts with M-threads, as well as all other pins and contact surfaces for the assembly must be functional after the sealant application.
Damage Caused by an Accident (Part Replacement)
- Clean the new part with Silicone Remover, Long.
- Sand the factory primer (sanding pad).
- Clean again using Silicone Remover, Long.
- Apply Two-Part Wash Primer -LHV 043 000 A2- to sanded through areas.
- Dry (note drying time).
- Then fill with Two-Part HS Performance Filler.
- Dry (note drying time).
- Dry-sand the filler with sandpaper (P400-P500), making sure not to sand through.
- Clean the surface with Silicone Remover, Long.
- Apply a suitable Stone Chip Protection.
- Dry (note drying time).
- If necessary, smoothen the texture.
- Clean the base surface with Silicone Remover, Water-Based.
- Apply the paint structure with top, base and clear coats.
Damage Caused by an Accident (Repair)
- Always clean damaged components/surfaces.
- Remove the underbody protection using Pneumatic Brush Grinder Set -VAS6446-.
- Remove the damaged area and sand down to the bare metal.
- Remove the existing corrosion using the Pneumatic Brush Grinder Set -VAS6446- while doing so finely sand the overlapping areas.
- Clean the base surface with Silicone Remover, Long.
- Apply Two-Part Wash Primer -LHV 043 000 A2-
- Dry (note drying time).
- Then fill with Two-Part HS Performance Filler.
- Dry (note drying time).
- Sand the filler.
- Clean the base surface with Silicone Remover, Long.
- Apply suitable filling paste.
- Then fill with Two-Part HS Performance Filler.
- Dry (note drying time).
- Dry-sand the filler in the stone chip protection area with sandpaper (P400-P500), making sure not to sand through.
- Clean the surface with Silicone Remover, Long.
- Apply a suitable Stone Chip Protection.
- Dry (note drying time).
- If necessary, smoothen the texture.
- Sand the complete filler surface with sand paper (P400-P500).
- Clean the base surface with Silicone Remover, Water-Based.
- Prepare the paint structure with top, base and clear coats.
Cracks in the Stone Chip Protection
Note
Repairs should be performed according to description "damage caused by an accident (repair)".
Damage caused by Stone Impact (Gravel, Grit, etc.)
- Clean the damaged areas thoroughly.
- Sand the damaged surfaces with sandpaper. If damage is deep, dry-sand with P120-P240 sandpaper.
- Clean the base surface with Silicone Remover, Long.
- Apply Two-Part Wash Primer -LHV 043 000 A2- to sanded through areas.
- Dry (note drying time).
- Then fill with Two-Part HS Performance Filler.
- Dry (note drying time).
- Dry-sand the filler with sandpaper (P400-P500), making sure not to sand through.
- Clean the base surface with Silicone Remover, Long.
- Apply a Suitable Stone Chip Protection (refer to → Chapter "Stone Chip Protection") to the damaged areas If damage is extensive, refinish the entire surface.
- Dry (note drying time).
- If necessary, smoothen the texture.
- Clean the surface with Silicone Remover, Water-Based.
- Apply the paint structure with top, base and clear coats.
Adhesive Surface Pretreatment when Replacing Laser-Soldered Roofs
- Dry sand the cataphoretic primer on the roof adhesive surface -item 6- down to the bare metal using P180 sandpaper.
- Dry sand the roof pillar adhesive surface -item 6- down to the bare metal using P180 sandpaper.
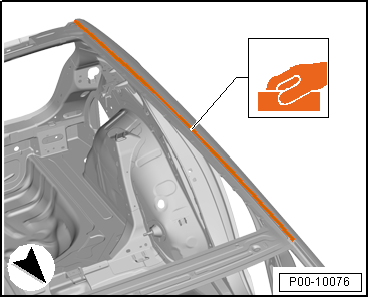
Note
Prime the sanded-through areas outside of the body adhesive -item 6- with Two-Part Wash Primer - LHV 043 000 A2- and then fill with Two-Part HS Performance Filler.
- Clean the adhesion area with Silicone Remover.
- Replace the roof.
- Two-Part Window Adhesive
- Roof
- Glass/Paint Primer
- Two-Part Body Adhesive
- Roof Pillar/Side Panel
- Sanded-Down Bare Metal Area
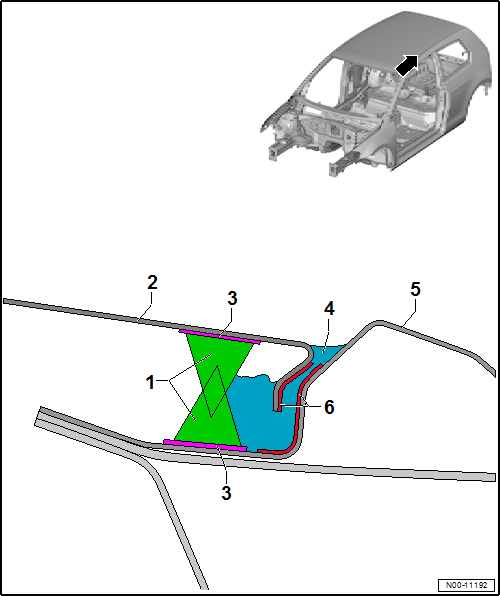
Fender Corrosion Repair Measures, in Wheel Housing Liner Contact Area
Note
- The corrosion protection in the fender seam must be applied on all replacement parts, on which the attached seal is not already present.
- The additional corrosion protection seal will prevent "chafe marks" in the fender wheel housing liner.
- Apply filler to the interior and exterior areas of the fender.
- Once the filler has dried, apply and spread the Sealing Material -D 511 500 A2- in the wheel housing liner contact area (fender seam).
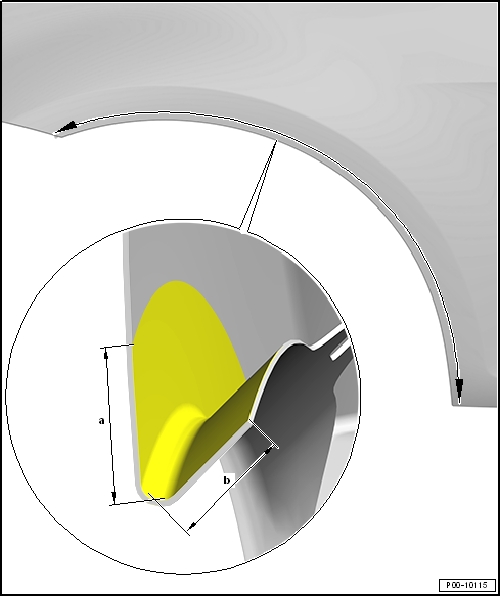
- 20 mm
- Height of the seal
- 10 mm
- Width of the seal
Note
The dimension -b- can vary, because the fender has different folded edge widths. Note that the entire folded edge is always sealed.
Before installing, the inner sides of the wheel housing and the fillet plate are to be sealed with cavity sealant.
Product Information:
- Refer to → Chapter "Preservation".
Fold Corrosion Servicing Notes
Corrosion on the Fold Edges, for Instance on the Hood, Door or also the Rear Lid
- Remove the corroded areas with → Chapter "Pneumatic Brush Grinder Set -VAS6446-" or → Chapter "Brush Grinder Set -VAS6776-".
- Sand the overlapping areas with P360 - P400 sandpaper.
- Clean the base surface with Silicone Remover.
- After a corrosion repair and before sealing, insulate the base surface with Two-Part Wash Primer -LHV 043 000 A2- and then fill with Two-Part HS Performance Filler.
- After the filler has dried, the filled area must be dry sanded with P400- P500. While doing so, make sure to avoid "sanding through". Then clean the sanded areas with Silicone Remover.
- After the filler has dried and has been sanded, the metal edges in the fold area must be thinly sealed with a fine seam sealant. The fine seam sealant must match the original state.
Note
- When repairing, the seam sealant is to be returned to replicate stock visual appearance and layer thickness.
- Sealing seams near attachments to be installed must be applied smoothly In order to avoid damage and malfunctions.
- Water drain holes must remain free.
- All threaded pins and weld nuts with M-threads, as well as all other pins and contact surfaces for the assembly must be functional after the sealant application.
- The sealing material cannot be applied on blank sheet metal, but rather on filled surfaces.
- Recreate the subsequent paint system according to the manufacturer's specifications.
- Seal the cavities around the fold area with → Chapter "Suction Feed Spray Gun -VAG1538-".
Note
Service work is effective only when the fold area can be sealed airtight from the inside (so that no moisture can get in).
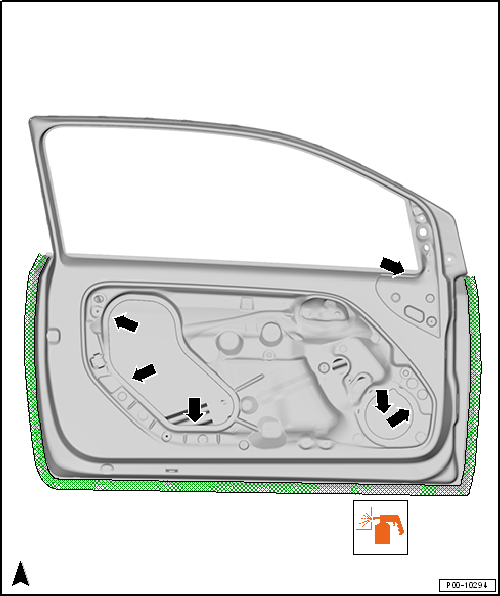
Cavity Sealant Area Example on Rear Lid
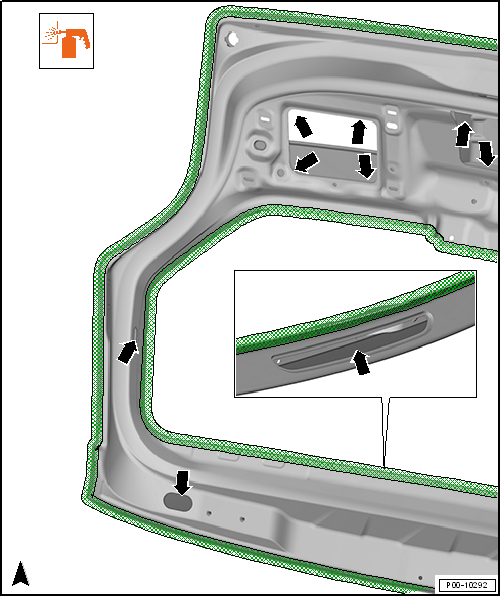
Cavity Sealant Area Example on Hood
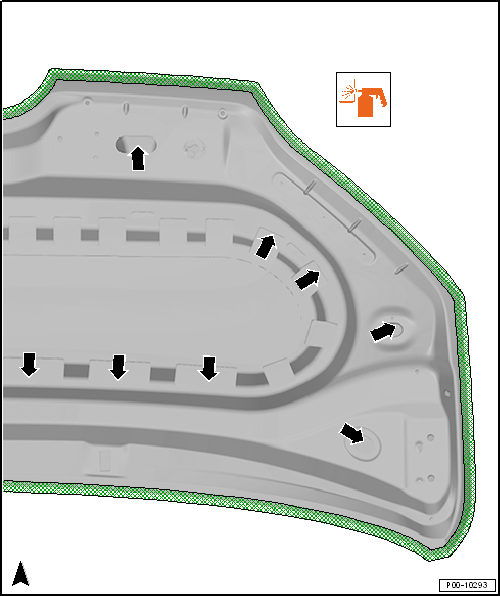
Cavity Sealant Area Example on a Door
Corrosion Protection for Body, Attached and Welded Parts
Attachments
- Coat the insides of the fenders, doors, covers and lids completely. A spray application wet in wet procedure is sufficient.
- Before assembly, the seal the inside of the attachments with cavity sealant (refer to → Chapter "Preservation") so as to recreate the original state. Refer to "Vehicle-Specific Paint Information".
- Vehicles with wheel housing liners must have an additional chafe protection on the wheel housing. Refer to → Chapter "Fender Corrosion Repair Measures, in Wheel Housing Liner Contact Area".
Welded Parts
- All welded parts except the roof are to be completely primed and filled on the inside. The visible inner surfaces must be coated with a spray application of base pant and clear coat. If necessary perform this before welding. In case of doubt, the production status applies.
- If sealing is required this is to take place after the specified paint structure.
- Coat all parts that form cavities, such as pillars, braces, side panels, etc., with cavity sealant. Refer to → Chapter "Preservation".
All parts in the series production that are coated with noise-damping or stone chip protection material (for example wheel housing, floor panel, front/rear cross panels or outer side sill) need to be coated as follows:
- Wheel housings and underbody with sprayable weld sealant. Refer to → Chapter "Sealing Materials".
- Even out large creases or thick layers with base material Adhesive Sealant -D 511 500 A2-.
- Sill panel region, lower side panel, rear cross panel corners with stone chip protection. Refer to → Chapter "Stone Chip Protection".
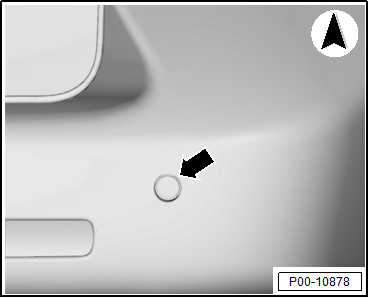
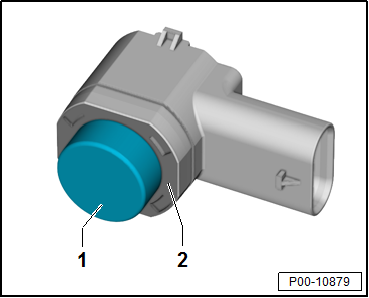
Parking Aid Sensor, Painting
The following parameters must be met when painting to avoid malfunctions in the parking aid sensor (parking aid system):
New Part, Painting
- Maximum coat thickness 125 um; the coat thickness must always be measured after painting
- Maximum curing temperature: 1 hour at 90 ºC (194 ºF)
Old Part, Painting
- Only remove paint (sand) down to the primer
- The minimum coat thickness of 5 - 10 um coating must be maintained
- Maximum coat thickness 125 um; the coat thickness must always be measured after painting
- Maximum curing temperature: 1 hour at 90 ºC (194 ºF)
Electric Conductivity
- Paint or paint spray must not go into the connector; the pin contact must be guaranteed after painting
Cleaning
- Dipping in cleaning solution without taping off the connector pin beforehand is prohibited.
Function Test
- Connect the Vehicle Diagnostic Tester and check the function.
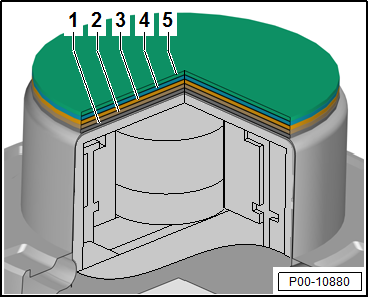
Paint Structure and Coat Thickness, Repairing
- Primed New Part with Replacement Part Primer Coat: 2 - 10 um
- Filler: 30 - 40 um
- Solid Base Coat: 10 - 20 um
- Metallic/Pearlescent Base Coat: 20 - 25 um
- Clear Lacquer: 35 - 50 um
Paint Area
- The paint area on the sensor is the front and side surface of the membrane The side surface is painted a minimum 3 mm to maximum 4 mm from the front side of the membrane toward the rear.
- No paint is permitted in this area.
ACC - Adaptive Cruise Control
Note
- On vehicles with ACC, the trim in the right cover section of the front bumper must not be painted if paint repairs or component replacements are performed. The ACC system is located behind this section therefore a coat of paint would destroy its functionality.
- The cover for the distance regulation sensor in the bumper grille is composed of radar-penetrable material. The cover is heated to avoid functions being restricted from snow or ice.
- All changes to the surface such as additional painting, bonding and other supplementary applied objects can cause malfunctions.
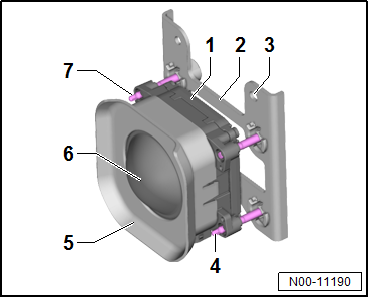
Distance Regulation Control Module -J428-
The image shows the Distance Regulation Control Module - J428- on the Golf. The image can vary on other vehicle models.
- Adapter Plate
- Bracket
- Fastening Hole
- Vertical Adjustment Bolt
- Trim
- Distance Regulation Sensor/ Distance Regulation Control Module
- Horizontal Adjustment Bolt


See More:
Volkswagen Tiguan Owners Manual > Engine coolant: Warning light and engine coolant temperature gauge
Fig. 162 Engine coolant temperature
gauge in the instrument cluster: Ⓐ Engine cold; Ⓑ Normal temperature range; Ⓒ Warning
zone.
Read and follow the introductory information and
safety information first⇒Introduction
to the subject If the indicator in the engine coolant temperature ...
Volkswagen Tiguan Owners Manual
Volkswagen Tiguan Service and Repair Manual
- Body exterior
- Body Interior
- General Paint Information
- Paint
- Brake System
- Suspension, Wheels, Steering
- Wheel and Tire Guide
- Towing Guide
- Wheel and Tire Guide General Information
- Communication
- Electrical Equipment General Information
- Electrical Equipment from 06/2011
- Heating, Ventilation and Air Conditioning
- Refrigerant R134a Servicing
- 6-Speed Manual Transmission 02Q, OBB, and OFB
