Volkswagen Tiguan Service and Repair Manual: Storage Compartments, Covers and Trim
Tools
Required Special Tools and Testing Equipment
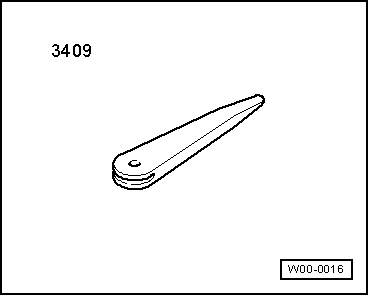
- Trim Removal Wedge -3409-
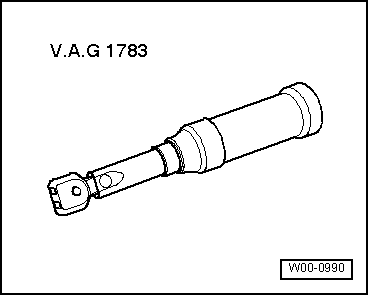
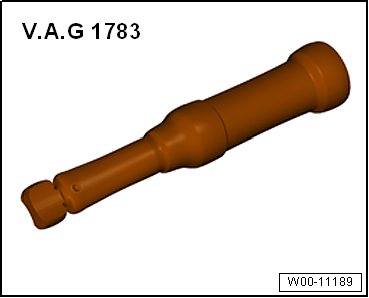
- Torque Wrench 1783 - 2-10Nm -VAG1783-
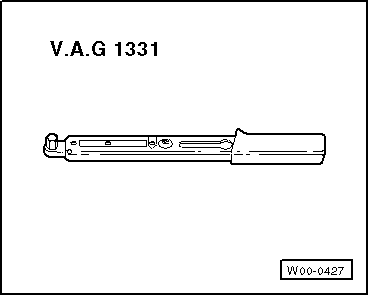
- Torque Wrench 1331 5-50Nm -VAG1331-
Footwell Trim, Removing and Installing
Note
The following describes the removing and installing on the left side of the vehicle. Removing and installing on the right side is identical.
Removing
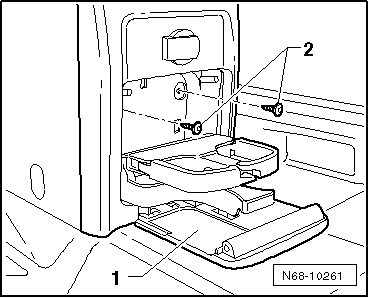
- Unclip the cover -1- from the trim using a small screwdriver.
- Remove the screw -2- (1.5 Nm).
- Pull the left footwell trim -3- out of the mounts.

Installing
- Install in reverse order of removal.
Center Console Trim, Removing and Installing
Note
The procedure describes removing and installing the trim in a vehicle with a cupholder. Removal and installation is similar on vehicles with the multimedia system or Converter with Socket, 12 V-230 V -U13-.
Removing
- Switch off the ignition.
Vehicles with Multimedia System
- Remove the multimedia system control head.
Vehicles with Converter with Socket, 12 V-230 V -U13-
- Remove the Converter with Socket, 12 V-230 V - U13-.
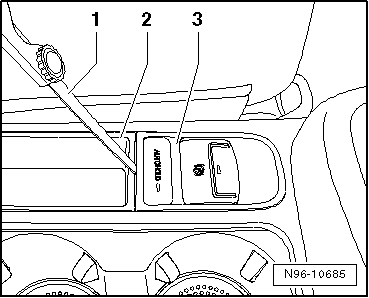
Vehicles with Cupholder
- Open the cupholder -1- and remove the two screws -2- (1.5 Nm).
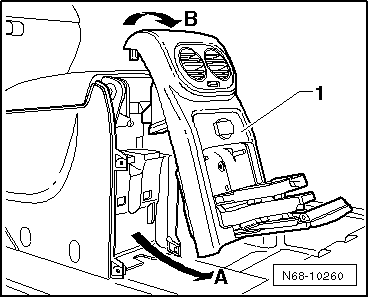
- Remove the bottom trim -1-, from the mounts -arrow A-.
- Remove the upper trim from the mounts in the center console -arrow B-.
- Disconnect wiring harnesses from the trim.
Installing
- Install in reverse order of removal.
Center Console Cover, Removing and Installing
Removing
Vehicles with Manual Transmission
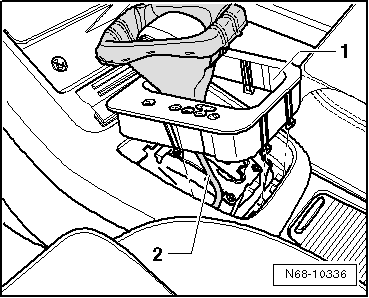
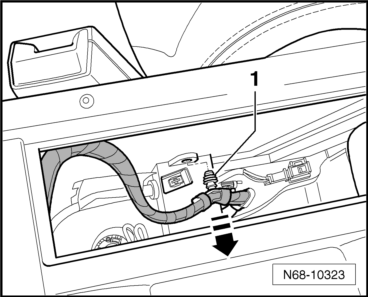
- Carefully pull the boot -1- with the frame -2- upward out of the mounts.
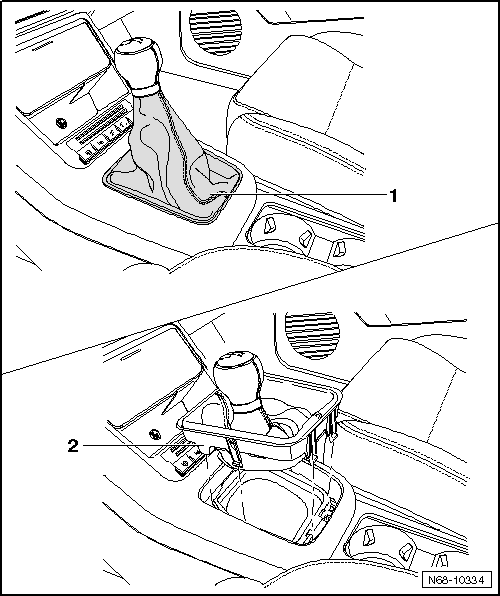
- Remove the shifting mechanism insulation -1- from center console.
Vehicles with Automatic Transmission
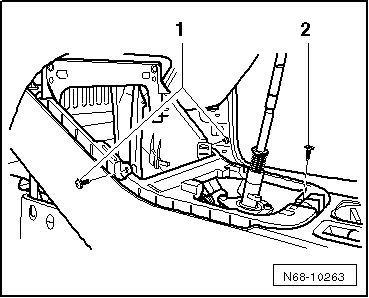
- Carefully pull the boot -1- upward out of the shift cover -2-.
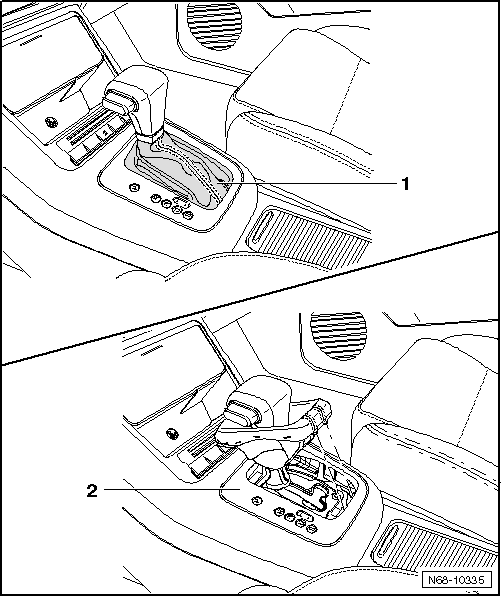
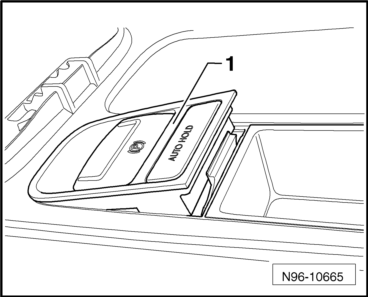
- Loosen the shift cover -1- from the mounts.
- Disconnect the harness connector -2- from the shift cover.
All Vehicles
- Remove the two respective screws -1- and -2- (1.5 Nm).
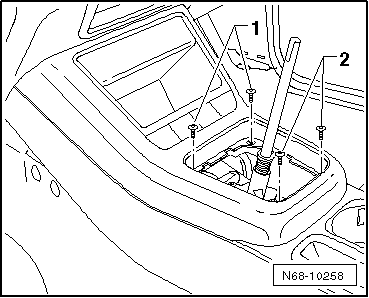
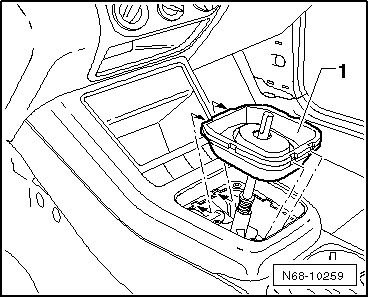
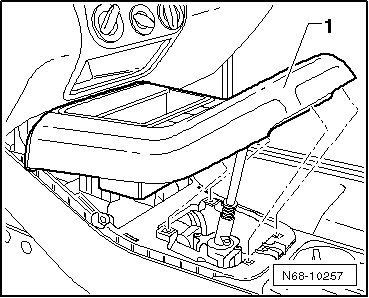
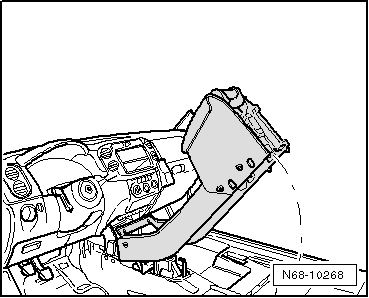
- Swivel the cover -1- in the rear upward out of the mounts in the center console and disconnect, depending on the vehicle equipment lever, the harness connectors.
Installing
- Install in reverse order of removal.
Center Console without Armrest, Removing and Installing
Removing
- Switch off the ignition.
- Carefully guide a feeler gauge with 0.6 mm thickness -1- in the gap between the center console -2- and button module -3-.
- Straighten the feeler gauge vertically and push it 10 mm deep in between the button module and the center console.

Note
The vertical inserting of the feeler gauge makes sure that the lock button reaches the outside. After 10 mm insertion depth the point of the feeler gauge contacts the lock button offset noticeably.
- Tip the feeler gauge -1- in the direction of the -arrow- to push the lock button -3-. Pry out the button module -2- at the same time upward from the rear of the center console -4-.

- Remove the button module -1- while paying attention to the wires that are still connected, upward from the center console.

- Remove the primary connector -1- push the lock button -2- and release and remove the connector -3-.
- Remove the button module from the vehicle.
- Remove the center console cover
- Remove the trim on both sides of the footwell

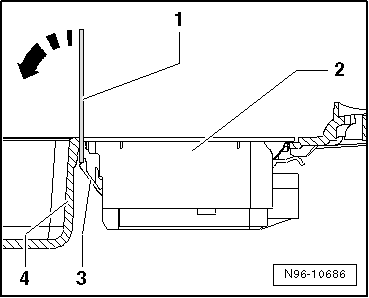
- Remove the two screws -1- (1.5 Nm).
- Remove the screw -2- (1.5 Nm).
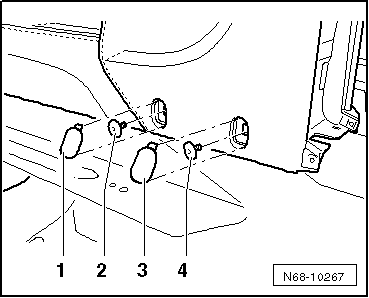
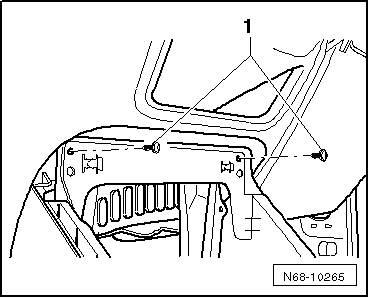
- Move the seats in the most forward and highest seating position.
- Unclip the cover -1- from the trim using a small screwdriver.
- Remove the bolt -2- (6 Nm).
- Remove the cover -3- and the bolt -4-.
- Remove the cover and bolts on the opposite side.
- Remove the two screws -1- (1.5 Nm).

- Swivel the rear part of the center console upward.
- Remove center console from vehicle.
Installing
- Install in reverse order of removal.
Center Console with Armrest, Removing and Installing
Removing
- Switch off the ignition.
- Carefully guide a feeler gauge with 0.6 mm thickness -1- in the gap between the center console -2- and button module -3-.
- Straighten the feeler gauge vertically and push it 10 mm deep in between the button module and the center console.
Note
The vertical inserting of the feeler gauge makes sure that the lock button reaches the outside. After 10 mm insertion depth the point of the feeler gauge contacts the lock button offset noticeably.
- Tip the feeler gauge -1- in the direction of the -arrow- to push the lock button -3-. Pry out the button module -2- at the same time upward from the rear of the center console -4-.

- Remove the button module -1- while paying attention to the wires that are still connected, upward from the center console.

- Remove the primary connector -1- push the lock button -2- and release and remove the connector -3-.
- Remove the button module from the vehicle.
- Remove the CD changer if equipped.
- Remove the "Media Device Interface" if equipped.
- Remove the DVD player if equipped.

Vehicles with Multimedia System
- Remove the multimedia system control head.
Vehicles with Converter with Socket, 12 V-230 V -U13-
- Remove the Converter with Socket, 12 V-230 V - U13-.
- Remove the center console trim.
- Remove the trim on both sides of the footwell.

- Remove the two screws -1- (1.5 Nm).
- Remove the screw -2- (1.5 Nm).
- Move the seats in the most forward and highest seating position.
- Unclip the cover -1- from the trim using a small screwdriver.
- Remove the bolt -2- (6 Nm).
- Remove the cover -3- and the bolt -4-.
- Remove the cover and bolts on the opposite side.
- Remove the two screws -1- (1.5 Nm).
- Loosen the clip on the harness connector -1- from the bracket -arrow- if present.
- Swivel the rear part of the center console upward.
Installing
- Install in reverse order of removal.
Center Armrest, Removing and Installing
Removing
- Switch off the ignition.
- Remove the Converter with Socket, 12 V-230 V -U13- if equipped.
- Remove the center console trim.
- Remove the CD changer if equipped.
- If equipped remove the External Multimedia Device Interface -R215-.
- If equipped remove the External Audio Source Connection -R199-.
- Remove the 12 V socket next to the AUX IN jack:
All instructions and information regarding this chapter can be found in the repair manual "Electrical Equipment General Information". Due to technical reasons, it is not currently possible to create a shortcut to this repair manual. Please select the "Electrical Equipment General Information" repair manual manually.
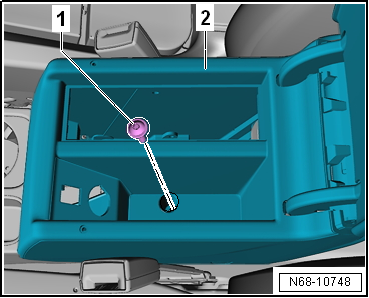
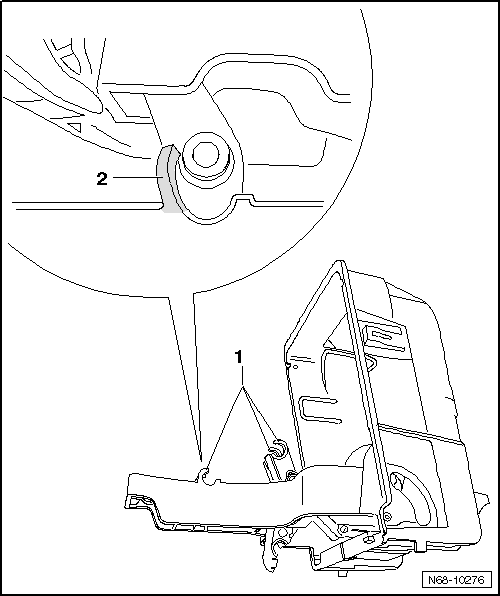
- Remove the lining mat from the storage compartment and remove the screw -1- from the rear section of the center console -2- (1.5 Nm).
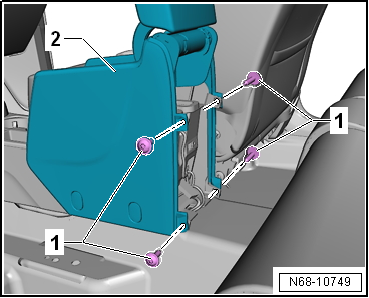
- Remove each of the two screws -1- on the left and right sides of the rear center console (1.5 Nm).
- Carefully loosen the rear section of the center console -2- and remove upward.
- Remove each of the two screws -1- (1.5 Nm) on the left and right sides.
- Remove center armrest -2- upward.
Installing
- Install in reverse order of removal.
Center Armrest Lower Section, Removing and Installing
Special tools and workshop equipment required
- Torque Wrench 1783 - 2-10Nm -VAG1783-
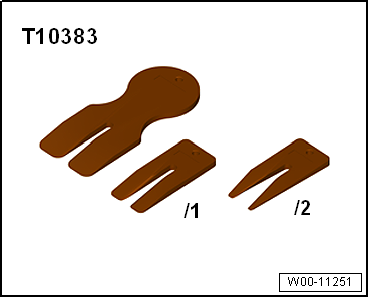
- Wedge Set -T10383-
Removing
- Remove the center armrest.
- Push the trim panel side retaining tabs on the bottom of the center armrest toward the inside.
- Loosen the trim panel in the rear area from the center armrest and remove.
- Carefully unclip the upper and lower trim panel in the rear area of the center armrest.
- Remove the four bolts for attaching the armrest on the lower section.
- Loosen the armrest with a screwdriver from the lower section.
Installing
- Install in reverse order of removal.
| Component | Tightening Specification |
| Four armrest bolts on the lower section | 3.2 +- 0.3 Nm |
Center Console Mounting Bracket, Removing and Installing
Removing
- Switch off the ignition.
- Carefully guide a feeler gauge with 0.6 mm thickness -1- in the gap between the center console -2- and button module -3-.
- Straighten the feeler gauge vertically and push it 10 mm deep in between the button module and the center console.

Note
The vertical inserting of the feeler gauge makes sure that the lock button reaches the outside. After 10 mm insertion depth the point of the feeler gauge contacts the lock button offset noticeably.
- Tip the feeler gauge -1- in the direction of the -arrow- to push the lock button -3-. Pry out the button module -2- at the same time upward from the rear of the center console -4-.
- Remove the button module -1- while paying attention to the wires that are still connected, upward from the center console.
- Remove the primary connector -1- push the lock button -2- and release and remove the connector -3-.
- Remove the button module from the vehicle.
- Remove the center console cover.
- Remove the trim on both sides of the footwell.
Vehicles with a Center Console without a Center Armrest
- Remove the center console, without center armrest.
Vehicles with a Center Console with a Center Armrest
- Remove the DVD player if equipped.
- Remove the CD changer if equipped.
- If equipped remove the "Apple""IPod player" baseplate.
- Remove the storage compartment with USB connection, if present.
- Remove the multimedia system control module, if present.

Vehicles with Multimedia System
- Remove the multimedia system control head.
Vehicles with Converter with Socket, 12 V-230 V -U13-
- Remove the Converter with Socket, 12 V-230 V - U13-.
- Remove the center console trim.
- Remove the center console, with center armrest.
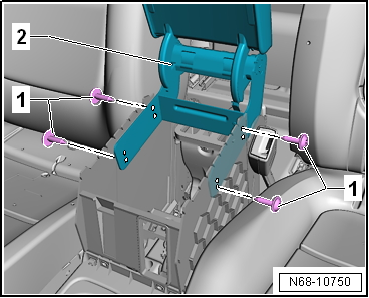
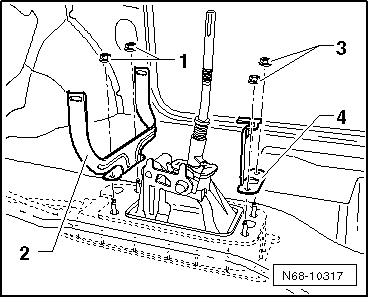
- Remove the two nuts -1- (8 Nm) and remove the securing bracket -2-.
- Remove the two nuts -3- (8 Nm) and remove the securing bracket -4-.
Rear Cupholder, Replacing
The rear cupholder can be replaced once if it is faulty. The entire rear trim cannot be replaced.
- Switch off the ignition.
Vehicles with Multimedia System
- Remove the multimedia system control head.
Vehicles with Converter with Socket, 12 V-230 V -U13-
- Remove the Converter with Socket, 12 V-230 V - U13-.
- Remove the center console trim
- Remove the back side of the trim around the weld points -1-, to do this use a 10 mm steel drill bit.
- Remove the defective cupholder -2- from the trim.
- Install the new cupholder into the trim.
- Melt any remaining plastic tips using a the heated point of a cotter pin driver -3-.
- Installing the rear trim is the same as removal, but in reverse order.
Rear Cupholder, Repairing
Note
If a cupholder is loose or has fallen out, it is not always necessary to replace it. It may be possible to service it.
Trim, Removing
- Switch off the ignition.
Vehicles with Multimedia System
- Remove the multimedia system control head.
Vehicles with Converter with Socket, 12 V-230 V -U13-
- Remove the Converter with Socket, 12 V-230 V - U13-.
- Remove the center console trim.
Checking if Servicing is Possible
Note
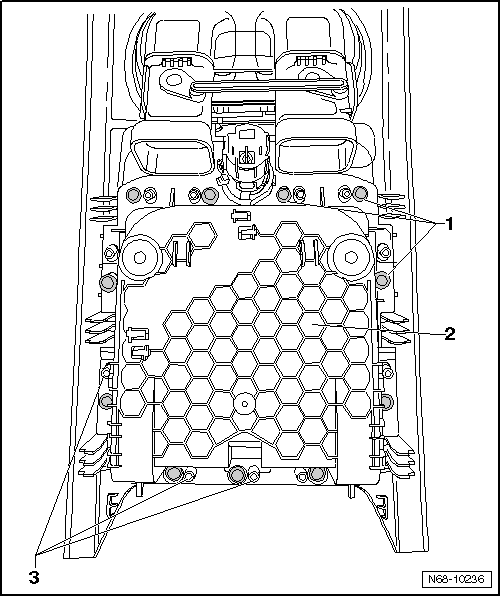
The illustration shows the Golf cupholder. The process is similar for the Tiguan cupholder.
A partial replacement should only be done if servicing is not possible, for example, because components are too heavily deformed, broken, broken off or damaged in any other way and correct function of the cupholder can no longer be ensured because of this.
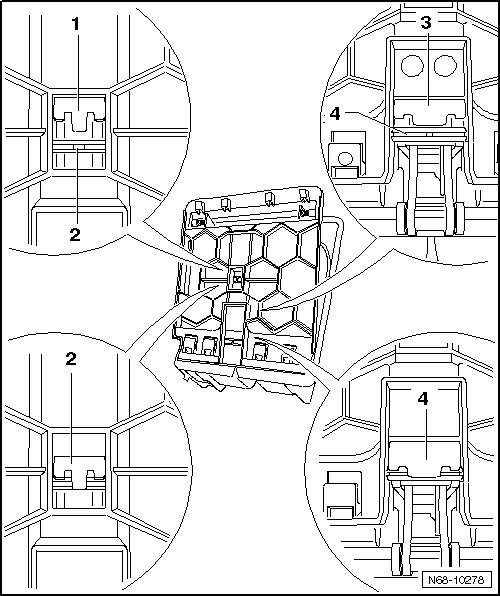
- Check all four cup holder mounting points -1- for damage.
- If a mounting point -2- is bent up sharply, replace the cupholder.
Note
The cupholder should be replaced if there is any further damage to components that affects proper cupholder function.
Cupholder, Servicing
- Insert the lower cover -1- over outer pivot pins -2- and -3- in the cupholder.
- Position the mounting pins -4- in front of mount -5-.
- Insert the upper section -6- over the pins -7- and pivot pins -8- in the cupholder.
- This places the mount -9- in front of the pins -10-.
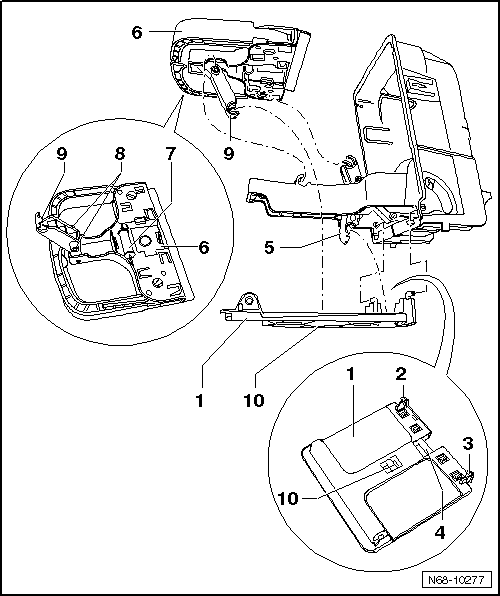
- Close the cupholder, the mounts -1- and -3- engage automatically with corresponding pins -2- and -4-.
- Open the cupholder.
Trim, Installing
- Installing the trim is the same as removal, but in reverse order.
Front Cupholder, Replacing, Vehicles without Center Armrest
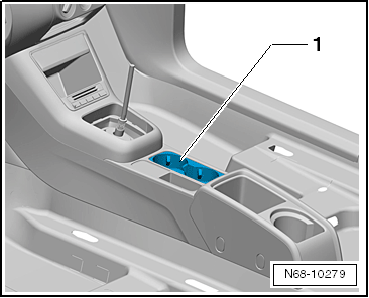
The front cupholder -1- can be replaced once if it is faulty. The entire lower section of the center console cannot be replaced.
- Switch off the ignition.
- Carefully guide a feeler gauge with 0.6 mm thickness -1- in the gap between the center console -2- and button module -3-.
- Straighten the feeler gauge vertically and push it 10 mm deep in between the button module and the center console.

Note
The vertical inserting of the feeler gauge makes sure that the lock button reaches the outside. After 10 mm insertion depth the point of the feeler gauge contacts the lock button offset noticeably.
- Tip the feeler gauge -1- in the direction of the -arrow- to push the lock button -3-. Pry out the button module -2- at the same time upward from the rear of the center console -4-.

- Remove the button module -1- while paying attention to the wires that are still connected, upward from the center console.

- Remove the primary connector -1- push the lock button -2- and release and remove the connector -3-.
- Remove the button module from the vehicle.
- Remove the center console cover.
- Remove the trim on both sides of the footwell.
Vehicles with a Center Console without a Center Armrest
- Remove the center console, without center armrest.
Vehicles with a Center Console with a Center Armrest
- Remove the DVD player if equipped.
- Remove the CD changer if equipped.
- If equipped remove the "Apple""IPod player" baseplate.
- Remove the storage compartment with USB connection, if present.
- Remove the multimedia system control module, if present.

Vehicles with Converter with Socket, 12 V-230 V -U13-
- Remove the Converter with Socket, 12 V-230 V - U13-.
- Remove the center console trim.
- Remove the center console, with center armrest.
Exchanging the front cupholder is identical to exchanging the rear cupholder.
Install in reverse order of removal.
Center Instrument Panel Trim, Removing and Installing
Note
The description shows a Tiguan through 05/2011. Removing and installing the trim and instrument panel in the center for the Tiguan from 06/2011 is identical.
Removing
- Switch off the ignition.
- Remove the telephone holder.
- Removal Wedge -3409- pry out the map compartment -1-.
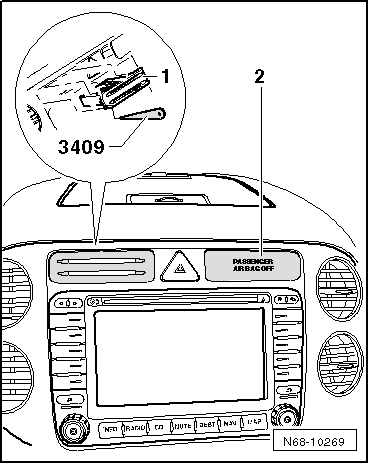
Vehicles with Front Passenger Airbag -Disabled- Indicator Lamp -K145-.
- Remove the Front Passenger Airbag -Disabled- Indicator Lamp -K145--2-.
Vehicles without Front Passenger Airbag -Disabled- Indicator Lamp -K145-.
- Position the Trim Removal Wedge -3409--1- in the bottom center of the blind cover -2-.
- Tap on the Trim Removal Wedge -3409- with a flat hand to release the blind cover.
All Vehicles
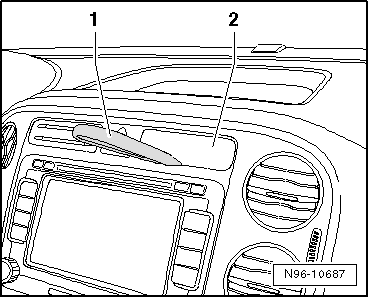
- Remove the screws -1- and -2- (1.5 Nm).
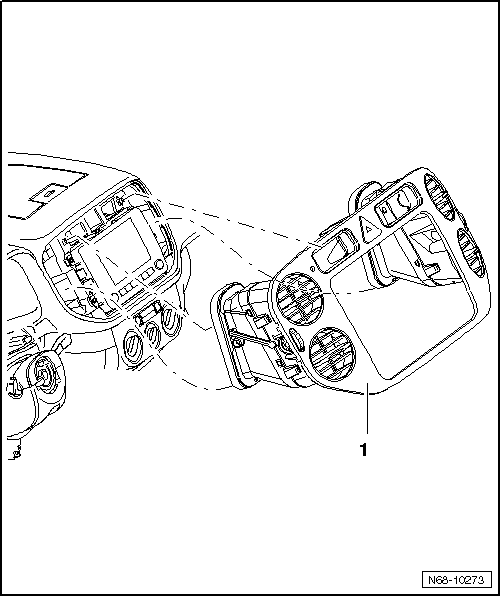
For the sake of the illustration, the trim is depicted as removed in the illustration.
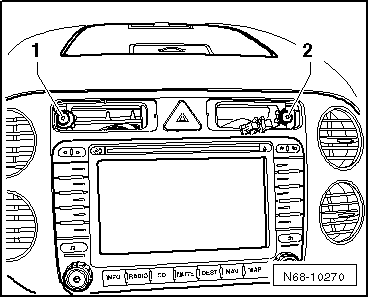
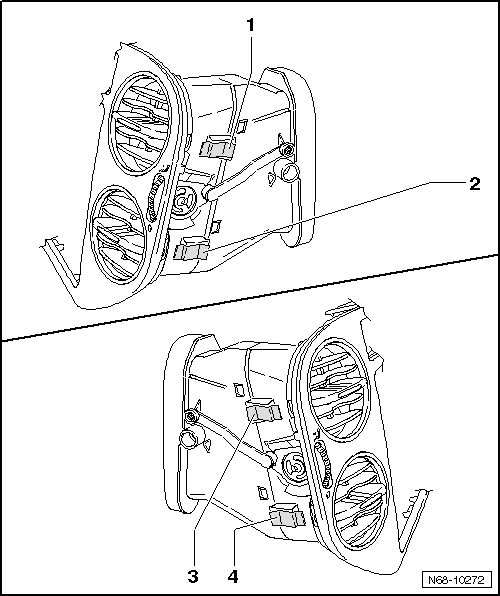
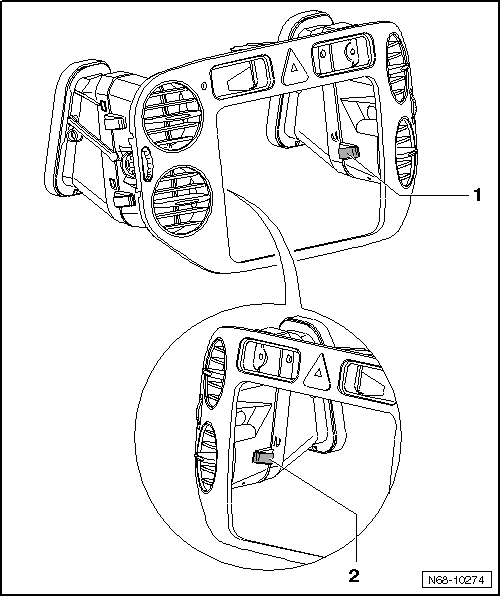
In the following steps, release the clips -1- and -2- on the right side of the trim.
Release the clips -3- and -4- on the left side.
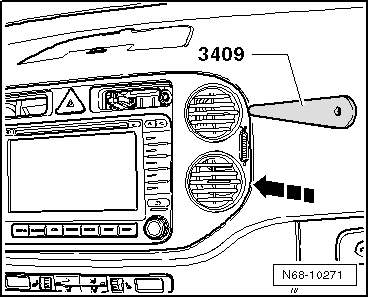
- Position the vent panel fins for the four round vents horizontally.
- With two fingers, reach into the openings next to the emergency flasher switch and slightly pull the trim forward toward the passenger compartment.
- Insert the Trim Removal Wedge -3409- into the gap between the trim and instrument panel near around the area of the center plate.
- Carefully pry the trim in this area out of the instrument panel.
- Release the lower trim catch -arrow-.
- Pull the trim toward the front passenger side and unlock, as described, the two clips on the opposite side.
- Pull the trim -1- straight out of the instrument panel.
Note
Be sure not to bend the trim when doing this.
- Disconnect wiring harness from the emergency flasher switch.
Installing
When removing the trim, it is possible that the metal clips -1- and -2- may loosen from the trim.
To prevent possible rattling noises, search in area around the center console for the clips which may have fallen off and reuse them.
Replace the clips "Part No.: 5M0 819 055" if they cannot be found.
- Install in reverse order of removal.
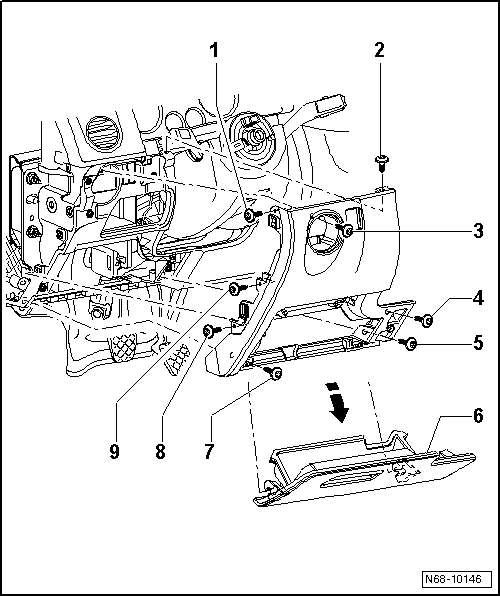
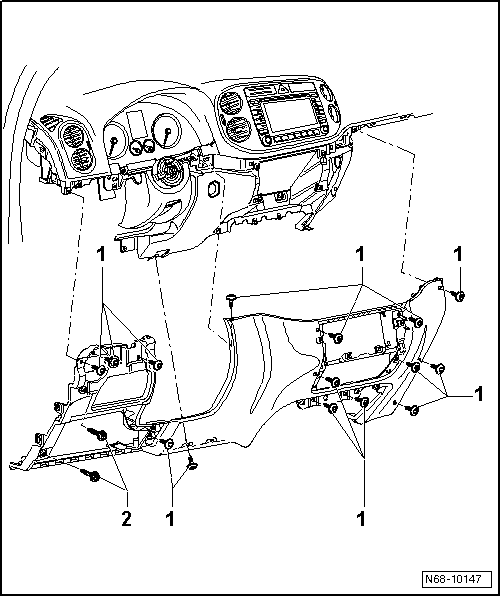
Glove Compartment, Removing and Installing
Removing
- Switch off the ignition.
- Remove right side instrument panel cover.
- Remove the Glove Compartment Lamp -W6-.
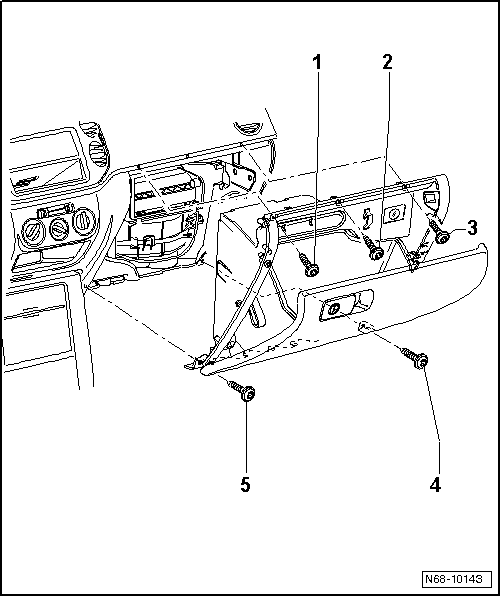
- Remove the screws -1-, -2-, -3-, -4- and -5-(1.5 Nm).
Note
When installing, the screws must be installed in the sequence -5-, -4-, -3-, -2- and -1- (1.5 Nm).
- Loosen glove compartment from instrument panel.
- Disconnect the wiring harness from the Glove Compartment Lamp Switch -E26-.
- In vehicles with front passenger airbag shut-off, disconnect the wiring harness from the key switch.
- On vehicles equipped with a Right Footwell Lamp -W10-, disconnect the harness connector from the lamp.
- In vehicles with glove compartment cooling, disconnect A/C channel from glove compartment.
Installing
- Install in reverse order of removal.
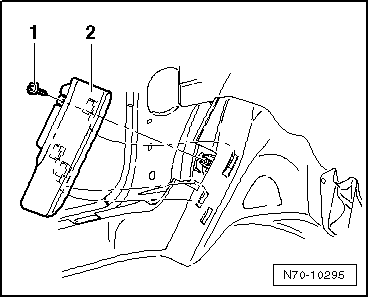
Glove Compartment Lock Cylinder, Removing and Installing
Removing
- Open the glove compartment.
Note
It is not possible to remove separately from lock cylinder -1-, the release button -2- must be replaced.
- Remove the bolt -3- and remove release button -2- from glove compartment lid.

Installing
- Install in reverse order of removal.
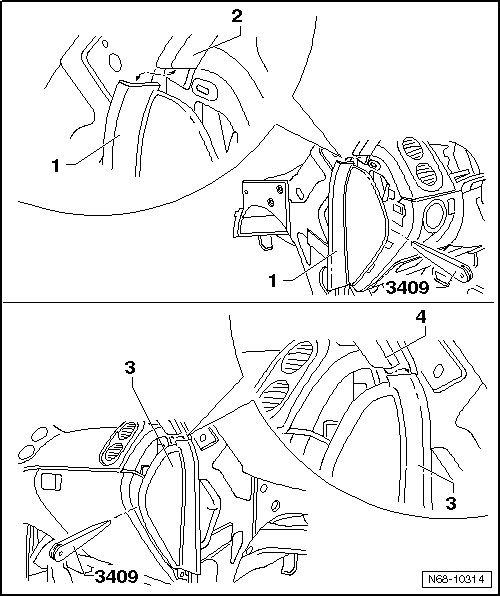
Instrument Panel Side Covers, Removing and Installing
Removing
- Release the left side instrument panel cover -1- using from the retainers in the instrument panel with the Trim Removal Wedge -3409-.
- Remove the instrument panel cover -1- under the A-pillar upper trim -2-.
- Loosen the right side instrument panel cover -3- from the retainers in the instrument panel with the Trim Removal Wedge -3409-.
- Remove the instrument panel cover -3- under the A-pillar upper trim panel -2-.
Installing
- Install in reverse order of removal.
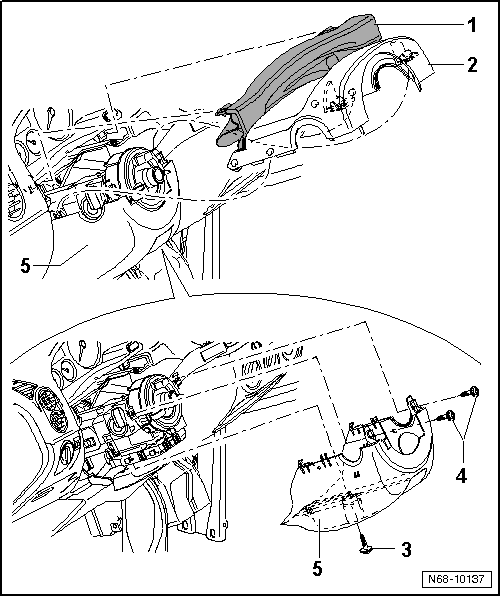
Steering Column Trim Panel, Removing and Installing
Removing
- Loosen the steering wheel adjustment locking lever.
- Pull out the steering wheel and push it downward.
- Remove the cover -1- and the upper steering column trim -2-.
Note
It is necessary to turn the steering wheel 90º out of its straight-ahead position, first to the right and then to the left, in order to remove the bolts -3- and -4-.
- Remove the screw -3- (1.5 Nm).
- Remove the two screws -4- (1.5 Nm).
- Remove the lower steering column trim -5-.
Installing
- Install in reverse order of removal.
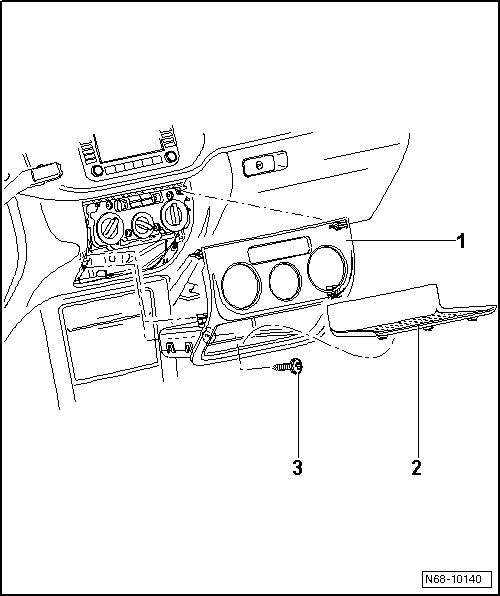
Heat and A/C Controls Trim, Removing and Installing
Note
The description shows a Tiguan through 05/2011. Removing and installing the trim and A/C controls for the Tiguan from 06/2011 is identical.
Removing
- Remove the liner mat -2- from the storage compartment -1-.
- Remove the screw -3- (1.5 Nm).
- Remove trim from mountings in instrument panel.
Installing
- Install in reverse order of removal.
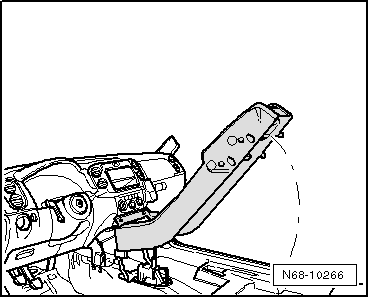
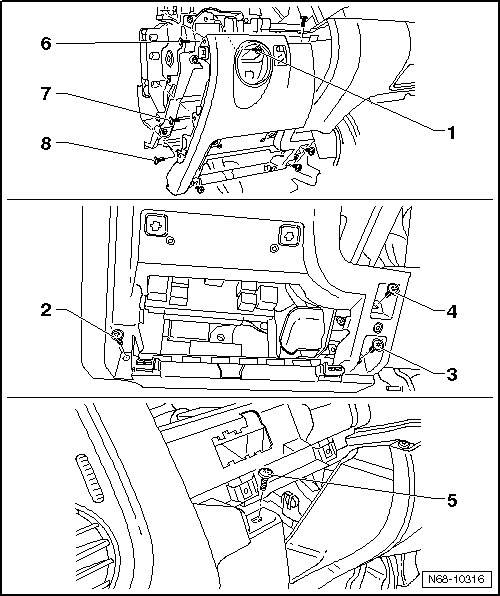
Driver Side Left Trim, Removing and Installing
Removing
Note
For reasons of clarity, the steering wheel is not depicted in the illustration, it is not necessary to remove it.
- Switch off the ignition.
- Remove side instrument panel cover on the driver side.
- Remove the Light Switch -E1-.
- Remove the steering column trim gap cover from the instrument panel. It is not necessary to remove the complete steering column trim.
- Remove the storage compartment -6- from the brackets -arrow-.
- Remove the screws -1-, -2-, -3-, -4-, -5-, -7-, -8- and -9- (1.5 Nm).
Note
When installing, install the screws in the following order -3-, -7-, -5-, -4-, -2-, -1-, -9- and -8- (1.5 Nm).
- Loosen the trim from the instrument panel and disconnect the wiring harness from the Instrument Panel and Switch Illumination Dimmer Switch -E20- and Headlamp Range Control Adjuster -E102-.
Installing
- Install in reverse order of removal.
Lower Instrument Panel Trim, Removing and Installing
Removing
- Switch off the ignition.
- Remove the instrument panel side covers.
- Remove the glove compartment.
- Remove the steering column trim gap cover from the instrument panel.
- Remove the Light Switch -E1-.
- Remove trim panel on driver side.
- Remove the heat and A/C controls trim.
- Remove the center console cover.
- Remove the trim on both sides of the footwell.
Vehicles with a Center Console without a Center Armrest
- Remove the center console, without center armrest.
Vehicles with a Center Console with a Center Armrest
- Remove the DVD player if equipped.
- Remove the CD changer if equipped.
- If equipped remove the "Apple""IPod player" baseplate.
- Remove the storage compartment with USB connection, if present.
- Remove the multimedia system control module, if present.
Vehicles with Multimedia System
- Remove the multimedia system control head.
Vehicles with Converter with Socket, 12 V-230 V -U13-
- Remove the Converter with Socket, 12 V-230 V - U13-.
- Remove the center console trim.
- Remove the center console, with center armrest.
- Remove the two bolts -2-.
- Remove the 15 screws -1- and loosen the instrument panel trim.
Installing
- Guide the light switch connector and cable and the headlamp range control through the opening.
- Secure the trim in the -specified sequence- (1.5 Nm).
Footrest Cover, Removing and Installing
Removing
- Remove left, side instrument panel cover.
- Remove the hood release lever.
- Remove the upper trim on the left B-pillar from the brackets.
- Remove the lower trim on the left B-pillar.
- Remove the lower trim on the A-pillar on the driver side.
- Remove bolt -1- (1.5 Nm) and the footrest cover -2- upward out of mounts in floor panel.
Installing
- Install in reverse order of removal.
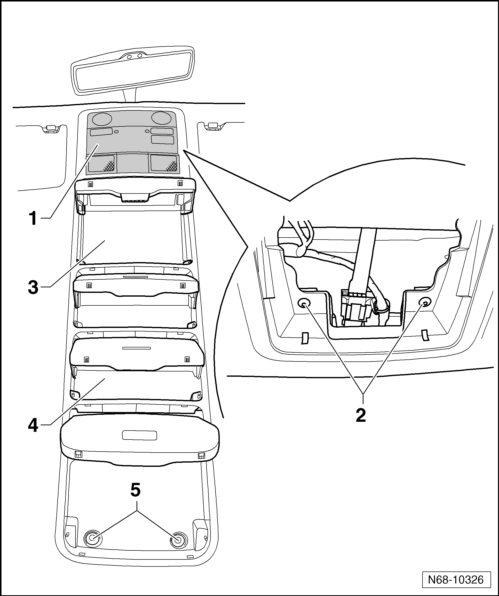
Roof Console, Removing and Installing
Removing
- Switch off the ignition.
- Remove the front interior and reading lamps -1-.
- Remove the two bolts -2- (3 Nm).
- Remove the two screws (3 Nm) in the storage compartment -3-.
- Remove the screw (3 Nm) in the storage compartment -4-.
- Remove the two bolts -5- (3 Nm).
- Pull the roof console down vertically out of the mounts in the headliner. Begin at the rear area of the roof console.
- Pull the console, near the interior and reading lamps, to the rear out of the brackets.
Installing
- Install in reverse order of removal.
Sun Visors, Removing and Installing
Note
The following describes the removing and installing on the left side of the vehicle. Removing and installing on the right side is identical.
Removing
- Switch off the ignition.
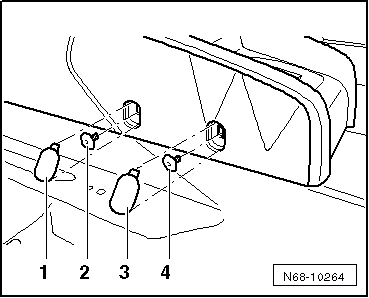
Note
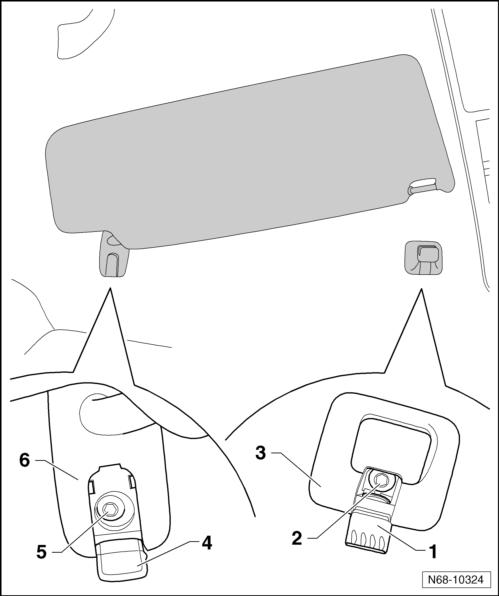
If only the sun visor is to be removed, the bolt -2- and the sun visor mount -3- do not have to be removed.
- Using a small screwdriver, open the caps -1- and -4-.
- Remove the bolts -4- and -5- (2 Nm).
- Pull the sun visor mount -3- out of the mount.
- Carefully pull the sun visor mount -6- out of the mount.
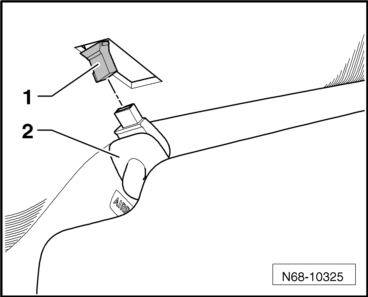
Caution
Hold the sun visor securely. Allowing the sun visor to hang by wiring harness is not permitted!
- Carefully disconnect the connector -1- from the sun visor -2- without pulling on the flat wire.
Installing
- Install in reverse order of removal.
 Interior Rearview Mirror
Overview - Manual Dimming Interior Rearview Mirror
Baseplate
Baseplate for mirror base
Bonded to the windshield
Servicing.
Interior Rearview Mirror
Manual dimming
Removing and Insta ...
 Sill Panels
Tools
Required Special Tools and Testing Equipment
Torque Wrench 1783 - 2-10Nm -VAG1783-
Front Sill Panels, Removing and Installing
Driver side. Refer to
→ Chapter "Driver Side Lower A-Pil ...
See More:
Volkswagen Tiguan Service and Repair Manual > Parallel Parking Assistance: General Information
Note
Familiarity with the function and operation of the parallel parking
assistance is needed if there are customer concerns.
Refer to Owner's Manual.
The parallel parking assistance assists the driver when backing up to
parallel park in a spot on the driver or passenger side. When parallel p ...
Volkswagen Tiguan Owners Manual
Volkswagen Tiguan Service and Repair Manual
- Body exterior
- Body Interior
- General Paint Information
- Paint
- Brake System
- Suspension, Wheels, Steering
- Wheel and Tire Guide
- Towing Guide
- Wheel and Tire Guide General Information
- Communication
- Electrical Equipment General Information
- Electrical Equipment from 06/2011
- Heating, Ventilation and Air Conditioning
- Refrigerant R134a Servicing
- 6-Speed Manual Transmission 02Q, OBB, and OFB
