Volkswagen Tiguan Owners Manual: Changing the light bulb in the license plate lamp
Volkswagen Tiguan Owners Manual / Do it yourself / Changing light bulbs / Changing the light bulb in the license plate lamp

Fig. 209 In the rear hatch: Clamped license plate lamp.
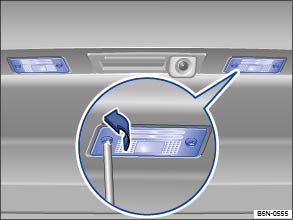
Fig. 210 In the rear hatch: Screwed license plate lamp.
 Read and follow the introductory information and
safety information first⇒
Read and follow the introductory information and
safety information first⇒ Introduction
to the subject
Introduction
to the subject | Please carry out each step only in the order specified: | ||
|---|---|---|
| Clamped license plate lamp | Screwed license plate lamp | |
| 1. | Please review and follow the checklist ⇒ Information on light bulb replacement . | |
| 2. | Press the flat blade of the screwdriver from the vehicle tool kit in the direction of the arrow in the notch in the license plate lamp ⇒ Fig. 209 . | Remove the screws of the license plate lamp with the screwdriver from the vehicle tool kit. |
| 3. | Pull out the license plate lamp slightly. The connector must not be separated for this. | |
| 4. | Replace the burned out light bulb with a new bulb of the same type. | |
| 5. | Carefully insert the license plate lamp into the opening in the bumper. Ensure that the license plate lamp is installed in the correct direction. | Carefully insert the license plate lamp into the opening in the bumper. Make sure that the adhesive anti-glare strip faces forward. |
| 6. | Press the license plate lamp into the bumper until it audibly latches. | Tighten the securing screws of the license plate lamp with the screwdriver. |
 Changing taillight bulbs in the vehicle body
Fig. 207 In the side of the luggage
compartment: releasing the tail light, removing the trim panel and removing the
screws.
Fig. 208 Removed tail light: removing
the bulb holder and replacing t ...
 Changing the light bulb in the backup lamp
Read and follow the introductory information and
safety information first⇒Introduction
to the subject The light bulbs for the backup lights are Lifetime bulbs with
a very long service life. ...
See More:
Volkswagen Tiguan Owners Manual > Volkswagen Information System: MFI menu (Multi-Function Indicator): Premium version
The MFI menu has 2 automatic trip memories: 1 – single
trip memory and 2 – total trip memory. The number of the
memory is shown at the upper right of the display. The trip memories are in addition
to the trip odometer, which is displayed in the bottom part of the instrument cluster
and c ...
Volkswagen Tiguan Owners Manual
Volkswagen Tiguan Service and Repair Manual
- Body exterior
- Body Interior
- General Paint Information
- Paint
- Brake System
- Suspension, Wheels, Steering
- Wheel and Tire Guide
- Towing Guide
- Wheel and Tire Guide General Information
- Communication
- Electrical Equipment General Information
- Electrical Equipment from 06/2011
- Heating, Ventilation and Air Conditioning
- Refrigerant R134a Servicing
- 6-Speed Manual Transmission 02Q, OBB, and OFB

© 2018-2026 Copyright www.vwtiguan.org - 0.098