Volkswagen Tiguan Owners Manual: Changing taillight bulbs in the vehicle body
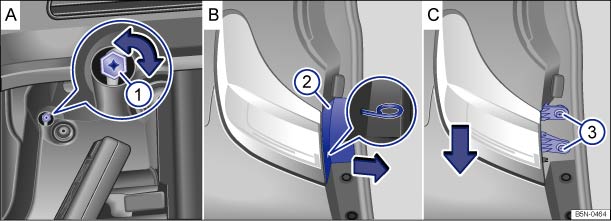
Fig. 207 In the side of the luggage compartment: releasing the tail light, removing the trim panel and removing the screws.
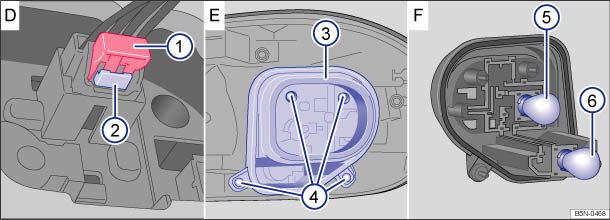
Fig. 208 Removed tail light: removing the bulb holder and replacing the tail light and brake light bulb ③ or turn signal bulb ④.
 Read and follow the introductory information and
safety information first⇒
Read and follow the introductory information and
safety information first⇒ Introduction
to the subject
Introduction
to the subject Please perform these steps only in the order listed.
Removing the tail lights
| 1. | Please review and follow the checklist ⇒ Information on light bulb replacement . |
| 2. | Open the rear hatch ⇒ Rear hatch . |
| 3. | Insert the wire bracket from the vehicle tool kit (⇒ Vehicle tool kit ) into the small hole in the trim panel ⇒ Fig. 207② B. Remove the trim panel in the direction of the arrow using the wire bracket. |
| 4. | Open the side storage compartment in the luggage compartment ⇒ Other storage compartments . |
| 5. | Using the Phillips screwdriver from the vehicle tool kit, turn the locking mechanism ⇒ Fig. 207① A 90 ° counterclockwise until it stops. |
| 6. | Remove the screws ⇒ Fig. 207③ C. |
| 7. | Pull the tail light out of the body carefully until the electrical connector is visible. |
| 8. | Remove the red locking mechanism ⇒ Fig. 208① D as illustrated and disconnect the electrical connector with the lever ⇒ Fig. 208② D pressed down. |
| 9. | Lay the tail light on a clean and level surface. |
Changing light bulbs
| 10. | Remove the screws ⇒ Fig. 208④ E. |
| 11. | Remove the bulb holder ⇒ Fig. 208③ E from the tail light. |
| 12. | Replace burned out tail light, brake light ⇒ Fig. 208⑤ F or turn signal bulbs ⇒ Fig. 208⑥ F with bulbs that are identical to the ones being replaced. |
| 13. | Insert the bulb holder in the tail light and screw it in ⇒ Fig. 208 E. |
Installing the tail lights
| 14. | Turn the locking mechanism ⇒ Fig. 207① A 90 ° clockwise until it stops. |
| 15. | Insert the electrical connector into the bulb holder until it clicks into place. Press the red locking mechanism ⇒ Fig. 208① D back in. |
| 16. | Insert the tail light into the opening on the body carefully. |
| 17. | Hold the tail light in the correct position with one hand and tighten the screws with the other hand ⇒ Fig. 208③ C. |
| 18. | Insert the trim panel ⇒ Fig. 207② B into its original position, first at the bottom and then at the top. |
| 19. | Close the side storage compartment in the luggage compartment. |
| 20. | Close the rear hatch ⇒ Rear hatch . |
 Replacing light bulbs in taillight in the rear hatch
Fig. 205 In the rear lid: removing the
cover and the bulb holder.
Fig. 206 Bulb holder with backup light
bulb ②.
Read and follow the introductory information and
safety information first⇒I ...
 Changing the light bulb in the license plate lamp
Fig. 209 In the rear hatch: Clamped
license plate lamp.
Fig. 210 In the rear hatch: Screwed
license plate lamp.
Read and follow the introductory information and
safety information first⇒Intr ...
See More:
Volkswagen Tiguan Service and Repair Manual > Exterior Equipment: Exterior Rearview Mirror
Tools
Special tools and workshop equipment required
Pry Lever -80 - 200-
Torque Wrench 1783 - 2-10Nm -VAG1783-
Overview - Exterior Rearview Mirror
Note
The illustration shows the right side. The left side is identical.
Mirror Base
Removing and installing.
Mirror Housing
Material - A ...
Volkswagen Tiguan Owners Manual
Volkswagen Tiguan Service and Repair Manual
- Body exterior
- Body Interior
- General Paint Information
- Paint
- Brake System
- Suspension, Wheels, Steering
- Wheel and Tire Guide
- Towing Guide
- Wheel and Tire Guide General Information
- Communication
- Electrical Equipment General Information
- Electrical Equipment from 06/2011
- Heating, Ventilation and Air Conditioning
- Refrigerant R134a Servicing
- 6-Speed Manual Transmission 02Q, OBB, and OFB
