Volkswagen Tiguan Service and Repair Manual: Additional Components for Control and Regulation
Sunlight Photo Sensor -G107-, Removing and Installing
Special tools and workshop equipment required
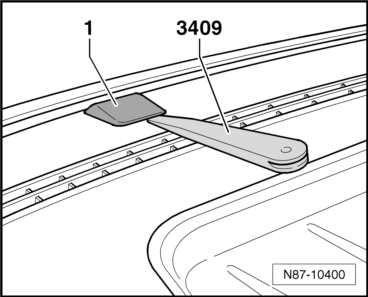
- Trim Removal Wedge -3409-
- Vehicle Diagnostic Tester
Removing
- Unclip the Sunlight Photo Sensor -G107--1- from the instrument panel using the Trim Removal Wedge -3409-.
- Remove the connector from the Sunlight Photo Sensor -G107-.

Installing
- Install in reverse order of removal.
Sunlight Photo Sensor 2 -G134-, Removing and Installing
Special tools and workshop equipment required
- Trim Removal Wedge -3409-
- Vehicle Diagnostic Tester
Removing
- Unclip the Sunlight Photo Sensor -G107--1- from the instrument panel using the Trim Removal Wedge -3409-.
- Remove the connector from the Sunlight Photo Sensor -G107-.
Installing
- Install in reverse order of removal.
Air Quality Sensor -G238- Function
- Sensor for air quality detects pollutants in the ambient air (mostly gasoline and/or diesel fumes).
- The Climatronic Control Module -J255- evaluates the signal from the Air Quality Sensor -G238-. The A/C system is activated depending on the strength and type of heavily polluted air.
At an outside temperature greater than approximately +2ºC (35.6 ºF) the recirculating air mode is switched on when there is only a slight increase in the pollutant concentration.
At an outside temperature between approximately +2 ºC (35.6 ºF) and approximately -5 ºC (23 ºF), the change over to recirculating air mode only occurs at a sharp increase of pollutant concentration, during which the compressor is switched on simultaneously.
At an outside temperature less than approximately -5ºC (23 ºF), the system still only changes to recirculation mode when there is a strong increase in the level of pollutants. However, it only switches on for approximately 15 seconds and the A/C compressor does not switch on. If the concentration decreases, the A/C system switches to the fresh air mode.
- "Automatic recirculating air mode" can be switched off at any time. If the function is active, the A/C compressor is switched on with a request for "automatic recirculating air mode" and also when the outside air temperature is below +2 ºC (35.6 ºF). If the temperature is below -5 ºC (23 ºF), it is not possible to use the A/C compressor.
- If the vehicles has "automatic recirculation mode", the A/C compressor can also be switched on manually when the temperature is approximately -5 ºC (23 ºF).
- To ensure that the A/C system does not operate constantly in the recirculating air mode in areas with a consistently higher pollution, the sensor is self-learning (it adjusts its sensitivity to the environmental conditions).
- If the pollutant level in the ambient air remains relatively high for a lengthy period, the sensor starts to adapt to the change in ambient conditions by way of an adaptation program, with the result that a recirculated-air request is generally applied for less than 12 minutes given uniform ambient air pollution. If a succession of peaks in the polluted air is detected, the A/C system can operate over a longer period of time in recirculating air mode.
- A certain amount of time is required for repositioning of the air conditioning system doors. In the event that a sudden increase in pollutants is encountered (for example, when driving through a diesel exhaust cloud) gaseous pollutants can be taken in with the fresh air into the passenger compartment until the door can be closed. For this reason, a dust and pollen filter is installed with a charcoal layer. A filter that is saturated with pollutants is no longer effective and needs to be replaced.
- In order to avoid frequent shifting of the recirculated air/fresh air door, a slight increase of pollutants in the ambient air will not allow for immediate shifting (the sensor does not send a request to the Climatronic Control Module -J255-). The filtering of the activated charcoal insert in the dust and pollen filter will be sufficient.
- In order to avoid frequent shifting of the recirculating air/fresh air door, the requirement from the sensor for "automatic recirculating air mode" remains for at least 25 seconds (minimum duration period), even if the pollutant concentration is so far reduced that recirculating air mode is no longer necessary.
- If the A/C compressor is shut-off (for example when in ECON mode or A/C off), the maximum duration of the "automatic recirculating air mode" is limited to approximately 15 seconds by the Climatronic Control Module -J255- to keep the windows from fogging up.
- The Climatronic Control Module -J255- does not allow any air circulation when "defrost" is being using so that the window glass can defog as quickly as possible.
- The Air Quality Sensor -G238- requires approximately 30 seconds to become operational once the ignition has been switched on (warm-up time). During this time there is no requirement from the sensor to Climatronic Control Module -J255- for "automatic recirculating air mode".
- The Air Quality Sensor -G238- contains a highly sensitive electronic component which can be damaged if it comes in direct contact with solvents, fuels or chemicals. For this reason, do not install sensors that may have come into contact with these substances.
Air Quality Sensor -G238-, Removing and Installing
Special tools and workshop equipment required
- Trim Removal Wedge -3409-
- Vehicle Diagnostic Tester
Note
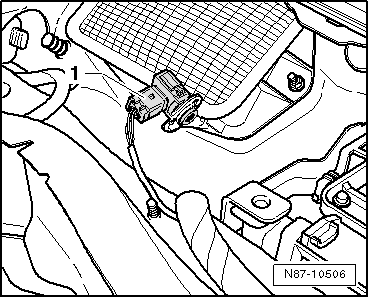
- The Air Quality Sensor -G238- is installed at the right front on the intake air grille in the plenum chamber.
- The Air Quality Sensor -G238- contains a highly sensitive electronic component that can be damaged if it comes in direct contact with solvents, fuels or chemicals.
- Do not install a sensor that has been kept, for example, in a tool box.
- Do not store removed sensors in areas where they can come into contact with solvents, fuels and certain chemical compositions (fluids or vapors).
Removing
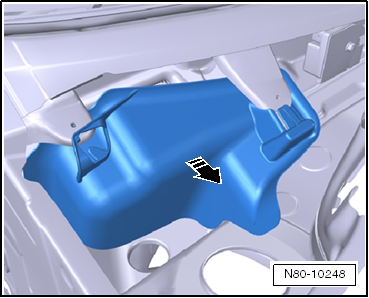
- Remove the plenum chamber cover.
- Remove the cover from the plenum chamber.
- Disconnect the connector from the Air Quality Sensor -G238-.
- Release the Air Quality Sensor -G238--1- and remove from the bracket on the air grille.
Installing
Install in reverse order of removal.
Outside Air Temperature Sensor -G17-, Removing and Installing
Note
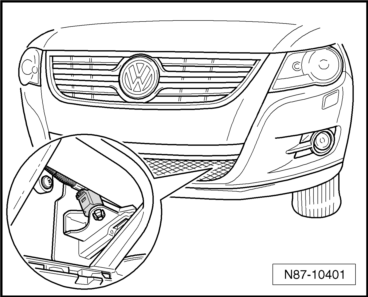
The Outside Air Temperature Sensor -G17- is located behind the air grille in the center.
Special tools and workshop equipment required
- Trim Removal Wedge -3409-
- Vehicle Diagnostic Tester
Removing
- Remove the center air grille from the bumper cover retainers.
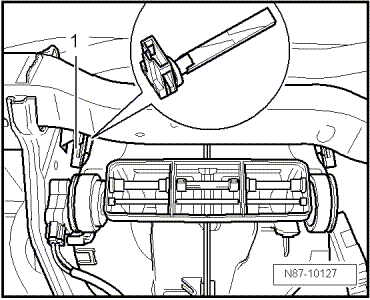
- Unclip the Outside Air Temperature Sensor -G17--1- from the bracket and remove the connector.
Installing
- Install the Outside Air Temperature Sensor -G17- in reverse order of removal.
Left Vent Temperature Sensor -G150-, Removing and Installing
Special tools and workshop equipment required
- Trim Removal Wedge -3409-
- Vehicle Diagnostic Tester
Removing
Note
Removal of sensors on both sides is identical, only the sides are reversed.
- Remove the right or left instrument panel cover.
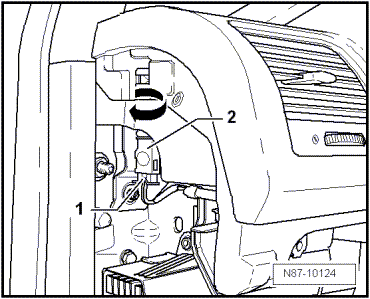
- Disconnect the connector -1- from the vent temperature sensor -2-.
- Rotate vent temperature sensor -2-, rotate 90º in direction of -arrow- and remove from instrument panel.
Installing
- Install in reverse order of removal.
Right Vent Temperature Sensor -G151-, Removing and Installing
Special tools and workshop equipment required
- Trim Removal Wedge -3409-
- Vehicle Diagnostic Tester
Removing
Note
Removal of sensors on both sides is identical, only the sides are reversed.
- Remove the right or left instrument panel cover.
- Disconnect the connector -1- from the vent temperature sensor -2-.
- Rotate vent temperature sensor -2-, rotate 90º in direction of -arrow- and remove from instrument panel.

Installing
- Install in reverse order of removal.
Center Vent Temperature Sensor -G191-, Removing and Installing
Special tools and workshop equipment required
- Trim Removal Wedge -3409-
- Vehicle Diagnostic Tester
Removing
- Remove the side left instrument panel cover.
- Disconnect the connector on the Center Vent Temperature Sensor -G191--1-.
- Turn the Center Vent Temperature Sensor -G191--2- 90º in the direction of the -arrow- and remove it from the instrument panel.

Installing
Install in reverse order of removal.
Footwell Vent Temperature Sensor -G192-, Removing and Installing
Special tools and workshop equipment required
- Trim Removal Wedge -3409-
- Vehicle Diagnostic Tester
Removing
- Remove the instrument panel.
- Disconnect the connector on the Footwell Vent Temperature Sensor -G192--1-.
- Rotate the Footwell Vent Temperature Sensor -G192- 90º and remove it from the housing.
Installing
Install in reverse order of removal.
Right Footwell Vent Temperature Sensor -G262-, Removing and Installing
Special tools and workshop equipment required
- Trim Removal Wedge -3409-
- Vehicle Diagnostic Tester
Removing
Note
The Right Footwell Vent Temperature Sensor -G262- is shown with instrument panel removed to provide a clearer illustration. It is not necessary to remove the instrument panel for installation.
- Remove the glove compartment.
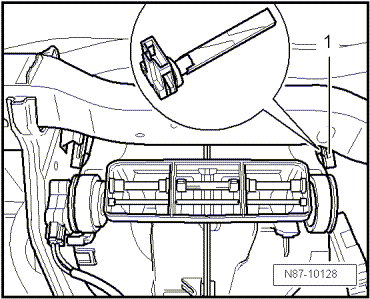
- Disconnect the connector on the Right Footwell Vent Temperature Sensor -G262--1-.
- Turn the Right Footwell Vent Temperature Sensor -G262--1- 90º and remove it from the housing.
Installing
Install in reverse order of removal.
Special Tools
Special tools and workshop equipment required
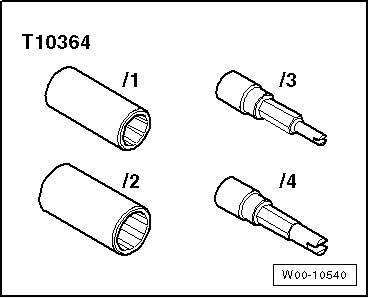
- Refrigerant Sockets -T10364-
- Vehicle Diagnostic Tester
- Test Box Kit - Adapter 47 -VAG1598/47-
- Test Box Kit - 105 Pin Test Box Kit -VAG1598/42-
- Test Box Kit - Adapter 47-2 -1598/47-2-

- Torque Wrench 1331 5-50Nm -VAG1331-
- Torque Wrench 1783 - 2-10Nm -VAG1783-
- Engine Bung Set -VAS6122-
- Torque Wrench 1783 - 1/4" Drive Ratchet -VAS6234-
- Trim Removal Wedge -3409-
- A/C Service Station
- Commercially available extra-long 12 edge socket, 1/2" 24- wrench size (Dimensions DxL 32x82 mm
Edition - K0059110521 - LC - 04/27/2015 - ESP
 Multi-Pin Connector Assignment on Back of Display Control Head
Multi-Pin Connector Assignment on Back of Display Control Head, Climatic
Special tools and workshop equipment required
Test Box Kit - 105 Pin Test Box Kit -VAG1598/42-
Test Box Kit - Adapter 47 -VA ...

See More:
Volkswagen Tiguan Owners Manual > Power locking and closing system: Unlocking and locking vehicles with Keyless Access
Fig. 25 Ranges of the Keyless Access
locking and starting system.
Fig. 26 Keyless Access locking and starting
system: Sensor Ⓐ for unlocking on the inside of the front door handles. Sensor for
locking Ⓑ on the outside of the door handles.
Keyless Access is a keyless starting and locki ...
Volkswagen Tiguan Owners Manual
Volkswagen Tiguan Service and Repair Manual
- Body exterior
- Body Interior
- General Paint Information
- Paint
- Brake System
- Suspension, Wheels, Steering
- Wheel and Tire Guide
- Towing Guide
- Wheel and Tire Guide General Information
- Communication
- Electrical Equipment General Information
- Electrical Equipment from 06/2011
- Heating, Ventilation and Air Conditioning
- Refrigerant R134a Servicing
- 6-Speed Manual Transmission 02Q, OBB, and OFB
