Volkswagen Tiguan Service and Repair Manual: Overview - Heater and A/C Unit
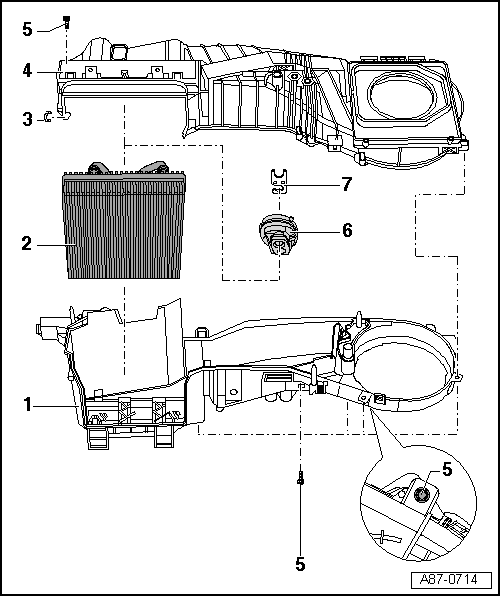
Overview - Heater and A/C Unit, Climatic
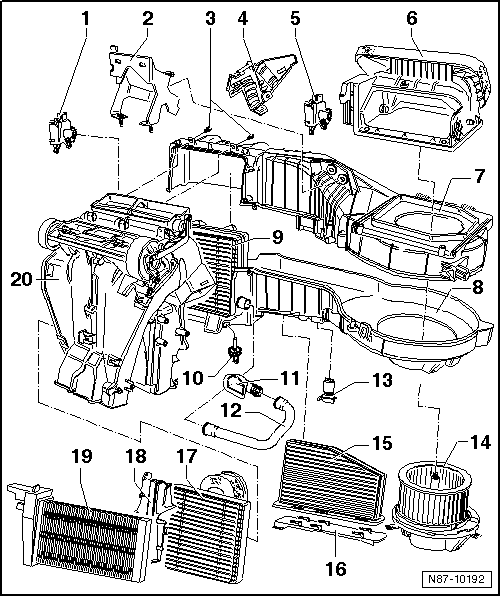
- Temperature Control Door Motor -V68-
- Check using the Vehicle Diagnostic Tester.
- Removing and installing.
- Replacing: initialize the basic setting using the Vehicle Diagnostic Tester.
- Bracket
- Bolts
- It is necessary to remove the bolts in order to separate the bracket from the air distribution and evaporator housing.
- Cover
- Recirculation Door Motor -V113-
- Check using the Vehicle Diagnostic Tester.
- Removing and installing
- Replacing: initialize the basic setting using the Vehicle Diagnostic Tester
- Air Intake Housing
- With air recirculation door
- Evaporator Housing Upper Section
- Evaporator Housing, Disassembling and Assembling.
- Evaporator Housing Lower Section
- Evaporator Housing, Disassembling and Assembling.
- Evaporator
- Removing and installing.
- Evaporator Temperature Sensor -G308- or Evaporator Vent Temperature
Sensor -G263-
- Check using the Vehicle Diagnostic Tester.
- Removing and installing.
Note
One or both of the component designations will appear, depending on software. The tasks are the same.
- Glove Compartment Cooling Connection
- To remove, the glove compartment must be removed.
- Installation position of glove compartment cooling connection.
- Glove Compartment Cooling Coolant Hose
- To remove, the glove compartment must be removed.
- Fresh Air Blower Series Resistor with Fuse -N24-
- Removing and installing.
- Fresh Air Blower -V2-
- Removing and installing.
- Dust and Pollen Filter
- With activated charcoal filter
- Removing and installing.
- Cover
- For dust and pollen filter
- Heater Core
- Removing and installing.
- Heater Core Trim Panel
- Auxiliary Heater Heating Element -Z35-
- Only on vehicles with a diesel engine without an auxiliary heater.
- Checking: using the Vehicle Diagnostic Tester under Heating, Ventilation and Air Conditioning; OBD-Capable Systems; Auxiliary Heater; Electrical Components.
- Removing and installing.
- Junction Box
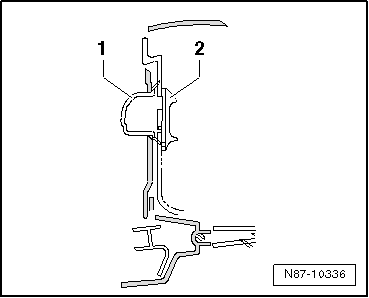
Installation Position of Glove Compartment Cooling Connection
- Connection
- Valve
Overview - Heater and A/C Unit, Electric-Manual Climate Control System
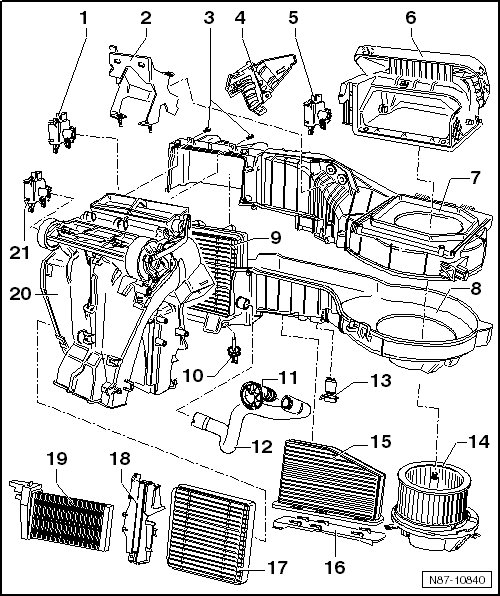
- Temperature Control Door Motor -V68-
- Check using the Vehicle Diagnostic Tester.
- Removing and installing.
- Replacing: initialize the basic setting using the Vehicle Diagnostic Tester.
- Bracket
- Bolts
- It is necessary to remove the bolts in order to separate the bracket from the air distribution and evaporator housing.
- Cover
- Recirculation Door Motor -V113-
- Check using the Vehicle Diagnostic Tester.
- Removing and installing.
- Replacing: initialize the basic setting using the Vehicle Diagnostic Tester.
- Air Intake Housing
- With air recirculation door
- Evaporator Housing Upper Section
- Evaporator Housing, Disassembling and Assembling.
- Evaporator Housing Lower Section
- Evaporator Housing, Disassembling and Assembling.
- Evaporator
- Removing and installing.
- Evaporator Temperature Sensor -G308- or Evaporator Vent Temperature
Sensor -G263-
- Check using the Vehicle Diagnostic Tester.
- Removing and installing.
Note
One or both of the component designations will appear, depending on software. The tasks are the same.
- Glove Compartment Cooling Connection
- To remove, the glove compartment must be removed.
- Installation position of glove compartment cooling connection.
- Glove Compartment Cooling Coolant Hose
- To remove, the glove compartment must be removed.
- Fresh Air Blower Series Resistor with Fuse -N24-
- Removing and installing.
- Fresh Air Blower -V2-
- Removing and installing.
- Dust and Pollen Filter
- With activated charcoal filter
- Removing and installing.
- Cover
- For dust and pollen filter
- Heater Core
- Removing and installing.
- Heater Core Trim Panel
- Auxiliary Heater Heating Element -Z35-
- Only on vehicles with a diesel engine without an auxiliary heater.
- Checking: using the Vehicle Diagnostic Tester under Heating, Ventilation and Air Conditioning; OBD-Capable Systems; Auxiliary Heater; Electrical Components.
- Removing and installing.
- Junction Box
- Air Distribution Door Motor -V428-
- Removing and installing.
Overview - Heater and A/C Unit, Climatronic
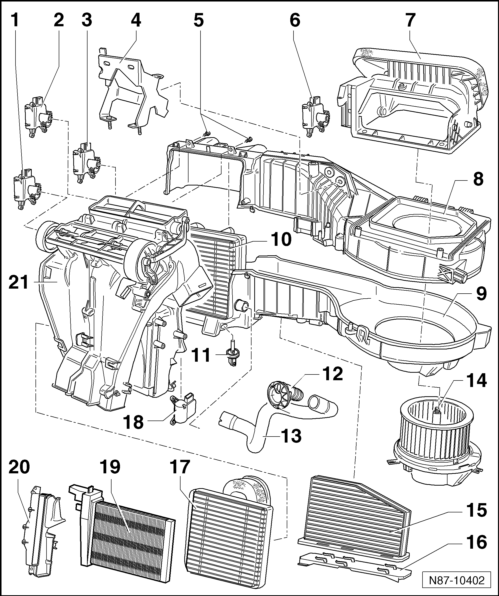
- Front Air Distribution Door Motor -V426-
- Check using the Vehicle Diagnostic Tester.
- Removing and installing.
- Replacing: initiate the basic setting using the Vehicle Diagnostic Tester.
- Left Temperature Control Door Motor -V158-
- Check using the Vehicle Diagnostic Tester.
- Removing and installing.
- Replacing: initiate the basic setting using the Vehicle Diagnostic Tester.
- Defroster Door Motor -V107-
- Check using the Vehicle Diagnostic Tester.
- Removing and installing.
- Replacing: initiate the basic setting using the Vehicle Diagnostic Tester.
- Bracket
- Bolts
- It is necessary to remove the bolts in order to separate the bracket from the air distribution and evaporator housing.
- Quantity: 4
- Fresh Air/Recirculating Air/Back Pressure Door Motor -V425- with Fresh
Air/Recirculating Air/Back Pressure Door Motor Position Sensor -G644-, from
June 2007
- Check using the Vehicle Diagnostic Tester.
- Removing and installing.
- Replacing: initiate the basic setting using the Vehicle Diagnostic Tester.
Note
- Through 12/2003 Fresh/Recirculated Air Door Motor -V154-
- From 01/2004 through 05/2007, Recirculation Door Motor -V113-
- Air Intake Housing
- With fresh air and recirculation door
- With back pressure door (Climatronic)
- Evaporator Housing Upper Section
- Evaporator Housing, Disassembling and Assembling.
- Evaporator Housing Lower Section
- Evaporator Housing, Disassembling and Assembling.
- Evaporator
- Removing and installing.
- Evaporator Vent Temperature Sensor -G263- or Evaporator Temperature
Sensor -G308-
- Check using the Vehicle Diagnostic Tester.
- Removing and installing.
- Glove Compartment Cooling Connection
- Installation position of glove compartment cooling connection.
- Glove Compartment Cooling Coolant Hose
- Fresh Air Blower -V2- with Fresh Air Blower Control Module -J126-
- Check using the Vehicle Diagnostic Tester.
- Fresh Air Blower -V2-, removing and installing.
- Fresh Air Blower Control Module -J126-, removing and installing.
- Dust and Pollen Filter
- With EVAP canister
- Removing and installing.
- Cover
- For the dust and pollen filter
- Heater Core
- Removing and installing.
- Right Temperature Control Door Motor -V159-
- Check using the Vehicle Diagnostic Tester.
- Removing and installing.
- Replacing: initiate the basic setting using the Vehicle Diagnostic Tester.
- Auxiliary Heater Heating Element -Z35-
- Only installed on vehicles with Diesel engine without auxiliary heater.
- Checking: using the Vehicle Diagnostic Tester under Heating, Ventilation and Air Conditioning; OBD-Capable Systems; Auxiliary Heater; Electrical Components.
- Removing and installing.
- Heater Core Trim Panel
- Junction Box
Installation Position of Glove Compartment Cooling Connection
- Connection
- Valve

Overview - Evaporator Housing
- Remove the heater and A/C unit.
- Disconnect the air distribution housing/evaporator housing from the heater and A/C unit.
- Evaporator Housing Lower Section
- Disassembling and Assembling.
- Evaporator
- Check insulation, it must be completely present
- Removing and installing.
- Clamp
- Evaporator Housing Upper Section
- Disassembling and Assembling.
- Screw
- Seal/Insulation
- Expansion valve heat insulation
- Removing and installing.
- Bracket
- Removing and installing.
Evaporator, Removing and Installing
Removing
- Remove the heater and A/C unit.
- Disassemble the heater and A/C unit. For vehicles with Climatic.
- Disassemble the evaporator housing.
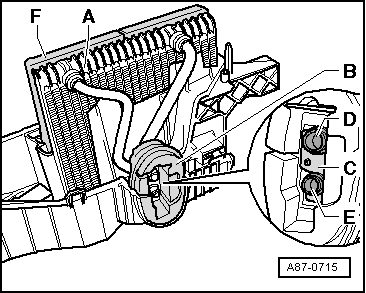
- Remove the evaporator -A- from the evaporator housing lower section.
Installing
Note
- Before inserting the evaporator, check condensation water drain and clean drain if necessary.
- Before inserting evaporator, clean evaporator housing and the evaporator, if necessary.
- When inserting evaporator -A- into lower section of evaporator housing, and when assembling both housing halves, make sure the seal -F- is not damaged.
- Check seal -F- (it must be glued all the way around) before inserting evaporator.
- Mount the bracket -C- and seal/insulation -B- on the evaporator connecting pipes -D- and -E-.
- Insert evaporator -A- into lower section of evaporator housing as shown in the illustration.

Note
- After assembling both housing halves, check the seal / insulation -B- for correct positioning on the holes for both refrigerant lines -D and E-.
- Check seating of bracket -C- on both refrigerant lines -D and E- for correct seating.
- If heat protection insulation -B- is missing or not installed correctly, it can cause reduced performance of the A/C system (change of adjusted control characteristics of expansion valve due to radiant heat).

 Auxiliary Heater Heating Element -Z35-, Checking
Checking the Auxiliary Heater Heating Element -Z35- with Peripheral
Components:
The Auxiliary Heater Heating Element -Z35- with peripheral components (load
signal for generator terminal DF, Low Heat ...
See More:
Volkswagen Tiguan Service and Repair Manual > Exterior Equipment: Exterior Rearview Mirror
Tools
Special tools and workshop equipment required
Pry Lever -80 - 200-
Torque Wrench 1783 - 2-10Nm -VAG1783-
Overview - Exterior Rearview Mirror
Note
The illustration shows the right side. The left side is identical.
Mirror Base
Removing and installing.
Mirror Housing
Material - A ...
Volkswagen Tiguan Owners Manual
Volkswagen Tiguan Service and Repair Manual
- Body exterior
- Body Interior
- General Paint Information
- Paint
- Brake System
- Suspension, Wheels, Steering
- Wheel and Tire Guide
- Towing Guide
- Wheel and Tire Guide General Information
- Communication
- Electrical Equipment General Information
- Electrical Equipment from 06/2011
- Heating, Ventilation and Air Conditioning
- Refrigerant R134a Servicing
- 6-Speed Manual Transmission 02Q, OBB, and OFB
