Volkswagen Tiguan Service and Repair Manual: Adjustment Motors
Temperature Control Door Motor -V68-, Removing and Installing
Special tools and workshop equipment required
- Vehicle Diagnostic Tester
Note
- The motors were changed starting from 11/04/2013. See the general information.
- The color-coded connecting elements on the actuator have been discontinued as a running change as of 11/04/2013 for those connecting elements installed by the manufacturer and delivered as a replacement part. Additionally the connecting elements are no longer preinstalled on actuators that are delivered as a replacement part.
- The actuators and the associated connecting elements differ. In some cases, however, the differences are so small that they are not always easy to detect at first glance. If a different version of the actuator or a connecting element is installed than the designated version, it usually leads to problems when performing the final basic setting.
Removing
- Remove the driver side footwell trim.
- Remove the left footwell vent.
- Remove the Data Bus on Board Diagnostic Interface -J533-.
- Remove the brake pedal crash bolster.
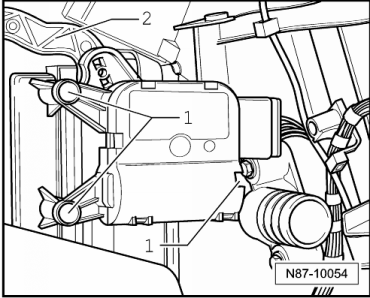
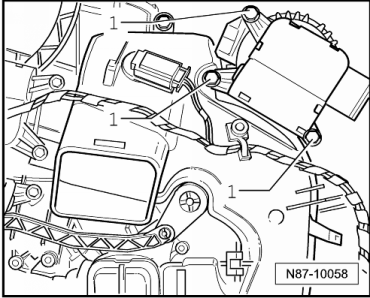
- Remove the bolts -4- (9 Nm)
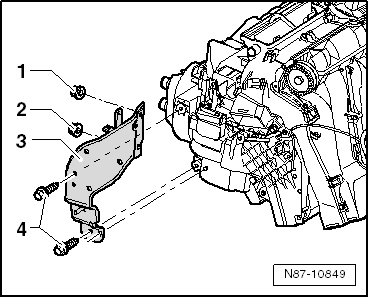
Note
- Do not loosen the nuts -1 and 2-.
- Do not remove the bracket -3-.

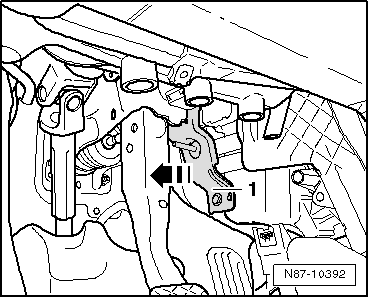
- Push the bracket -1- in the direction of the brake pedal -arrow- and secure it there with binding components (for example with cable ties).
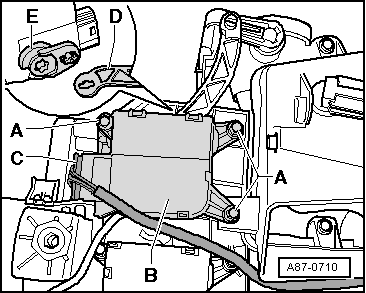
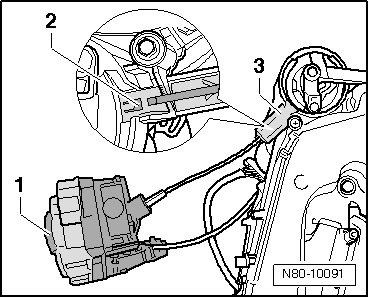
- Mark the connector -C- for the motor (danger of confusing it with other connectors that may look the same).
- Disconnect the connector -C- on the Temperature Control Door Motor -V68-.
- Remove the cover -A-.
- Remove the screws -D- 1.4 Nm and the Temperature Control Door Motor -V68--B-.
- Disconnect the lever -E- from the connecting rod -F-.

Installing
- See notes. Refer to → Chapter "Actuator Information".
Note
- Incorrectly installed actuators or connecting elements cause malfunctions in the heating or A/C system.
- Label the connectors to the actuators.
- Install the correct connecting elements on the actuators.
Note
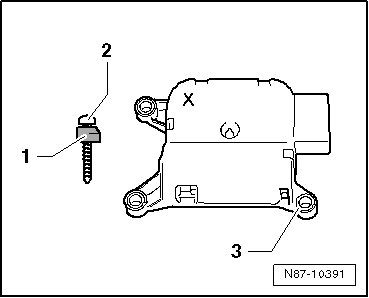
Optimal adjustment motors are marked with an "X".
For better assembly a Raised Head Screw -N 106 115 02- can be used.
- Disconnect the mount from the old Temperature Control Door Motor -V68- using for example a diagonal cutter -1-.
- Attach the new Temperature Control Door Motor -V68- that is marked with an "X" to the mount -3- on the blower case using the new raised head screw -2- and the removed mount -1-.
- Route the wiring harness so that it cannot come in contact with any moving parts (for example, the adjustment motor lever).
Note
After installing, the function of the left temperature door must be checked.
- Initiate the "basic setting" using the Vehicle Diagnostic Tester.
- Additional installation is in reverse order of removal.
Defroster Door Motor -V107-, Removing and Installing
Special tools and workshop equipment required
- Vehicle Diagnostic Tester
Note
- The motors were changed starting from 11/04/2013. See the general information.
- The color-coded connecting elements on the actuator have been discontinued as a running change as of 11/04/2013 for those connecting elements installed by the manufacturer and delivered as a replacement part. Additionally the connecting elements are no longer preinstalled on actuators that are delivered as a replacement part.
- The actuators and the associated connecting elements differ. In some cases, however, the differences are so small that they are not always easy to detect at first glance. If a different version of the actuator or a connecting element is installed than the designated version, it usually leads to problems when performing the final basic setting.
Removing
- Remove the instrument panel assembly carrier.
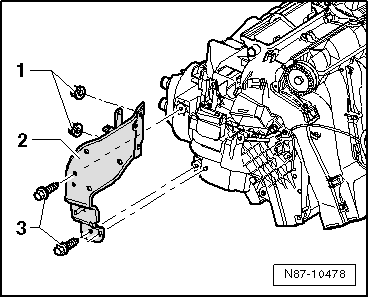
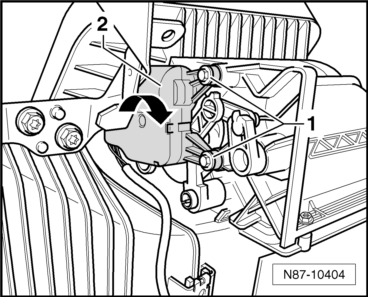
- Remove the bracket -2- if it is still installed.
- Remove the nuts -1- (9 +- 1.3 Nm) and bolts -3- (9 +-1.3 Nm).
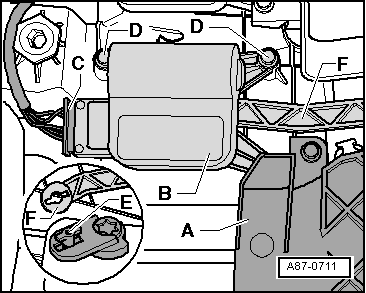
- Mark the connector -C- for the motor (danger of confusing it with other connectors that may look the same).
- Disconnect the connector -C- from the Defroster Door Motor -V107-.
- Remove the bolts -A- (1.4 Nm) and remove the Defroster Door Motor -V107--B-.
- Disconnect the lever -E- from the connecting rod -D-.
Installing
- See notes. Refer to → Chapter "Actuator Information".
Note
- Incorrectly installed actuators or connecting elements cause malfunctions in the heating or A/C system.
- Label the connectors to the actuators.
- Install the correct connecting elements on the actuators.
Install in reverse order of removal.
Note
After installing, the function of the defroster door must be checked.
- Check the DTC memory and erase any displayed entries, then perform the "basic setting". Use the Vehicle Diagnostic Tester in the "Guided Fault Finding" function.
Recirculation Door Motor -V113-, Removing and Installing
Special tools and workshop equipment required
- Vehicle Diagnostic Tester
Note
- The motors were changed starting from 11/04/2013. See the general information.
- The color-coded connecting elements on the actuator have been discontinued as a running change as of 11/04/2013 for those connecting elements installed by the manufacturer and delivered as a replacement part. Additionally the connecting elements are no longer preinstalled on actuators that are delivered as a replacement part.
- The actuators and the associated connecting elements differ. In some cases, however, the differences are so small that they are not always easy to detect at first glance. If a different version of the actuator or a connecting element is installed than the designated version, it usually leads to problems when performing the final basic setting.
Removing
- Remove the glove compartment.
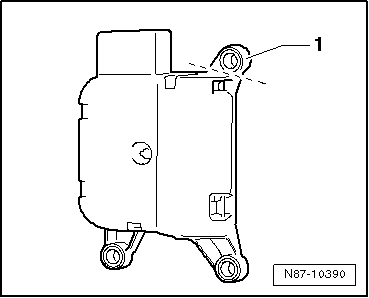
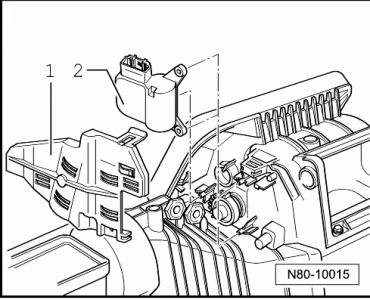
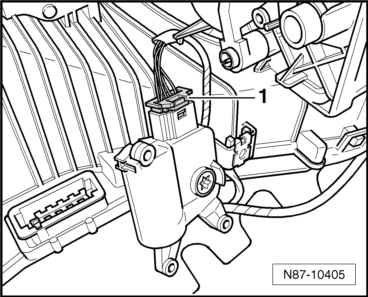
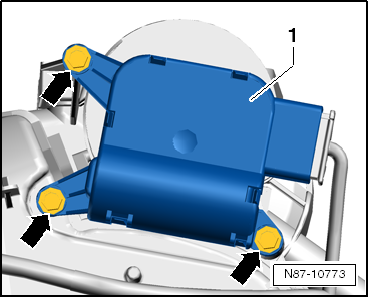
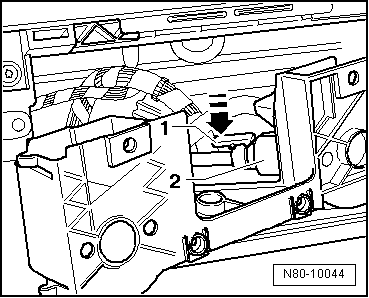
- Remove the adjustment motor cover -1-.
- Disconnect the connector from the Recirculation Door Motor -V113--2-.
- Remove the Recirculation Door Motor - V113--2-.
Installing
- See notes. Refer to → Chapter "Actuator Information".
Note
- Incorrectly installed actuators or connecting elements cause malfunctions in the heating or A/C system.
- Label the connectors to the actuators.
- Install the correct connecting elements on the actuators.
Install in reverse order of removal.
Note
After installing, the recirculation door function must be checked.
- Check the DTC memory and erase any displayed entries, then perform the "basic setting". Use the Vehicle Diagnostic Tester in the "Guided Fault Finding" function.
Fresh/Recirculated Air Door Motor -V154-, Removing and Installing
Special tools and workshop equipment required
- Vehicle Diagnostic Tester
Note
- The motors were changed starting from 11/04/2013. See the general information.
- The color-coded connecting elements on the actuator have been discontinued as a running change as of 11/04/2013 for those connecting elements installed by the manufacturer and delivered as a replacement part. Additionally the connecting elements are no longer preinstalled on actuators that are delivered as a replacement part.
- The actuators and the associated connecting elements differ. In some cases, however, the differences are so small that they are not always easy to detect at first glance. If a different version of the actuator or a connecting element is installed than the designated version, it usually leads to problems when performing the final basic setting.
Removing
Note
The position of the air recirculation door must not be changed.
- Remove the glove compartment.
- Remove the cover -1-.
- Disconnect the connector from the Fresh/Recirculated Air Door Motor -V154--2-.
- Remove the Fresh/Recirculated Air Door Motor -V154--2- for the mount.

Installing
Install in reverse order of removal.
- See notes. Refer to → Chapter "Actuator Information".
Note
- Incorrectly installed actuators or connecting elements cause malfunctions in the heating or A/C system.
- Label the connectors to the actuators.
- Install the correct connecting elements on the actuators.
Note
After installing the Fresh/Recirculated Air Door Motor -V154-, the function of the recirculating air door must be checked.
- Check the DTC memory and erase any displayed entries, then perform the "basic setting". Use the Vehicle Diagnostic Tester in the "Guided Fault Finding" function.
Left Temperature Control Door Motor -V158-, Removing and Installing
Special tools and workshop equipment required
- Vehicle Diagnostic Tester
Note
- The motors were changed starting from 11/04/2013. See the general information.
- The color-coded connecting elements on the actuator have been discontinued as a running change as of 11/04/2013 for those connecting elements installed by the manufacturer and delivered as a replacement part. Additionally the connecting elements are no longer preinstalled on actuators that are delivered as a replacement part.
- The actuators and the associated connecting elements differ. In some cases, however, the differences are so small that they are not always easy to detect at first glance. If a different version of the actuator or a connecting element is installed than the designated version, it usually leads to problems when performing the final basic setting.
Removing
- Remove the driver side footwell trim.
- Remove the left footwell vent.
- Remove the Data Bus on Board Diagnostic Interface -J533-.
- Remove the brake pedal crash bolster.
- Remove the bolts -4- (9 Nm)

Note
- Do not loosen the nuts -1 and 2-.
- Do not remove the bracket -3-.
- Push the bracket -1- in the direction of the brake pedal -arrow- and secure it there with binding components (for example with cable ties).
- Mark the connector -C- for the motor (danger of confusing it with other connectors that may look the same).
- Disconnect the connector -C- on the Left Temperature Control Door Motor -V158-.
- Remove the cover -A-.
- Remove the screws -D- 1.4 Nm and the Left Temperature Control Door Motor -V158--B-.
- Disconnect the lever -E- from the connecting rod -F-.
Installing
- See notes. Refer to → Chapter "Actuator Information".
Note
- Incorrectly installed actuators or connecting elements cause malfunctions in the heating or A/C system.
- Label the connectors to the actuators.
- Install the correct connecting elements on the actuators.
Note
Optimal adjustment motors are marked with an "X".
For better assembly a Raised Head Screw -N 106 115 02- can be used.
- Remove the mount from the old Left Temperature Control Door Motor -V158- using a diagonal cutter -1-, for example.

- Attach the new Left Temperature Control Door Motor -V158- that is marked with an "X" to the mount -3- on the blower case using the new raised head screw -2- and the removed mount -1-.
- Route the wiring harness so that it cannot come in contact with any moving parts (for example, the adjustment motor lever).

Note
After installing, the function of the left temperature door must be checked.
- Check the DTC memory and erase any displayed entries, then perform the "basic setting". Use the Vehicle Diagnostic Tester in the "Guided Fault Finding" function.
- Additional installation is in reverse order of removal.
Right Temperature Control Door Motor -V159-, Removing and Installing
Special tools and workshop equipment required
- Vehicle Diagnostic Tester
Note
- The motors were changed starting from 11/04/2013. See the general information.
- The color-coded connecting elements on the actuator have been discontinued as a running change as of 11/04/2013 for those connecting elements installed by the manufacturer and delivered as a replacement part. Additionally the connecting elements are no longer preinstalled on actuators that are delivered as a replacement part.
- The actuators and the associated connecting elements differ. In some cases, however, the differences are so small that they are not always easy to detect at first glance. If a different version of the actuator or a connecting element is installed than the designated version, it usually leads to problems when performing the final basic setting.
Removing
- Remove the glove compartment.
- Remove the right footwell vent.
- Disconnect the connector on the Right Temperature Control Door Motor -V159-.
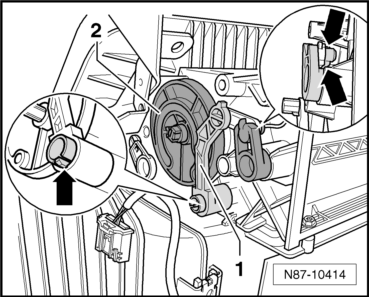
- Remove the screws -1- (1.4 Nm) and the Right Temperature Control Door Motor -V159-.
- Unhook the brace -2- from the Right Temperature Control Door Motor -V159-.
Installing
- See notes. Refer to → Chapter "Actuator Information".
Note
- Incorrectly installed actuators or connecting elements cause malfunctions in the heating or A/C system.
- Label the connectors to the actuators.
- Install the correct connecting elements on the actuators.
Install in reverse order of removal.
Note
After installing, the function of the right temperature door must be checked.
- Check the DTC memory and erase any displayed entries, then perform the "basic setting". Use the Vehicle Diagnostic Tester in the "Guided Fault Finding" function.
Fresh Air/Recirculating Air/Back Pressure Door Motor -V425-, Removing and Installing
Special tools and workshop equipment required
- Vehicle Diagnostic Tester
Note
- The motors were changed starting from 11/04/2013. See the general information.
- The color-coded connecting elements on the actuator have been discontinued as a running change as of 11/04/2013 for those connecting elements installed by the manufacturer and delivered as a replacement part. Additionally the connecting elements are no longer preinstalled on actuators that are delivered as a replacement part.
- The actuators and the associated connecting elements differ. In some cases, however, the differences are so small that they are not always easy to detect at first glance. If a different version of the actuator or a connecting element is installed than the designated version, it usually leads to problems when performing the final basic setting.
Removing
- Remove the glove compartment.
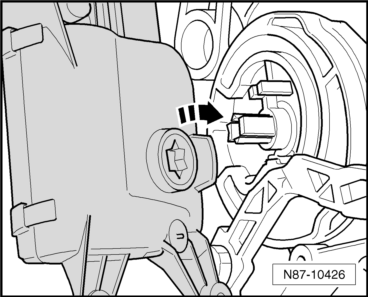
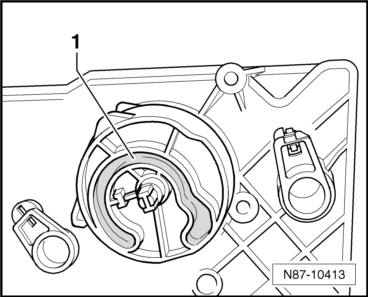
- Remove the bolts -1- (1.4 Nm).
- Turn the Fresh Air/Recirculating Air/Back Pressure Door Motor -V425--2- approximately 15º in direction of the -arrow- and then pull it off of the air intake housing.
- Disconnect the connector -1- from the Fresh Air/Recirculating Air/Back Pressure Door Motor -V425-.
Note
Position of air flow door must not be changed.
Installing
- See notes. Refer to → Chapter "Actuator Information".
Note
- Incorrectly installed actuators or connecting elements cause malfunctions in the heating or A/C system.
- Label the connectors to the actuators.
- Install the correct connecting elements on the actuators.
Install in reverse order of removal. Note the following:
The Fresh Air/Recirculating Air/Back Pressure Door Motor -V425- fits in only one position on the curved washer.
Note
After installing, check the function of the back pressure and recirculation door.
- Check the DTC memory and erase any displayed entries, then perform the "basic setting". Use the Vehicle Diagnostic Tester in the "Guided Fault Finding" function.
Front Air Distribution Door Motor -V426-, Removing and Installing
Special tools and workshop equipment required
- Vehicle Diagnostic Tester
Note
- The motors were changed starting from 11/04/2013. See the general information.
- The color-coded connecting elements on the actuator have been discontinued as a running change as of 11/04/2013 for those connecting elements installed by the manufacturer and delivered as a replacement part. Additionally the connecting elements are no longer preinstalled on actuators that are delivered as a replacement part.
- The actuators and the associated connecting elements differ. In some cases, however, the differences are so small that they are not always easy to detect at first glance. If a different version of the actuator or a connecting element is installed than the designated version, it usually leads to problems when performing the final basic setting.
Removing
- Remove the instrument panel.
- Disconnect the connector from the Front Air Distribution Door Motor -V426-.
- Remove the screws -1- (1.4 Nm).
- Remove the Front Air Distribution Flap Motor -V426-.
Installing
See notes. Refer to → Chapter "Actuator Information".
Note
- Incorrectly installed actuators or connecting elements cause malfunctions in the heating or A/C system.
- Label the connectors to the actuators.
- Install the correct connecting elements on the actuators.
Install in reverse order of removal.
Note
After installing, the function of the central air door must be checked.
- Check the DTC memory and erase any displayed entries, then perform the "basic setting". Use the Vehicle Diagnostic Tester in the "Guided Fault Finding" function.
Air Distribution Door Motor -V428-, Removing and Installing
Special tools and workshop equipment required
- Vehicle Diagnostic Tester
Removing
- Remove the instrument panel.
- Disconnect the connector from the Air Distribution Door Motor -V428--1-.
- Remove the bolts (1.5 Nm) -arrows-.
- Remove the Air Distribution Door Motor - V428--1-.
Installing
- Install the Air Distribution Door Motor -V428- in the reverse order of removal.
- Check the DTC memory and erase any displayed entries, then perform the "basic setting". Use the Vehicle Diagnostic Tester in the "Guided Fault Finding" function.
Fresh Air/Recirculating Air/Back Pressure Door Adjuster, Removing and Installing
Removing
- Remove the Fresh Air/Recirculating Air/Back Pressure Door Motor -V425- with Fresh Air/Recirculating Air/Back Pressure Door Motor Position Sensor -G644-
- Open the retainers -arrows- on the adjusting lever -1-.
- Remove the adjusting lever from the curved washer.
- Remove the curved washer -2- from the air intake housing.
Installing
Note
When installing the curved washer, make sure the guide pin for the air flow door adjusting lever is seated in the groove.
- Install the curved washer -1- on the air intake housing.
Note
Make sure the guide pin for the recirculation air door adjusting lever is seated in the curved washer groove.
- Mount and latch the recirculation air door adjusting lever.
Flexible Air Distribution Shaft, Removing and Installing
Removing
- Remove the radio.
- Remove the center instrument panel trim from vehicles without a radio.
- Move the flexible shaft to the following position:
- Turn the air distribution control knob -1- until the locking mechanism on the shaft -2- is visible in gear reduction -3-.
- Remove controls for heating and A/C system, Climatic.
- Carefully pull out the adapter for the controls.
- Press in the flexible shaft retaining tab in direction of -arrow- and remove flexible shaft.
Note
When installing flexible shaft, adapter and rotary switch on controls for heating and A/C system, Climatic must have a specific position to each other, otherwise it will malfunction .
Installing
- Install in reverse order of removal. Note the following:
Flexible shaft for adjusting unit of air distribution doors:
- Let fresh air blower run on highest speed. If air flows out of defroster vents in the "Defrost" position and no air flows out of footwell vents, installation of flexible shaft is correct. If this is not the case, remove the flexible shaft from the adapter. Place controls for heating and A/C system, Climatic onto adapter and rotate rotary knob for air distribution 1/2 rotation (180º). Then reconnect the flexible shaft. Repeat the test.
 A/C Compressor
Overview - A/C Compressor Power Unit
Screw
22 +- 1 Nm
Screw
25 +- 2 Nm
Quantity: 3
Alignment Sleeve
Quantity: 2
Overview - Belt Pulley
Overview - Belt Pulley, Denso
Note
T ...

See More:
Volkswagen Tiguan Owners Manual > Driving checklists and warnings: Introduction to the subject
In this chapter you will find information on the following subjects:⇒ Getting
ready and driving safely
⇒ Driving in other countries ⇒ Driving through water on roads
More information:
Sitting properly and safely ⇒ Sitting properly and safely
Transporting ⇒ Tra ...
Volkswagen Tiguan Owners Manual
Volkswagen Tiguan Service and Repair Manual
- Body exterior
- Body Interior
- General Paint Information
- Paint
- Brake System
- Suspension, Wheels, Steering
- Wheel and Tire Guide
- Towing Guide
- Wheel and Tire Guide General Information
- Communication
- Electrical Equipment General Information
- Electrical Equipment from 06/2011
- Heating, Ventilation and Air Conditioning
- Refrigerant R134a Servicing
- 6-Speed Manual Transmission 02Q, OBB, and OFB
