Volkswagen Tiguan Service and Repair Manual: Center Console Lamps and Switches
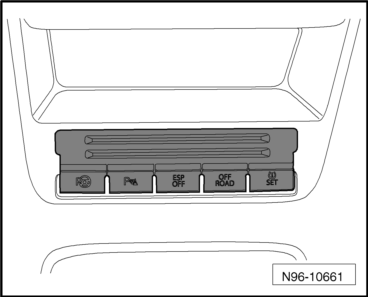
Buttons in Center Console Storage Compartment
General Information
Note
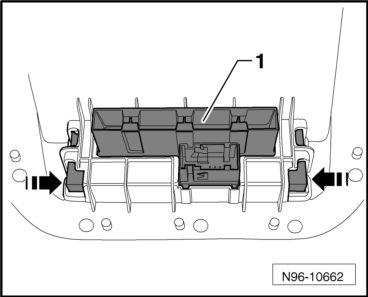
- The buttons in the center console are contained in a single switch module.
- All buttons in the center console storage compartment are removed and installed the same way. The procedure is described for just one switch.
- Depending on the equipment level of the vehicle, the following switches are installed in the center console storage compartment.
- Parallel Parking Assistance Button -E581-
- Parking Aid Button -E266-
- ASR/ESP Button -E256-
- Driving Program Button -E598-
- Start/Stop Mode Button -E693-
- Damping Adjustment Button -E387-
Buttons in Center Console Storage Compartment, Removing and Installing
Removing
- Switch off the ignition and all electrical consumers and remove the ignition key.
- Remove the center console.
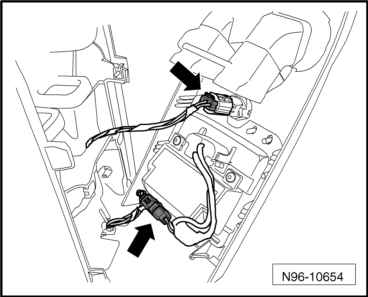
- Disconnect the connectors from the button module -1-.
- Release both catches on the sides -arrows- and remove the switch cluster -1- from the center console.
Installing
Install in reverse order of removal.
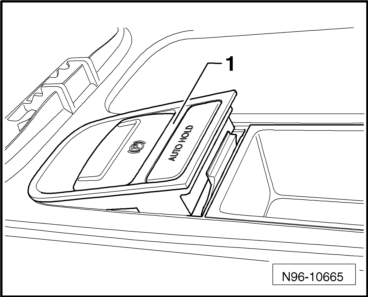
Electromechanical Parking Brake Button and -AUTO HOLD- Button
Electromechanical Parking Brake Button and -AUTO HOLD- Button, Removing and Installing
The Electromechanical Parking Brake Button -E538- and the -AUTO HOLD- Button -E540- are contained in a single button module which is located in the center console between the front seats.
Note
When removing and installing components in visible area (switches, covers, trim, etc.), cover by taping the areas at which a prying tool (Trim Removal Wedge -3409-, screwdriver) will be positioned using commercially available adhesive tape.
Removing
- Switch off the ignition and all electrical consumers and remove the ignition key.
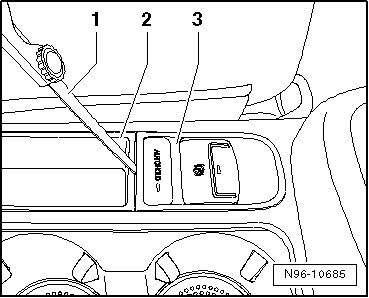
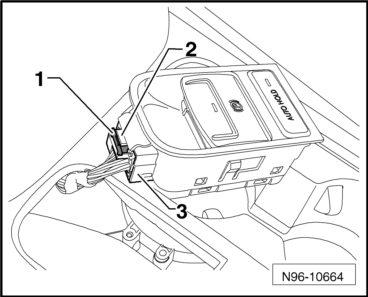
- Insert a 0.6 mm feeler gauge -1- into the gap between the center console -2- and the button module -3- as illustrated.
- Hold the feeler gauge vertically and push it in 10 mm between the button module and center console.
Note
Inserting the feel gauge vertically makes sure that it reaches the locking button and outer side. At 10 mm, the tip of the feeler gauge will touch the locking button.
- Tilt the feeler gauge -1- in the direction of -arrow- to press the button -3-. Lift the button module -2- toward the rear out of the center console -4- at the same time.
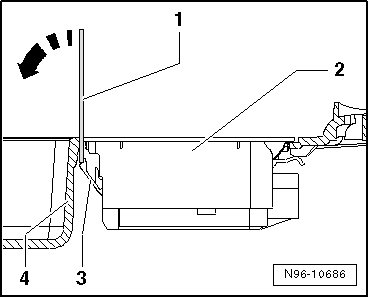
- Remove the button module -1- from the center console. Pay attention to the wires still connected.
- Remove the primary connector
- Remove the button module from the vehicle.
Installing
Install in reverse order of removal.
Converter with Socket, 12 V-230 V -U13-
Converter with Socket, 12 V-230 V -U13-, Removing and Installing
Special tools and workshop equipment required
- Trim Removal Wedge -3409-
WARNING
- The Converter with Socket, 12 V-230 V -U13- housing contains chargeable capacitors.
- There is a danger of electric shock.
- The housing of Converter with Socket, 12 V-230 V -U13- must not be opened under any circumstances.
Note
- When removing and installing components in visible area (switches, covers, trim, etc.), cover by taping the areas at which a prying tool (Trim Removal Wedge -3409-, screwdriver) will be positioned using commercially available adhesive tape.
- No repairs may be performed on the harness connector, on the wires and the 230 V-outlet.
- If there is a fault at harness connector, at wires, at 230 V-socket or in the converter, the complete unit must always be replaced.
Removing
- Switch off the ignition and all electrical consumers and remove the ignition key.
- Open the flap in front of the 230 V socket.
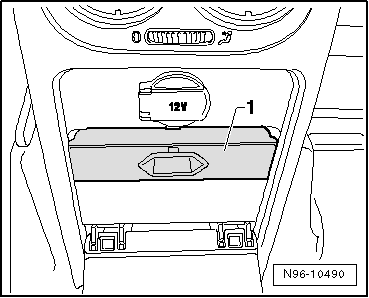
- Remove the trim -1-.
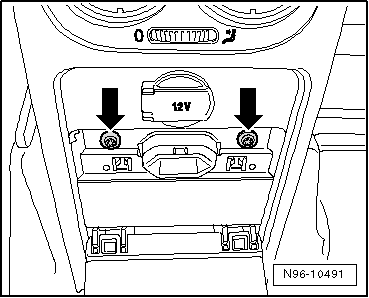
- Remove the screws -arrows-.
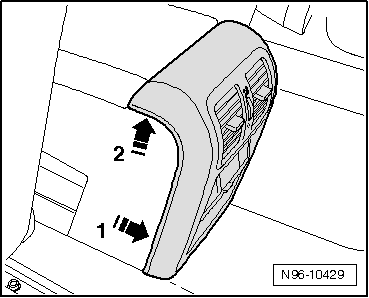
- Pull the lower trim first to the rear in the direction of -arrow 1- and then lift it upward in the direction of -arrow 2-. Pay attention to the wires still connected.
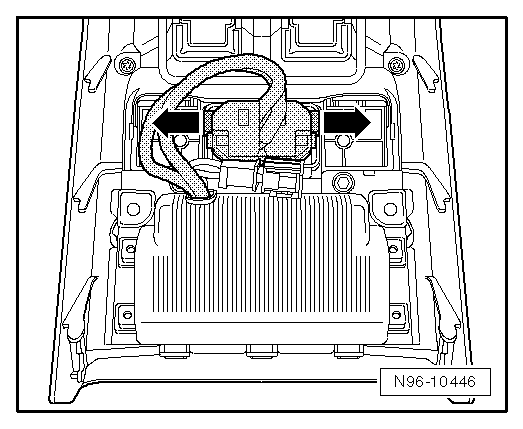
- Disconnect the connectors -arrows- and remove the trim.
- Release the socket at the tabs -arrows- and remove it from the trim.
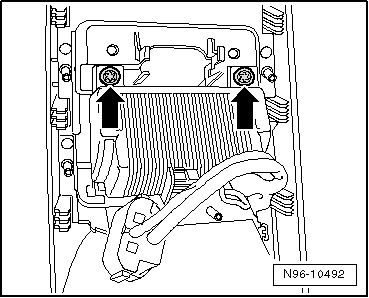
- Remove the screws -arrows- and then remove the Converter with Socket, 12 V-230 V -U13- from the trim.
Installing
Install in reverse order of removal.
12 V Socket
12 V Socket, Removing and InstallingThere 12 V sockets installed in the front and rear center consoles and in the left luggage compartment trim panel.
RemovingAll instructions and information on this chapter can be found in the "Electrical Equipment General Information" repair manual. A link to this repair manual is currently not possible due to technical reasons. Refer to repair manual "Electrical Equipment General Information" in ELSA.
Socket Illumination Bulb -L42-, Removing and InstallingThere 12 V sockets installed in the front and rear center consoles and in the left luggage compartment trim panel.
The Socket Illumination Bulb -L42- also illuminates the socket. It is part of the 12 V socket and only be removed and installed together with the 12 V socket.- 12 V Socket, Removing and Installing.
 Lamps and Switches in
Roof Trim Panel
Lamps and Switches in
Roof Trim Panel
Front Interior and Reading Lamps
General Information
The following components are integrated in the front interior and reading
lamps:
Front Interior Lamp -W1-
Front Passenger Reading Lamp -W13-
D ...
 Horn
Horn
High Tone Horn -H2- and Low Tone Horn -H7-
High Tone Horn -H2- and Low Tone Horn -H7-, Removing and Installing
Special tools and workshop equipment required
Torque Wrench 1331 5-50Nm -VAG1331-
The ...
See More:
Volkswagen Tiguan Owners Manual > Lights: Indicator lights
Read and follow the introductory information and
safety information first⇒Introduction
to the subject
Lights up
Possible cause
Proper response
One or more driving lights not working or cornering
light malfunction.
Replac ...
Volkswagen Tiguan Owners Manual
Volkswagen Tiguan Service and Repair Manual
- Body exterior
- Body Interior
- General Paint Information
- Paint
- Brake System
- Suspension, Wheels, Steering
- Wheel and Tire Guide
- Towing Guide
- Wheel and Tire Guide General Information
- Communication
- Electrical Equipment General Information
- Electrical Equipment from 06/2011
- Heating, Ventilation and Air Conditioning
- Refrigerant R134a Servicing
- 6-Speed Manual Transmission 02Q, OBB, and OFB
