Volkswagen Tiguan Service and Repair Manual: HID Headlamp with Dynamic High Beam Control
General Information
Note
- Always switch off headlamps with gas-discharge lamps and remove ignition key before working on headlamps.
- Automatic vertical headlamp aim control of headlamps with gas-discharge lamps has On Board Diagnostics (OBD).
- Familiarity with the function and operation of the lighting system is required if there are customer concerns.
- Additional information:
- Refer to the Owner's Manual.
- Refer to Self Study Program; No 404; The Tiguan.
Malfunction Recognition and Malfunction Indicator:
The automatic headlamp range control and vehicle electrical system control modules are equipped with OBD which facilitates fault finding for the HID headlamps.
Use the Vehicle Diagnostic Tester in "Guided Fault Finding".
Depending on vehicle equipment, the following functions can be adapted or coded via the Vehicle Electrical System Control Module -J519-.
- Coming Home Time, Adapting
- Leaving Home Time, Adapting
- Rain Light Sensor, Coding
- Coding the wiper motor control module/deactivating the APP function
Overview - HID Headlamp with Dynamic High Beam Control
Note
After measures that could affect the headlamp adjustment, check the headlamp adjustment and adjust if necessary.
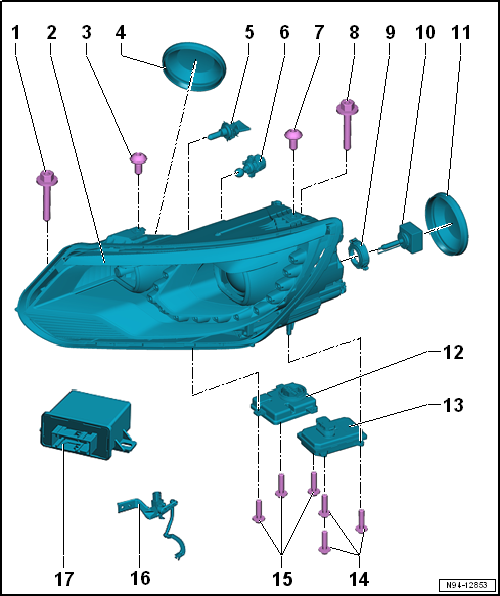
- Headlamp Bolt to Body
- 4 Nm
- 6 x 40
- Headlamp
- Removing and installing.
- Headlamp installation position, correcting.
- Headlamp mounting tabs, servicing.
- The headlamp range control positioning motor cannot be removed. If there is damage, replace the headlamp.
- Headlamp Bolt to Carrier
- 4 Nm
- 6 x 14
- Cap
- Left Cornering Lamp Bulb -L148- or Right Cornering Lamp Bulb -L149-
- 12V, 55 W
- Replacing.
- Left Front Turn Signal Bulb -M5- and Right Front Turn Signal Bulb -M7-
- Bulb 12V, PSY 24W
- Replacing.
- Headlamp Bolt to Carrier
- 4 Nm
- 6 x 14
- Headlamp Bolt to Body
- 4 Nm
- 6 x 40
- Retaining Ring for HID Headlamp Bulb
- Is removed together with the HID headlamp bulb.
- Must be rearranged for replacing the HID headlamp bulb.
- Left HID Headlamp Bulb -L13- or Right HID Headlamp Bulb -L14-
WARNING
Follow all Use and Safety Precautions when replacing HID bulbs.
- Type DS3, 35W
- Replacing.
- Cap
- Left HID Headlamp Control Module -J343- or Right HID Headlamp Control
Module -J344-
- Removing and installing.
- Left Headlamp Power Output Stage -J667- or Right Headlamp Power Output
Stage -J668-
- Removing and installing.
- Headlamp Power Output Stage Screws to Headlamp
- 3 Nm
- HID Headlamp Control Module Screws to Headlamp
- 3 Nm
- Left Rear Level Control System Sensor -G76-
- Removing and installing.
- Checking.
- Cornering Lamp and Headlamp Range Control Module -J745-
- Removing and installing.
- Coding.
HID Headlamp with Dynamic High Beam Control, Removing and Installing
Special tools and workshop equipment required
- Torque Wrench 1331 5-50Nm -VAG1331-
Note
- It is not necessary to disconnect the battery ground cable.
- The following illustrations show removing and installing the left headlamp. Removing and installing the right headlamp is identical.
- If an HID headlamp is removed, perform the basic setting after installation.
Removing
- Switch off the ignition and all electrical consumers and remove the ignition key.
- Remove the front bumper cover.
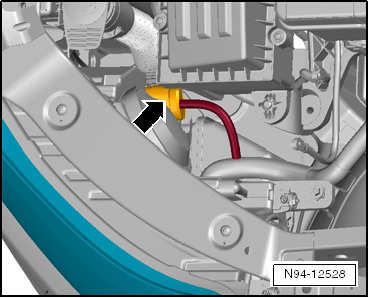
- Disconnect the connector -arrow-.
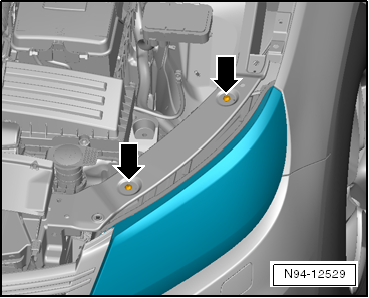
- Remove the two bolts -arrows-.
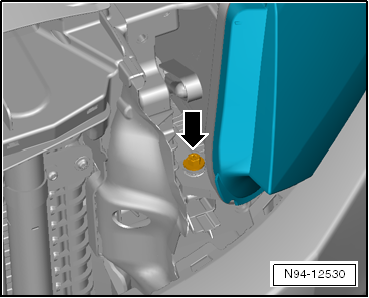
- Remove the front bolt -arrow- from the headlamp.
- Remove the rear bolt -arrow- from the headlamp.
- Remove the headlamp forward and out through the opening in the body.
Installing
Install in reverse order of removal. Note the following:
- Tighten all threaded connections to the tightening specifications given in the assembly overview.
- Make sure the gap around the headlamp is even all the way around.
If headlamp has an uneven gap dimension to the body, installation position must be corrected.
- Check the headlamp functions.
- Check the headlamp adjustment and adjust the headlamp if necessary.
Headlamp Installation Position, Correcting
Adjusting the HID headlamps is performed the same way as adjusting Halogen headlamps.
HID Headlamp with Dynamic High Beam Control, Replacing
HID Headlamp Bulb, Replacing
WARNING
Follow all Use and Safety Precautions when replacing HID bulbs.
Note
- The function of the Left HID Headlamp Bulb -L13- and the Right HID Headlamp Bulb -L14- can be checked using the Vehicle Electrical System Control Module -J519- output diagnostic test mode.
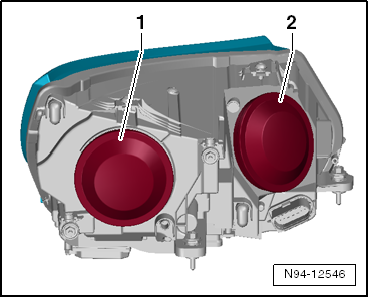
- The illustrations show replacing the Left HID Headlamp Bulb -L13-.
- Replacing the Right HID Headlamp Bulb -L14- is identical.
Removing
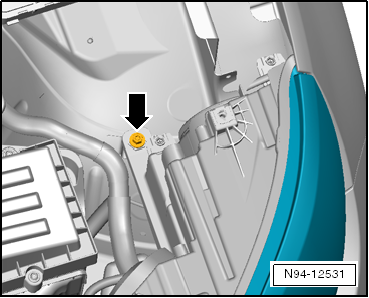
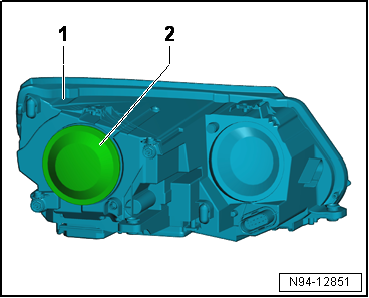
- Remove the headlamp.
- Remove the cap -2- from the headlamp housing -1-.
WARNING
- There are pressures from 7 bar (101.52 psi) (cold) to 100 bar (1450 psi) (hot) in the glass cone of the HID bulb. The hot glass of the bulb can reach temperatures of up to 700 ºC (1292 ºF).
- The glass can explode and there is a danger of burning.
- Always wear safety glasses and gloves when removing and installing HID bulbs.
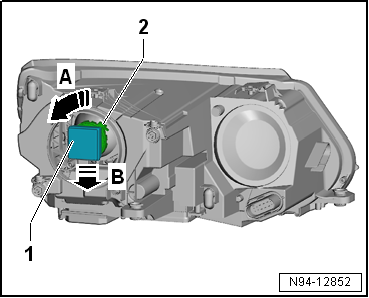
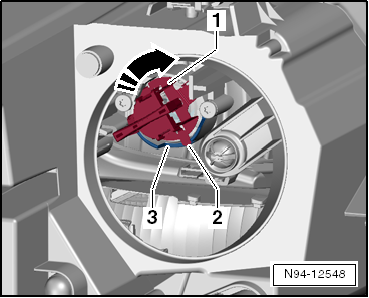
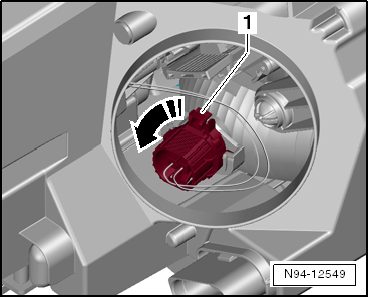
- Turn the HID headlamp bulb -1- in the direction of -arrow A- until stop.
- Remove together with the HID headlamp bulb retaining ring -2- in the direction of -arrow B- toward the rear from the reflector.
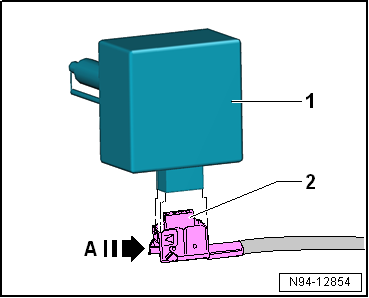
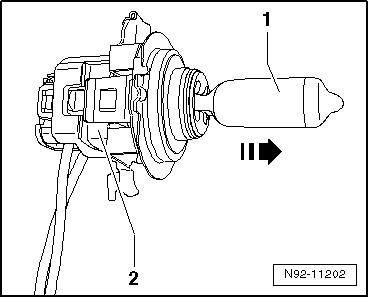
- Push the side release button in the direction of -arrow A-.
- Remove the connector -2- from the HID headlamp bulb -1-.
HID headlamp bulb: D1S, 35W
HID Bulb, Replacing
Note
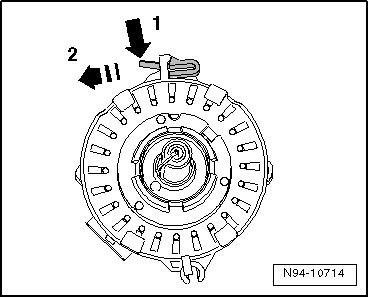
The retaining ring consists of two parts.
- Open the retaining ring by pushing the tab in the direction of -arrow 1- and at the same time guide in the direction of -arrow 2-.
- Remove the retaining ring from the HID headlamp bulb.
Installing
Install in reverse order of removal. Note the following:
- Tighten the threaded connections to the tightening specifications given in the assembly overview.
Caution
- Do not touch the glass of the HID headlamp bulb during installation. Fingers leave traces of grease on the glass which can evaporate when the HID headlamp bulb is switched on causing the glass to cloud.
- The glass of the HID headlamp bulb must not be exposed to any mechanical strain. The glass is extremely sensitive and is also under high pressure.
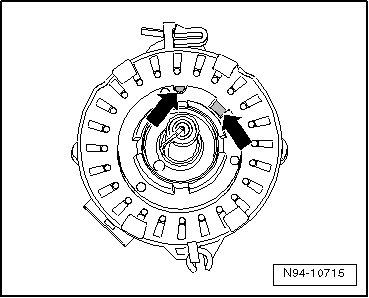
- Pay attention when installing that the retaining ring is seated correctly in the retaining tab -arrows- and that the two parts engage with each other.
Caution
Make sure the cap fits correctly when installing it. Water getting in the headlamp will cause damage.
- Check the headlamp functions.
- Check the headlamp adjustment and adjust the headlamp if necessary.
Cornering Lamp Bulb, Replacing
Note
- The following illustrations show changing the Left Cornering Lamp Bulb -L148-.
- Removing and installing the Right Cornering Lamp Bulb -L149- is identical.
- For reasons of clarity, the headlamp is shown in the uninstalled state.
- It is not necessary to remove the headlamp when replacing the headlamp bulb.
Removing
- Remove the cap -2-.

- Turn the bulb socket -1- for the cornering lamp bulb all the way in the direction of -arrow-.
- Remove the cornering lamp bulb carefully from the reflector. Pay attention to the wires still connected.
- Remove the cornering lamp bulb -1- from the bulb socket -2- in the direction of -arrow-.
Cornering lamp bulb: H7 12V, 55W
Installing
Caution
Do not touch the glass when installing a bulb. Fingers will leave traces of grease on the glass which, when the light is switched on, will evaporate and cloud the glass.
Install in reverse order of removal. Note the following:
- Insert the bulb socket -1- with the cornering lamp bulb into the reflector.
- Position the metal tab on the bulb socket -2- on the right stop into the opening in the reflector -3-.
- Turn the bulb socket -1- forward in the direction of -arrow- using light pressure so that the bulb socket locks in the reflector.
Caution
Make sure the cap fits correctly when installing it. Water getting in the headlamp will cause damage.
- Install the cap.
- Check the headlamp functions.
Front Turn Signal Bulb, Replacing
Note
- The following illustrations show replacing the Left Front Turn Signal Bulb -M5-.
- Removing and installing the Right Front Turn Signal Bulb -M7- is identical.
- For reasons of clarity, the headlamp is shown in the uninstalled state.
- It is not necessary to remove the headlamp when replacing the headlamp bulb.
Removing
- Switch off the ignition and all electrical consumers and remove the ignition key.
- Remove the cap -2-.
- Turn the bulb socket -1- with the cornering lamp bulb all the way in the direction of -arrow-.
- Remove the front turn signal bulb carefully from the reflector. Pay attention to the wires still connected.
- Push the locking mechanisms -arrows-.
- Remove the front turn signal bulb -1- from the bulb socket -2-.

Note
The front turn signal bulb and the bulb socket are a single piece and cannot be disassembled.
Front turn signal bulb: 12V, PSY 24W
Installing
Install in reverse order of removal. Note the following:
Caution
Do not touch the glass when installing a bulb. Fingers will leave traces of grease on the glass which, when the light is switched on, will evaporate and cloud the glass.
Make sure the cap fits correctly when installing it. Water getting in the headlamp will cause damage.
- Install the cap.
- Check the headlamp functions.
Daytime Running Lamp and Position Lamp LED Module
Daytime Running Lamp and Position Lamp LED Module, Removing and Installing
The Left Daytime Running Lamp and Position Lamp LED Module -L149- and the Right Daytime Running Lamp and Position Lamp LED Module -L177- are located inside the headlamp and cannot be replaced individually.
If a failure occurs, the entire headlamp must be replaced.
Headlamp Range Control Positioning Motor
Headlamp Range Control Positioning Motor, Removing and Installing
The headlamp range control positioning motor cannot be removed.
If a failure occurs, the entire headlamp must be replaced.
HID Headlamp Control Module
HID Headlamp Control Module, Removing and Installing
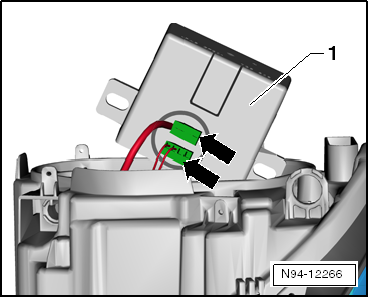
The Left HID Headlamp Control Module -J343- or the Right HID Headlamp Control Module -J344- is secured at the bottom of the respective headlamp housing.
Note
- The illustrations show removing and installing the Right HID Headlamp Control Module -J344-.
- Removing and installing the Left HID Headlamp Control Module -J343- is identical.
Removing
- Remove the headlamp.
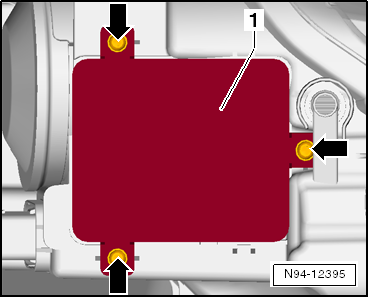
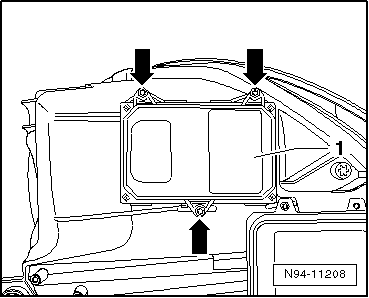
- Remove the three bolts -arrows-.
- Remove the HID headlamp control module -1- straight upward from the headlamp housing while paying attention to the connected wires.
- Disconnect the connectors -arrows- and remove the HID headlamp control module -1-.
Installing
Install in reverse order of removal. Note the following:
Caution
Make sure the seal fits correctly when installing the HID headlamp control module. Water getting in the headlamp will cause damage.
- Tighten the three bolts to the tightening specification specified in the overview.
- Check the headlamp functions.
- Check the headlamp adjustment and adjust the headlamp if necessary.
Headlamp Power Output Stage
Headlamp Power Output Stage, Removing and Installing
The headlamp power output stage is located on the bottom of the respective headlamp housing.
Note
The following illustrations show the procedure for removing and installing the headlamp power output stage on the right headlamp. Removing and installing the left head lamp is identical.
Removing
- Remove the headlamp.
- Remove the three bolts -arrows-.
Note
When removing the front headlamp power output stage from the headlamp housing, the connector is also disconnected at the same time.
- Remove the headlamp power output stage -1- straight upward from the headlamp housing.
Installing
Install in reverse order of removal. Note the following:
Caution
Make sure the seal fits correctly when installing the headlamp power output stage. Water getting in the headlamp will cause damage.
- Tighten the bolts to the tightening specification specified in the overview.
- Check the headlamp functions.
- Check the headlamp adjustment and adjust the headlamp if necessary.
Cornering Lamp and Headlamp Range Control Module -J745-
Cornering Lamp and Headlamp Range Control Module -J745-, Removing and Installing
The Cornering Lamp and Headlamp Range Control Module -J745- is mounted on the tunnel support baseplate between the glove compartment and center console on the passenger side.
Removing
- Switch off the ignition and all electrical consumers and remove the ignition key.
- Remove the glove compartment.
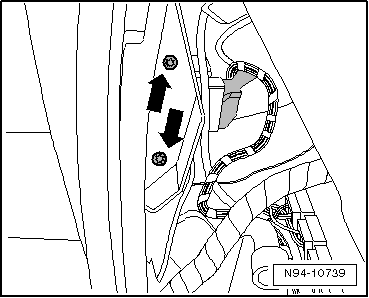
- Remove the bolts -arrows-.
- Remove the control module. Pay attention to the wires still connected.
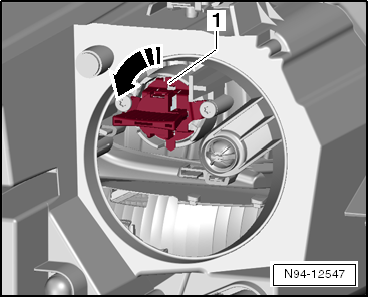
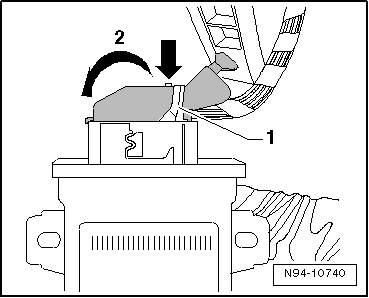
- Press the tab -arrow- and move the bracket -1- in the direction of -arrow 2-.
- Remove the Cornering Lamp and Headlamp Range Control Module -J745-.
Installing
Install in reverse order of removal. Note the following:
Note
- After installing a new cornering lamp and headlamp range control module, the control module must be coded.
- The basic setting for the headlamp must be performed.
- Check the headlamp functions.
- Check the headlamp adjustment and adjust the headlamp if necessary.
Cornering Lamp and Headlamp Range Control Module -J745-, Coding
The Cornering Lamp and Headlamp Range Control Module -J745- is mounted on the tunnel support baseplate between the glove compartment and center console on the passenger side.
Note
- A possible DTC memory entry "CAN-BUS comfort, check the DTC memory", must not be updated in the Cornering Lamp and Headlamp Range Control Module -J745-.
- Correct any faults in the Cornering Lamp and Headlamp Range Control Module -J745-.
- When all DTC memory entries, CAN Data Bus Comfort, are corrected, the entry in the Cornering Lamp and Headlamp Range Control Module -J745- are automatically erased.
- If Headlamp Range/Cornering Lamp Control Module -J745- is coded, basic setting of headlamp control module must be performed after coding.
- Code the Cornering Lamp and Headlamp Range Control Module -J745- using the Vehicle Diagnostic Tester.
- Check the headlamp functions.
- Check the headlamp adjustment and adjust the headlamp if necessary.
Level Control System Sensor
Left Rear Level Control System Sensor -G76-, Removing and Installing
The Left Rear Level Control System Sensor -G76- is located on the left side of the rear axle.
- Install the vehicle level sensor.
Note
Perform a basic setting on the headlamp whenever the vehicle level sensors are replaced.
- Perform the headlamp basic settings.
Level Control System Sensor, Checking
The Left Rear Level Control System Sensor -G76- is located on the left side of the rear axle.The vehicle level sensors transmit vehicle level in the form of a signal to the Cornering Lamp and Headlamp Range Control Module -J745-.
In the following, it will be checked whether Left Rear Level Control System Sensor -G76- and Left Front Level Control System Sensor -G78- send signals which can be evaluated to Cornering Lamp and Headlamp Range Control Module -J745-.In the following cases, no DTC entry is stored in Cornering Lamp and Headlamp Range Control Module -J745-:
- If the vehicle level sensor was not installed as specified in the Repair Manual
- If the vehicle level sensors are mechanically damaged
- If changed were made to the axle geometry on the vehicle (for example, lowered vehicles)
Note
If the values of the vehicle level sensors are outside the tolerance range, a basic setting of the headlamps cannot be performed.
- Check the vehicle level sensors using the Vehicle Diagnostic Tester.
Headlamp Mounting Tabs, Servicing
The headlamp mounting tabs for HID headlamps with dynamic high beam control are repaired in the same way as in the case of headlamps with halogen lamps.
Headlamp, Adjusting
HID Headlamps with Dynamic High Beam Control, Adjusting.
 HID Headlamp with Cornering Lamp and LED Daytime Running Lamp
General Information
Note
Always switch off headlamps with gas-discharge lamps and remove ignition
key before working on headlamps.
Automatic vertical headlamp aim control of headlamps with gas-di ...
 Fog Lamp
General Information
NoteThe design of the front bumper cover on the Tiguan has two different
approach angles (18º and 28º) depending on the equipment level. Removing and
installing the fog lamp bu ...
See More:
Volkswagen Tiguan Owners Manual > Changing a wheel: After changing a wheel
Read and follow the introductory information and
safety information first⇒Introduction
to the subject
Clean the tools in the vehicle tool kit if necessary and stow them in the
left storage compartment in the luggage compartment ⇒ Vehicle tool kit .
Securely store the compact ...
Volkswagen Tiguan Owners Manual
Volkswagen Tiguan Service and Repair Manual
- Body exterior
- Body Interior
- General Paint Information
- Paint
- Brake System
- Suspension, Wheels, Steering
- Wheel and Tire Guide
- Towing Guide
- Wheel and Tire Guide General Information
- Communication
- Electrical Equipment General Information
- Electrical Equipment from 06/2011
- Heating, Ventilation and Air Conditioning
- Refrigerant R134a Servicing
- 6-Speed Manual Transmission 02Q, OBB, and OFB
