Volkswagen Tiguan Service and Repair Manual: Wiring Harnesses, Repairing
Airbag and Belt Tensioner Wire Repair Information
Note
Observe general notes for repairs on the vehicle electrical system.
In addition to the general repairs on wiring harnesses, the following methods and instructions must be observed for repairs on airbag- and seat belt tensioner wires
WARNING
- The airbag and seat belt tensioner system can fail.
- Faulty repairs performed on airbag and seat belt tensioner system can lead to malfunction in passenger protection.
- When performing repairs on airbag and seat belt tensioner wiring harness, use only terminals, connectors and wires designated for it. Refer to the Parts Catalog.
Note
- Air bag wires and the safety belt tensioner wiring harness may repaired only with the Wiring Harness Repair Set -VAS1978B- and previous versions.
- Observe general notes for repairs on the vehicle electrical system.
- Pay attention to decals designating high voltage components. When performing repairs, the residual voltage must be discharged.
- A maximum of two repairs may be performed when repairing wires of airbag- and seat belt tensioner system. Repairs increase the electrical resistance in the wire and may trigger malfunctions in the system On Board Diagnostic (OBD).
- When repairing wiring harness of airbag- and seat belt tensioner system, the crimp connectors must always be heat-shrunk to prevent corrosion.
- Do not wrap the repair point again into the vehicle-specific wiring harness and mark the repair point quite visibly with yellow insulating tape.
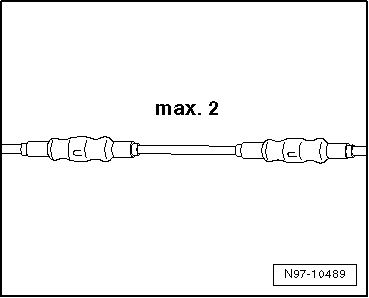
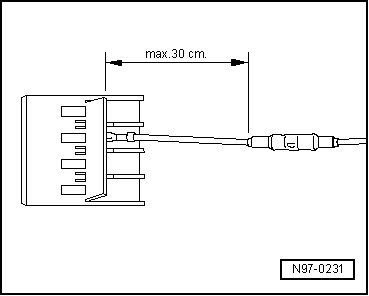
- Repairs in the area of the airbag or seat belt tensioner should be performed a maximum of 30 cm from the next contact housing. Together with the identification via yellow insulating tape, this procedure makes it possible to obtain a quick overview of previously performed repairs.
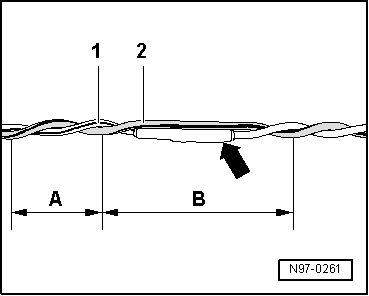
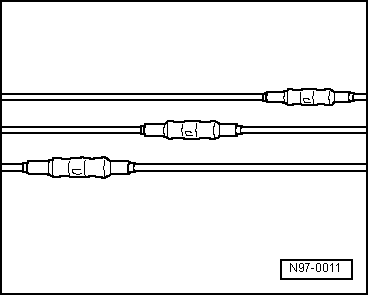
- Wires to the deploying units (airbags) have a wire-twisting with a length of lay of 20 mm +- 5 mm in series production. This length of lay is guaranteed via the norm part numbers for wire pairs in series production and must be observed strictly for the repair lengths of twisted wires.
- During repair work, wires to deploying units (airbags) must have the same length. When twisting together wires -1 and 2-, length of lay of -A- = 20 mm +-5 must be strictly observed.
- While doing this, no section of the wire, for example, in area of crimp connectors -arrow-, may be greater than B = 100 mm without twisting of the wires.
CAN Bus Wires, Repairing
- Unshielded two-strand wiring -1- and -2- with a cross section of 0.35 mm2 or 0.5 mm2 can be used as CAN bus wiring.
- The color coding of CAN bus wires can be found in the following table:

| CAN High wire, powertrain | orange/black |
| CAN High wire, Convenience | orange/green |
| CAN High wire, Infotainment | orange/violet |
| CAN-Low lead (all) | orange/brown |
- Repairs on CAN-Bus wires can be performed with repair wire with matching cross section and also with twisted wires "green/yellow" or "white/yellow" from Parts Catalog.
- When repairing Bus leads, both wires must be of the same length. When twisting together wires -1- and -2-, the lay length of -A- = 20 mm must be observed.
- While doing this, no section of the wire, for example, in area of crimp connectors -arrow-, may be greater than -B- = 50 mm without twisting of the wires.
- Wrap repair points with yellow adhesive tape to mark a performed repair.
Antenna Wires, Replacing
A new repair concept has been developed for repairing antenna wires.
Instead of a complete antenna wire, connecting wires of different lengths and various adapter leads are now available as replacement parts.
General Description
- Replacement parts can be found in Parts Catalog.
- These original replacement parts are suitable for all antenna wires and wire cross sections to be replaced.
- Connector housing for antenna wires can be obtained as a replacement part only in one color, but can be used for all antenna connector colors.
- The replacement of individual antenna connectors during repair work is not intended.
- The wires are appropriate for use on all VW models with equipped antenna wiring cross-sections.
- All adapter leads and connecting wires are suitable for various transmission and reception signals.
- This repair concept can also be used for testing or as an aftermarket solution.
Assembly Overview of Antenna Wire
Example: antenna wire from the radio to the antenna is faulty. The following wires are required for repair
- Adapter lead for connection to radio. Length approximately 30 cm.
- Connecting wire, available in various lengths.
- Adapter lead, for connection to antenna. Length approximately 30 cm.

Installation of a New Antenna Wire
Note
Depending on vehicle equipment, make sure that the total length of antenna wire can be divided into partial lengths by control modules for antenna selection, control modules for traffic monitoring or antenna amplifier. Only the defective sections need to be replaced.
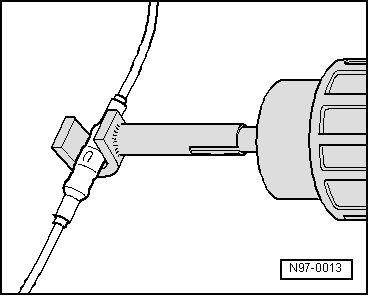
- Separate the connectors of the faulty antenna wiring from their components.
- Determine the path of the faulty antenna wire in the vehicle and measure the total length of antenna wire to be replaced.
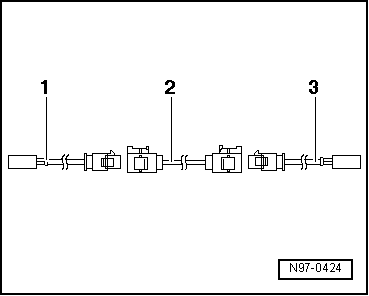
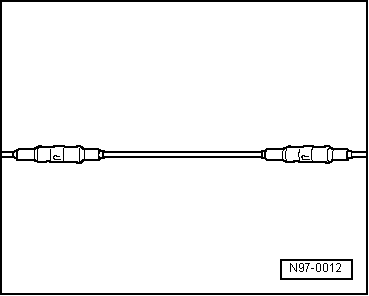
The entire length of the antenna wire consists of the length of the required adapter leads -1- and -3- as well as the connecting wire -2-.
- Subtract 60 cm from the total length calculation for an antenna wire to provide for the required length of connecting wire -2- to be installed.
- Obtain the required adapter cables -1 and 3- as well as the calculated length of connecting wire -2- as genuine replacement part according to the Parts Catalog.
- Cut the connectors off of the faulty antenna wiring.
Leave the rest of the defective antenna wire in the vehicle.
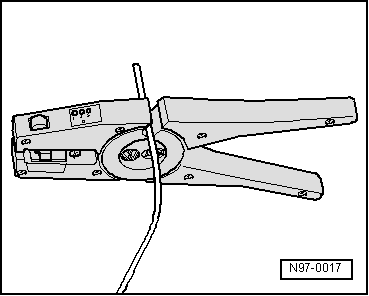
- Connect adapter leads -1- and -3- to modules in vehicle.
- Route and secure connecting wire -2- in the immediate vicinity of the series-installed wire routing.
Note
Antenna wires must not be kinked or excessively bent! The bending radius must not be less than 50 mm.
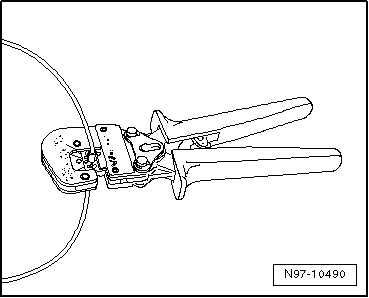
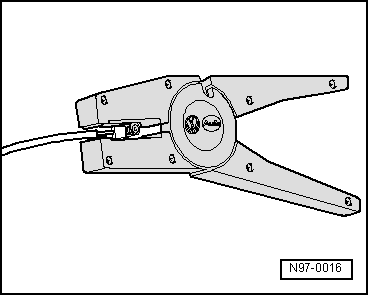
- Connect the connecting wire with the adapter leads.
- Perform a function test.
Wires with Cross Section up to 0.35 mm 2, Repairing
Special tools and workshop equipment required
- Crimping Pliers - .35-2.5mm -VAS1978/1A-
- Wiring Harness Repair - Crimping Head - .35-2.5mm -VAS1978/1-1-
When repairing wires with a cross-section up to 0.35 mm2, new contacts must always be crimped on using the Crimping Pliers - JPT -VAS1978/9A- or the Wiring Harness Repair - Crimping Plier - Base Tool -VAS1978/1-2- with the Wiring Harness Repair Set - Crimping Head - JPT -VAS1978/9-1- installed. Due to the low current strengths of these wires in the micro- to milli- range, contacts crimped on incorrectly lead to continuity resistances and cause malfunctions or failure of the respective system. The most frequent applications of these contacts are
- Heated Oxygen Sensor
- RPM sensor
- Mass Airflow Sensor
By using the Crimping Pliers - JPT -VAS1978/9A- or the Wiring Harness Repair - Crimping Plier - Base Tool -VAS1978/1-2- with the Wiring Harness Repair Set - Crimping Head - JPT -VAS1978/9-1- installed, the correct connection between crimp contact, wire and single wire seal is guaranteed. The tool is to be used only for the purpose described.
Note
Contacts in a normal and a gold-plated version are crimped onto repair wires. The same version of the contact that was installed at the factory must always be used for repairs.
Crimping A New Contact with Single Wire Seal
- Insert the Wiring Harness Repair Set - Crimping Head - JPT -VAS1978/9-1- into the Wiring Harness Repair - Crimping Plier - Base Tool -VAS1978/1-2-.
- Place the single wire seal onto the repair wire.
Note
When doing this, the smaller diameter of single wire seal must be facing in the direction of the contact to be crimped on.

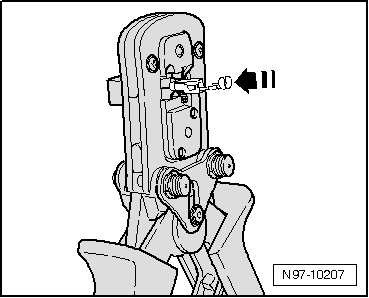
- Open crimp pliers and place the repair wire end into stripping slot of crimp pliers.
- Close crimp pliers completely.
- Open crimp pliers again and remove the stripped wire end.
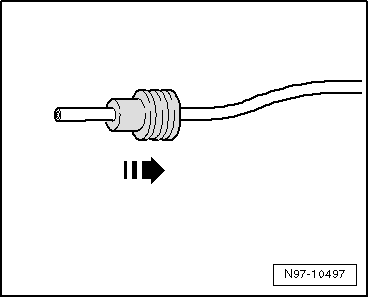
- Slide single wire seal in direction of stripped wire end until it rests flush with the wire insulation.
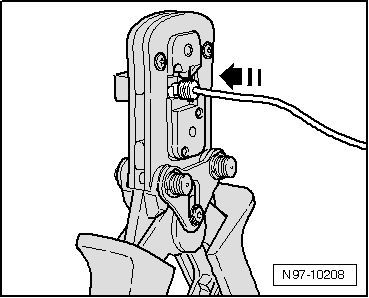
- Place new crimp contact into mount on crimp pliers.
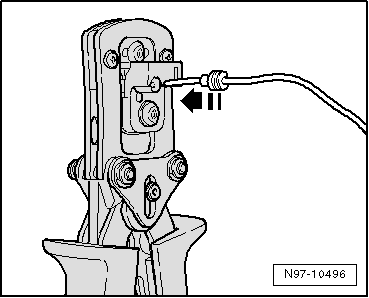
- Insert the stripped wire end with positioned single wire seal into crimp contact until it makes contact on "wire stop".
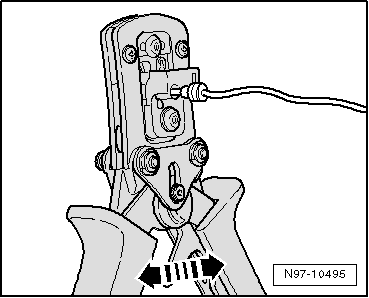
- Crimp the contact, wire and single wire seal by closing crimp pliers completely.
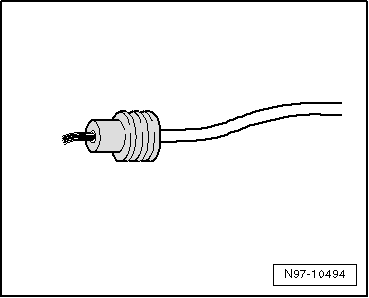
- Open crimp pliers again and remove the finished crimped-on contact.
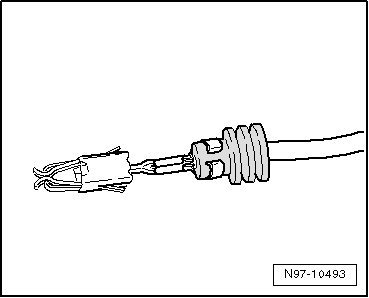
A correctly performed crimp is distinguished by a clean compression of wire and single wire seal in the contact and has an impression on the rear side which identifies that the crimp was performed by a professional using the correct tool.
Wire Break with Single Repair Point
Repair point with single crimp connection
- Free up wire intended for repair (approximately 20 cm to both sides of repair point).
- If required, remove wiring harness wrapping using a folding knife.
- Cut out the damaged section of wire using the Wiring Harness Repair Set - Wire Strippers -VAS1978/3-.
Note
If, by cutting out the damaged wire section, both ends of the vehicle-specific single wire are too short for a repair using a single crimp connection, insert a repair wire section of matching length with two crimp connections.
- Strip the wire ends using the 6 - 7 mm wire stripper.

- Slide crimp connection onto both stripped wire ends of vehicle-specific single wire and crimp them using crimp pliers.
Note
- Always be sure to use the correct crimping slot for the crimping connection used.
- Do not crimp wire insulation.
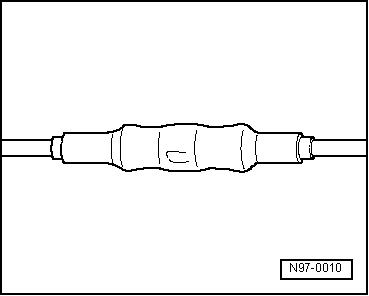
After crimping, crimp connections must be heat-shrunk using hot air gun to prevent moisture penetration.
- Place the Wiring Harness Repair - Blower - Shrink Element -VAS1978/15A- on the Wiring Harness Repair Set - Hot Air Blower -VAS1978/14A-.
- Heat crimp connection using hot air gun lengthwise from center outward until it is sealed completely and adhesive comes out the ends.

Caution
When heat-shrinking crimp connections, be careful not to damage any other wiring, plastic parts or insulating material with the hot nozzle of the hot air gun.
Always observe operating instructions of heat gun.

Note
- Make sure that crimp connections do not lie directly next to each other when several wires need to be repaired. Arrange the crimp connectors at a slight offset so that the circumference of the wiring harness does not become too large.
- In the event the repair point was previous taped, this point must be taped anew with yellow insulating tape after repairs.
- Secure the repaired wiring harness if necessary with a cable tie to prevent flapping noises while driving.
Wire Break with Dual Repair Point
Repair point with intermediate wire section
- Free up wire intended for repair at two points (approximately 20 cm to both sides of respective repair points).
- If required, remove wiring harness wrapping using a folding knife.
- Route the yellow repair wire next to the damaged wiring harness and cut the repair wire to the required length using the Wiring Harness Repair Set - Wire Strippers -VAS1978/3-.
- Cut damaged wire section from the vehicle-specific single wire.

- Strip the wire ends using the 6 - 7 mm wire stripper.
- Slide crimp connection onto vehicle-specific single wire at one side and onto repair wire at the other side.
- Crimp the crimp connection at both wire ends using crimp pliers.
- Repeat this procedure at the other repair wire end.

Note
- Always be sure to use the correct crimping slot for the crimping connection used.
- Do not crimp wire insulation.
After crimping, crimp connections must be heat-shrunk using hot air gun to prevent moisture penetration.
- Place the Wiring Harness Repair - Blower - Shrink Element -VAS1978/15A- on the Wiring Harness Repair Set - Hot Air Blower -VAS1978/14A-.
- Heat crimp connection using hot air gun lengthwise from center outward until it is sealed completely and adhesive comes out the ends.
Caution
When heat-shrinking crimp connections, be careful not to damage any other wiring, plastic parts or insulating material with the hot nozzle of the hot air gun.
Always observe operating instructions of heat gun.
Note
- Make sure that crimp connections do not lie directly next to each other when several wires need to be repaired. Arrange the crimp connectors at a slight offset so that the circumference of the wiring harness does not become too large.
- In the event the repair point was previous taped, this point must be taped anew with yellow insulating tape after repairs.
- Secure the repaired wiring harness if necessary with a cable tie to prevent flapping noises while driving.
 Tool Descriptions
Crimping Pliers with Insert
The Crimping Pliers without Insert -VAS1978/1- with Crimping Pliers - Insert
2 -VAS1978/2- is a component of the Wiring Harness Repair Set -VAS1978- and is
used to crimp ...
 Fiber-Optic Cables, Repairing
Fiber-Optic Cable, Assembling
Special tools and workshop equipment required
Fiber-Optic Conductor Repair Set -VAS6223A-
Hose Cutting Pliers -VAS6228-
Vehicle Diagnostic Tester
It is very difficul ...
See More:
Volkswagen Tiguan Service and Repair Manual > Wheels, Tires, Wheel Alignment: Tire Pressure Monitoring System (TPMS) with Autolocation
General Information
Note
The Tire Pressure Monitoring System (TPMS) specified within this section
refers to the optional TPMS, which employs individual pressure sensors to
determine individual tire pressures.
The base TPMS does not employ individual pressure sensors to determine
individual ...
Volkswagen Tiguan Owners Manual
Volkswagen Tiguan Service and Repair Manual
- Body exterior
- Body Interior
- General Paint Information
- Paint
- Brake System
- Suspension, Wheels, Steering
- Wheel and Tire Guide
- Towing Guide
- Wheel and Tire Guide General Information
- Communication
- Electrical Equipment General Information
- Electrical Equipment from 06/2011
- Heating, Ventilation and Air Conditioning
- Refrigerant R134a Servicing
- 6-Speed Manual Transmission 02Q, OBB, and OFB
