Volkswagen Tiguan Service and Repair Manual: Rim Information
Overview - Rim
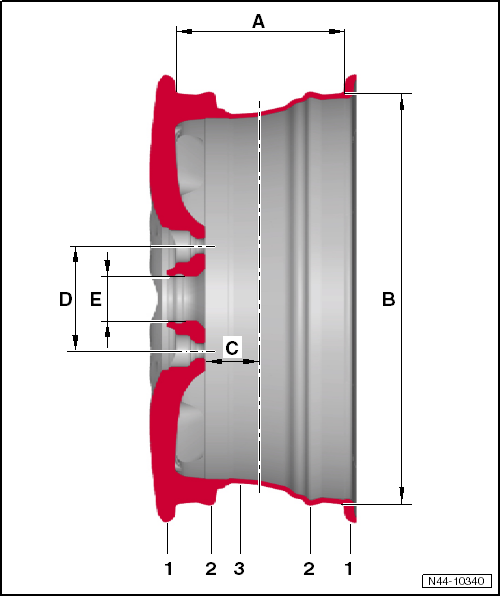
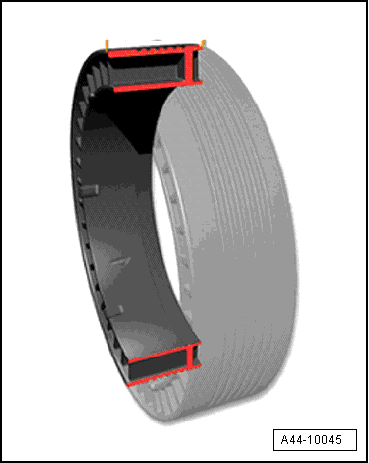
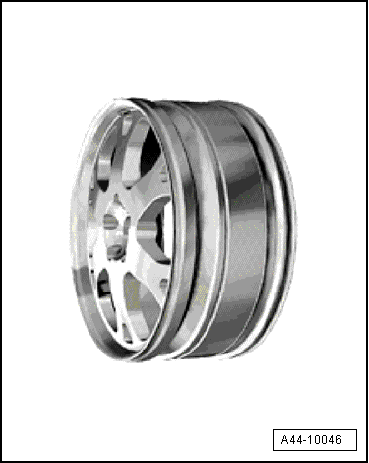
- Rim Flange
- Stop for the side tire bead
- Hump (H2) on Both Bead Seats
- Prevents the tire from slipping off the bead seat when driving around tight curves
- An extended hump (EH2) is required when using run-flat tires.
- Bed
- Makes it easier to mount the tire
- Rim Width
- Distance between the tire contact surfaces on both rim flanges
- Dimensions in inches
- Rim Diameter
- Distance between the rim contact surfaces on the opposite tire shoulders
- Dimensions in inches
- Offset
- Distance between the vertical wheel center and the inner wheel contact surface
- Dimensions in mm
- Pitch Circle Diameter
- Circle diameter where the wheel bolt holes are located
- Dimensions in mm
- Center Hole
- Enables centering
- Dimensions in mm
Identification
There are several specifications located on the rim. The following examples shows the rim identification:
| Replacement parts number: | 6E0 601 027 A |
| Size of disc wheel: | 6 J x 15 6 - Rim width in inches J - Shape of rim flange 15 - Rim diameter in inches |
| Offset (mm): | 43 |
| Indication for hump on bead seat: | EH2 Extended Hump 1) |
1) Raised round hump on both bead seats. These ensure that when using a tire with emergency mode properties in airless condition, the tire does not slip from the bead seat. Wheels with EH2 are only necessary if tires with emergency mode properties are mounted.
Composite Wheels
Composite wheels consist of various parts.
The primary components are rims and wheel discs. These components are fastened to each other with special screws and a special procedure. This ensures the wheel's function, proper seal, safety and true running. These important requirements cannot be guaranteed under shop conditions and using shop tools.
WARNING
Composite wheels must not be disassembled or repaired!
Light Alloy Wheels, Care and Maintenance
To maintain the decorative appearance of light alloy wheels for a long time, regular care is necessary.In particular, road salt and dust from brake abrasion must be thoroughly washed off every two weeks. Otherwise, the paint of the light alloy wheel will be attacked.
Cleaning AgentThe following are appropriate cleaning agents:
- Water or water and soft soap
- Water and vinegar essence
- Light alloy wheel cleaning agents without acids or harsh solvents
Do not exceed the soaking time of the cleaning agent.
The shorter the specified soaking time is, the stronger and more aggressive the cleaning solution is.
Paint Damage
Fix paint damage as soon as possible.
Removing Adhesive Residue from Glued Balance Weights on Light Alloy Rims
- Harsh solvents and acids attack the paint on light alloy wheels and the surface of the wheel becomes matte and milky. These agents therefore must not be used.
- To remove adhesive residue on light alloy wheels, use light alloy cleansers or benzene-based cleanser. Do not exceed the soaking time of the cleaning agent.
- After cleaning or removing adhesive residue on the tires, they must be rinsed again with water.
Light Alloy Wheels, Preparing
WARNING
- Do not repair damaged rims by heating, welding or adding or removing material.
- Do not repair damaged or deformed rims or rims with cracked or deformed bolt holes.
- Only prepare wheels with tested and specified original paint materials.
- No warranty claims can be made against the manufacturer after preparing rims.
Cutting work, application of heat and welding applications of any kind are not permitted.
Reshaping material is not permitted.The true running and axial run-out deviations before preparation must not exceed the manufacturing tolerance of 0.8 mm.
Only cast light alloy wheels may be primed. These wheels have the material identification AlSi xx on the inside.Forged wheels may only be painted.
Preparation is limited to the painted surfaces.Wheels that have been worn smooth that only have a clear coat may not be repaired.
Only surface damage on the visible side of the wheel may be prepared.Damage must not be more than 1 mm deep.
Up to 50 mm of the rim flange may be removed and filled.Hub Cap for Alloy Wheels with Open Threaded Connection, Removing and Installing
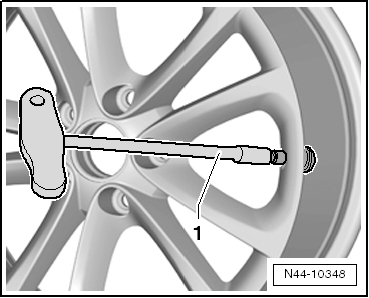
Removing
- The wheel is removed.
Note
Hold the cap secure -1- with the hammer.
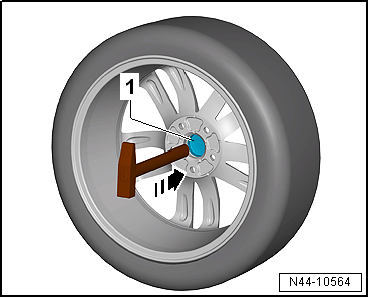
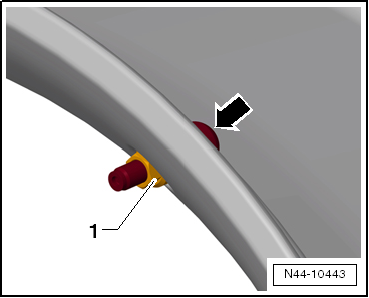
Installing
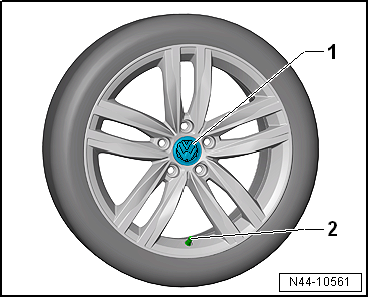
- Hold the cap -1- flush against the opening in the aluminum rim.
- Line up the Volkswagen logo on the cap with the valve so that the logo is centered over the valve -2-.
- Press on the cap so that it is secure inside the opening in the aluminum rim.
- Make sure the cap it secure inside the aluminum rim.
Decorative Trims, Replacing
Decorative Trims, Replacing, Bonded Decorative Trims
Special tools and workshop equipment required
- Cartridge Gun -VAG1628-
- Trim Removal Wedge -3409-
- Wiring Harness Repair Set - Hot Air Blower -VAS1978/14A-
Materials
- 1K Window Adhesive - DH 009 100 A2-
- Silicone Remover - LSE 020 100 A3-
Decorative Trim, Removing
Note
It is not possible remove the decorative trim without damaging it.
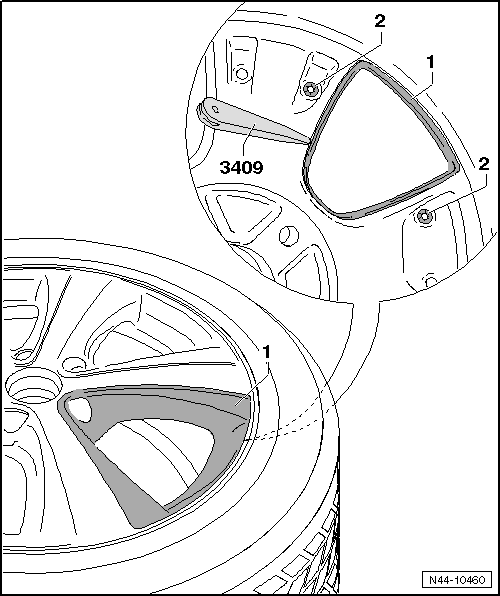
- Loosen the lock washers -2- from the inside of the light alloy wheel.
- Warm the decorative trim -1- from the outside using the Hot Air Blower -VAG1416-.
Caution
Do not overheat tires and light alloy wheels.
- Loosen the decorative trim -1- from the inside of the light alloy wheel using the Trim Removal Wedge -3409-.
- Grab under one corner from the outside and pull the decorative trim -1- off the light alloy wheel.
Note
- The adhesive points for the PUR label are cut into the light alloy wheel.
- The remaining material serves as the adhesive base for the new decorative trim.
- The new decorative trim can be installed immediately.
Decorative Trim, Installing
These light alloy wheels are equipped with replaceable decoration elements. Note the following when installing.
- Make sure the adhesion area on the light alloy wheels and decorative trim are free of dust and grease.
- Clean the adhesion area with Silicone Remover -LSE 020 100 A3-.
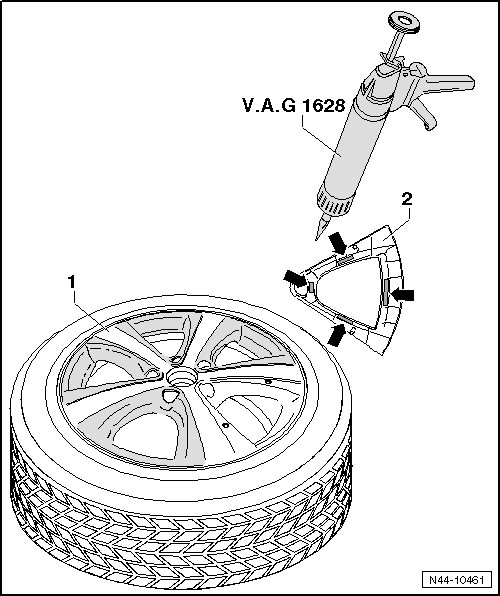
- Apply 1K Window Adhesive -DH 009 100 A2- on the adhesive surfaces -arrows- using the Cartridge Gun -VAG1628-.
Adhesive point: length = approximately 25 mm and diameter = approximately 10 mm
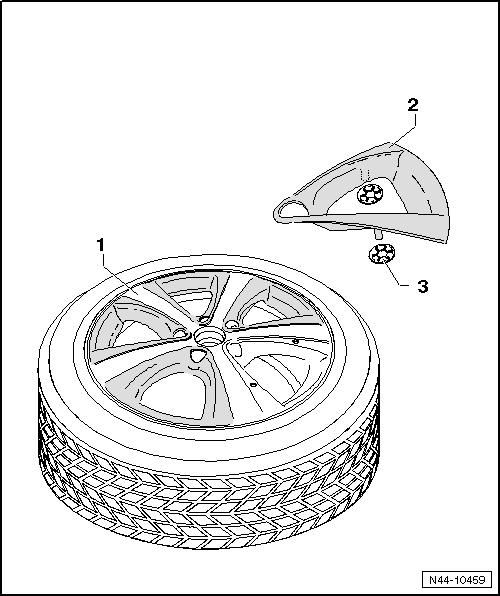
- Press the decorative trim -2- into the light alloy wheels -1- using firm pressure.
- Secure the decorative trim -2- to the inside of the light alloy wheel with lock washers -3-.
Minimum Curing Time: 3 Hours at Room Temperature of Minimum 15 ºC (59 ºF).
WARNING
The light alloy wheel must be balanced again.
Decorative Trims, Replacing, Bolted Decorative Trims
These disc wheels are equipped with replaceable decoration elements. Note the following when installing.
- Clean the thread in the disc wheel before screwing in the new bolts.
- Use new bolts only!
- Decoration element
- Hex socket bolts
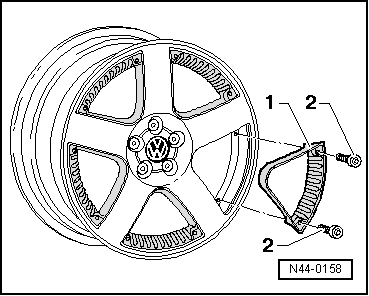
Tightening specification for self-locking hex socket bolts: 5 Nm
Valve, Removing and Installing
Valve, Removing and Installing, Valve Explanations
1. Valve Body
- Valve body
- Valve Insert
- Valve cap
The rubber valve for tubeless tires is designed to seal air-tight in the hole in the rim. The elastic material of the rubber body presses itself tightly into the hole in the rim.
When valves with threaded metal feet are used, a rubber seal is used to seal the rim. The area around the edge of the valve hole is a sealing area. Therefore, they must be free of rust, dirt and damage.
2. Valve Insert
The valve core has the most important job in the valve. It creates a seal and enables the regulation of the air pressure. The small plate seal on the valve core can only do its job when it is free of impurities, dirt and moisture. The compressed air system must be free of water and oil!
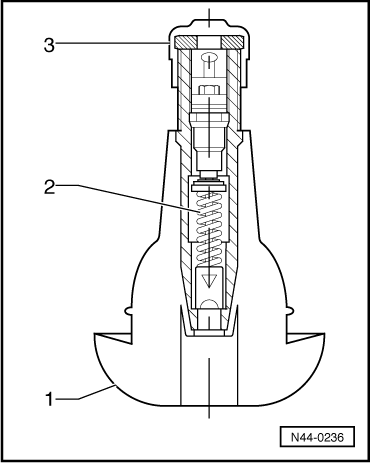
3. Valve Cap
A valve cap must always be screwed onto the valves. It prevents dirt from getting into the valve. Dirt which may be in the valve would reach the seal of the valve plate when the tire is inflated and cause a leak.
The valve must be replaced every time a new tire is fitted.
If the vehicle is driven without caps on the valves, there is the danger that dirt may get into the valve. This leads to gradual loss of air and therefore lead to the destruction of the tire:
- Separation of carcass and rubber.
- Wide circumferential furrows in the area of the bead.
- Disintegrated tread or torn-out tread.
WARNING
An air-tight seal is ensured only if the valve cap is secured tightly.
Valve, Removing and Installing, Rubber Valve
Make sure wheel rim is clean.
- Using the Valve Fitting Tool Valve Fitting Tool -VAS6459--1-, insert a new tire valve.
- Remove the valve insert.
- Inflate tire to approximately 3 to 4 bar (43.5 to 58 psi), tire bead must slip audibly over rim hump when doing this.
- Install the valve insert.
- Check the tire pressure for specified pressure.
- Balance the tire.
Valve, Removing and Installing, Metal Valve
Special tools and workshop equipment required
- Torque Wrench -VAG1410-
Perform the Following:
Removing
- Remove the Tire Pressure Monitoring Sensor.
- Remove the nut -1- from the metal valve.
- Counterhold -arrow- the metal valve using a retainer (for example 2 mm spiral bore) while doing so.
Installing
Caution
Only apply the specified torque to tighten the nut for the metal valve. Tightening more is not permitted because it damages the seal.
- Tighten the nut -1- of the metal valve.
- Counterhold -arrow- the metal valve using a retainer (for example 2 mm spiral bore) while doing so.
- Install the Tire Pressure Monitoring Sensor.

Run-Flat System PAX
Run-Flat System PAX, Support Ring
Dimensions
Overview of the most important dimensions:
Names
Example: 90-500(35) CLI A 1 876107
90 - Designated width in millimeters
500 - Designated diameter in millimeters
35 - Height in millimeters
CLI - Support ring versions: CLI - Clip supporting ring/FL - standard supporting ring
A - Build type index, asymmetrical. Indication of wheels with emergency running characteristics (PAX)
1 - Supporting ring versions
876107 - CAI, international item code
Run-Flat System PAX, Dimensions and Designations on PAX Rims
Example: 235 x 500 A - 5 - 41
235 - Designated width in millimeters
x - One-part
500 - Designated diameter of standardized rim seat in millimeters
A - Asymmetrical
5 - Number of bolt holes
41 - Offset in millimeters
Run-Flat System PAX, Examining Support Ring
As with the tire, the supporting ring is generally not replaced after driving with flat tire.
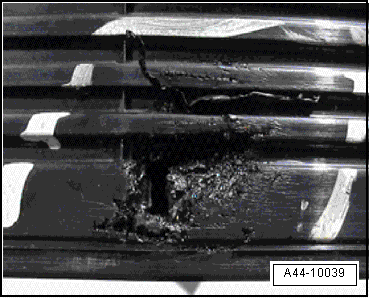
Replace the support ring if the following damages have occurred:
- Blowouts or missing parts
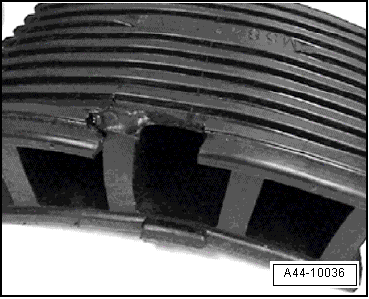
- Cracks in partitions

- Stitch damage and holes
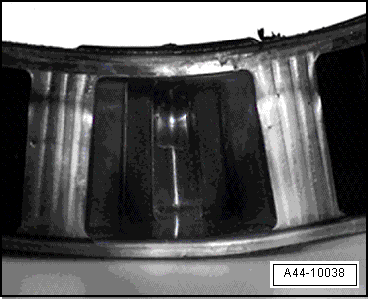
- Bubbles and discoloration due to overheating
Repairs on Tires
Note
- Repairs on tires with emergency running characteristics (PAX) must not be performed with adhesive tape.
- Tire repair sprays must not be used on tires with emergency running characteristics (PAX) because these products are not compatible with the gel in the tires.
 Run-Flat Tire PAX
Tires, Storing
Storage Room
Tire storage must be:
Dark,
Dry,
Cool and
Ventilated
WARNINGStored tires must not come in contact with fuel, oil, grease or
chemicals under any circumstances. Otherw ...
 Tire Pressure Sensor
Overview - Tire Pressure Monitoring Sensor
Overview - Tire Pressure Monitoring Sensor with Valve
Tire Pressure Monitoring Sensor
Supplied complete as a service part
Removing and Installing.
...
See More:
Volkswagen Tiguan Service and Repair Manual > Refrigerant R134a Servicing: A/C Service Station, Working with
Important Information when Working with the A/C Service Station
Caution
If it is suspected that chemicals were added to the refrigerant circuit
to seal leaks, do not connect the A/C service station and do not extract the
refrigerant.
Chemicals that seal leaks in the coolant circuit form depos ...
Volkswagen Tiguan Owners Manual
Volkswagen Tiguan Service and Repair Manual
- Body exterior
- Body Interior
- General Paint Information
- Paint
- Brake System
- Suspension, Wheels, Steering
- Wheel and Tire Guide
- Towing Guide
- Wheel and Tire Guide General Information
- Communication
- Electrical Equipment General Information
- Electrical Equipment from 06/2011
- Heating, Ventilation and Air Conditioning
- Refrigerant R134a Servicing
- 6-Speed Manual Transmission 02Q, OBB, and OFB
