Volkswagen Tiguan Service and Repair Manual: Subframe without Steering Gear, Removing and Installing
Special tools and workshop equipment required
- Torque Wrench 1331 5-50Nm -VAG1331-
- Torque Wrench 1332 40-200Nm -VAG1332-
Removing
Note
Subframe is removed together with control arms.
- Remove the lower noise insulation.
- Remove the wheels.
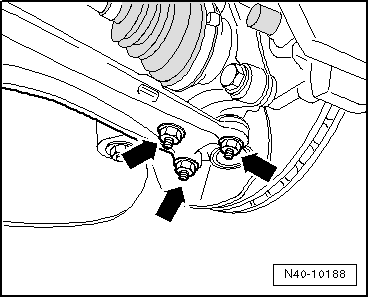
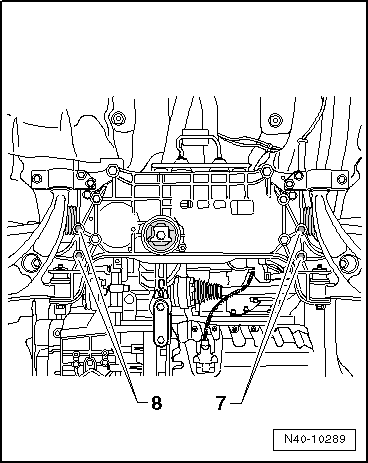
- Remove the nuts -arrows- on left and right side of vehicle.
- Remove the control arm from the ball joint.
- Remove the exhaust system bracket from the subframe -arrows-.
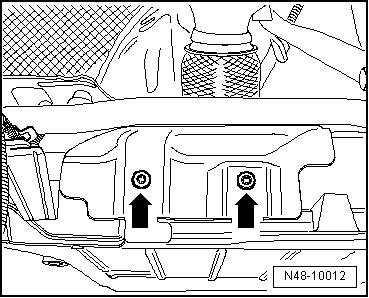
- If equipped, remove the heat shield bolts -arrows-.
- If equipped, remove the subframe heat shield.
- Remove coupling rod from stabilizer bar.
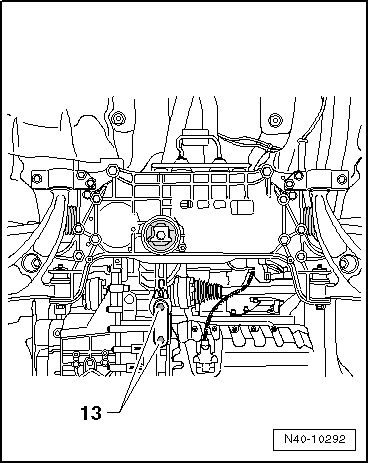
- Remove the bolts -13- and then remove the pendulum support from the transmission.
- Secure the subframe.
- Remove the steering gear bolts -5 and 6-.

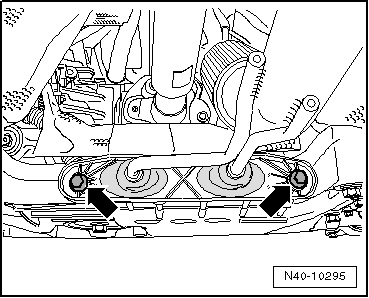
- Remove the stabilizer bar bolts -7 and 8-.
- Remove the subframe bolts -9 and 10-.
- Lower the subframe using the Engine/Gearbox Jack -VAG1383A-.

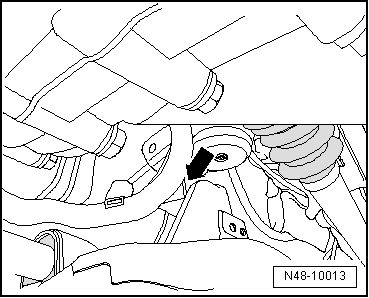
- Remove cable guide from subframe -arrow-.
- Secure steering gear to body.
Installing
Install in reverse order of removal.
- Install the wheels.
- Install and tighten the noise insulation.
If the steering wheel is still crooked after using the Locating Pins -T10096- then an axle alignment is necessary. In this case the record it in the vehicles axle alignment log.
Tightening Specifications
| Component | Tightening Specification |
Mounting bracket to body
|
70 Nm + 180º |
Stabilizer bar to
subframe
|
20 Nm + 90º |
Stabilizer bar to
coupling rod
|
65 Nm |
Shield to subframe
|
6 Nm |
Steering gear to subframe
|
50 Nm + 90º |
Ball joint to aluminum
control arm:
|
60 Nm |
Ball joint to sheet steel
control arm
|
100 Nm |
| Exhaust system bracket to subframe. | |
Tightening Specifications, Subframe to Body
| Bolt | Tightening Specification |
M12 x 1.5 x 90
|
70 Nm + 180º |
M12 x 1.5 x 100
|
70 Nm + 180º |
M12 x 1.5 x 110
|
70 Nm + 90º |
Tightening Specifications, Pendulum Support to the Transmission
| Bolt | Tightening Specification |
M10 x 35
|
50 Nm + 90º |
M10 x 75
|
50 Nm + 90º |
M12 x 1.5 x 85
|
60 Nm + 90º |
 Subframe, Lowering
Special tools and workshop equipment required
Locating Pins -T10096-
Engine and Gearbox Jack -VAS6931-
Removing
Turn the steering wheel in the straight position and remove the ignition
key so ...
 Subframe with Steering Gear, Removing and Installing
Special tools and workshop equipment required
Puller - Ball Joint -3287A-
Torque Wrench 1332 40-200Nm -VAG1332-
Removing
Turn the steering wheel in the straight position and remove the ignition ...
See More:
Volkswagen Tiguan Service and Repair Manual > Seat Frames: Power Driver Seat
Tools
Special tools and workshop equipment required
Engine and Gearbox Bracket VAS6095A -VAS6095A-
Engine/Transmission Holder - Seat Repair Fixture -VAS6136-
Pop Rivet Nut Pliers -VAS5072A-
Window Release Tool -T10236-
Sill-Side Trim Panel, Removing and Installing
Removing
Switch o ...
Volkswagen Tiguan Owners Manual
Volkswagen Tiguan Service and Repair Manual
- Body exterior
- Body Interior
- General Paint Information
- Paint
- Brake System
- Suspension, Wheels, Steering
- Wheel and Tire Guide
- Towing Guide
- Wheel and Tire Guide General Information
- Communication
- Electrical Equipment General Information
- Electrical Equipment from 06/2011
- Heating, Ventilation and Air Conditioning
- Refrigerant R134a Servicing
- 6-Speed Manual Transmission 02Q, OBB, and OFB
