Volkswagen Tiguan Service and Repair Manual: Rear Brake Caliper, Servicing
Overview - Brake Caliper CII 41
- Install the entire repair kit when servicing.
- Only use mineral spirits to clean the brakes.
- New brake calipers are filled with brake fluid and are pre-bled.
- Apply a thin coat of Assembly Paste -G 052 150 A2- to brake cylinders, pistons and seals.
- If a repair is required, the brake calipers must always be pre-bled before being installed in the vehicle (without brake pads).
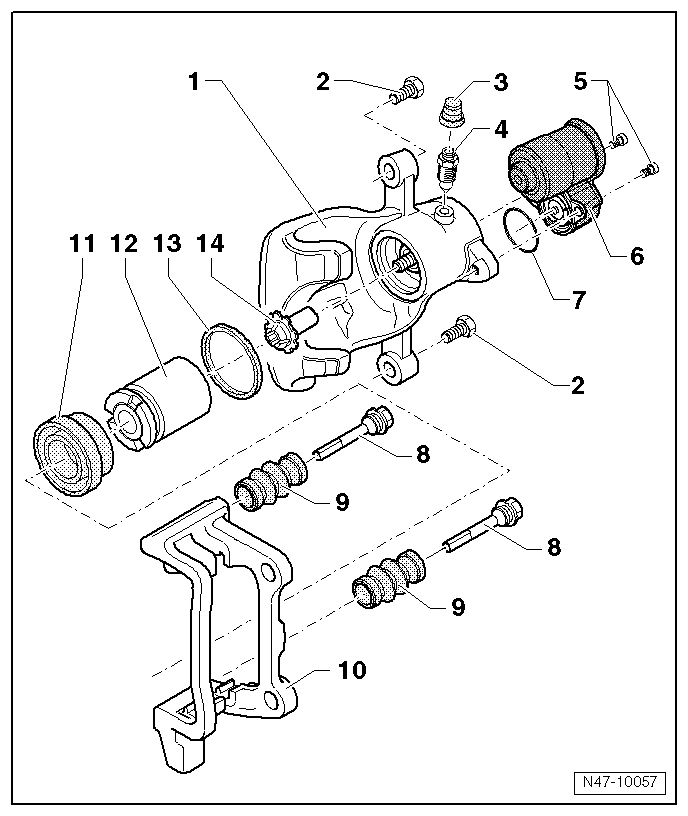
- Brake Caliper
- Pre-bleed the brake caliper after servicing
- Self-Locking Bolt
- 35 Nm
- Replacing
- When loosening and tightening, counterhold at guide pin
- Dust Cap
- Bleeder Valve
- 10 Nm
- Apply a thin coat of Assembly Paste -G 052 150 A2- to the threads before screwing in.
- TORX Socket Bolt
- 12 Nm
- Parking Brake Motor
- Seal
- Guide Pin
- Grease before pulling on the protective cap
- Protective Cap
- Install on brake carrier and guide pin.
- Brake Carrier with Guide Pins and Protective Cap
- Delivered as an assembled replacement part with sufficient grease on the guide pins
- Install the repair kit if the caps or guide pins are damaged. Use the supplied grease packet to lubricate guide pins.
- Protective Cap
- Pull onto the piston with the outer sealing lip
- Removing and installing.
- Pull onto the piston with the outer sealing lip
- Removing and installing.
- Piston
- Removing and installing.
- Apply a thin coat of Assembly Paste -G 052 150 A2- to piston beforehand
- Seal
- Removing and installing.
- Thrust Nut
Brake Caliper Piston, Removing and Installing
Special tools and workshop equipment required
- Trim Removal Wedge -3409-
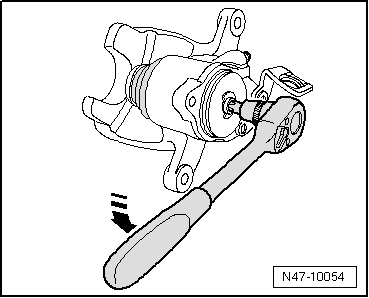
Removing
- Rotate the spindle in the direction of -arrow- with an 8 mm socket.
The pressure nut presses the piston out of the brake caliper.
- Remove the piston with the protective boot from the brake caliper.
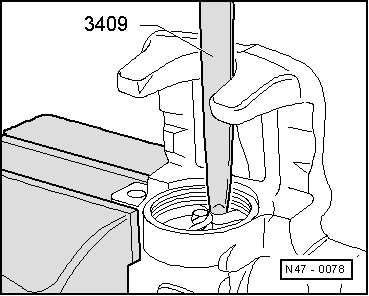
- Remove the seal with the Trim Removal Wedge -3409-.
Installing
- The surface of the piston and seal must only be cleaned with mineral spirits and then dried.
- Thinly coat piston and seal with Assembly Paste -G 052 150 A2- before inserting.
- Insert the gasket into the brake caliper.
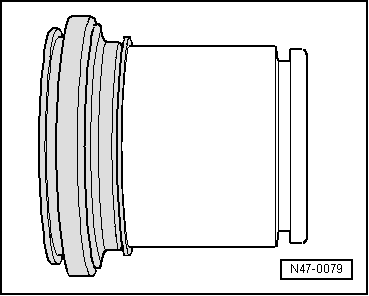
- Place the protective cap with outer sealing lip on the piston.
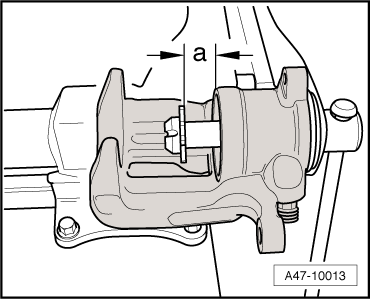
- Screw the thrust nut so far onto the spindle until the dimension -a- 15 mm has been achieved.
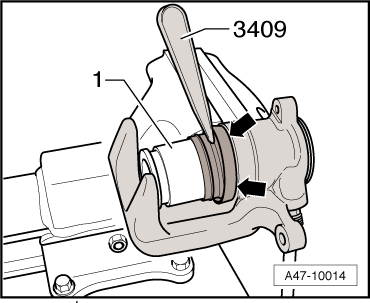
- Using the Trim Removal Wedge -3409-, insert the inner sealing lip of the protective cap into the groove -arrows- in the brake caliper.
- Push the piston onto the thrust nut, which is only possible in four positions.Carefully press the piston into the brake caliper, moving the piston while doing this.
- Carefully press the piston into the brake caliper, moving the piston while doing this.
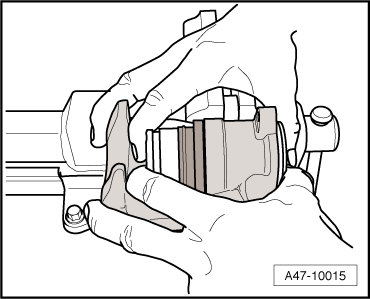
- Only press the piston so far into the brake caliper until it contacts the thrust nut.

- Carefully turn the spindle clockwise until the thrust nut is at the stop.

- Make sure that the protective cap is seated against the brake caliper -arrows- all around.
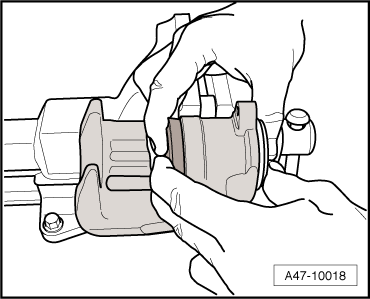
- Press the piston into the brake caliper by hand.
The outer sealing lip thereby slips into the groove on the piston.
Brake Caliper, Pre-Bleeding
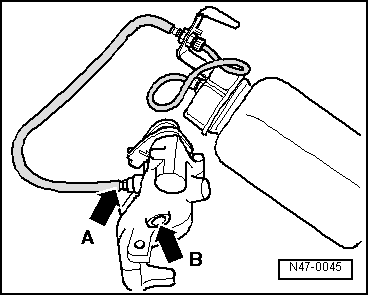
- Open the bleeder valve -arrow A- and using a commercially available bleeder bottle, fill with brake fluid until brake fluid flows out of the threaded hole (brake hose connection) -arrow B- without any bubbles. Close the bleeder valve.
Position the brake caliper as shown during the pre-bleed procedure.
Pressure Leak Test
Special tools and workshop equipment required
- Brake Pressure Gauge -VAG1310A-
- Brake Pressure Gauge - Adapter M10 -VAG1310/6-
Test Requirement
Brake system (hydraulic unit, brake hoses, brake lines and brake calipers) operating properly and free of leaks.
- Remove the bleeder valve at one of the front brake calipers. Connect the Brake Pressure Gauge -VAG1310A- and bleed.
- Apply pressure to the brake pedal until the pressure gauge indicates a pressure of 50 bar (725 psi). The pressure must not drop more than 4 bar (58 psi) during the test period of 45 seconds. Replace the brake master cylinder if the pressure decrease is too high.
 Front Brake Caliper, Servicing
Overview - Brake Caliper FN 3
Install the entire repair kit when servicing.
Only use mineral spirits to clean the brakes.
Apply a thin coat of Assembly Paste -G 052 150 A2- to brake cylinders,
p ...
 Brake System, Bleeding
The bleeding of brake system is described using the Brake Charger/Bleeder
Unit -VAS5234-.
WARNING
Only use new brake fluid conforming to VW standard (VW 501 14).
Note
Brake fluid is poisonous. Due ...
See More:
Volkswagen Tiguan Service and Repair Manual > Air Conditioning: Coolant Circuit
Coolant Pipe, Removing and Installing
Special tools and workshop equipment required
Shop Crane - Drip Tray -VAS6208-
Hose Clamps - Up To 25mm -3094-
Engine Bung Set -VAS6122-
Removing
Remove the nuts -1- (9 +-1.3 Nm).
Remove the heat shield -2-.
Place the Shop Crane - Drip Tray -VAS6208- un ...
Volkswagen Tiguan Owners Manual
Volkswagen Tiguan Service and Repair Manual
- Body exterior
- Body Interior
- General Paint Information
- Paint
- Brake System
- Suspension, Wheels, Steering
- Wheel and Tire Guide
- Towing Guide
- Wheel and Tire Guide General Information
- Communication
- Electrical Equipment General Information
- Electrical Equipment from 06/2011
- Heating, Ventilation and Air Conditioning
- Refrigerant R134a Servicing
- 6-Speed Manual Transmission 02Q, OBB, and OFB
