Volkswagen Tiguan Service and Repair Manual: Other Attachments
Volkswagen R GmbH "R-Line" optional equipment
Note
More information about special attachments can be obtained from the Volkswagen R GmbH Hotline.
Safety Precautions
Note
- The special attachments were designed to meet the technical requirements of each model.
- Always use Original Parts whenever replacing a special attachment.
- Without these special attachments, the vehicle may not be driven in open traffic.
Tools
Special tools and workshop equipment required
- Torque Wrench 1783 - 2-10Nm -VAG1783-
- Wiring Harness Repair Set - Hot Air Blower -VAS1978/14A-
- Adhesive Strip Remover -VAS6349-
- Trim Removal Wedge -3409-
- Double Cartridge Gun -VAS5237-
- Bonded Window Tool Kit -VAG1351-
Materials
Note
Refer to the Parts Catalog for the part numbers for the materials.
- Two-Part Window Adhesive
- One-Part Window Adhesive
- Mixer with cone shaped nozzle
- Glass/Paint Primer
- Plastic Primer
- Cleaning Solution
- Primer applicator
- Adhesive Remover
- Plastic Cleaner
- Silicone Remover
- Cutting Wire
- Two-Sided Adhesive Tape
Note
- Follow the manufacturer instructions supplied with the package.
- The Double Cartridge Gun -VAS5237- must be used to apply two-part window adhesive.
Component Overview - Special Attachments
Volkswagen R GmbH "R-Line" optional equipment
Note
The overview shows only the left side. The overview for the right side is identical.
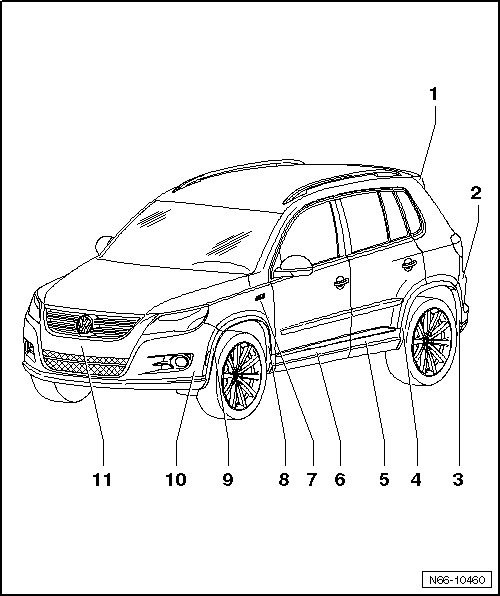
- Rear Spoiler
- Removing and installing
- Rear Bumper Cover
- Removing and installing
- Removing and Installing with Trailer Hitch
- Rear Bumper Wheel Cover
- Removing and installing
- Side Panel Wheel Cover
- Removing and installing
- Rear Door Cover
- Removing
- Installing
- Front Door Cover
- Removing
- Installing
- Fender Name Badge
- Left fender name badge dimensions
- Fender Wheel Cover
- Removing and installing
- Front Bumper Wheel Cover
- for 28º version
- Removing and installing
- Front Bumper Cover
- Removing and installing
- Radiator Grille
- Removing and installing
Wheel Covers
Volkswagen R GmbH "R-Line" optional equipment
Note
The installation overview applies only to the left side. The installation overview for the right side is identical.
Overview - Wheel Covers
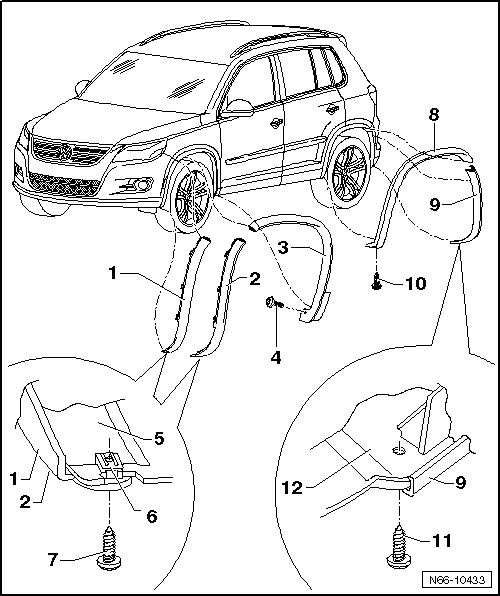
- Front Bumper Wheel Cover
- Through 12/2009 connected to the fender wheel cover with a clamp
- From 01/2010 connected to the fender wheel cover with a reinforcement frame
- For 18º version
- Removing and installing
- Front Bumper Wheel Cover
- Through 12/2009 connected to the fender wheel cover with a clamp
- From 01/2010 connected to the fender wheel cover with a reinforcement frame
- For 28º version
- Removing and installing
- Fender Wheel Cover
- Through 12/2009 connected to the front bumper wheel cover with a clamp
- From 01/2010 connected to the front bumper wheel cover with a reinforcement frame
- Fender wheel cover with trim, removing
- Fender wheel cover with trim, installing
- Screw
- Tightening specification: 2 Nm
- Spoiler
- Front Bumper
- Spring Nut
- Screw
- Tightening specification: 2 Nm
- Side Panel Wheel Cover
- Removing and installing
- Rear Bumper Wheel Cover
- Removing and installing
- Screw
- Tightening specification: 2 Nm
- Screw
- Tightening specification: 2 Nm
- Spoiler
- Rear Bumper
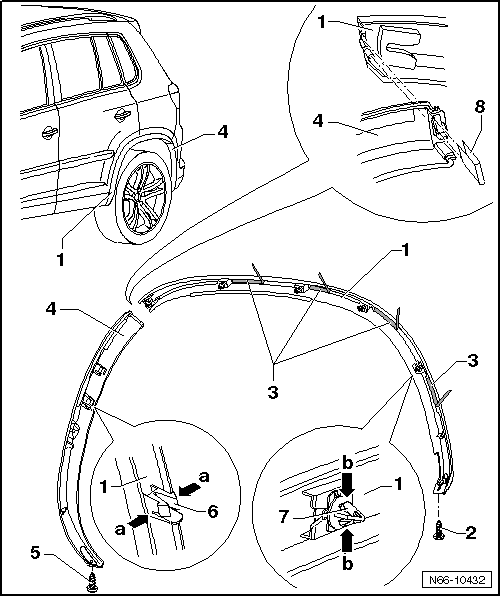
Overview - Fender Wheel Cover
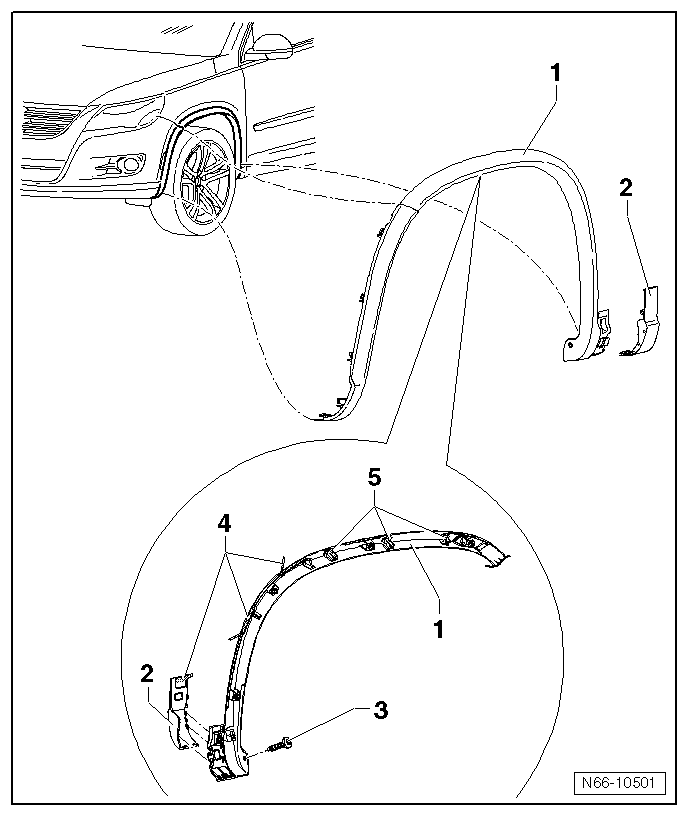
- Fender Wheel Cover
- Removing and installing.
- locked inside the wheel cover, fender
- Trim
- For covering the door, painted in the vehicle color
- Screw
- Tightening specification: 2 Nm
- Double-Sided Adhesive Tape
- Reinforcing Ribs
- Only in vehicles from 04/2009
- Bonding point (Two-Part Window Adhesive - DA 004 600 A2-)
- Bonding point: 9 mm diameter, height of at least 4 mm
Front Wheel Cover, Removing and Installing
Volkswagen R GmbH "R-Line" optional equipment
Note
The following describes the removal and installation of the left side. Removing and installing on the right side is identical.
Removing, Vehicles through 03/2009
Note
The front wheel cover cannot be removed without destroying it.
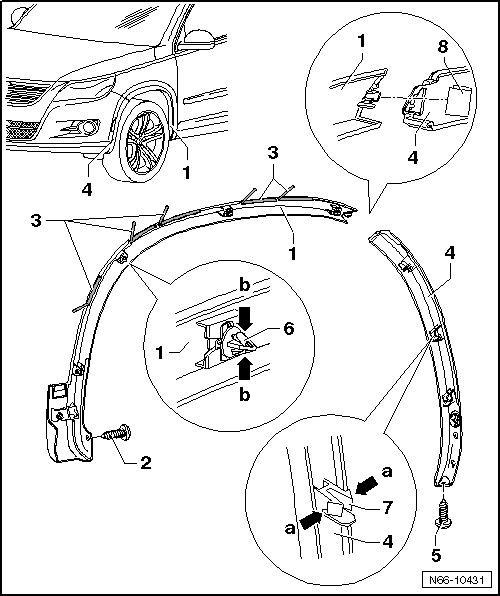
- Remove the front wheel housing liner.
Front Bumper Wheel Cover
- Remove the bolt -5-.
- Compress the hooks -7- (qty: 3) -arrows a- and remove them from the front bumper from the inside.
Fender Wheel Cover
- Remove the bolt -2-.
- Before removing, heat the fender wheel cover -1- in the area of the adhesive tape -3- using a Hot Air Blower - VAG1416-.
- Push the clips -6- (qty: 5) out of the grommets from the inside of the fender -arrows b-.
- Pull wheel cover -1- out of clip -8-.
- Remove fender wheel cover -1- and front bumper wheel cover -4- together.
Removing, Vehicles from 04/2009
Note
The front wheel cover cannot be removed without destroying it.

- Remove the front wheel housing liner.
Front Bumper Wheel Cover
- Remove the bolt -6-.
- Press the hooks -8- (quantity: 3) together -arrows a- and remove them from the front bumper from the inside.
Fender Wheel Cover
- Remove the bolt -2-.
- Before removing, heat the fender wheel cover -1- in the area of the adhesive tape -3- and the reinforcing ribs -4- using a Hot Air Blower - VAG1416-.
- Push the clips -7- (qty: 5) out of the grommets from the inside of the fender -b arrows-.
- Remove the wheel cover -1- from the clamp -9-.
- Remove fender wheel cover -1- and front bumper wheel cover -5- together.
Installing
Note
- Prior to assembly, check the parts for damage and replace them if necessary.
- Mount the wheel cover with the help of a second technician.
- Note the installation instructions for the wheel covers.

- Attach the front bumper wheel cover -5- to the fender wheel cover -1-.
- For vehicles through 12/2009, secure the wheel cover connection with clip -9-.
- For vehicles from 01/2010, connect the wheel covers with the reinforcement frame.
- Insert one adhesive point each into the reinforcement rib cylinders -4-.
- Mount the joined wheel covers on the vehicle.
Note
Mount the joined wheel covers with the help of a second technician.
- Peel off the protective strip from adhesive tape -3- on fender wheel cover -1-.
- Press the front bumper wheel cover -5- with the hooks -8- into the front bumper.
- Press the fender wheel cover -1- and clips -7- into the grommets on the fender.
- Press on fender wheel cover -1- with force in the area of adhesive tape -3- and reinforcing ribs -4-.
- Tighten bolts -2- and -6- to 2 Nm.
- Install the front wheel housing liner.
Rear Wheel Trim
Volkswagen R GmbH "R-Line" optional equipment
Note
The following describes the removal and installation of the left side. Removing and installing on the right side is identical.
Removing
Note
The rear wheel cover cannot be removed without destroying it.

- Remove the rear wheel housing liner.
Rear Bumper Wheel Cover
- Remove the bolt -5-.
- Compress the hooks -6- (qty: 2) -arrows a- and remove them from the rear bumper from the inside.
Side Panel Wheel Cover
- Side Panel Wheel Cover
- Before removing, heat the side panel wheel cover -1- in the area of the adhesive tape -3- using a Hot Air Blower -VAG1416-.
- Push the clips -7- (qty: 5) out of the grommets from the inside of the side panel -arrows b-.
- Pull side wheel cover section -1- out of clip -8-.
- Remove rear bumper wheel cover -4- and side wheel cover section -1- together.
Installing
Note
Check the parts for damage and replace them if necessary.
Note the installation instructions for the wheel covers.
- Attach the rear bumper wheel cover -4- to the side panel wheel cover -1-.
- Secure the wheel cover connection with a clip -8-.
- Mount the joined wheel covers on the vehicle.
Note
Mount the joined wheel covers with the help of a second technician.
- Peel off the protective strip from the adhesive tape -3- on the side panel wheel cover -1-.
- Press the rear bumper wheel cover -4- with the hooks -6- into the rear bumper.
- Press the side panel wheel cover -1- and clips -7- into the grommets on the side panel.
- Press the side panel wheel cover -1- forcefully around the adhesive tape -3-.
- Tighten bolts -2- and -5- to 2 Nm.
- Install the rear wheel housing liner.
Front and Rear Door Cover
Volkswagen R GmbH "R-Line" optional equipment
Note
Removal and installation are described only for the left front and rear door cover. The removal and installation of the right front and rear door cover are derived accordingly from this.
Overview
Note
The installation overview applies only to the left side. The installation overview for the right side is identical.

- Front Door Cover
- With a chromed insert
- Painted in vehicle color
- Removing
- Installing
- Front Door
- Rear Door
- Grommet
- Rear Door Cover
- With a chromed insert
- Painted in vehicle color
- Removing
- Installing
- PUR Adhesive Bead
- Two-Part Window Adhesive -DA 004 600 A2-
- Bead diameter: approximate width = 5 mm, height = 7 mm
- Adhesive Tape
- Primer
- Screw
- Tightening specification: 2 Nm
- 3 for the rear cover
- Screw
- Tightening specification: 2 Nm
- 2 for the front cover
Removing

- Remove the bolts -9/10- on the inner side of the door -2/3-.
- Before removing, heat the cover -1/5- in the area of the adhesive tape -7- using a Hot Air Blower - VAG1416-.
- Remove the cover from the grommets -4-.
- Cut through the adhesive bead -6- using a Bonded Window Tool Kit - Pull Handle -VAG1351/1- and the Cutting Wire - 357 853 999 A-.
- Remove the cover -1/5-.
Installing
Note
- The waiting period after installing body side moldings is approximately 4 hours at a temperature of approximately 21 ºC (69.8 ºF).
- Inspect the grommets -4- for damage; if necessary, replace.

- Note the cleaning instructions.
- Note the installation instructions.
- Prepare the body for the adhesive.
- Prepare the new attachment for the adhesive.
The surface in the cover -1/5- and on the door -2/3- are primed.
- Apply the adhesive bead -6- (Two-Part Window Adhesive - DA 004 600 A2-) to the primed surfaces -8- on the cover -1/5- using the Double Cartridge Gun -VAS5237
- Peel off the protective film from the adhesive tape -7-.
- Mount the cover -1/5- on the vehicle and forcefully press on it around the adhesive tape -7- and the adhesive bead -6-.
- Tighten the bolts -9/10- on the inner side of the door -2/3-.
Spoiler on Roof Edge
Volkswagen R GmbH "R-Line" optional equipment
Overview - Spoiler on Roof Edge
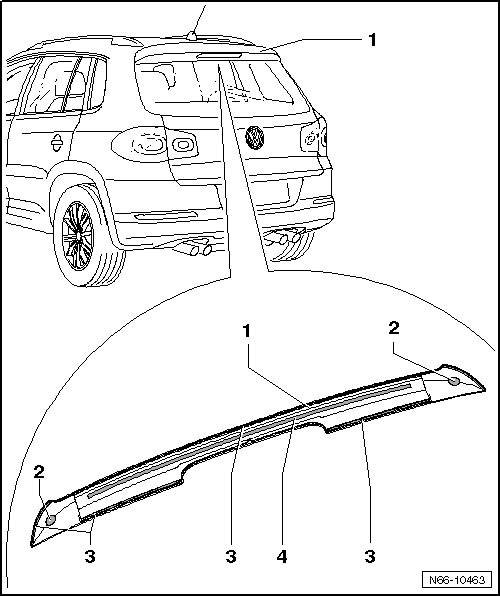
- Spoiler on Roof Edge
- Removing and installing.
- PUR Adhesive Point
- Left and right
- 20 mm x 10 mm bonding point
- Two-Sided Adhesive Tape
- PUR Adhesive Bead
- Bead diameter: approximate width = 5 mm, height = 7 mm
Roof Edge Spoiler, Removing and Installing
Removing
WARNING
When disassembling roof edge spoiler, a cutting cable must not be used because of the danger of damaging painted surfaces.
Note
- The spoiler on the edge of the roof cannot be removed without damaging it.
- Remove dirt from all joints, so that the paint is not damaged when removing the attachments.
- Cover all adjacent paint surfaces and gap between roof and rear lid with tape.
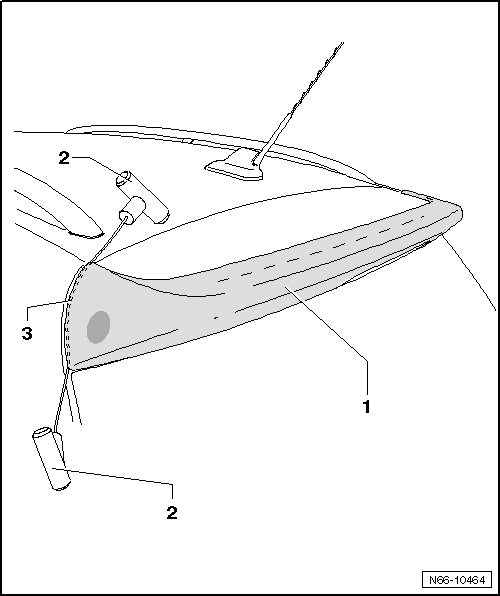
- Guide the cutting wire -3- at one corner between the rear lid and the spoiler on the edge of the roof -1-.
Note
A second technician is needed to cut the roof edge spoiler.
- Using a "sawing" motion, cut through the adhesive bead, bonding points and the adhesive tape on one side up the center of the roof edge spoiler using both Bonded Window Tool Kit - Pull Handles -VAG1351/1--2-.
- Separate the adhesive sealing material on other side.
- Remove the spoiler on the edge of the roof -1-.
Installing
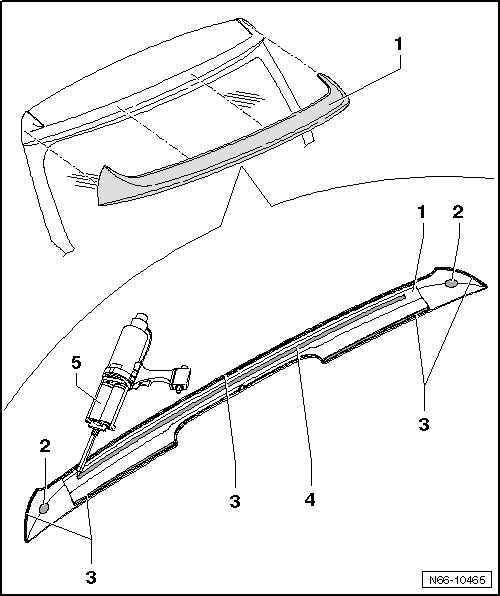
- Follow the cleaning instructions.
- Follow the installation instructions.
- Prepare the body component for bonding.
- Prepare new attachment for bonding.
Surfaces on the roof edge spoiler -1- and rear lid are primed.
- Using the Double Cartridge Gun -VAS5237-, apply the adhesive bead -4- on the primed surfaces of the rear lid spoiler -1- and on the bonding points -2- on the left and right side.
- Peel off the protective film from the double-sided adhesive tape -3-.
- Position the roof edge spoiler -1- on the rear lid with a second technician.
Note
Check the fit of the spoiler on the edge of the roof -1-.
- Firmly press on the roof edge spoiler and secure it with cloth reinforced tape.
Minimum curing time.
Assembly Instructions
Note
- The special attachments are attached at the factory with two-sided adhesive tape and two-part windshield adhesive.
- The manufacturer has already primed the special attachments and delivers them with two-sided adhesive tape.
- When painting the spoiler, be careful not get any paint or paint spray on the two-sided adhesive tape.
Caution
Wear protective gloves and eyewear when removing the special attachments.
Never use cutting wire to remove any special attachments.
The temperature of the room, working space and vehicle must be the same, between 18 ºC (64.4ºF ) and maximum 30 ºC (86 ºF).
Remove any adhesive residue using Adhesive Strip Remover -VAS6349-.
Always use a clean, lint-free towel.
Clean the outer panel with adhesive remover just before installing the special attachments. Then remove dirt, grease, wax or other contaminants with plastic cleaner.
Only remove the protective film right before assembly.
Before washing and protecting the vehicle, the wheel covers must be adhered for at least 4 hours.
Preparing Components for Adhesion
- Remove any adhesive residue from the double-sided tape using Adhesive Strip Remover - VAS6349-.
- Clean the adhesive surface with adhesive remover right before bonding the attachments.
The bonding surfaces must be free of dust and grease and there must be no left-over adhesive on them.
- Now apply plastic primer evenly in a single stroke using the applicator.
Drying time is approximately 10 minutes
Bodywork must be prepared for adhesion.
- Apply a thin and even coat of two-part adhesive on the primed surfaces with a Double Cartridge Gun -VAS5237-.
New Attachment, Preparing for Bonding
WARNING
Clean the adhesive surfaces before applying the primer.
For Two-Part Windshield Adhesive
- Prepare the adhesive surface with plastic primer.
- Apply the two-part window adhesive to the attachment in the specified locations using the Double Cartridge Gun -VAS5237-.
For Double-Sided Adhesive Tape
- Clean the adhesive surface for the double-sided adhesive tape thoroughly with adhesive remover.
- Apply the double-sided adhesive tape along the indicated adhesive surfaces making sure there it is no tension and there are no creases.
WARNING
Apply the double-sided adhesive tape and cut it exactly without lifting or loosening the protective film on adhesive tape, otherwise the tape will not adhere as well.
Body Component, Preparing for Adhesive
- Remove any adhesive residue from the double-sided tape using Adhesive Strip Remover - VAS6349-.
- The PUR adhesive points are cut down to approximately 2 - 3 mm without damaging the paint.
- It is not necessary to clean the cutting surface.
Note
The remaining material serves as a base for the new adhesive sealant being applied.
- Make sure the surrounding parts are clean.
- Immediately mount the new special attachments with the adhesive points on the specified positions.
If bodywork is being worked on or is partially replaced, it must be cleaned and primed again after painting the corresponding area.
WARNING
Exception: If the bonding is going to be performed more than one day after cutting back the adhesive bead, then the remaining material must be activated with the Activator - D 181 801 A1-.
Apply the activator evenly in one stroke with the Applicator -D 009 500 25-.
Do not let the activator come in contact with the paint, otherwise this will damage the paint.
Drying time is approximately 10 minutes.
Installation Instructions
Always use a clean, lint-free towel.
Peel off the protective film just before installing.
The temperature of the room and of the object must be at least + 18 ºC (64.4 ºF).
The points on the outer panel that are going to be primed must be clean.
- Remove the adhesive residue using the adhesive remover.
Drying time is approximately 10 minutes.
- Apply the adhesive material to the primed locations on the attachments using a Double Cartridge Gun -VAS5237-.
WARNING
The attachments must be installed within 10 minutes otherwise the adhesive will not adhere correctly.
Minimum Curing Time
Minimum hardening time for newly mounted special attachments is two hours.
Minimum curing time is the time from applying the components up to vehicle use.
Wait two hours after bonding with two-sided adhesive tape before performing other work on the vehicle.
During this time, the vehicle must be on a level surface and the temperature in the room must be 18ºC (64.4 ºF).
WARNING
The vehicle is operationally ready only after the minimum curing time has elapsed.
Paint Damage, Repairing
The paint construction must be re-established according to specifications of → Paint.
Adhesive Sealant, Removing from Window
- Adhesive remover is the recommended cleaning solution. Follow all safety precautions.
- Clean the painted surface with a dry cloth and remove any residual adhesive with adhesive remover.
Cleaning Instructions
- Carefully clean the outer panel from dirt, grease, wax and other contaminants just before installing the special attachments first with adhesive remover and then with plastic cleaner.
Always use a clean, lint-free towel.
 Trim Moldings and Trim
Tools
Special tools and workshop equipment required
Torque Wrench 1783 - 2-10Nm -VAG1783-
Wiring Harness Repair Set - Hot Air Blower -VAS1978/14A-
Adhesive Strip Remover -VAS6349-
Plenum Chamber ...
 Name Badges
Assembly Instructions for Name Badges and Emblems
Note
It is not possible to remove the name badge without breaking it.
Warm the name badges or emblems before removing using a Hot Air
Blower -VAG ...
See More:
Volkswagen Tiguan Service and Repair Manual > Rear Suspension: Drive Axle
Overview - Drive Axle
Outer CV joint
Replace only as a complete unit.
Removing.
Installing: Using a plastic hammer, drive onto the shaft as far as
the stop
Bolt
Always replace if removed
There are different versions.
WARNING
There are two types of twelve-point bolts, wi ...
Volkswagen Tiguan Owners Manual
Volkswagen Tiguan Service and Repair Manual
- Body exterior
- Body Interior
- General Paint Information
- Paint
- Brake System
- Suspension, Wheels, Steering
- Wheel and Tire Guide
- Towing Guide
- Wheel and Tire Guide General Information
- Communication
- Electrical Equipment General Information
- Electrical Equipment from 06/2011
- Heating, Ventilation and Air Conditioning
- Refrigerant R134a Servicing
- 6-Speed Manual Transmission 02Q, OBB, and OFB
