Volkswagen Tiguan Service and Repair Manual: Roof Railing
Tools
Special tools and workshop equipment required
- Torque Wrench 1331 5-50Nm -VAG1331-
Overview - Roof Railing

- Roof Railing
- Removing.
- Installing.
- Bolt
- Upper Conical Washer
- Upper Conical Washer
- Bracket
- Removing and installing
- New Bracket, Installing
- Hex Nut
- Tightening specification: 10 Nm.
- Roof railing threaded connection
- Quantity: 4 on each side
- Bolt
- Tightening specification: 10 Nm.
- Bracket threaded connection
- quantity: 2 per bracket
Roof Railing, Removing and Installing
Removing
Note
- If the roof railing is only removed on one side, it is sufficient to lower the headliner on this side.
- If the roof railing is removed on both sides, the headliner must be completely removed.
- Loosen the headliner on one side until it can be lowered.
The headliner must not be damaged when lowering it and performing the following steps.
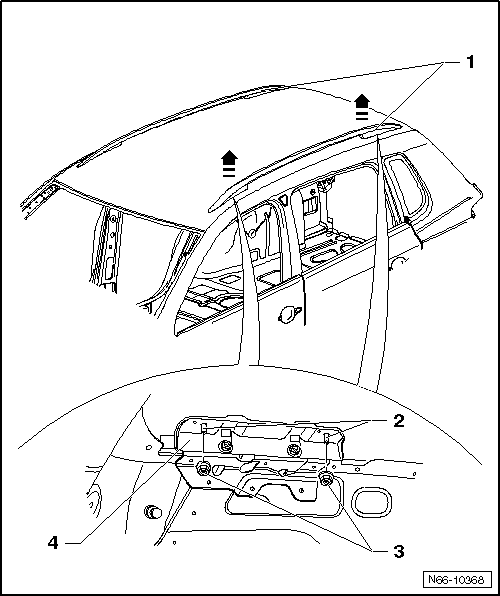
- Remove the nuts -3- from the roof railing threaded bolts -2-.
- Guide the roof railing -1- with threaded pins upward out of the brackets -3- and evenly lift -arrows- the roof railing from the roof.
When removing the roof railing, the brackets -4- remain in the vehicle.
Installing

All brackets -4- are installed.
- Evenly place the roof railing -1- on the roof. Do this beginning with front threaded pins -2-.
- Mount the nuts -3- (tightening specification: 10 Nm).
Roof Rail Bracket, Removing and Installing
Bracket, Removing
Note
- If the bracket is to be re-installed, make sure the conical washers remain in tolerance compensations in their places.
- Always use a lower and upper conical washer.
- The conical washers must not be interchanged.
- Remove the headliner.
- Remove the roof rail.
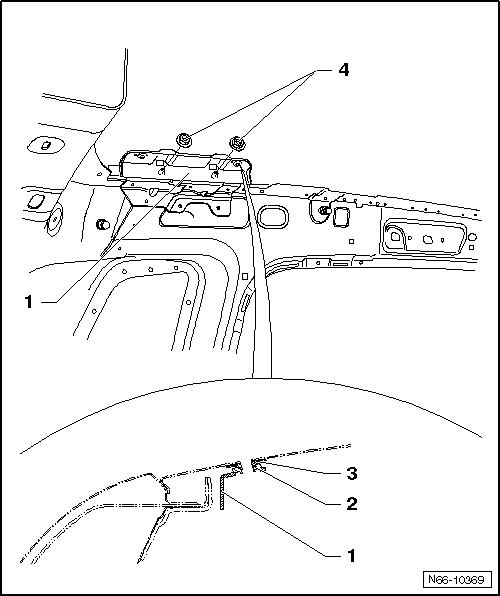
- Remove the nuts -4-.
- Remove the bracket -1- together with tolerance compensations -2 and 3-.
If the bracket is to be reinstalled, secure the tolerance compensations with commercially available adhesive tape.
Bracket, Installing
Note
Do not interchange the conical washers -3 and 4-.
If you have secure the conical washers with adhesive tape, remove tape before installation.
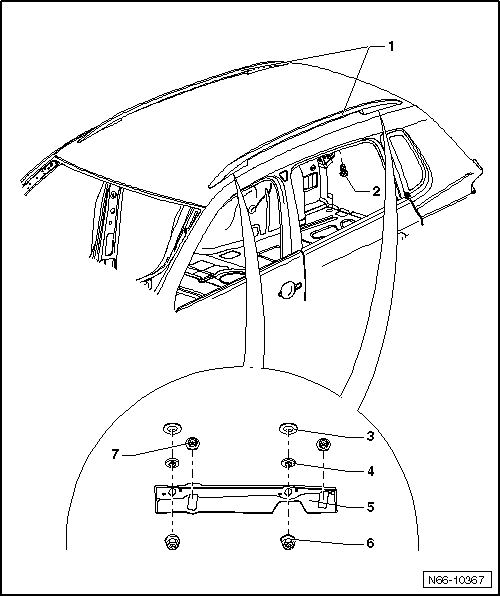
- Make sure the conical washers -3 and 4- fit properly.
- Place the roof railing -1- on the roof, then guide the bracket -5- over the threaded pins until the conical washers -3 and 4- are centered.
- Tighten the nuts -6- until the bracket comes in contact with the roof.
- Tighten the nuts -7- (tightening specification: 10 Nm).
- Now tighten the nuts -6- (tightening specification: 10 Nm).
- If dents appear around the base of the roof railing, readjust the bracket.
New Bracket, Installing
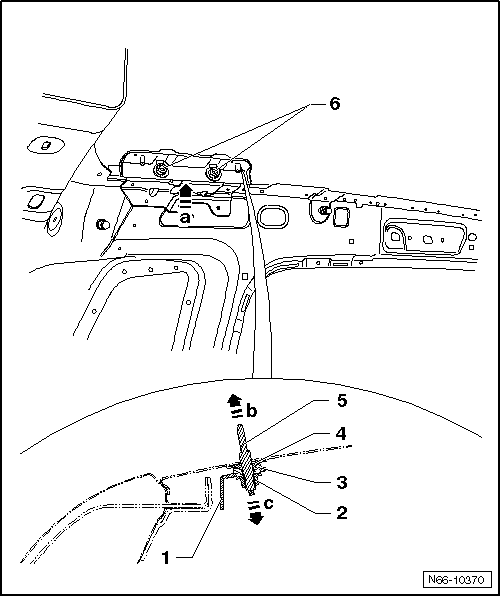
- Install the new bracket -1- until the securing pins -5- in the roof engage -arrow a-.
- Tighten the nuts -6- (tightening specification: 10 Nm).
- Remove the securing pin -5- upward -arrow b- and remove the securing cap -2- downward -arrow c-.
- If dents appear around the base of the roof railing, readjust the bracket.
 Radiator Grille
Tools
Special tools and workshop equipment required
Torque Wrench 1783 - 2-10Nm -VAG1783-
Radiator Grille, Removing and Installing through 06/2011
This procedure applies also to vehicles with optio ...
 Trim Moldings and Trim
Tools
Special tools and workshop equipment required
Torque Wrench 1783 - 2-10Nm -VAG1783-
Wiring Harness Repair Set - Hot Air Blower -VAS1978/14A-
Adhesive Strip Remover -VAS6349-
Plenum Chamber ...
See More:
Volkswagen Tiguan Owners Manual > Interior care and cleaning: Cleaning upholstery, fabric trim and Alcantara®
Read and follow the introductory information and
safety information first⇒Introduction
to the subject Cleaning upholstery on heated seats and power seats or seats
with airbag components
Airbag components and electrical connectors may be installed in the driver seat,
the front passenger ...
Volkswagen Tiguan Owners Manual
Volkswagen Tiguan Service and Repair Manual
- Body exterior
- Body Interior
- General Paint Information
- Paint
- Brake System
- Suspension, Wheels, Steering
- Wheel and Tire Guide
- Towing Guide
- Wheel and Tire Guide General Information
- Communication
- Electrical Equipment General Information
- Electrical Equipment from 06/2011
- Heating, Ventilation and Air Conditioning
- Refrigerant R134a Servicing
- 6-Speed Manual Transmission 02Q, OBB, and OFB
