Volkswagen Tiguan Service and Repair Manual: Front Door
Tools
Special tools and workshop equipment required
- Wrench - Door Adjusting -3320-
- Door Adjusting Wrench - Joint -3320/1-
- Wrench - Door Adjusting - Box Wrench -3320/2-
- Wrench - Door Adjusting - Box Wrench -3320/3-
- Roller - 3356-
- Torque Wrench 1331 5-50Nm -VAG1331-
- Gauge - Gap Adjustment -3371-
- Cylinder Head Bolt Socket -3410-
- Trim Removal Wedge -3409-
Overview - Front Door
- Door
- Removing and installing.
- Adjusting.
- Door Handle
- Removing and installing.
- Backing Plate
- Cap
- Driver Side with Lock Cylinder, Removing and installing.
- Passenger Side without Lock Cylinder, Removing and installing.
- Lock Cylinder
- Removing and installing.
- Door Lock
- Door lock can only be removed in conjunction with subframe
- Removing and installing.
- Subframe
- Removing and installing
- Bolt
- Tightening specification: 32 Nm
- Always replace bolts after loosening them
- Bolt
- Tightening specification: 30 Nm
- Loosen this bolt in order to remove the door from the hinge
- Lower Door Hinge
- The hinge has two sections.
- The bolt -9- attaches the upper section to the lower section.
- Bolt
- Tightening specification: 32 Nm
- Always replace bolts after loosening them
- Bolt
- Tightening specification: 9 Nm
- Strap
- Bolt
- Tightening specification: 30 Nm
- Upper Door Hinge
- The hinge has two sections.
- The bolt -12- attaches the upper section to the lower section.
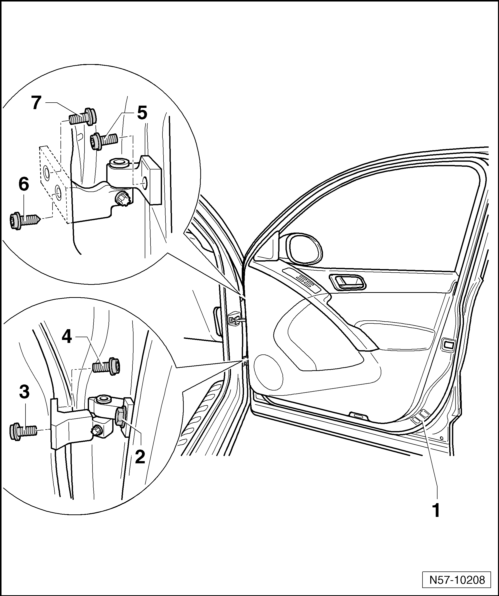
Overview - Door Hinges
Note
- The illustration shows the right side. The left side is identical.
- Always replace the door hinge bolts after loosening them.
- Lubricate the new door hinge if the old one was replaced.

- Door
- Removing and installing.
- Adjusting.
- Door Hinge
- A bolt -4- attaches the upper section to the lower section.
- The hinge has two sections.
- Lubricate if the hinge is replaced.
- Bolt
- Tightening specification: 32 Nm
- Always replace bolts after loosening them
- Bolt
- Tightening specification: 30 Nm
- This screw must be unscrewed to remove the door from the hinge
- Door Hinge
- A bolt -4- attaches the lower section to the upper section of the hinge.
- The hinge has two sections.
- Lubricate if the hinge is replaced.
- Bolt
- Tightening specification: 32 Nm
- Installed from vehicle interior
- Remove the lower A-pillar trim panel.
- After replacing the A-pillar, other tightening specifications are to be observed.
- Always replace bolts after loosening them
- Bolt
- Tightening specification: 32 Nm
- After replacing the A-pillar, other tightening specifications are to be observed.
- Always replace bolts after loosening them
- Bolt
- Tightening specification: 32 Nm
- Bolt
- Tightening specification: 32 Nm
- Bolt
- Remove the bolt on the driver side
- Remove the glove compartment.
- Tightening specification: 32 Nm
- After replacing the A-pillar, other tightening specifications are to be observed.
- Always replace bolts after loosening them
- Door Hinge
- The lower portion is attached to the upper portion of the hinge by the bolt -13-.
- The hinge has two sections.
- Lubricate if the hinge is replaced.
- Bolt
- This screw must be unscrewed to remove the door from the hinge
- Tightening specification: 30 Nm
- Door Hinge
- A bolt -13- attaches the upper section to the lower section.
- The hinge has two sections.
- Lubricate if the hinge is replaced.
- Bolt
- Tightening specification: 32 Nm
- Always replace bolts after loosening them
- Bolt
- Tightening specification: 32 Nm
- After replacing the A-pillar, other tightening specifications are to be observed.
- Always replace bolts after loosening them
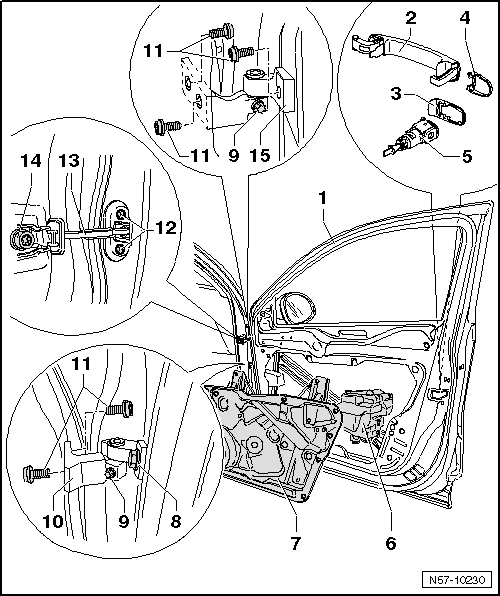
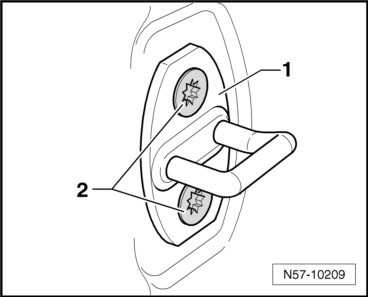
New Door Hinges, Lubricating
Note
- The description applies to the right side. The left side is identical.
- Lubricate the new door hinge after the painting is completed.
- The upper door hinge -1- is lubricated all around -arrows- at the pins and hole with Lithium Grease - G 000 150-.
- The lower hinge -1- is lubricated all around -arrows- at the pins and hole with Lithium Grease - G 000 150-.
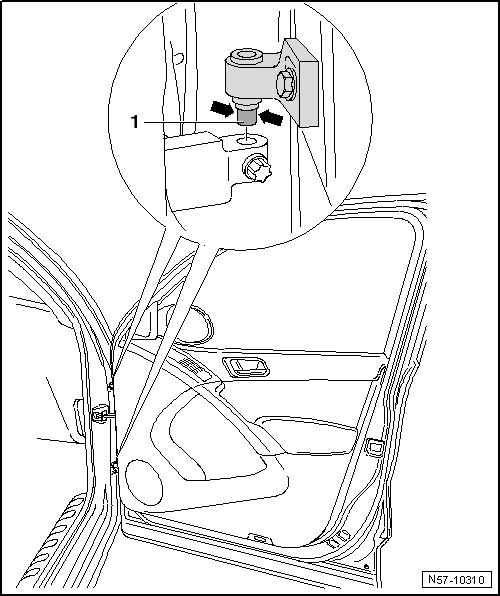
Door, Removing and Installing
Note
The following describes removing and installing the right door. Removing and installing the left door is identical.
Removing

- Press on the catch -arrow a- and remove the boot -2- from the A-pillar.
- Pivot the locking lever -3- downward -arrow b- and disconnect the connector -4- from the connector station.
- Remove the bolt -5- and slide the door strap -6- toward the inside -arrow c-.
- Loose the bolt -7- on both lower hinge parts -8-.
- Lift the door upward -arrows d- together the upper sections of the hinge -9-.
- When installing the door, observe the different tightening specifications.
If the A-pillar was replaced, then proceed as described under "Installing after Replacing the A-Pillar".
If the A-pillar was not replaced, then proceed as described under "Installing".
Installing
Install in reverse order of removal.
- Tightening specification for bolt -5-: 32 Nm.
- Tightening specification for bolt -7-: 30 Nm
- Make sure the front door gap dimension is correct.
Installing after Replacing the A-Pillar
WARNING
If the A-pillar was replaced, the bolts in the A-pillar must be tightened as described.

The A-pillar was replaced.
Install in reverse order of removal.
- Install the door and tighten the bolts -6, 7, 11 and 16- to 32 Nm.
- Assemble the door completely.
- After completing all the work, tighten the bolts -6, 7, 11 and 16- to 20 Nm.
Always replace the bolts.
- Make sure the front door gap dimension is correct.
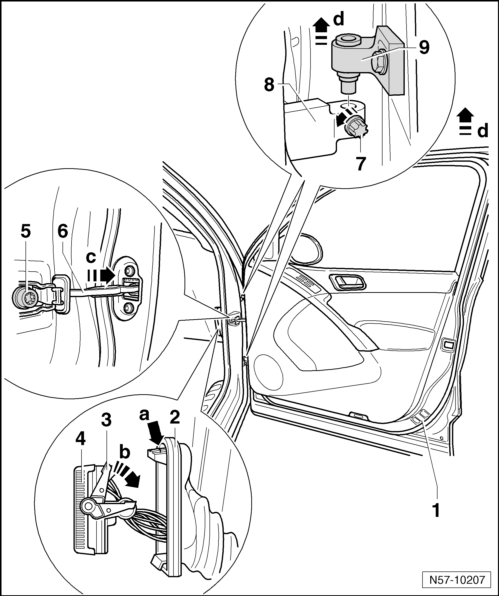
Door Hinge, Upper Bolt
Note
- The upper bolt can be loosened without having to remove the instrument panel.
- The driver side, left-hand drive, is described. For right-hand drive vehicle, the process is the same.
- Remove the driver side trim -1-.
- Loosen the lower instrument panel trim panel -3- and bend it to the side -arrow-.
- Now remove the relay carrier bracket -4-.
- It is not possible to get to the bolt -6- for the upper door hinge -5-.
Door, Adjusting
Note
- The vehicle must standing on all four wheels when adjusting the front door.
- The front door is adjusted properly when it has an even gap dimension overall when closed, it does not rest too far in or out and the contours align.
- To check gap dimensions.
- Perform corrosion protection measures on the hinge and bolts after assembly or adjusting work.
To adjust the gap dimensions correctly, remove the bolts -3, 4, 6 and 7- from the A-pillar. The lower A-pillar trim must be removed for the screw -5-.
Other measures, such as aligning the door upward, do not work. Pressure later will cause the door to sag again.
The bolts-2 and 5- must be loosened in order to correctly adjust the flush dimension.
The Wrench - Door Adjusting -3320- and Wrench - Door Adjusting - Box Wrench -3320/3- are used for this.
Catch, Adjusting
Note
- The following describes adjusting the right front door. Adjusting the left front door is identical.
- When closing, the front door must latch completely without additional force and it must not have any play.
- The front door must not be pushed up or down when adjusting the catch.
The catch can be used to adjust:
If the front door adjustment does not align with the rear door.
- Loosen the striker pin -1- by loosening the screws -2- on the A-pillar.
- Adjust front door with striker pin -1- so that front door aligns with rear door when closed (wind noise).
- Tighten the bolts -2- for the catch -1-.
Tightening specifications for bolts -2-: 20 Nm.

 Door Components
Tools
Special tools and workshop equipment required
Torque Wrench 1331 5-50Nm -VAG1331-
Cylinder Head Bolt Socket -3410-
Roller -3356-
Trim Removal Wedge -3409-
Wiring Harness Repair Set - Hot A ...
See More:
Volkswagen Tiguan Owners Manual > Emergency closing and opening: Emergency unlocking of the rear hatch
Fig. 182 View from luggage compartment:
Emergency unlocking rear hatch with the remote control vehicle key.
Read and follow the introductory information and
safety information first⇒Introduction
to the subject
If necessary, fold the rear seat backrest forward ⇒ Seat functions .
...
Volkswagen Tiguan Owners Manual
Volkswagen Tiguan Service and Repair Manual
- Body exterior
- Body Interior
- General Paint Information
- Paint
- Brake System
- Suspension, Wheels, Steering
- Wheel and Tire Guide
- Towing Guide
- Wheel and Tire Guide General Information
- Communication
- Electrical Equipment General Information
- Electrical Equipment from 06/2011
- Heating, Ventilation and Air Conditioning
- Refrigerant R134a Servicing
- 6-Speed Manual Transmission 02Q, OBB, and OFB
