Volkswagen Tiguan Service and Repair Manual: Fuel Filler Door Unit
Overview - Fuel Filler Door Unit and Adjusting Element
Note
- If tank flap does not open, it can be opened by hand via the actuator -4-.
- The actuator can be reached by grabbing between the side panel and loosened wheelhouse liner.
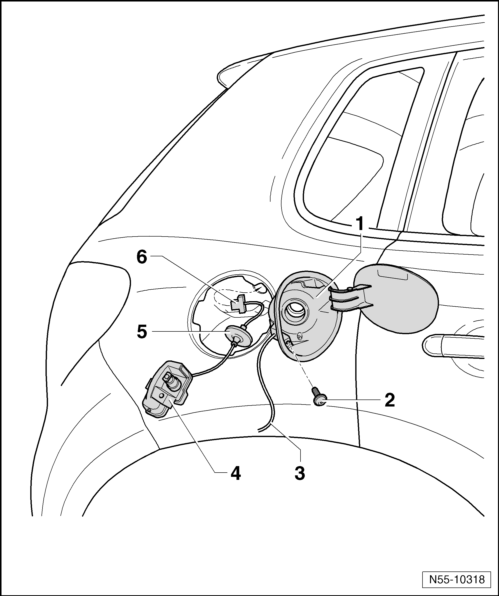
- Fuel Filler Door Unit
- Removing and installing
- Bolt
- Tightening specification: 1.5 Nm
- Water Drain Hose
- Adjusting Element
- Removing and installing.
- Seal
- Connector
Fuel Filler Door Unit, Removing and Installing
Removing
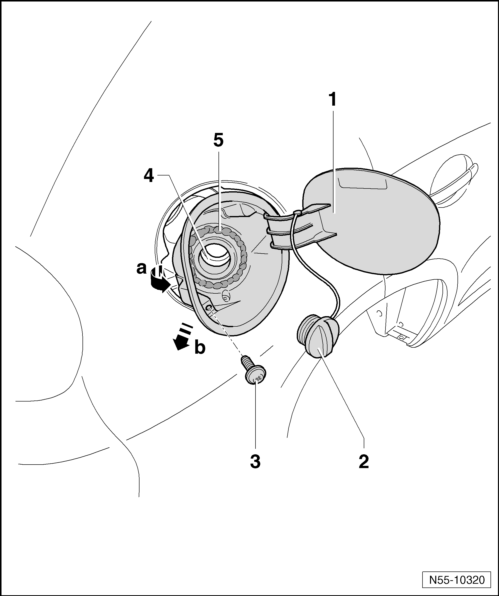
- Remove the tank cap -2-.
- Remove the screw -3-.
- Roll up the boot -5- from the fuel filler tube -4-.
- Remove the tank flap unit -1- together with the drain hose to the rear -arrow b- out of the catches and remove the tank flap unit -1- out of the side panel -arrow a-.
Installing

The adjustor is installed.
- Insert drain hose through opening in tank flap unit and pull drain hose through until it stops.
- Guide drain hose into side panel.
- Slide the tank door unit -1- into the side panel with the hinge side first.
- Then swivel the fuel filler door unit completely into side panel, make sure that upper and lower catches engage correctly in side panel.
- Pull the boot -5- over the fuel filler neck -4- and tighten the screw -3-.
Tightening specification for bolt -2- 2 Nm.
Adjusting Element, Removing and Installing
Removing
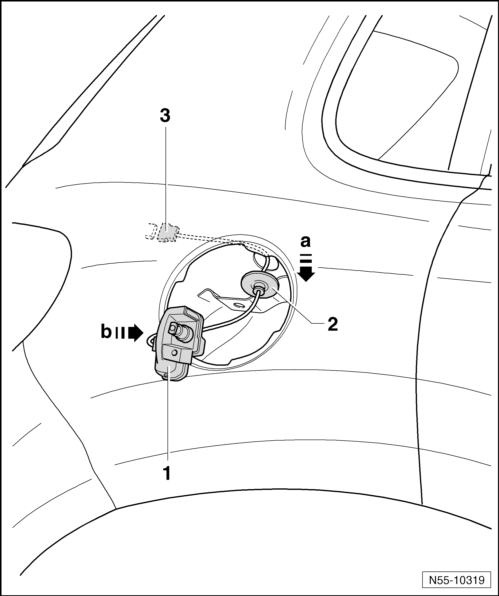
- Open the service flap in the side luggage compartment trim.
- Disconnect the connector -3-.
- Remove the tank flap unit.
- Remove the adjustor -1- from the bracket in the side panel -arrow b-.
- Remove the wire together with the connector -3- and the seal -2- from the side panel -arrow a-.
Installing
Install in reverse order of removal.
Special Tools
Special tools and workshop equipment required
- Torque Wrench 1331 5-50Nm -VAG1331-
- Pry Lever -80-200-
 Rear Lid
Tools
Special tools and workshop equipment required
Torque Wrench 1331 5-50Nm -VAG1331-
Overview - Rear Lid
Rear Lid
Removing.
Installing.
Adjusting.
Grip Piece with Button
Removin ...

See More:
Volkswagen Tiguan Service and Repair Manual > Interior Lights, Switches: Interior Lamps and Switches
Interior Monitoring Deactivation Switch -E267-
Interior Monitoring Deactivation Switch -E267-, Removing and Installing
The Interior Monitoring Deactivation Switch -E267- is installed inside the
B-pillar trim panel on the driver side.
Special tools and workshop equipment required
Trim Removal Wedg ...
Volkswagen Tiguan Owners Manual
Volkswagen Tiguan Service and Repair Manual
- Body exterior
- Body Interior
- General Paint Information
- Paint
- Brake System
- Suspension, Wheels, Steering
- Wheel and Tire Guide
- Towing Guide
- Wheel and Tire Guide General Information
- Communication
- Electrical Equipment General Information
- Electrical Equipment from 06/2011
- Heating, Ventilation and Air Conditioning
- Refrigerant R134a Servicing
- 6-Speed Manual Transmission 02Q, OBB, and OFB
