Volkswagen Tiguan Service and Repair Manual: Hood
Tools
Special tools and workshop equipment required
- Torque Wrench 1331 5-50Nm -VAG1331-
- Pry Lever -80 - 200-
Overview - Hood
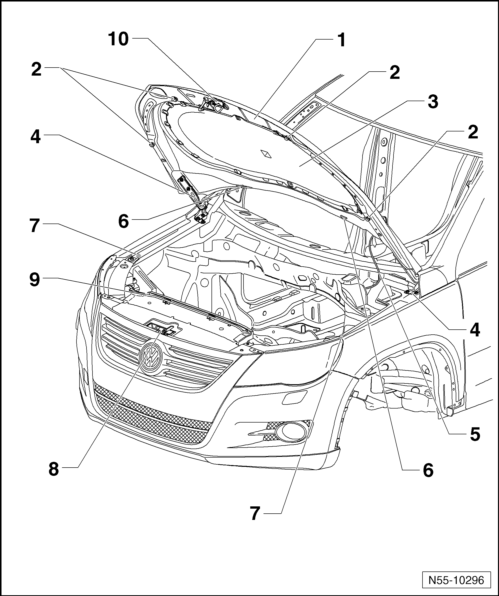
- Hood
- Removing and installing.
- Adjusting.
- Adjusting Buffer
- Left and right, each 2 pieces
- Insulation
- Removing and installing.
- Hinge
- Removing and installing.
- Adjusting.
- Hose
- To the spray nozzles
- Spray Nozzles
- Removing and installing.
- Anti-friction Film
- Anti-Friction Film - 7D0 827 471-
- Hood Latch
- Removing and installing.
- Adjusting.
- Hood Support
- Hook
- Removing and installing
Hood, Removing and Installing
Removing

- Remove the spray nozzles.
- Remove the hose out of the opening in the hood -1-.
- Loosen the left and right bolts -5- (do not remove completely).
A second technician is required for the rest of the removal procedure.
- Remove the support rod.
- Remove the bolts -5- and only now and lift the hood -1- out of its hinges -4-.
Installing
Install the hood in the same manner in reverse order of removal.
- Tightening specification for the bolts: 21 Nm.
- Adjust the hood.
Hood Hinge, Removing and Installing
Removing
- Hood -1-
- Remove the plenum chamber cover.
- Remove the bolts -3-.
- Loosen bolt -2-.
- Remove the hinge -4-.
Installing
Install in reverse order of removal.
- Tightening specification for the bolts: 21 Nm.
- Hood, Installing
Note
The following describes the removal and installation of the right hinge. Removing and installing the left hinge is identical.
Insulation, Removing and Installing
Removing

- Pry the clips -3- out of the insulation -1- using the Pry Lever - 80-200-.
- Remove the insulation -1- from the longitudinal holes in the hood -2-.
Installing
- Slide the insulation back into the longitudinal holes in the hood.
- Engage the mounting clips in the insulation.
Overview - Hood Locking and Unlocking Components
- Hood Latch
- Removing and installing.
- Adjusting.
- Release Cable
- From the hood lock to the cable coupling
- Clipped inside the hood lock
- Release Cable Coupling
- Disconnecting.
- Release Cable
- Clipped into mounting bracket
- Release Lever
- Removing and installing.
- Hook
- Removing and installing.
Catch, Removing and Installing
Removing
Note
To adjust the catch -1- just loosen the bolts -2- and slide the catch into the elongated holes -arrows-.
- Remove the bolts -2-.
- Remove the lock -1- from the hood -3-.
Installing
Install in reverse order of removal.
- Tightening specification for bolts -2-: 10 Nm.
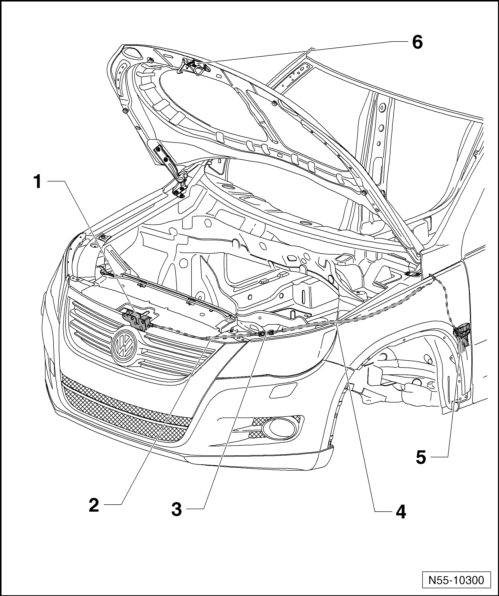
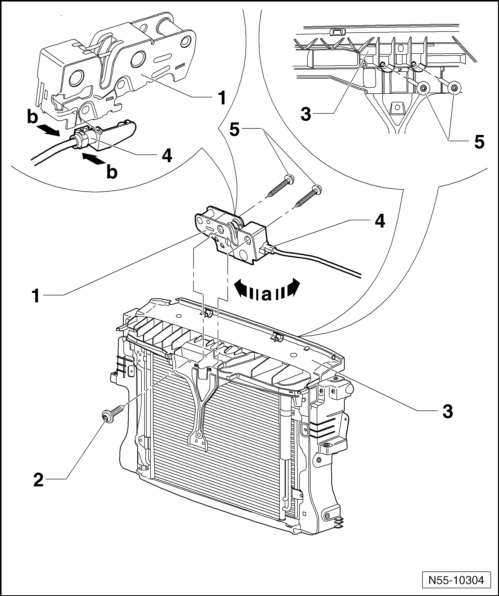
Hood Latch, Removing and Installing
Removing

- Open the hood.
- Remove the radiator grille.
- Disconnect the release cable.
- Disconnect the hood contact switch electrical connector.
The electrical connector is attached above the headlamp on the driver side.
- Remove the bolts -5- on the lock carrier -3 - from the rear.
- Remove the bolt -2- on the lock carrier -3 - from the front.
- Remove the lock -1- upward -arrow a-.
- To unclip the release cable -4-, press the tabs on the release together -arrows b-.
- The locking mechanism is released and release -4- can be removed from lid lock -1-.
Note
Engine hood contact switch, removing and installing at hood latch.
Installing
- Install the release cable -4- into the lock -1--arrows b-.
- Install the lock -1- into the lock carrier -3-.
- Install the bolts -5- from the rear into the lock carrier.
- Tightening specifications for bolts -5-: 12 Nm.
- Install the bolt -2- from the front into the lock carrier.
- Tightening specifications for bolt -2-: 12 Nm.
- Connect the connector for the hood contact switch.
- Install the release cable -4-.
- Adjust the lid latch.
Before closing the hood, test the release lever and the release cable.
Note
Insert the bolts -5- through the lock -1- and attach them with the tension strut.
Release Cable, Disconnecting
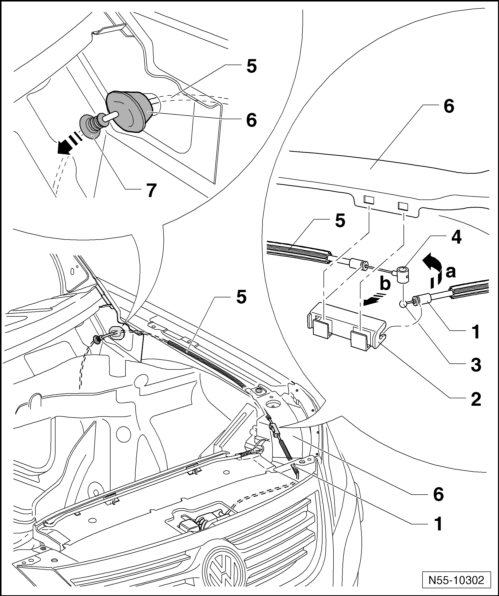
- Open the hood.
The release -2- is located on the lock carrier -6- above the headlamp on the driver side.
- Remove the cable coupling -2- from the lock carrier -6- in the direction of -arrow b-.
- Remove the cables -1 and 5- from the cable coupling.
- Rotate the cable -1- in direction of -arrow a-.
- Remove the cable ball -3--1- from the cable -5- mount-4-.
Note
- When installing, make sure that cable sleeves are inserted correctly and coupling is locked correctly on the lock carrier
- Make sure the grommets -6 and 7- are properly seated.
Before closing the hood, test the release lever and the release cable.
Hood, Adjusting
Note
- The vehicle must be standing on the ground when adjusting the hood.
- The left and right adjusting buffers -2- are not meant for adjusting. Their function is to stabilize and to cushion the hood -5-.
- The hood is properly adjusted when there is an overall even gap dimension when closed, it is not too far inward or outward and contours align.
- The hood must latch into the lid latch without using much force.
- Remove the catch -3-.
- To align the hood, just loosen the left and right bolts -5- on the hinge; do not remove them.
- To adjust the height at the rear of the hood, just loosen the left and right bolts -6- on the hinge; do not remove them.
- Turn the adjusting buffer -2- in or out to adjust the position of the hood.
- Make sure that the gap dimensions are even.
- After adjusting, apply corrosion protection to the hinge -4- and the bolts -5 and 6-.
- After adjusting the hood, reinstall the catch -3- and adjust it.
- The height of the hood can be adjusted in the front area using the hood latch -1-.
Hood Latch, Adjusting
Note
The hood remains installed. In the illustration, the hood is removed.

- Remove the radiator grille.
- Loosen the front bolt -2- and the rear bolts -5- to adjust the hood panel gap dimension.
- Tightening specifications for bolts -2 and 5-: 12 Nm.
- Adjust the catch.
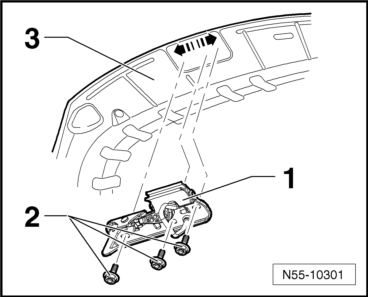
Overview - Release Lever
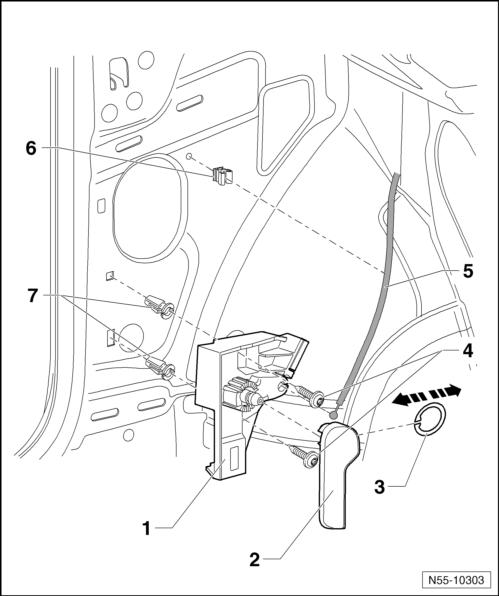
- Bracket
- Release Lever
- Removing and installing.
- Clip
- Bolt
- Quantity: 2
- Tightening specification 1.5 Nm.
- Release Cable
- Clipped into mounting bracket
- Bracket
- Speed Nut
- Quantity: 2
Release Lever, Removing and Installing
Removing
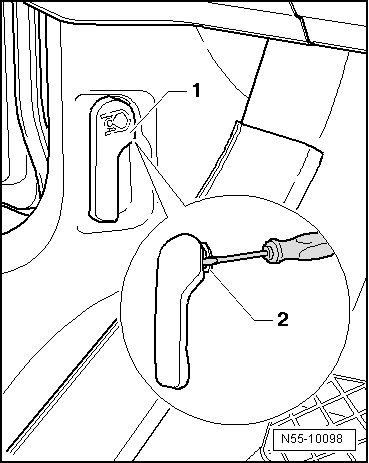
- Pull the operating lever -1- and unlock the hood.
- Insert a small screwdriver into the gap between the operating lever -1- and the clip -2-.
- Remove clip -3- from operating lever -1- and pull operating lever off.
Installing

- Slide the clip -2- completely into the release lever -1-.
- Then push the release lever -1- onto mount in mounting bracket and engage the release lever.
Before closing the hood, test the release lever and the release cable.
 Hood, Lids
...
 Rear Lid
Tools
Special tools and workshop equipment required
Torque Wrench 1331 5-50Nm -VAG1331-
Overview - Rear Lid
Rear Lid
Removing.
Installing.
Adjusting.
Grip Piece with Button
Removin ...
See More:
Volkswagen Tiguan Service and Repair Manual > Parallel Parking Assistance: Front Parking Aid or Parallel Parking Assistance Sensors
Front Parking Aid or Parallel Parking Assistance Sensors, Removing and
InstallingThe front parking aid sensors and the front parallel parking
assist sensors are installed in the front bumper cover. Both of the front
parallel parking assist sensors sit sideways in the outer locations in the
bump ...
Volkswagen Tiguan Owners Manual
Volkswagen Tiguan Service and Repair Manual
- Body exterior
- Body Interior
- General Paint Information
- Paint
- Brake System
- Suspension, Wheels, Steering
- Wheel and Tire Guide
- Towing Guide
- Wheel and Tire Guide General Information
- Communication
- Electrical Equipment General Information
- Electrical Equipment from 06/2011
- Heating, Ventilation and Air Conditioning
- Refrigerant R134a Servicing
- 6-Speed Manual Transmission 02Q, OBB, and OFB
