Volkswagen Tiguan Owners Manual: Removing and installing the rear seat
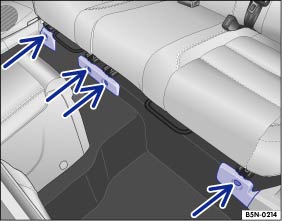
Fig. 96 Front attachment of the rear seat.
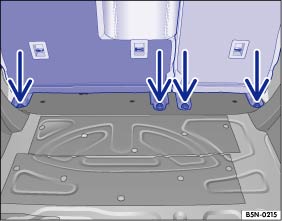
Fig. 97 Rear attachment of the rear seat.
 Read and follow the introductory information and
safety information first⇒
Read and follow the introductory information and
safety information first⇒ Introduction
to the subject
Introduction
to the subject Perform the following work yourself only if you have the necessary knowledge and experience to do so safely. Volkswagen recommends having the work performed by an authorized Volkswagen dealer or authorized Volkswagen Service Facility.
The lug wrench from the vehicle tool kit is required for removing and installing the rear seat ⇒ Vehicle tool kit .
Removing the rear seat
- Push the driver seat and front passenger seat as far forward as possible ⇒ Adjusting the seating position .
- Remove all rear head restraints ⇒ Adjusting the seating position .
- Remove the luggage compartment cover ⇒ Luggage compartment cover .
- Remove the luggage compartment floor ⇒ Variable luggage compartment floor .
- Remove the spare wheel and foam insert from the vehicle ⇒ Compact spare wheel .
- Move the backrests to the upright position and lock them ⇒ Adjusting rear seat .
- Push the rear seats as far back as possible ⇒ Adjusting rear seat .
- Unclip the small covers (not pictured) on the hexagonal nuts in the rear footwell ⇒ Fig. 96 (arrows).
- Remove all hexagonal nuts ⇒ Fig. 96 (arrows) with the lug wrench.
- Remove the 3 plastic covers.
- Push the rear seats all the way forward ⇒ Adjusting rear seat .
- Remove all hexagonal nuts ⇒ Fig. 97 (arrows) in the luggage compartment using the lug wrench.
- First, lift the smaller rear seat on the right from the vehicle through the right rear door.
- Then lift the left rear seat from the vehicle through the rear hatch.
Installing the rear seat
- Push the driver seat and front passenger seat as far forward as possible ⇒ Adjusting the seating position .
- Then lift the left rear seat into the vehicle through the rear hatch.
- Set the seat rails of the rear seat first on the front anchoring studs and then on the rear studs.
- Secure both seat rails of the rear seat in front and back with 2 hexagonal nuts each, tightening the nuts by hand - do not tighten them with the lug wrench yet.
- Lift the right rear seat into the vehicle through the right rear door.
- Set the seat rails of the rear seat first on the front anchoring studs and then on the rear studs.
- Secure both seat rails of the rear seat in front and back with 2 hexagonal nuts each, tightening the nuts by hand - do not tighten them with the lug wrench yet.
- To align the seat rails, press the left rear seat all the way to the left in the vehicle.
- To align the seat rails, press the right rear seat all the way to the right in the vehicle.
- Tighten the hexagonal nuts in the luggage compartment ⇒ Fig. 97 (arrows) to 44 ft-lbs (60 Nm) using a torque wrench. If no torque wrench is available, tighten the hexagonal nuts using the lug wrench and have the torque checked at a qualified workshop as soon as possible.
- Push the rear seats as far back as possible ⇒ Adjusting rear seat .
- Remove the hexagonal nuts in the rear of the footwell again, set the 3 plastic covers ⇒ Fig. 96 on the studs and screw on with the hexagonal nuts.
- Tighten the hexagonal nuts ⇒ Fig. 96 (arrows) to 44 ft-lbs (60 Nm) using a torque wrench. If no torque wrench is available, tighten the hexagonal nuts using the lug wrench and have the torque checked at a qualified workshop as soon as possible.
- Clip on the small covers (not pictured) on the hexagonal nuts ⇒ Fig. 96 (arrows).
- Install the foam insert and spare wheel in the vehicle ⇒ Compact spare wheel .
- Install the luggage compartment floor ⇒ Variable luggage compartment floor .
- Install the luggage compartment cover ⇒ Luggage compartment cover .
- Install all rear head restraints ⇒ Adjusting the seating position .

 Warning
WarningAn improperly installed rear seat can separate from its mountings during an accident.
- All securing bolts must be tightened to the specified torque after the rear seat has been installed.

 Caution
- Protect your hands when you lift the rear seat in or out.

 Note
Note
- Have at least one person help to lift the rear seat in or out. One person should be in the vehicle and one outside.
- The lever ⇒ Fig. 42 for the fore and aft adjustment of the rear seat must not be operated while the seat is removed. If the position of the fore and aft adjustment is changed, the rear seat can only be installed by a qualified workshop.
 Folding the backrest of the rear seat bench forward and back into place
Fig. 95 Folding the rear seat up and
down.
Read and follow the introductory information and
safety information first⇒Introduction
to the subject The rear backrest is divided into 2 sections ...
 Luggage compartment cover
Fig. 98 Installing and removing the
luggage compartment cover.
Read and follow the introductory information and
safety information first⇒Introduction
to the subject When you open or close t ...
See More:
Volkswagen Tiguan Service and Repair Manual > Output Shaft: Overview - Output Shaft
Overview - Output Shaft, 1st to 4th Gears
Note
Warm the bearing inner race/tapered roller bearing and synchronizer hub
to approximately 100 ºC (212 ºF) using Inductive Heater -VAS6414-. Wear
protective gloves.
Install a collar bushing instead of thrust washers -item 19- and
retaining ring ...
Volkswagen Tiguan Owners Manual
Volkswagen Tiguan Service and Repair Manual
- Body exterior
- Body Interior
- General Paint Information
- Paint
- Brake System
- Suspension, Wheels, Steering
- Wheel and Tire Guide
- Towing Guide
- Wheel and Tire Guide General Information
- Communication
- Electrical Equipment General Information
- Electrical Equipment from 06/2011
- Heating, Ventilation and Air Conditioning
- Refrigerant R134a Servicing
- 6-Speed Manual Transmission 02Q, OBB, and OFB
